Page 89 of 216
4. Unfold the cushion protector
flap onto adult seat cushion
5. If connected, disconnect the
chest clip and buckles.
6. Place the child in the seat and
position the left shoulder belt over
the child's left shoulder first, then
place the right shoulder belt over
the child's right shoulder
Seating and safety restraints
89
Page 90 of 216
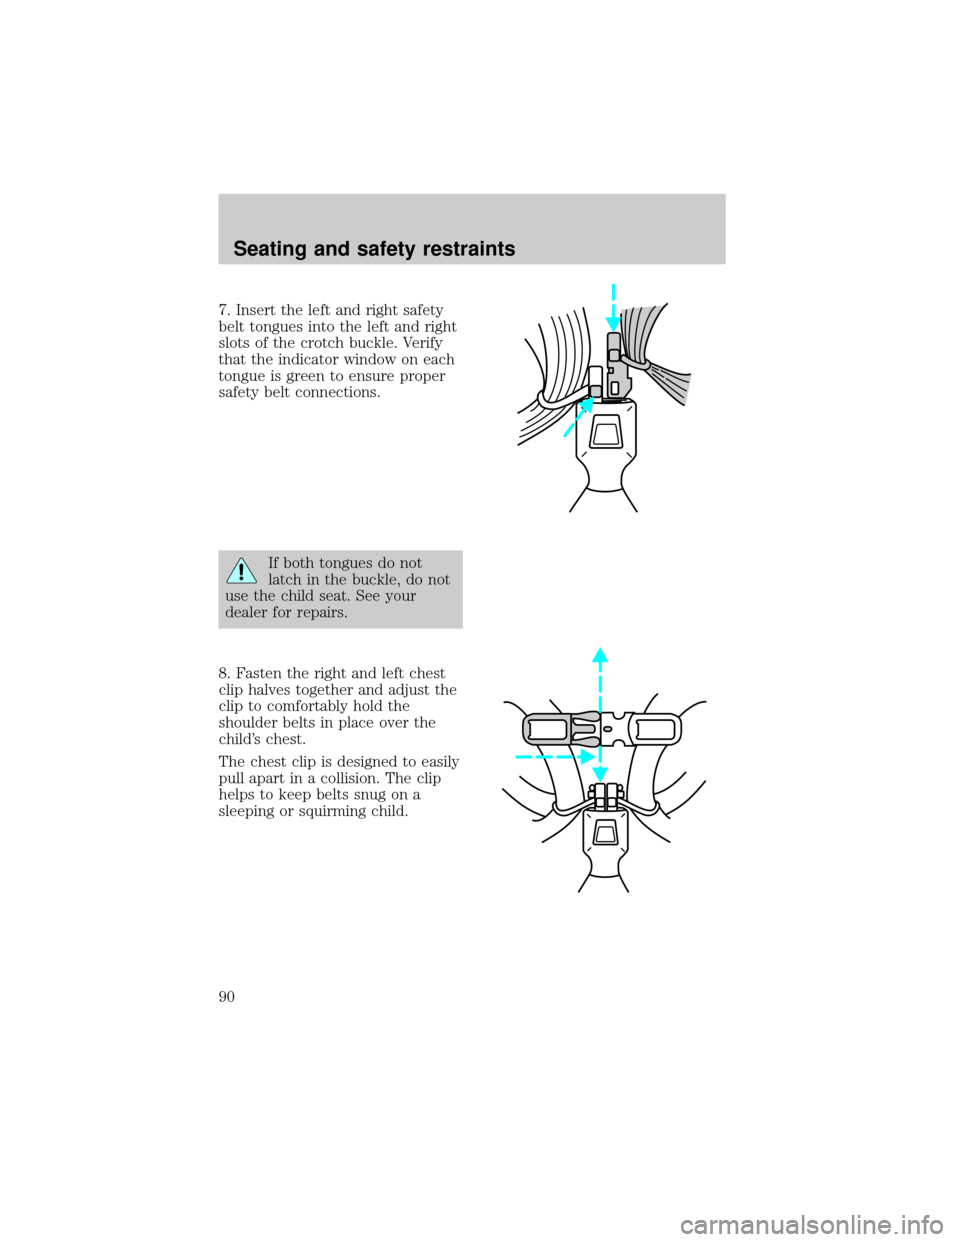
7. Insert the left and right safety
belt tongues into the left and right
slots of the crotch buckle. Verify
that the indicator window on each
tongue is green to ensure proper
safety belt connections.
If both tongues do not
latch in the buckle, do not
use the child seat. See your
dealer for repairs.
8. Fasten the right and left chest
clip halves together and adjust the
clip to comfortably hold the
shoulder belts in place over the
child's chest.
The chest clip is designed to easily
pull apart in a collision. The clip
helps to keep belts snug on a
sleeping or squirming child.
Seating and safety restraints
90
Page 91 of 216
9. Pull on the safety belt tongues
to ensure that they are both
securely latched. If they are not
properly latched, repeat steps
seven and eight.
If necessary, the shoulder belt may
be put in automatic locking mode
(ALR) to limit the child's
movement in the seat. The ALR
mode should be used if the child is
sleeping or attempting to get out
of the seat.
If not placed in ALR mode, the
child seat shoulder belts are in
vehicle sensitive (emergency
locking) mode, which allow some
movement of the shoulder belts
(like adult shoulder belts).
In emergency locking mode, the
shoulder belts of the child seat will
lock in response to hard braking,
hard cornering or if your vehicle is
involved in a collision with an
impact of 8 km/h (5 m.p.h.) or
more.
Activating the automatic locking
mode (ALR) on the built-in child
safety seat
1. Fully extend the right shoulder
belt.
2. Allow the belts to tighten snugly
against the child's shoulders
Seating and safety restraints
91
Page 92 of 216
Deactivating the automatic
locking mode (ALR) on the
built-in child safety seat
1. Disconnect the chest clip and
remove the left and right safety
belt tongues from the crotch
buckle.
2. Allow the shoulder belts to fully
retract.
Removing your child from the
built-in child safety seat
1. Disconnect the chest clip by
squeezing the release tabs together
and pulling the two sides apart.
2. Press the release button on the
crotch buckle.
3. Slide the shoulder belts off the
child's shoulders and remove the
child from the seat.
If ALR is activated, hold either the
left or right shoulder belt out fully
while helping the child slide arms
out of the belts.
4. Fold the cushion protector flap
onto the child seat cushion. Slide
the belt tongues up and out of the
way of the cushion, then return
the child seat cushion to the
stowed (upright) position.
Seating and safety restraints
92
Page 93 of 216
5. Slide the Velcrotstraps through
the D-rings on the child seat
cushion and attach.
6. Slide the head restraint down
until the top of the head restraint
is flush with the top of the adult
seat back.
7. Press firmly on the top center of
the built-in child safety seat head
restraint to ensure it is stowed
properly.
Inspecting the built-in child seat
after a collision
Inspect all built-in child restraints,
including seats, buckles, retractors,
seat latches. Interlocks and
attaching hardware should be
inspected by a qualified technician
after any collision. If the child seat
was in use during a collision, Ford
recommends replacing it. Built-in
child restraints not in use during a
collision should be inspected and
replaced if either damage or
improper operation is noted.
Seating and safety restraints
93
Page 94 of 216
PREPARING TO START YOUR
VEHICLE
Engine starting is controlled by the
spark ignition system. This system
meets all Canadian
Interference-Causing Equipment
standard requirements regulating
the impulse electrical field strength
of radio noise.
When starting a fuel-injected
engine, avoid pressing the
accelerator before or during
starting. Only use the accelerator
when you have difficulty starting
the engine. For more information
on starting the vehicle, refer to
Starting the enginein this
chapter.
Extended idling at high
engine speeds can produce
very high temperatures in the
engine and exhaust system,
creating the risk of fire or other
damage.
Do not park, idle, or drive
your vehicle in dry grass
or other dry ground cover. The
emission system heats up the
engine compartment and exhaust
system, which can start a fire.
Starting
94
Page 95 of 216
Do not start your vehicle
in a closed garage or in
other enclosed areas. Exhaust
fumes can be toxic. Always open
the garage door before you start
the engine. SeeGuarding
against exhaust fumesin this
chapter for more instructions.
If you smell exhaust fumes
inside your vehicle, have
your dealer inspect your vehicle
immediately. Do not drive if you
smell exhaust fumes.
Important safety precautions
A computer system controls the
engine's idle revolutions per
minute (RPM). When the engine
starts, the idle RPM runs faster to
warm the engine. If the engine idle
speed does not slow down
automatically, have the vehicle
checked.
Before starting the vehicle:
1. Make sure all vehicle occupants
have buckled their safety belts. For
more information on safety belts
and their proper usage, refer to
theSeating and safety restraints
chapter.
2. Make sure the headlamps and
vehicle accessories are off.
Starting
95
Page 96 of 216
²Make sure the parking brake is
set.
²Make sure the gearshift is in P
(Park).
3. Turn the key to 4 (ON) without
turning the key to 5 (START).
3
2
1
5
4
C
012345
6
RPMx1000ABS
CHECK
ENGINE
DOOR
AJAR
EFH
H
H
PRN D 2 1THEFT
SPEED
CONT
4WD
4WD
LOW
O/D
OFFL
L
10MPH 205060
70
304080
90
km/h
0 0 0
10 100
1
20
1
0 0 0 0 0 0406080100
120
140
160
180
20
DOOR
AJAR
CHECK
GAGE
!BRAKE
Starting
96