Page 932 of 2490
Engi
ne Coolant Temperature Sensor (ECT) - Circuit Diagram
Intercooler Pump Relay - Circuit Diagram
T emper
ature (°C)
No
mi
nal Resistance (kOHM)
-2
015 .0
4
05.7
4
202.45
401.15
600.
584
800.3
2
1000.
184
ItemPar
t
Number
De
scrip
tion
1—Eng
i
ne Coolant Temperature (ECT) Sensor
2—Eng
i
ne to EMS Harness Connector
3—EMS Con
trol Modu
le
Page 934 of 2490

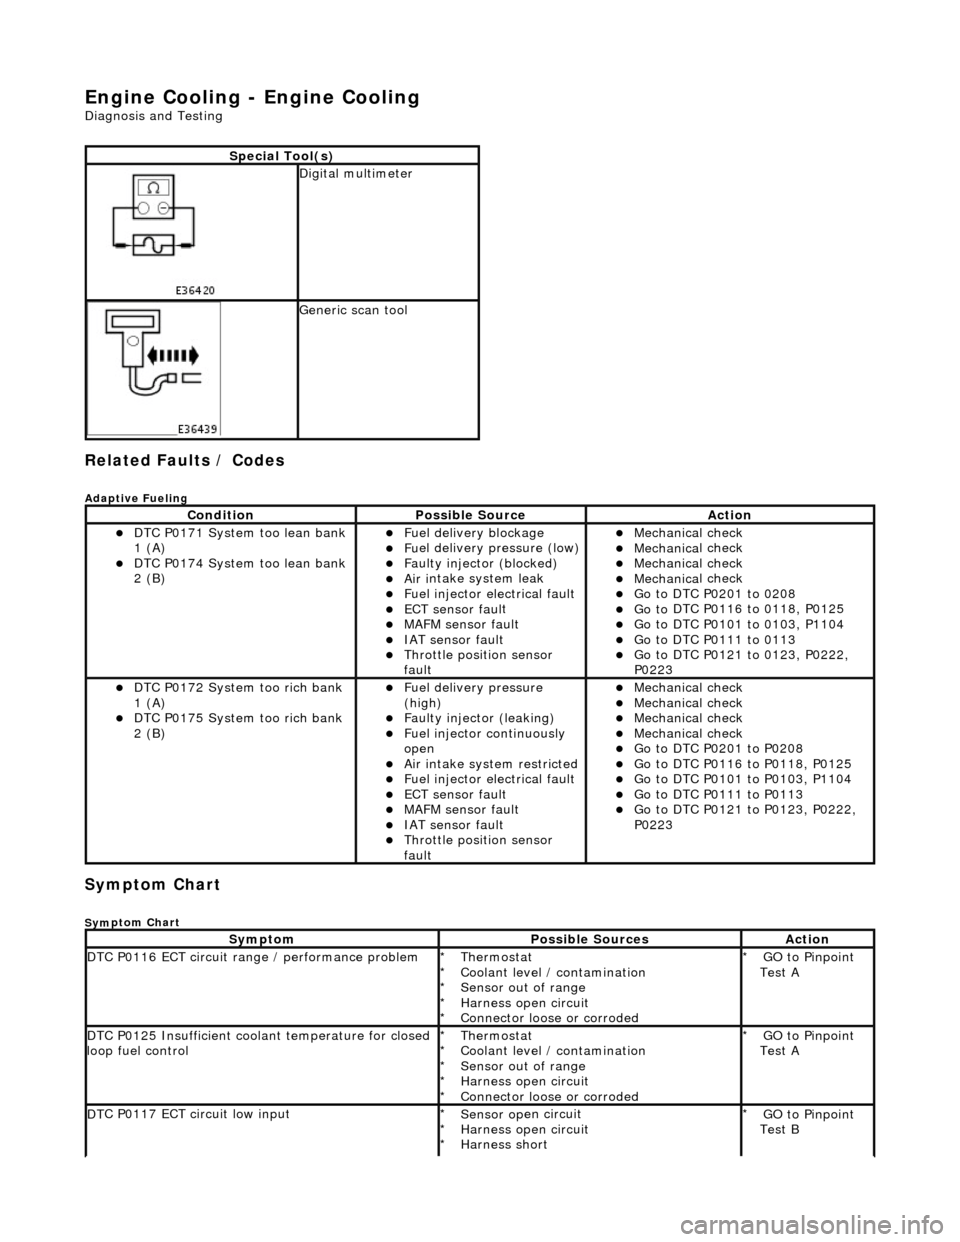
Engine Cooling - Engine Cooling
Diagn
osis and Testing
Related Faults / Codes
Adaptive
Fue
ling
Sym
p
tom Chart
Sy
m
ptom Chart
S
p
ecial Tool(s)
D
i
gital multimeter
Generi
c scan tool
Conditi
on
Possib
l
e Source
Acti
o
n
D
T
C P0171 System too lean bank
1 (A)
D T
C P0174 System too lean bank
2 (B)
Fuel delivery blockage Fu
el delivery pressure (low)
F
a
ulty injector (blocked)
Ai
r i
ntake system leak
F
u
el injector electrical fault
ECT sensor
faul
t
MAFM sensor fault IAT se
nsor fault
Thro
tt
le position sensor
fault
Mec hanica
l check
Mec
hanica
l check
Mec
hanica
l check
Mec
hanica
l check
Go t
o DTC P020
1 to 0208
Go t
o
DTC P0116 to 0118, P0125
Go t
o
DTC P0101 to 0103, P1104
Go t
o DTC P011
1 to 0113
Go t
o
DTC P0121 to 0123, P0222,
P0223
D T
C P0172 System too rich bank
1 (A)
D T
C P0175 System too rich bank
2 (B)
F u
el delivery pressure
(high)
F a
ulty injector (leaking)
F
u
el injector continuously
open
Ai r i
ntake system restricted
Fu
el injector electrical fault
ECT sensor
faul
t
MAFM sensor fault IAT sensor fault
Thrott
le position sensor
fault
Mec hanica
l check
Mec
hanica
l check
Mec
hanica
l check
Mec
hanica
l check
Go t
o DTC P020
1 to P0208
Go t
o
DTC P0116 to P0118, P0125
Go t
o
DTC P0101 to P0103, P1104
Go t
o DTC P011
1 to P0113
Go t
o
DTC P0121 to P0123, P0222,
P0223
Sy m
ptom
Possib
l
e Sources
Acti
o
n
D
T
C P0116 ECT circuit range / performance problem
Thermostat
Coo
l
ant level / contamination
Sensor out of range
Harness open circuit
Connector loose or corroded
*
*
*
*
*
GO to Pinpoint
Test A
*
D
T
C P0125 Insufficient coolant temperature for closed
loop fuel control
Thermostat
Coo l
ant level / contamination
Sensor out of range
Harness open circuit
Connector loose or corroded
*
*
*
*
*
GO to Pinpoint
Test A
*
D
T
C P0117 ECT circuit low input
Sensor o
p
en circuit
Harness open circuit
Harness short
*
*
*
GO to Pinpoint
Test B
*
Page 935 of 2490

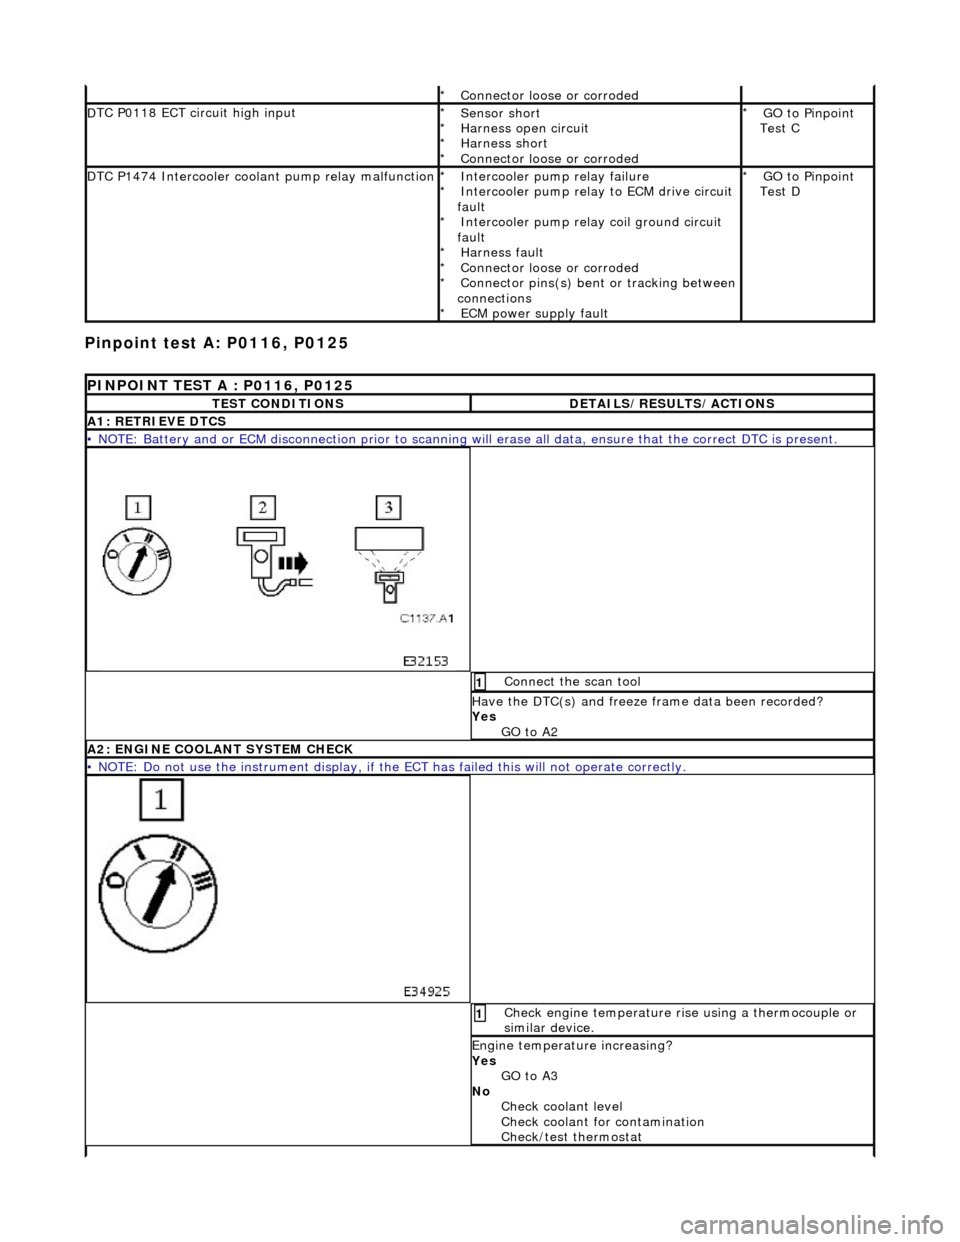
Pinpoint test
A: P0116, P0125
Connector
loose or corroded
*
D
TC P0118 ECT circuit high input
Sensor short
Harness open circui
t
Harness short
Connector loose or corroded
*
*
*
*
GO to Pinpoint
Test C
*
D
TC P1474 Intercooler coolant pump relay malfunction
Intercooler pump relay
failure
Intercooler pump relay to ECM drive circuit
fault Intercooler pump relay coil ground circuit
fault Harness fault
Connector loose or corroded
Connector pins(s) bent or tracking between
connections ECM power supply fault
*
*
*
*
*
*
*
GO to Pinpoint
Test D
*
P
INPOINT TEST A : P0116, P0125
T
EST CONDITIONS
D
ETAILS/RESULTS/ACTIONS
A1
: RETRIEVE DTCS
•
NOTE: Battery and or ECM disconnection prior to scanning wi
ll erase all data, ensure that the correct DTC is present.
Conne
ct the scan tool
1
Have the DTC(s) and fr
eeze
frame data been recorded?
Yes GO to A2
A2: ENGINE
COOLANT SYSTEM CHECK
•
NOTE: Do not use the instrument display, if th
e ECT has failed this will not operate correctly.
Chec
k engine temperature rise using a thermocouple or
similar device.
1
Engine
temperature increasing?
Yes GO to A3
No Check coolant level
Check coolant for contamination
Check/test thermostat
Page 948 of 2490
Ig
nition switch to position 0
1
R
e
move intercooler
coolant pump relay
Inside EC
M housing
2
Ignition switc
h
to position II
3
Ch
e
ck for battery voltage at relay socket between pins 3
and 2.
4
B+ ?
Yes
GO to D6
No GO to D4
D4: C H
ECK RELAY SOCKET SUPPLY CONTINUITY
•
NOTE: Install fuse F2.
Do not replace relay.
Page 953 of 2490
Engine Cooling - Cooling System Draining,
Filling and Bleeding4.0L NA V8
- AJ27/3.2L NA V8 - AJ26
Gen
eral Procedures
Drain
Refill
1. O
pen the engine compartment and fit paintwork protection
sheets.
2. Ensure that the cooling system is cool and very carefully,
remove the pressure cap from the header tank.
3. Raise the vehicle.
4. Drain th
e coolant.
Pla
ce a coolant drain tray on
the floor, below the radiator
drain plug.
1. Remove the radiator drain plug. and allow the coolant to drain.
5. Fit a new seal to the
drain plug.
1. Remove the seal from the drain plug. and clean the plug face.
Fit a new seal.
6. Re
fit the radiator drain plug.
Cl
ean any coolant from the
underside of the vehicle.
Remove the drain tray.
7. Lower the vehicle.
1. Refill the cooling system with a 50% solution of water and
Jaguar Antifreeze / Corrosion Inhibitor ESD-M97B49-A.
1. Fill the cooling system at the header tank until the level stabilises at the top of the breather neck.
Page 955 of 2490
Engine Cooling - Cooling System Draining, Filling and Bleeding4.0L SC V8 -
AJ26
Gen
eral Procedures
Drain
Refill
1. O
pen the engine compartment and fit paintwork protection
sheets.
2. Ensure that the cooling system is cool and very carefully,
remove the pressure cap from the header tank.
3. Raise the vehicle.
4. Drain th
e coolant.
Pla
ce a coolant drain tray on
the floor, below the radiator
drain plug.
1. Remove the radiator drain plug. and allow the coolant to drain.
5. Fit a new seal to the
drain plug.
1. Remove the seal from the drain plug. and clean the plug face.
Fit a new seal.
6. Re
fit the radiator drain plug.
Cl
ean any coolant from the
underside of the vehicle.
Remove the drain tray.
7. Lower the vehicle.
1. Refill the cooling system with a 50% solution of water and
Jaguar Antifreeze / Corrosion Inhibitor ESD-M97B49-A.
1. Remove the threaded plug and Dowty washer from the charge air cooler fill point.
Page 956 of 2490

• NOTE
: To ensure that
air is not drawn into the system during the following operations:
Do
not remove the cap from the header tank whilst the
charge air cooling system is open to atmosphere.
Do
not switch on the ignition when th
e charge air cooling system is open to atmosphere because the electrical
cooling pump may draw air into the system.
2. Fi
ll the cooling system at the header tank until the
level stabilises near the to p of the charge air cooler
fill point. This will take some time, as air is being
purged from the system.
Ensure that the head
er tank is full.
2. Fit the pressure cap to the header tank.
3. Pour coolant careful l
y into the charge air cooler fill point until
the system is full.
Fi t t
he plug and washer to the fill point.
4. Remove the pressure cap from the header tank.
5. Switch on the ignition and switch off the climate control
system.
Le ave
the ignition switched on (do not start the engine)
for at least 2 minutes to allow the air charge cooler
electric water pump to oper ate and to purge any air from
the air charge cooler radiator to the header tank. (This
operation will be repeated later)
6. Switch off the ignition for at least 1 minute.
7. Leave the ignition switched on (do not start the engine) for at
least 2 minutes to allow the air charge cooler electric water
pump to operate and to purg e any air from the air charge
cooler radiator to the header tank.
8. Top up the cooling system.
1. Top up the header tank and fit the pressure cap.
2. Remove the plug from the air charge cooler fill point. Pour coolant carefully into the air charge cooler fill
point until the system is full.
3. Fit the plug and washer to the fill point.
Page 957 of 2490
9.
R
un the engine at between 1500 and 2000 rpm until the
cooling fans operate.
10. Switch on the climate control system, set to maximum heat,
and check that heat is coming from the heater at the fascia
vents or the footwell outlets.
11. Switch off the engine and allow it to cool down.
12. When cool, remove the pressure cap and top up the system
as necessary at the header tank.
13
.
If necessary, fit new seals to the pressure cap.
1. Remove both O-rings from the pressure cap.
Fit and
fully seat new O-rings
to the pressure cap. Fit the
pressure cap.
14. Check that the pressure cap is fitted. Remove the plug from
the air charge cooler fill point. Pour coolant carefully into the air
charge cooler fill point until the system is full.
F
it the plug to the fill poin
t, using a new Dowty sealing
washer.
15. Remove the paintwork protection sheets and close the engine
cover.