Page 1792 of 2490
Installation
21. Remove tape securing LH rear footwell intermediate duct to
rear duct joint.
Displace duct to clear heater / cooler assembly.
22. Remove heater / cooler assembly from vehicle.
Guide matrix heater pipe stubs through firewall grommet
and remove assembly.
1. Install heater / cooler assembly into vehicle.
Guide matrix heater pipe stubs through firewall grommet.
Position heater / cooler as sembly against firewall.
2. Install heater / cooler assembly fixings.
Install upper fixing nuts.
Install lower fixing nut.
Page 1794 of 2490
7. Position LH rear footwell inte rmediate duct to rear duct.
Secure with suitable cloth tape.
8. Connect heater / cooler assembly electrical connector.
9. Install LH fan motor duct.
Install duct.
Install screws.
10. Install cable tie to secure console harness to LH blower duct.
Page 1795 of 2490
11. Install RH fan motor duct.
Install duct.
Install screws.
12. Install cable tie to secure console harness to RH blower
duct.
13. Install passenger side footwell vent.
Install vent.
Install nut.
14. Install driver footwell duct.
Install duct.
Install screw.
Page 1796 of 2490
15. Position upper steering column and install upper fixings.
1. Install bolts, do not tighten.
16. Install upper steering column lower fixings.
Tighten fixings.
17. Tighten upper fi xing bolts.
18. Under hood: reconnect heater ho ses to heater matrix pipes.
Remove blanking plugs.
Reconnect heater hoses and secure with spring band clips.
Page 1798 of 2490
Air Conditioning - Air Conditioning
Description and Operation
Introduction
Parts List
The climate control system features fully automatic control of temperature, blower speed (airflow) and air distribution to
maintain optimum comfort under most driving conditions.
Manual controls are provided to allow the operator to over-ride automatic operation.
System Features
ItemPart NumberDescription
1—Fascia panel with integral ducting
2—Heater / cooler assembly
3—A/CCM
4—Blower LH and RH
5—Plenum
6—Control panel
7—Solar sensor
8—Assembly valve - water
9—Assembly pump - water
10—Temperature sensor - external
11—Compressor
12—Pressure switch - 4 level
13—Motorized in-car aspirator (LHD shown)
14—Receiver drier
15—Condenser
Page 1799 of 2490

Twin blower assemblies Center mounted evaporator, heater and air distribution unit Electric solenoid water valve controlled heating Electric water pump assembly Servo motor driven air distribution flaps Dedicated side glass defrost / demist vents External temperature sensor Motorised in-car aspirator Solar sensor
Electronic Control Panel
Liquid Crystal Display (LCD) Digital temperature display Manual fan speed level External temperature display Celsius / Fahrenheit selection Heated windshield switch (where fitted) Heated backlight switch Defrost switch Manual airflow distribution overrides (4) Access to self diagnostic system and error codes
Sensors
External ambient temperature sensor Motorized in-car aspirator Heater matrix temperature sensor Evaporator temperature sensor Solar sensor
These sensors feedback information to the Air Conditioning Control Module (A/CCM) which automatically adjusts air
temperature, airflow volume and distributi on from the air conditioning unit to maintain a stable passenger compartment
average temperature under changing weather conditions.
Major Components
Page 1802 of 2490

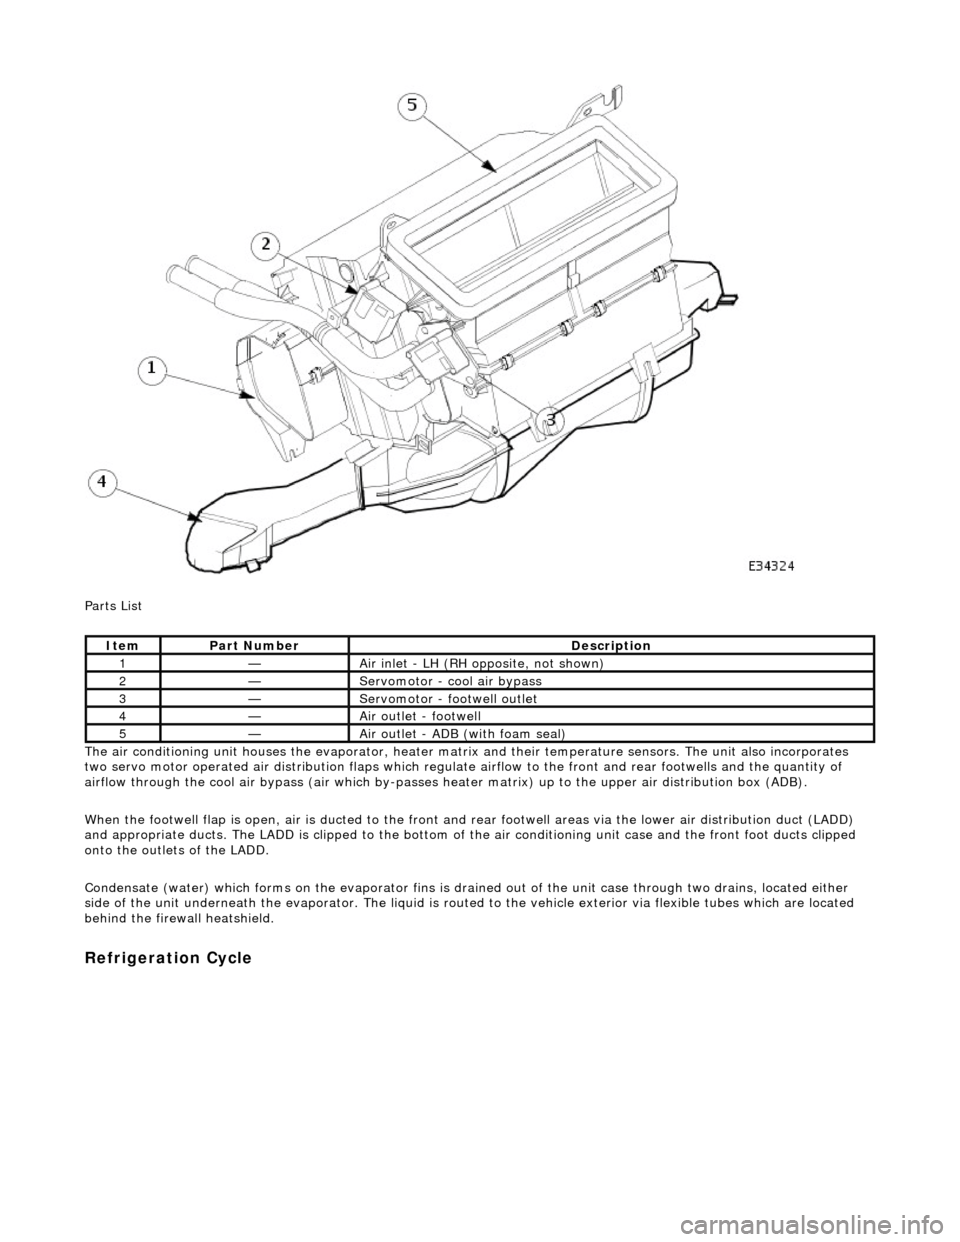
Parts List
The air conditioning unit houses the evap orator, heater matrix and their temperatur e sensors. The unit also incorporates
two servo motor operated air distribution flaps which regulate airflow to the front and rear footwells and the quantity of
airflow through the cool air bypass (air which by-passes he ater matrix) up to the upper air distribution box (ADB).
When the footwell flap is open, air is du cted to the front and rear footwell areas via the lower air distribution duct (LADD)
and appropriate ducts. The LADD is clipped to the bottom of the air conditioning unit case an d the front foot ducts clipped
onto the outlets of the LADD.
Condensate (water) which forms on the evaporator fins is drained out of the unit case through two drains, located either
side of the unit underneath the evaporator. The liquid is routed to the vehicle exterior via flexible tubes which are located
behind the firewa ll heatshield.
Refrigeration Cycle
ItemPart NumberDescription
1—Air inlet - LH (RH opposite, not shown)
2—Servomotor - cool air bypass
3—Servomotor - footwell outlet
4—Air outlet - footwell
5—Air outlet - ADB (with foam seal)
Page 1806 of 2490
3. Install lines to compressor.
Install new O-ring seal and lubricate with clean
compressor oil.
4. Connect clutch harness connector to compressor.
1. Connect clutch connector.
5. Connect power steering hose to pump.
1. Remove blanking plugs.
2. Install new O-ring seal and lubricate with clean
compressor oil.
3. Tighten union nut.
6. Lower ramp.
7. Unclamp power steering rese rvoir to pump feed hose.