Page 2274 of 2490

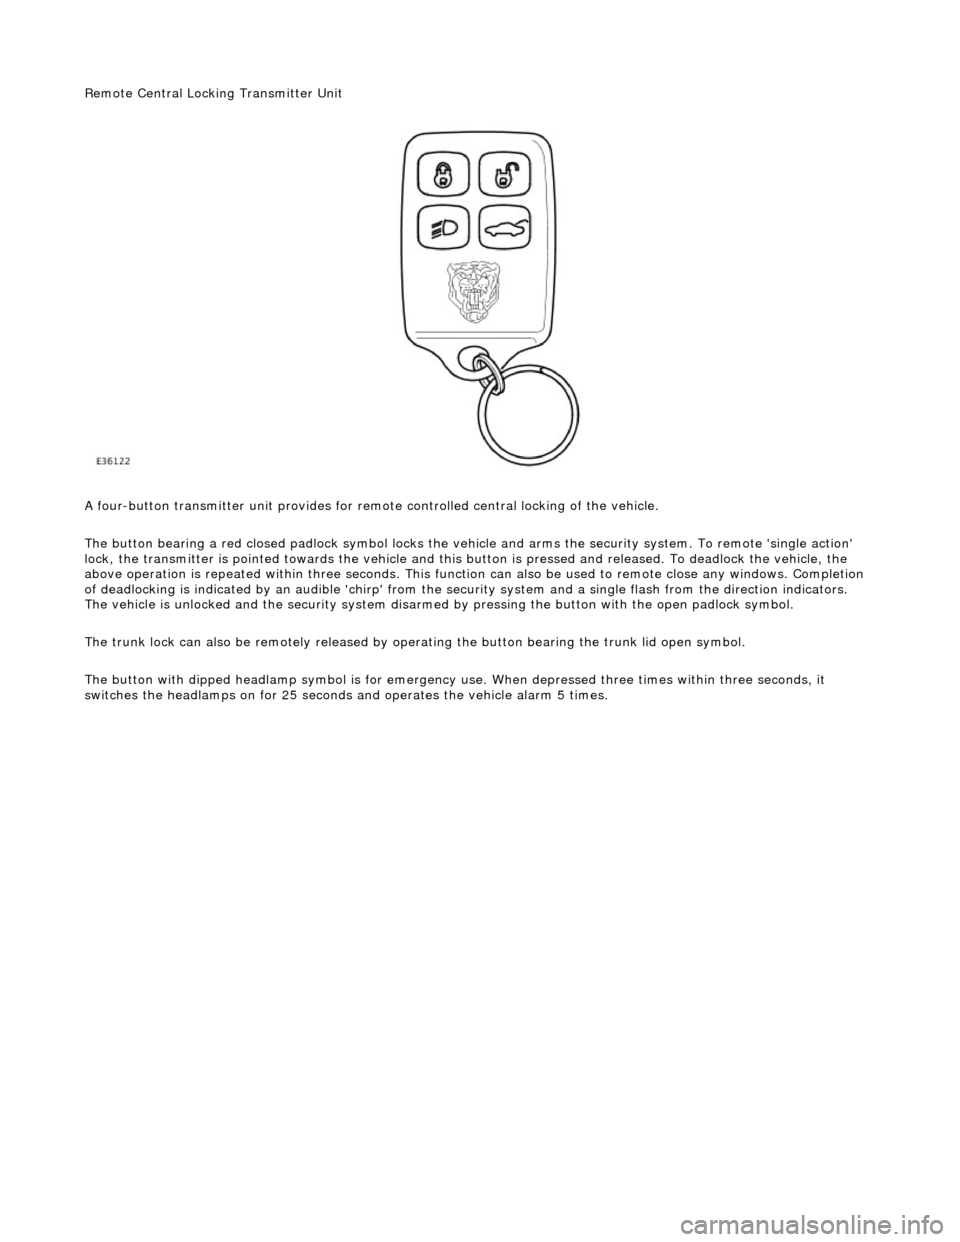
Remote Central Locking Transmitter Unit
A four-button transmitter unit provides for remote controlled central locking of the vehicle.
The button bearing a red closed padlock sy mbol locks the vehicle and arms the security system. To remote 'single action'
lock, the transmitter is pointed towards the vehicle and this bu tton is pressed and released. To deadlock the vehicle, the
above operation is repeated with in three seconds. This function can also be used to remote close any windows. Completion
of deadlocking is indicated by an audible 'chirp' from the security system and a single flash from the direction indicators.
The vehicle is unlocked and the security system disarmed by pressing the button with the open padlock symbol.
The trunk lock can also be remotely released by op erating the button bearing the trunk lid open symbol.
The button with dipped headlamp symbol is for emergency us e. When depressed three times within three seconds, it
switches the headlamps on for 25 seconds and operates the vehicle alarm 5 times.
Page 2287 of 2490
Handles, Locks, Latches and Entry Systems - Luggage Compartment Lid
Latch
Removal and Installation
Removal
1. Remove trunk lamp assemblies. Refer to 86.45.16.
2. Remove covers from the two tr unk latch finisher securing
bolts and slacken and remove securing bolts.
3. Remove latch finisher from trunk.
4. Release and discard the four trunk lid liner rear fasteners
and position liner for access.
5. Release trunk open switch multiplug from retaining clip and
disconnect multiplug.
6. Slacken and remove the latch assembly securing bolt.
Page 2288 of 2490
Installation
7. Disconnect lock barrel link rod.
8. Disconnect lock motor link rod.
9. Withdraw lock assembly from trunk , release trunk open
switch retaining tang and remove switch from lock assembly.
1. Fit and fully seat trunk open switch to lock assembly.
2. Position lock assembly in trunk and connect lock barrel and
Page 2292 of 2490
Handles, Locks, Latches and Entry Systems - Luggage Compartment Lid
Release Switch
Removal and Installation
Removal
1. Remove trunk lamp assemblies. Refer to 86.45.16.
2. Remove covers from the two tr unk latch finisher securing
bolts and slacken and remove bolts.
3. Remove latch finisher from trunk.
4. Remove and discard the four fast eners securing rear of trunk lid liner and position liner for access.
5. Release trunk release button harness connector from retaining
clip and disconnect connector.
6. Slacken and remove the trunk u pper trim finisher securing
nuts.
Page 2293 of 2490
Installation
7. Position upper trim finisher fo r access and withdraw release
button harness grommet from trunk lid aperture.
8. Position upper trim finisher for access and slacken and remove
release button securing screws.
9. Withdraw release button asse mbly from trim finisher.
1. Position trunk release button as sembly on trim finisher and
install securing screws.
2. Position trim finisher/release button assembly at trunk lid and
route harness through lid aperture.
3. Position grommet over harness and install in trunk lid aperture.
4. Position trim finisher/release button assembly on trunk lid and
install securing nuts.
5. Connect release button harness connector and install on
retaining clip.
6. Reposition rear of trunk lid liner and secure with new fasteners.
7. Position lock finisher and install securing bolts.
8. Install covers over finisher securing bolts.
9. Install trunk lights. Refer to 86.45.16.
Page 2294 of 2490
Handles, Locks, Latches and Entry Systems - Luggage Compartment Lid
Warning Indicator Switch
Removal and Installation
Removal
1. Remove trunk lamp assemblies. Refer to 86.45.16.
2. Remove covers from the two tr unk latch finisher securing
bolts and slacken and remove securing bolts.
3. Remove latch finisher from trunk.
4. Release and discard the four trunk lid liner rear fasteners
and position liner for access.
5. Release trunk open switch multiplug from retaining clip and
disconnect multiplug.
6. Remove the latch assembly securing bolt.
Page 2295 of 2490
Installation
7. Disconnect lock barrel link rod.
8. Disconnect lock motor link rod.
9. Withdraw lock assembly from trunk , release trunk open
switch retaining tang and remove switch from lock assembly.
1. Install and fully seat trunk open switch to lock assembly.
2. Position lock assembly in trunk and connect lock barrel and
Page:
< prev 1-8 9-16 17-24