Page 1435 of 2490
the specified torque figure.
2. Stake the nut to the output shaft.
4. Refit the bolts securing the dr iveshaft and tighten to the
specified torque figure.
5. Refit the the rear mounting crossmember and tighten the
securing bolts to the specified torque figures.
6. Refer to Operation 44.24.02 for fluid fill procedure.
7. Check for leaks and remove spilt fluid.
Page 1436 of 2490
Automatic Transmission/Transaxle - 4.0L SC V8 - AJ26 - Main Control
Valve Body
In-vehicle Repair
Removal
• NOTE: This procedure will not remove re sidual fluid from the torque converter.
1. Disconnect the battery ground lead.
2. Raise the vehicle for access.
3. Remove the RH catalytic converter; refer to Operation
17.50.10.
4. Remove the harness heatshield lower fixing.
Remove the screw heatshield / fluid pan clamp.
5. Remove the harness heatshield.
Pull the heatshield from under the clip.
6. Disconnect the transmission link harness connector.
1. Release the locking lever.
7. Release the (transmission case mounted) female connector.
Remove the (center) retaining bolt.
Page 1438 of 2490
Installation
13. Remove the valve body assembly.
Remove the nine bolts which re tain the valve body to the
transmission case.
1. Installation is the re verse of the removal procedure, noting the
following:
2. Clean all mating faces and relevant parts.
3. Tighten the nine bolts securing the valve body, to the specified
torque figure.
4. Refit the dowel (leaf spring to valve body) and the leaf spring.
Fit and tighten the securing bolt to the specified torque figure.
5. Tighten the centre retaining bolt of the electrical connector to
the specified torque figure.
Page 1441 of 2490
Automatic Transmission/Transaxle - 4.0L SC V8 - AJ26 - Transmission
Fluid Pan Gasket
In-vehicle Repair
Removal
• NOTE: This procedure will not remove re sidual fluid from the torque converter.
Installation
1. Disconnect the battery ground lead.
2. Raise the vehicle for access.
3. Drain the transmission fluid.
3. WARNING: TRANSMISSION FLUID MAY CAUSE
SEVERE BURNS, ENSURE THAT ALL SAFETY PROCEDURES
ARE OBSERVED AND THAT THE RECEPTACLE FOR WASTE
HAS SUFFICIENT CAPACITY.
Carefully remove the drain pl ug and discard the sealing
washer.
4. Remove the fluid pan.
• NOTE: The harness heatshield upper edge is retained by
a clip.
Remove the six bolts and clam ps which secure the fluid
pan to the transmission.
1. Installation is th e reverse of the re moval procedure.
Tighten the fluid pan retaining bolts to the specified torque figure.
2. Refit and tighten the drain plug to the specified torque figure.
Use a new sealing washer.
Page 1452 of 2490
Discard the Dowty seals.
Fit blanking plugs to the pipe and transmission.
24. Disconnect the fluid cooler lower pipe.
Remove the 'banjo' bolt.
Discard the Dowty seals.
Fit blanking plugs to the pipe and transmission.
25. Remove the three bolts which se cure the torque converter to
the drive plate.
1. Remove the access cover.
2. Rotate the crankshaft for access to each bolt and hold
to prevent movement. Remove each bolt.
26. Remove the LH and RH cataly st mounting brackets from the
transmission case.
Remove the two bolts from each side.
27. On the RH side, clear the cooler pipe for access.
28. NOTE: Viewed from the rear of the vehicle.
Remove the two upper bolts, as indicated, transmission to
engine.
Page 1454 of 2490
34. NOTE: Do not allow the converter to detach from the
transmission.
Remove the transmission / converter assembly from the
vehicle.
Lower the lift and remove the transmission, ensuring that
the torque converter spigot disengages cleanly.
35. Remove the side clamps and chain for access.
36. Remove the front muffler mounting bracket.
Remove the two bolts which secure the bracket to the
transmission case.
37. Remove the transmission dipstick tube.
1. Remove the fixing which secures the tube to the case.
Discard the filler tube 'O' ring. 2. Fit a blanking plug to the transmission casing orifice.
Page 1456 of 2490

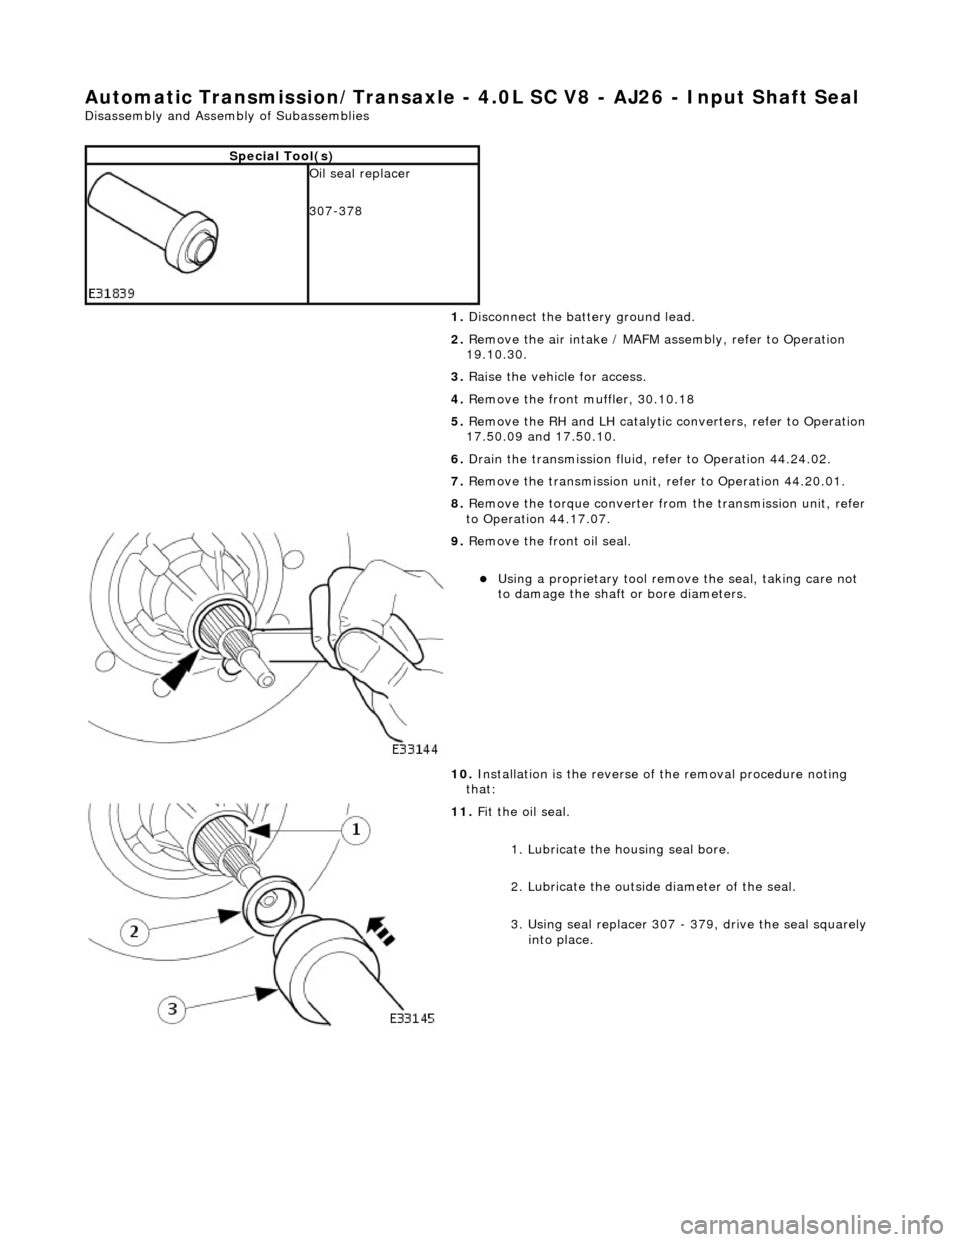
Automatic Transmission/Transaxle - 4.0L SC V8 - AJ26 - Input Shaft Seal
Disassembly and Assembly of Subassemblies
Special Tool(s)
Oil seal replacer
307-378
1. Disconnect the battery ground lead.
2. Remove the air intake / MAFM assembly, refer to Operation
19.10.30.
3. Raise the vehicle for access.
4. Remove the front muffler, 30.10.18
5. Remove the RH and LH catalytic converters, refer to Operation
17.50.09 and 17.50.10.
6. Drain the transmission fluid, refer to Operation 44.24.02.
7. Remove the transmission unit, refer to Operation 44.20.01.
8. Remove the torque converter fro m the transmission unit, refer
to Operation 44.17.07.
9. Remove the front oil seal.
Using a proprietary tool remove the seal, taking care not
to damage the shaft or bore diameters.
10. Installation is the reverse of the removal procedure noting
that:
11. Fit the oil seal.
1. Lubricate the housing seal bore.
2. Lubricate the outside diameter of the seal.
3. Using seal replacer 307 - 379, drive the seal squarely into place.
Page 1457 of 2490

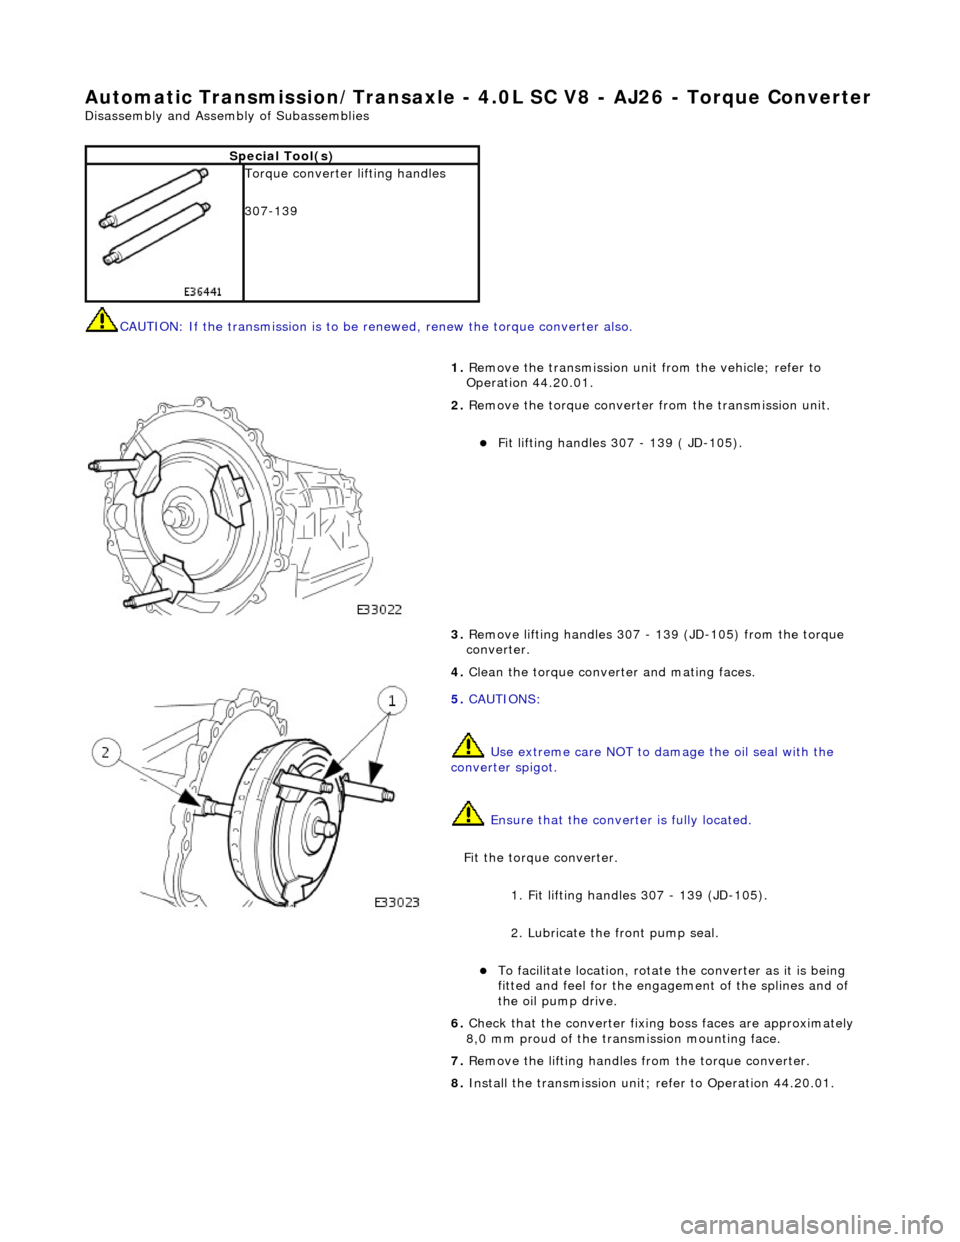
Automatic Transmission/Transaxle - 4.0L SC V8 - AJ26 - Torque Converter
Disassembly and Assembly of Subassemblies
CAUTION: If the transmission is to be renewed, renew the to rque converter also.
Special Tool(s)
Torque converter lifting handles
307-139
1. Remove the transmission unit from the vehicle; refer to
Operation 44.20.01.
2. Remove the torque converter from the transmission unit.
Fit lifting handles 307 - 139 ( JD-105).
3. Remove lifting handles 307 - 139 (JD-105) from the torque
converter.
4. Clean the torque conver ter and mating faces.
5. CAUTIONS:
Use extreme care NOT to damage the oil seal with the
converter spigot.
Ensure that the conver ter is fully located.
Fit the torque converter.
1. Fit lifting handles 307 - 139 (JD-105).
2. Lubricate the front pump seal.
To facilitate location, rotate the converter as it is being
fitted and feel for the engage ment of the splines and of
the oil pump drive.
6. Check that the converter fixing boss faces are approximately
8,0 mm proud of the transm ission mounting face.
7. Remove the lifting handles from the torque converter.
8. Install the transmission unit; refer to Operation 44.20.01.