Page 2355 of 2490
Installation
2. Slide each blade forward to release three side tangs from cover and remove blades from bumper.
9. Drill out rivets securing beam to bumper cover.
10. Withdraw beam from bumper cover.
1. Position beam in bumper cover and secure with new fir tree
fasteners and rivets.
2. Fit and fully seat sidemarker lamp s/reflectors in bumper cover.
3. Fit chrome blades to top of cover locating tangs in slots and fit
and tighten securing screws.
4. Fit bumper assembly to vehicle. Refer to operations in this
section.
5. Fit ground cable to battery terminal and fit battery cover. Refer
to 86.15.15.
Page 2356 of 2490
Bumpers - Rear Bumper Cover
Removal and Installation
Removal
Installation
1. Position vehicle on 4-post lift.
2. Remove battery cover and disc onnect ground cable from
battery terminal. Refer to 86.15.19.
3. WARNING: THE REAR BUMPER IS CLOSE TO THE
EXHAUST PIPES WHICH MAY BE HOT. CARE MUST THEREFORE BE
EXERCISED WHEN WORKING IN THIS VICINITY.
Raise vehicle to working height.
4. If fitted, disconnect sidemarker lamp harness multiplugs and
position clear of armatures.
5. Slacken and remove bumper to strut securing bolts.
6. With assistance, carefully slide bumper clear of guide blocks
and remove from vehicle.
1. Release retaining clips and remo ve sidemarker lamps/reflectors from bumper.
2. Remove bumper blades.
1. Slacken and remove three screws securing each blade
Page 2357 of 2490
Installation
to bumper cover.
2. Slide each blade forward to release three side tangs from cover and remove blades from bumper.
3. Drill out rivets securing cover to bumper beam.
4. Withdraw cover from bumper beam.
1. Position cover over bumper beam and secure with new fir tree
fasteners and rivets.
2. Fit and fully seat sidemarker lamp s/reflectors in bumper cover.
3. Fit chrome blades to top of cover locating tangs in slots and fit
and tighten securing screws.
4. Fit bumper assembly to vehicle. Refer to operations in this
section.
5. Fit ground cable to battery terminal and fit battery cover. Refer
to 86.15.15.
Page 2358 of 2490
Bumpers - Rear Bumper Isolator
Removal and Installation
Removal
Installation
1.
Remove rear bumper assembly. Refer to 76.22.77 and
76.22.27.
2. Remove four nuts securing stru t to rear cross-member, remove strut from vehicle and discard gasket.
1. Position strut and new gasket on cross-member and fit and
tighten securing nuts on studs.
2. Fit bumper assembly to struts. Refer to 76.22.27 and
76.22.77.
Page 2362 of 2490

Safety Belt System - Front Safety Belt Retractor
Removal and Installation
Removal
• WARNINGS:
IF A SEAT BELT PRETENSIONING UNIT IS INADVERTENTLY RUPTURED AND INGESTION AND/OR INHALATION
OCCURS, FIRST AID MUST BE APPLIED AND MEDICAL ADVICE SOUGHT.
NO ATTEMPT MUST BE MADE TO DISMANTLE A PRETENSIONING RETRACTOR UNIT. THERE ARE NO SERVICEABLE
PARTS.
WHEN HANDLING A RETRACTOR UNIT PISTON HOUSING, THE PISTON MUST ALWAYS BE POINTED DOWNWARDS
AND AWAY FROM ONE'S SELF AND OTHER PERSONNEL AND FINGERS MUST BE KEPT AWAY FOM THE TAKE-UP SPOOL
MECHANISM.
ANY PRETENSIONING UNIT DROPPED FROM A HEIGHT GREA TER THAN 0.3M (12 INCHES) MUST NOT BE FITTED TO A
VEHICLE.
UNACTIVATED PRE-TENSIONING UNIT COMPONENTS CONTAIN A SOLID, FLAMMABLE MATERIAL.
1. Position seat fully forward for access.
2. Remove battery cover and disc onnect ground cable from
battery terminal. Refer to 86.15.19.
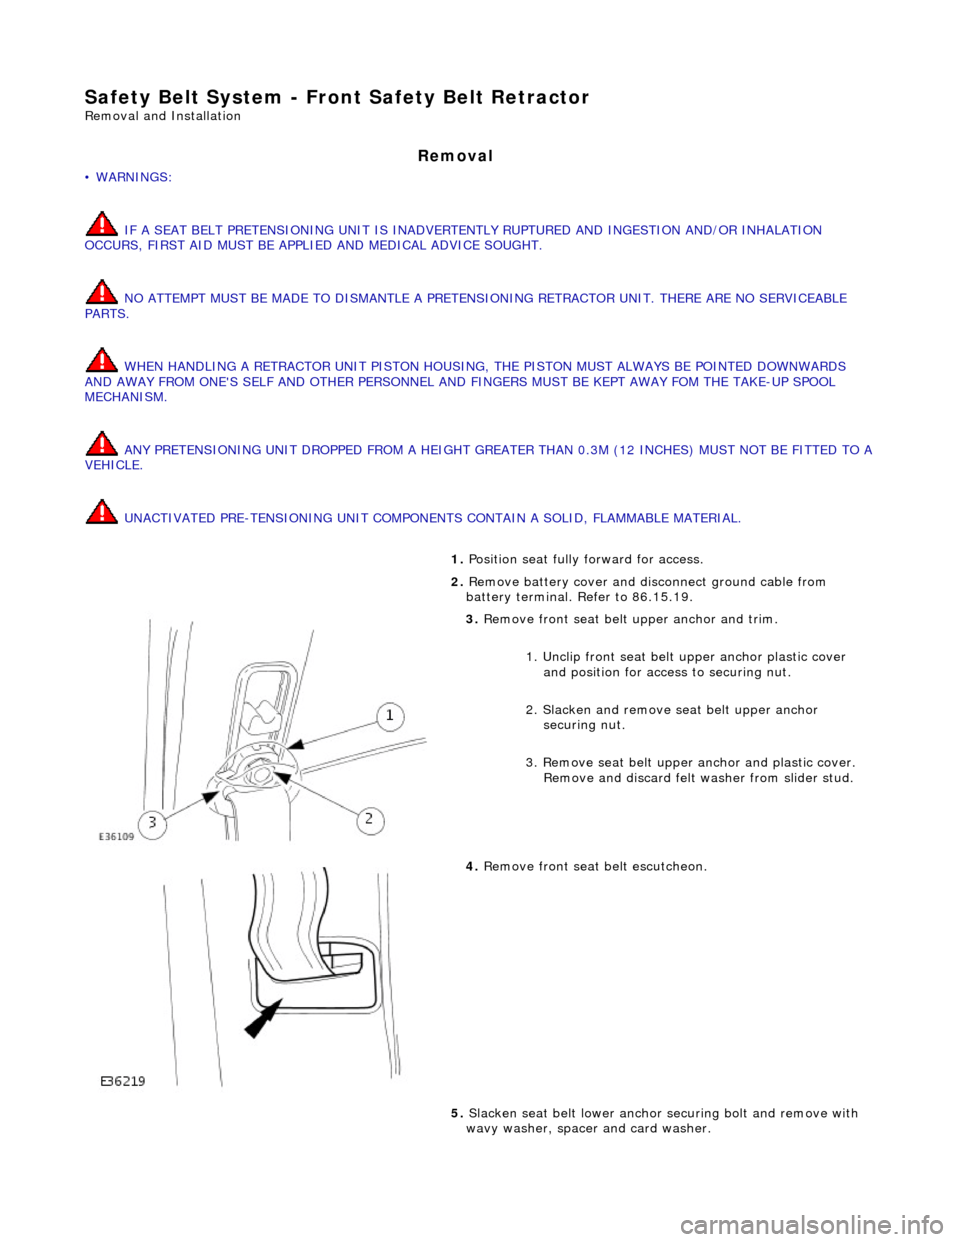
3. Remove front seat belt upper anchor and trim.
1. Unclip front seat belt upper anchor plastic cover
and position for access to securing nut.
2. Slacken and remove se at belt upper anchor
securing nut.
3. Remove seat belt upper anchor and plastic cover. Remove and discard felt washer from slider stud.
4. Remove front seat belt escutcheon.
5. Slacken seat belt lower anchor securing bolt and remove with
wavy washer, spacer and card washer.
Page 2363 of 2490
Installation
6. Remove 'B' post casing fo r access. Refer to 76.13.08.
7. Pass seat belt anchor plate through 'B' post casing and
remove casing from vehicle.
8. Slacken and remove two screws se curing seat belt guide to 'B'
post and position belt guide along seat belt.
9. Slacken and remove bolt securing seat belt pretensioner to 'B'
post.
10. Withdraw belt and pretensioner assembly from 'B' post and
remove from vehicle.
1. Position pretensioner in 'B' post , align with fixing holes and fit
Page 2364 of 2490
and fully tighten
securing bolts.
2. Position seat belt guide on 'B' post and fit and fully tighten the
two securing screws.
3. Position 'B' post casing in vehicle and pass seat belt anchor
plates and tongue through aperture.
4. Fit 'B' post casing. Refer to 76.13.08.
5. Fit securing bolt and wavy washer to seat belt anchor. Fit
spacer and card washer to bolt and fit and fully tighten securing
bolt.
6. Fit felt washer with paper ba cking outwards, onto height
adjuster stud
7. Position upper anchor on height adjuster stud, fit and tighten
securing nut and fit pl astic cap over nut.
8. Connect ground cable to battery terminal and fit battery cover.
Refer to 86.15.15.
9. Return seat to original position.
Page 2365 of 2490
Safety Belt System - Rear Safety Belt Retractor
Removal and Installation
Removal
1. Remove rear seat cushion. Refer to 76.70.37.
2. Remove rear headrests.
3. Slacken and remove bolt securi ng lower anchor to front of
inner wheel arch.
4. Slacken and remove bolt securing belt buckle cable to seat
pan and remove belt buckle assembly from vehicle.
5. Remove escutcheon.
1. Using a flat-bladed screwdriver in the two rectangular apertures, carefully withdraw
escutcheon from top of seat squab.
2. Remove escutcheon from belt via split in moulding.
6. Pass seat belt lower anchor plate and tongue through squab
aperture.