1998 ISUZU TROOPER transmission fluid
[x] Cancel search: transmission fluidPage 29 of 3573
0BÐ2 MAINTENANCE AND LUBRICATION
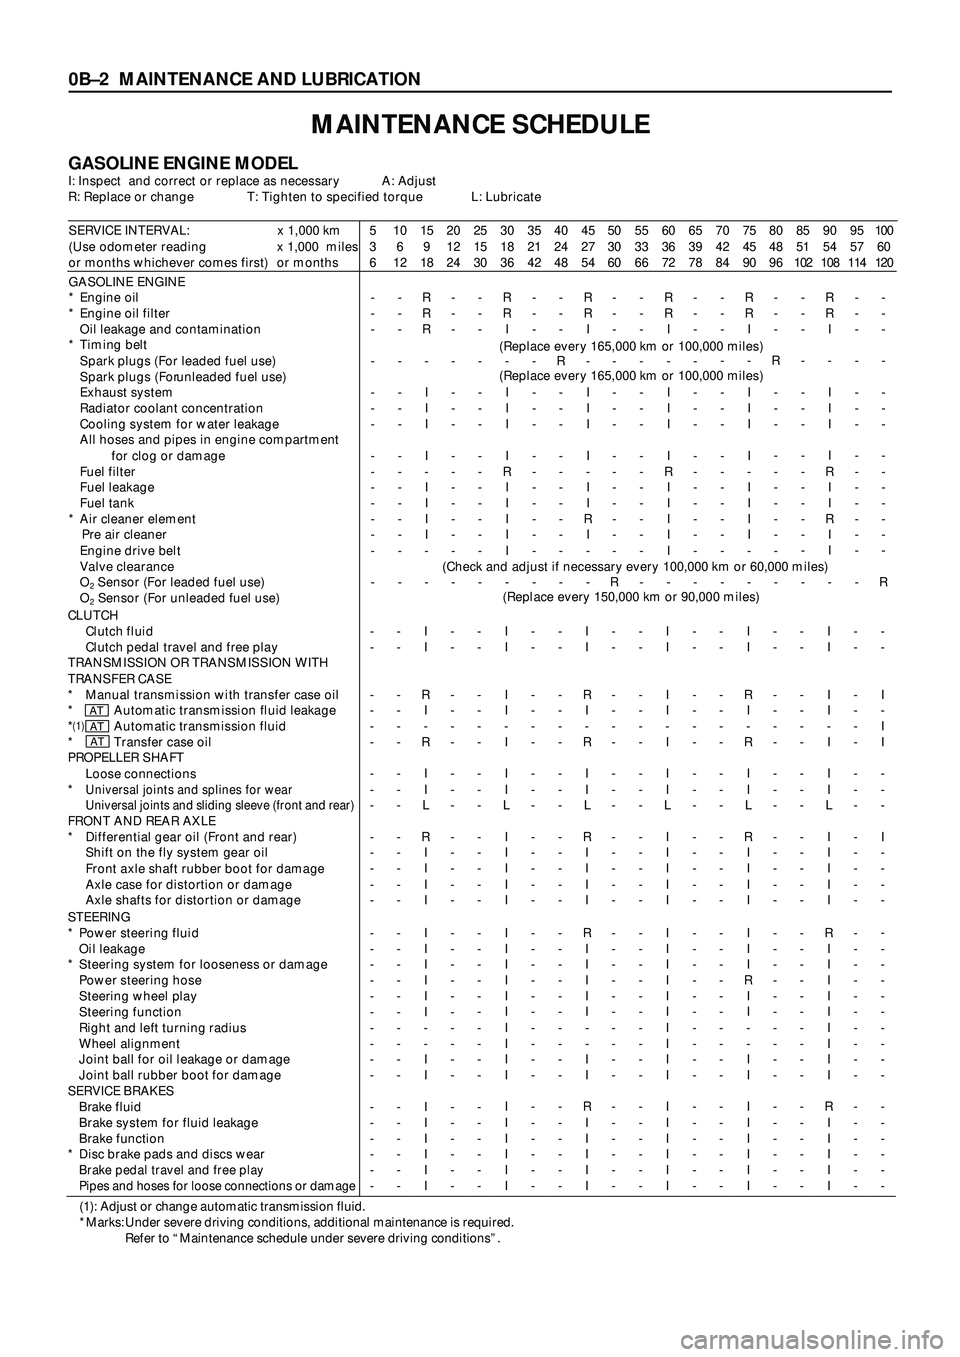
MAINTENANCE SCHEDULE
GASOLINE ENGINE MODELI: Inspect and correct or replace as necessary A: Adjust
R: Replace or change T: Tighten to specified torque L: Lubricate
SERVICE INTERVAL: x 1,000 km
(Use odometer reading x 1,000 miles
or months whichever comes first) or months5
3
610
6
1215
9
1820
12
2425
15
3030
18
3635
21
4240
24
4845
27
5450
30
6055
33
6660
36
7265
39
7870
42
8475
45
9080
48
9685
51
10290
54
10895
57
114100
60
120
GASOLINE ENGINE
* Engine oil
* Engine oil filter
Oil leakage and contamination
* Timing belt
Spark plugs (For leaded fuel use)
Spark plugs (For unleaded fuel use)
Exhaust system
Radiator coolant concentration
Cooling system for water leakage
All hoses and pipes in engine compartment
for clog or damage
Fuel filter
Fuel leakage
Fuel tank
* Air cleaner element
Pre air cleaner
Engine drive belt
Valve clearance
O
2 Sensor (For leaded fuel use)
O
2 Sensor (For unleaded fuel use)-
-
-
-
-
-
-
-
-
-
-
-
-
-
--
-
-
-
-
-
-
-
-
-
-
-
-
-
-R
R
R
-
I
I
I
I
-
I
I
I
I
-
--
-
-
-
-
-
-
-
-
-
-
-
-
-
--
-
-
-
-
-
-
-
-
-
-
-
-
-
-R
R
I
-
I
I
I
I
R
I
I
I
I
I
--
-
-
-
-
-
-
-
-
-
-
-
-
-
--
-
-
R
-
-
-
-
-
-
-
-
-
-
-R
R
I
-
I
I
I
I
-
I
I
R
I
-
--
-
-
-
-
-
-
-
-
-
-
-
-
-
R-
-
-
-
-
-
-
-
-
-
-
-
-
-
-R
R
I
-
I
I
I
I
R
I
I
I
I
I
--
-
-
-
-
-
-
-
-
-
-
-
-
-
--
-
-
-
-
-
-
-
-
-
-
-
-
-
-R
R
I
-
I
I
I
I
-
I
I
I
I
-
--
-
-
R
-
-
-
-
-
-
-
-
-
-
--
-
-
-
-
-
-
-
-
-
-
-
-
-
-R
R
I
-
I
I
I
I
R
I
I
R
I
I
--
-
-
-
-
-
-
-
-
-
-
-
-
-
--
-
-
-
-
-
-
-
-
-
-
-
-
-
R
(Replace every 165,000 km or 100,000 miles)
(Replace every 165,000 km or 100,000 miles)
(Check and adjust if necessary every 100,000 km or 60,000 miles)
(Replace every 150,000 km or 90,000 miles)
CLUTCH
Clutch fluid
Clutch pedal travel and free play
TRANSMISSION OR TRANSMISSION WITH
TRANSFER CASE
* Manual transmission with transfer case oil
* Automatic transmission fluid leakage
*
(1)Automatic transmission fluid
* Transfer case oil
PROPELLER SHAFT
Loose connections
*
Universal joints and splines for wear
Universal joints and sliding sleeve (front and rear)
FRONT AND REAR AXLE
* Differential gear oil (Front and rear)
Shift on the fly system gear oil
Front axle shaft rubber boot for damage
Axle case for distortion or damage
Axle shafts for distortion or damage-
-
-
-
-
-
-
-
-
-
-
-
-
--
-
-
-
-
-
-
-
-
-
-
-
-
-I
I
R
I
-
R
I
I
L
R
I
I
I
I-
-
-
-
-
-
-
-
-
-
-
-
-
--
-
-
-
-
-
-
-
-
-
-
-
-
-I
I
I
I
-
I
I
I
L
I
I
I
I
I-
-
-
-
-
-
-
-
-
-
-
-
-
--
-
-
-
-
-
-
-
-
-
-
-
-
-I
I
R
I
-
R
I
I
L
R
I
I
I
I-
-
-
-
-
-
-
-
-
-
-
-
-
--
-
-
-
-
-
-
-
-
-
-
-
-
-I
I
I
I
-
I
I
I
L
I
I
I
I
I-
-
-
-
-
-
-
-
-
-
-
-
-
--
-
-
-
-
-
-
-
-
-
-
-
-
-I
I
R
I
-
R
I
I
L
R
I
I
I
I-
-
-
-
-
-
-
-
-
-
-
-
-
--
-
-
-
-
-
-
-
-
-
-
-
-
-I
I
I
I
-
I
I
I
L
I
I
I
I
I-
-
-
-
-
-
-
-
-
-
-
-
-
--
-
I
-
I
I
-
-
-
I
-
-
-
-
ATATAT
STEERING
* Power steering fluid
Oil leakage
* Steering system for looseness or damage
Power steering hose
Steering wheel play
Steering function
Right and left turning radius
Wheel alignment
Joint ball for oil leakage or damage
Joint ball rubber boot for damage
SERVICE BRAKES
Brake fluid
Brake system for fluid leakage
Brake function
* Disc brake pads and discs wear
Brake pedal travel and free play
Pipes and hoses for loose connections or damage
-
-
-
-
-
-
-
-
-
-
-
-
-
-
-
--
-
-
-
-
-
-
-
-
-
-
-
-
-
-
-I
I
I
I
I
I
-
-
I
I
I
I
I
I
I
I-
-
-
-
-
-
-
-
-
-
-
-
-
-
-
--
-
-
-
-
-
-
-
-
-
-
-
-
-
-
-I
I
I
I
I
I
I
I
I
I
I
I
I
I
I
I-
-
-
-
-
-
-
-
-
-
-
-
-
-
-
--
-
-
-
-
-
-
-
-
-
-
-
-
-
-
-R
I
I
I
I
I
-
-
I
I
R
I
I
I
I
I-
-
-
-
-
-
-
-
-
-
-
-
-
-
-
--
-
-
-
-
-
-
-
-
-
-
-
-
-
-
-I
I
I
I
I
I
I
I
I
I
I
I
I
I
I
I-
-
-
-
-
-
-
-
-
-
-
-
-
-
-
--
-
-
-
-
-
-
-
-
-
-
-
-
-
-
-I
I
I
R
I
I
-
-
I
I
I
I
I
I
I
I-
-
-
-
-
-
-
-
-
-
-
-
-
-
-
--
-
-
-
-
-
-
-
-
-
-
-
-
-
-
-R
I
I
I
I
I
I
I
I
I
R
I
I
I
I
I-
-
-
-
-
-
-
-
-
-
-
-
-
-
-
--
-
-
-
-
-
-
-
-
-
-
-
-
-
-
-
(1): Adjust or change automatic transmission fluid.
*Marks: Under severe driving conditions, additional maintenance is required.
Refer to “Maintenance schedule under severe driving conditions”.
Page 31 of 3573
0BÐ4 MAINTENANCE AND LUBRICATION
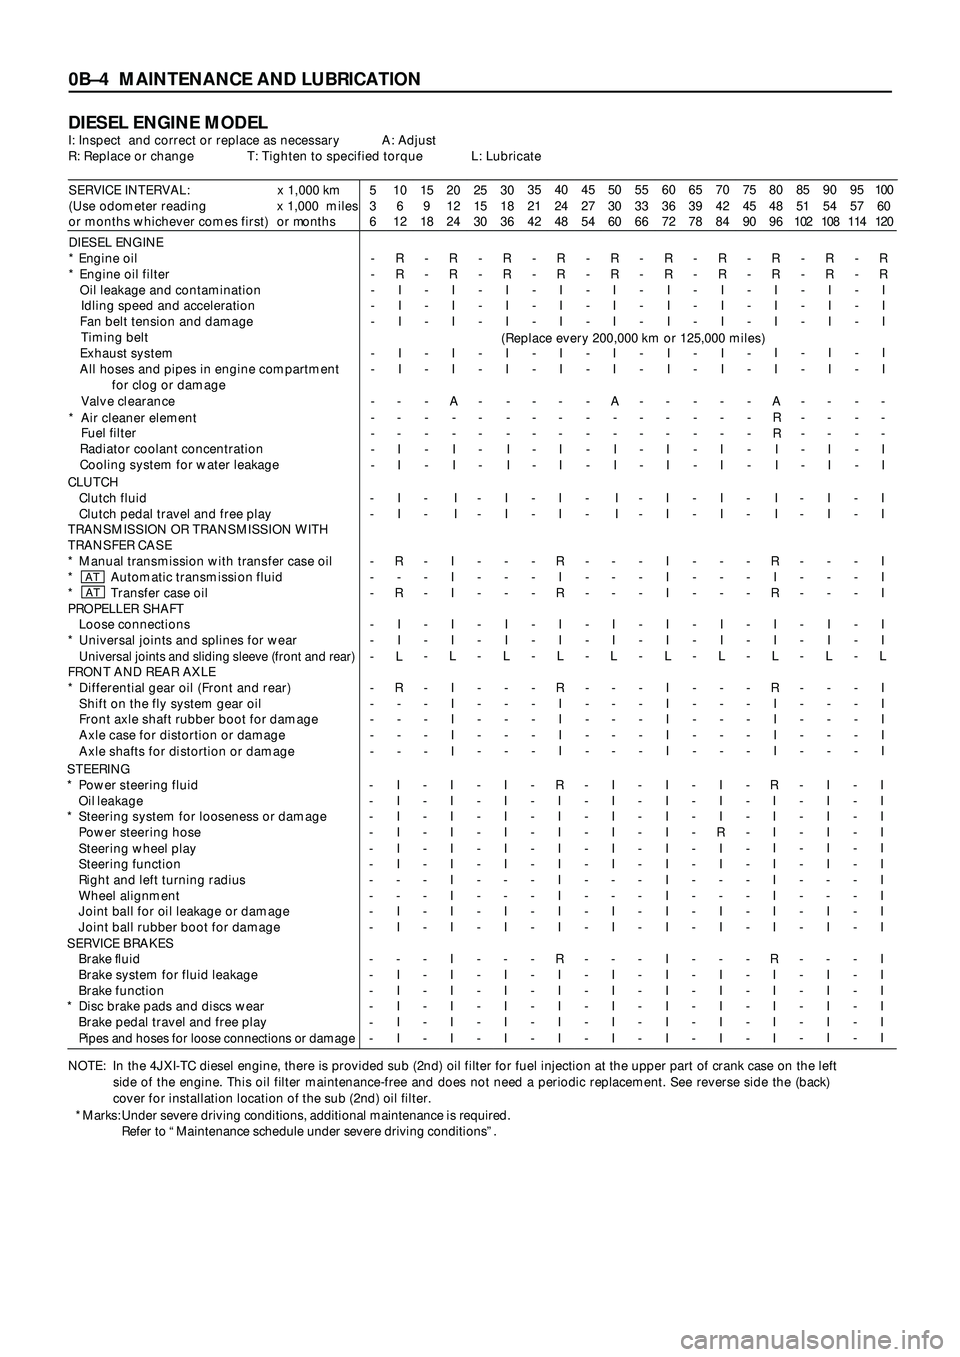
DIESEL ENGINE MODELI: Inspect and correct or replace as necessary A: Adjust
R: Replace or change T: Tighten to specified torque L: Lubricate
SERVICE INTERVAL: x 1,000 km
(Use odometer reading x 1,000 miles
or months whichever comes first) or months5
3
610
6
1215
9
1820
12
2425
15
3030
18
3635
21
4240
24
4845
27
5450
30
6055
33
6660
36
7265
39
7870
42
8475
45
9080
48
9685
51
10290
54
10895
57
114100
60
120
DIESEL ENGINE
* Engine oil
* Engine oil filter
Oil leakage and contamination
Idling speed and acceleration
Fan belt tension and damage
Timing belt
Exhaust system
All hoses and pipes in engine compartment
for clog or damage
Valve clearance
* Air cleaner element
Fuel filter
Radiator coolant concentration
Cooling system for water leakage-
-
-
-
-
-
-
-
-
-
-
-R
R
I
I
I
I
I
-
-
-
I
I-
-
-
-
-
-
-
-
-
-
-
-R
R
I
I
I
I
I
A
-
-
I
I-
-
-
-
-
-
-
-
-
-
-
-R
R
I
I
I
I
I
-
-
-
I
I-
-
-
-
-
-
-
-
-
-
-
-R
R
I
I
I
I
I
-
-
-
I
I-
-
-
-
-
-
-
-
-
-
-
-R
R
I
I
I
I
I
A
-
-
I
I-
-
-
-
-
-
-
-
-
-
-
-R
R
I
I
I
I
I
-
-
-
I
I-
-
-
-
-
-
-
-
-
-
-
-R
R
I
I
I
I
I
-
-
-
I
I-
-
-
-
-
-
-
-
-
-
-
-R
R
I
I
I
I
I
A
R
R
I
I-
-
-
-
-
-
-
-
-
-
-
-R
R
I
I
I
I
I
-
-
-
I
I-
-
-
-
-
-
-
-
-
-
-
-R
R
I
I
I
I
I
-
-
-
I
I
NOTE: In the 4JXI-TC diesel engine, there is provided sub (2nd) oil filter for fuel injection at the upper part of crank case on the left
side of the engine. This oil filter maintenance-free and does not need a periodic replacement. See reverse side the (back)
cover for installation location of the sub (2nd) oil filter.(Replace every 200,000 km or 125,000 miles)
*Marks: Under severe driving conditions, additional maintenance is required.
Refer to “Maintenance schedule under severe driving conditions”. CLUTCH
Clutch fluid
Clutch pedal travel and free play
TRANSMISSION OR TRANSMISSION WITH
TRANSFER CASE
* Manual transmission with transfer case oil
* Automatic transmission fluid
* Transfer case oil
PROPELLER SHAFT
Loose connections
* Universal joints and splines for wear
Universal joints and sliding sleeve (front and rear)FRONT AND REAR AXLE
* Differential gear oil (Front and rear)
Shift on the fly system gear oil
Front axle shaft rubber boot for damage
Axle case for distortion or damage
Axle shafts for distortion or damage-
-
-
-
-
-
-
-
-
-
-
-
-I
I
R
-
R
I
I
L
R
-
-
-
--
-
-
-
-
-
-
-
-
-
-
-
-I
I
I
I
I
I
I
L
I
I
I
I
I-
-
-
-
-
-
-
-
-
-
-
-
-I
I
-
-
-
I
I
L
-
-
-
-
--
-
-
-
-
-
-
-
-
-
-
-
-I
I
R
I
R
I
I
L
R
I
I
I
I-
-
-
-
-
-
-
-
-
-
-
-
-I
I
-
-
-
I
I
L
-
-
-
-
--
-
-
-
-
-
-
-
-
-
-
-
-I
I
I
I
I
I
I
L
I
I
I
I
I-
-
-
-
-
-
-
-
-
-
-
-
-I
I
-
-
-
I
I
L
-
-
-
-
--
-
-
-
-
-
-
-
-
-
-
-
-I
I
R
I
R
I
I
L
R
I
I
I
I-
-
-
-
-
-
-
-
-
-
-
-
-I
I
-
-
-
I
I
L
-
-
-
-
--
-
-
-
-
-
-
-
-
-
-
-
-I
I
I
I
I
I
I
L
I
I
I
I
I
ATAT
STEERING
* Power steering fluid
Oil leakage
* Steering system for looseness or damage
Power steering hose
Steering wheel play
Steering function
Right and left turning radius
Wheel alignment
Joint ball for oil leakage or damage
Joint ball rubber boot for damage
SERVICE BRAKES
Brake fluid
Brake system for fluid leakage
Brake function
* Disc brake pads and discs wear
Brake pedal travel and free play
Pipes and hoses for loose connections or damage
-
-
-
-
-
-
-
-
-
-
-
-
-
-
-
-I
I
I
I
I
I
-
-
I
I
-
I
I
I
I
I-
-
-
-
-
-
-
-
-
-
-
-
-
-
-
-I
I
I
I
I
I
I
I
I
I
I
I
I
I
I
I-
-
-
-
-
-
-
-
-
-
-
-
-
-
-
-I
I
I
I
I
I
-
-
I
I
-
I
I
I
I
I-
-
-
-
-
-
-
-
-
-
-
-
-
-
-
-R
I
I
I
I
I
I
I
I
I
R
I
I
I
I
I-
-
-
-
-
-
-
-
-
-
-
-
-
-
-
-I
I
I
I
I
I
-
-
I
I
-
I
I
I
I
I-
-
-
-
-
-
-
-
-
-
-
-
-
-
-
-I
I
I
I
I
I
I
I
I
I
I
I
I
I
I
I-
-
-
-
-
-
-
-
-
-
-
-
-
-
-
-I
I
I
R
I
I
-
-
I
I
-
I
I
I
I
I-
-
-
-
-
-
-
-
-
-
-
-
-
-
-
-R
I
I
I
I
I
I
I
I
I
R
I
I
I
I
I-
-
-
-
-
-
-
-
-
-
-
-
-
-
-
-I
I
I
I
I
I
-
-
I
I
-
I
I
I
I
I-
-
-
-
-
-
-
-
-
-
-
-
-
-
-
-I
I
I
I
I
I
I
I
I
I
I
I
I
I
I
I
Page 33 of 3573
0BÐ6 MAINTENANCE AND LUBRICATION
Item IntervalCondition
ABCD A+D
Engine oil G : Change every 5,000 km (3,000 miles)
D : Change every 5,000 km (3,000 miles) ll
Engine oil filter G : Replace every 10,000 km (6,000 miles)
D : Replace every 5,000 km (3,000 miles) ll
Air cleaner element G : Replace every 20,000 km (12,000 miles)
D : Replace every 40,000 km (25,000 miles)l
Power steering fluid Replace every 50,000 km (30,000 miles)ll
Steering system for looseness
or damage Inspect every 5,000 km (3,000 miles)l
Universal joints and sleeves Inspect for wear and lubricate every 7,500 km (4,500 miles)ll
Transmission with MT Change every 20,000 km (12,000 miles)
transfer case oil after changing at initial 10,000 km (6,000 miles)l
Transmission :
AT
Change every 32,000 km (20,000 miles) lll l
Transfer:
TF Change every 20,000 km (12,000 miles)
after changing at initial 10,000 km (6,000 miles)l
Differential oil Change every 20,000 km (12,000 miles)
after changing at initial 5,000 km (3,000 miles) l
Disc brake pads and discs Inspect every 5,000 km (3,000 miles)lll
Timing belt G : Replace every 120,000 km (75,000 miles)ll
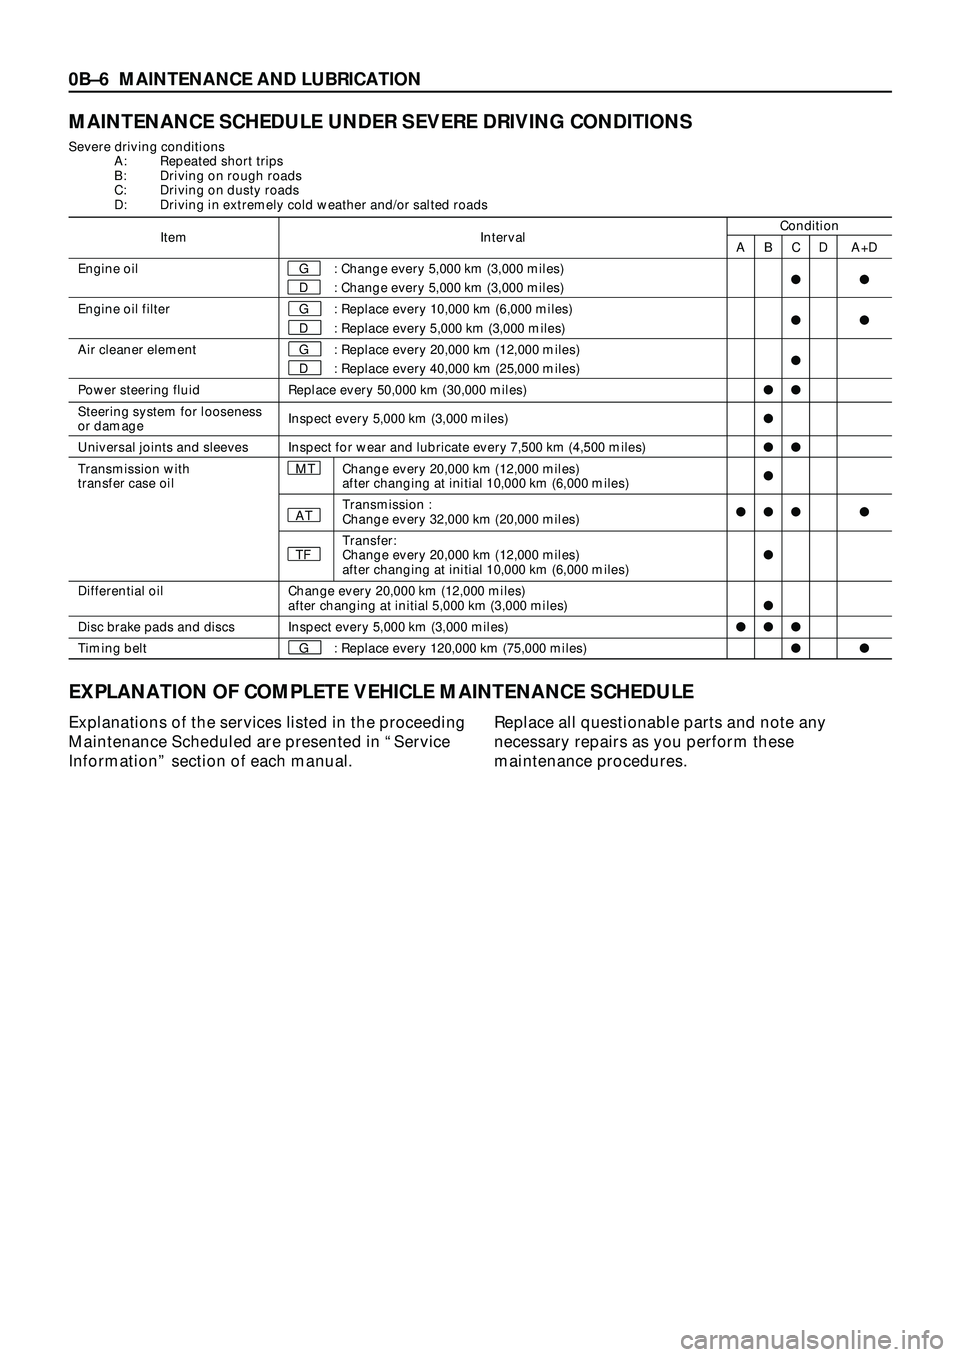
EXPLANATION OF COMPLETE VEHICLE MAINTENANCE SCHEDULE
Explanations of the services listed in the proceeding
Maintenance Scheduled are presented in ÒService
InformationÓ section of each manual.Replace all questionable parts and note any
necessary repairs as you perform these
maintenance procedures.
MAINTENANCE SCHEDULE UNDER SEVERE DRIVING CONDITIONS
Severe driving conditions
A: Repeated short trips
B: Driving on rough roads
C: Driving on dusty roads
D: Driving in extremely cold weather and/or salted roads
Page 34 of 3573
MAINTENANCE AND LUBRICATION 0BÐ7
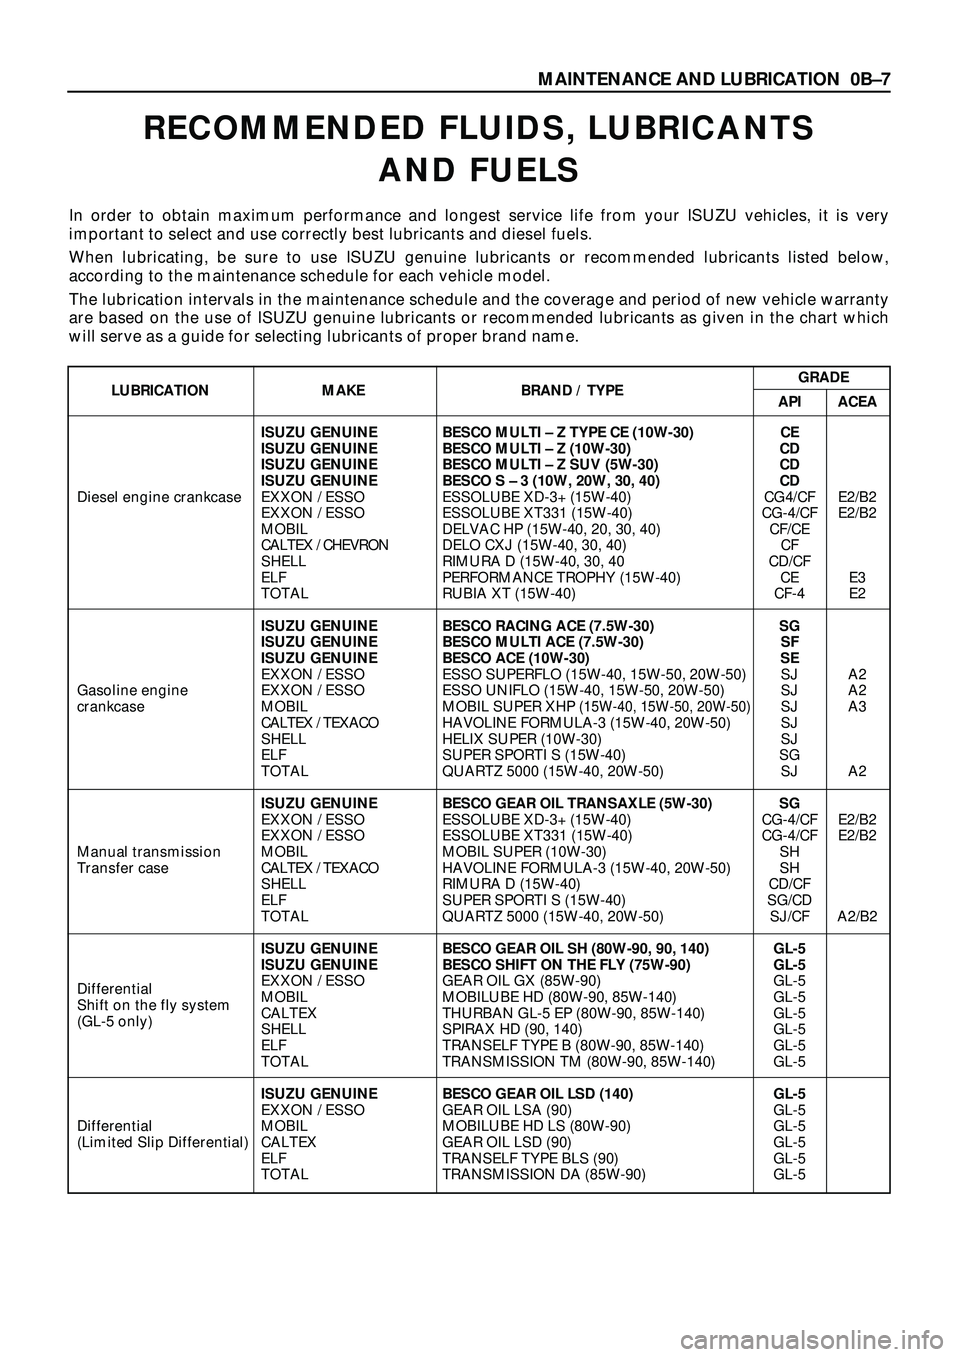
RECOMMENDED FLUIDS, LUBRICANTS
AND FUELS
In order to obtain maximum performance and longest service life from your ISUZU vehicles, it is very
important to select and use correctly best lubricants and diesel fuels.
When lubricating, be sure to use ISUZU genuine lubricants or recommended lubricants listed below,
according to the maintenance schedule for each vehicle model.
The lubrication intervals in the maintenance schedule and the coverage and period of new vehicle warranty
are based on the use of ISUZU genuine lubricants or recommended lubricants as given in the chart which
will serve as a guide for selecting lubricants of proper brand name.
LUBRICATION MAKE BRAND / TYPEGRADE
API ACEA
ISUZU GENUINE BESCO MULTI Ð Z TYPE CE (10W-30) CE
ISUZU GENUINE BESCO MULTI Ð Z (10W-30) CD
ISUZU GENUINE BESCO MULTI Ð Z SUV (5W-30) CD
ISUZU GENUINE BESCO S Ð 3 (10W, 20W, 30, 40) CD
Diesel engine crankcase EXXON / ESSO ESSOLUBE XD-3+ (15W-40) CG4/CF E2/B2
EXXON / ESSO ESSOLUBE XT331 (15W-40) CG-4/CF E2/B2
MOBIL DELVAC HP (15W-40, 20, 30, 40) CF/CE
CALTEX / CHEVRONDELO CXJ (15W-40, 30, 40) CF
SHELL RIMURA D (15W-40, 30, 40 CD/CF
ELF PERFORMANCE TROPHY (15W-40) CE E3
TOTAL RUBIA XT (15W-40) CF-4 E2
ISUZU GENUINE BESCO RACING ACE (7.5W-30) SG
ISUZU GENUINE BESCO MULTI ACE (7.5W-30) SF
ISUZU GENUINE BESCO ACE (10W-30) SE
EXXON / ESSO ESSO SUPERFLO (15W-40, 15W-50, 20W-50) SJ A2
Gasoline engine EXXON / ESSO ESSO UNIFLO (15W-40, 15W-50, 20W-50) SJ A2
crankcase MOBIL MOBIL SUPER XHP
(15W-40, 15W-50, 20W-50)SJ A3
CALTEX / TEXACOHAVOLINE FORMULA-3 (15W-40, 20W-50) SJ
SHELL HELIX SUPER (10W-30) SJ
ELF SUPER SPORTI S (15W-40) SG
TOTAL QUARTZ 5000 (15W-40, 20W-50) SJ A2
ISUZU GENUINE BESCO GEAR OIL TRANSAXLE (5W-30) SG
EXXON / ESSO ESSOLUBE XD-3+ (15W-40) CG-4/CF E2/B2
EXXON / ESSO ESSOLUBE XT331 (15W-40) CG-4/CF E2/B2
Manual transmission MOBIL MOBIL SUPER (10W-30) SH
Transfer caseCALTEX / TEXACOHAVOLINE FORMULA-3 (15W-40, 20W-50) SH
SHELL RIMURA D (15W-40) CD/CF
ELF SUPER SPORTI S (15W-40) SG/CD
TOTAL QUARTZ 5000 (15W-40, 20W-50) SJ/CF A2/B2
ISUZU GENUINE BESCO GEAR OIL SH (80W-90, 90, 140) GL-5
ISUZU GENUINE BESCO SHIFT ON THE FLY (75W-90) GL-5
DifferentialEXXON / ESSO GEAR OIL GX (85W-90) GL-5
Shift on the fly systemMOBIL MOBILUBE HD (80W-90, 85W-140) GL-5
(GL-5 only)CALTEX THURBAN GL-5 EP (80W-90, 85W-140) GL-5
SHELL SPIRAX HD (90, 140) GL-5
ELF TRANSELF TYPE B (80W-90, 85W-140) GL-5
TOTAL TRANSMISSION TM (80W-90, 85W-140) GL-5
ISUZU GENUINE BESCO GEAR OIL LSD (140) GL-5
EXXON / ESSO GEAR OIL LSA (90) GL-5
Differential MOBIL MOBILUBE HD LS (80W-90) GL-5
(Limited Slip Differential) CALTEX GEAR OIL LSD (90) GL-5
ELF TRANSELF TYPE BLS (90) GL-5
TOTAL TRANSMISSION DA (85W-90) GL-5
Page 35 of 3573
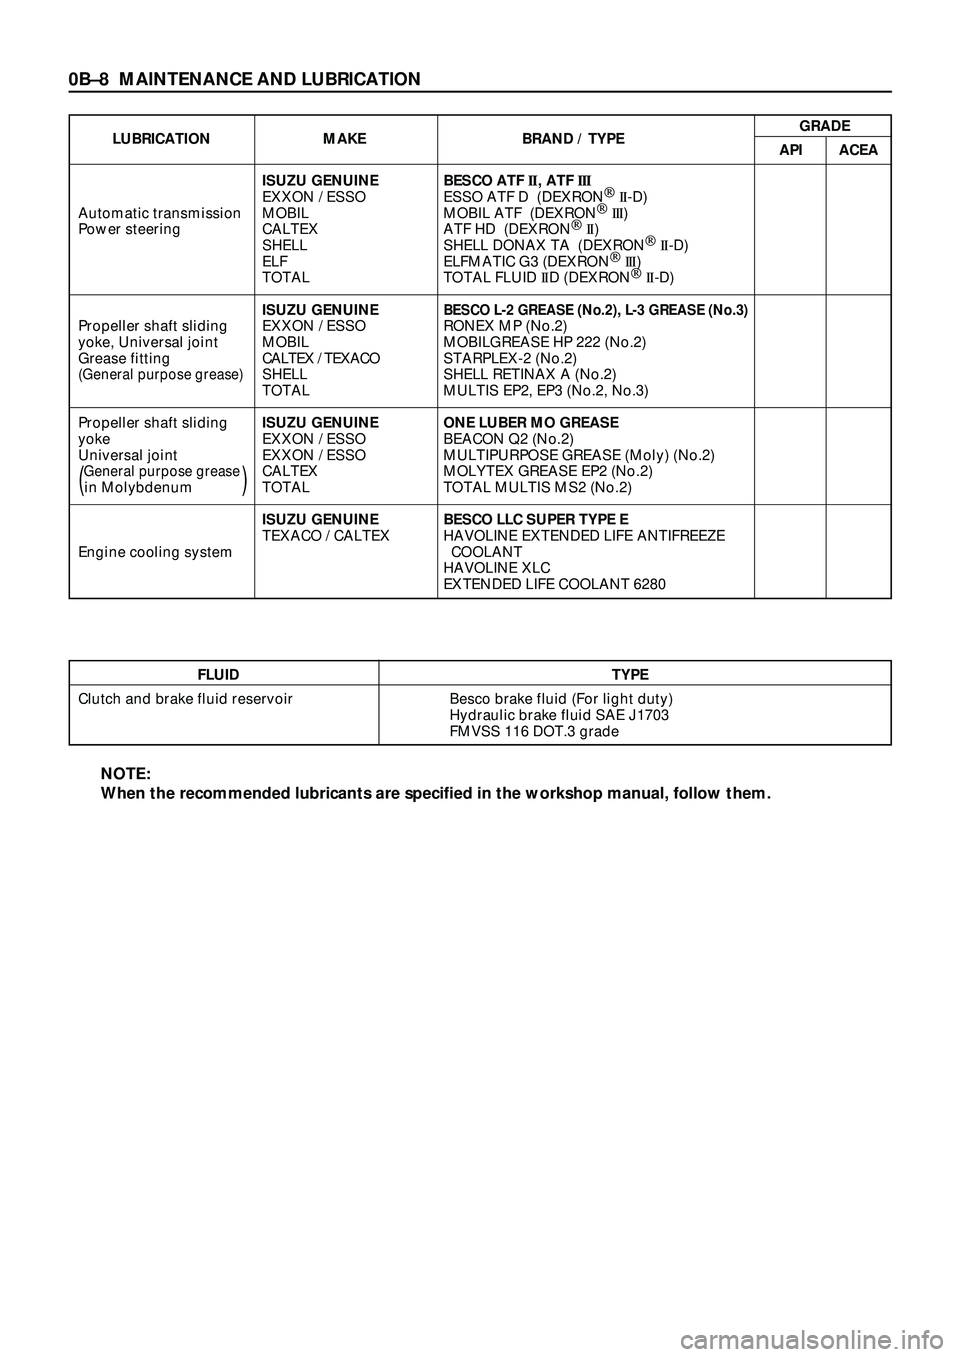
0BÐ8 MAINTENANCE AND LUBRICATION
FLUID TYPE
Clutch and brake fluid reservoir Besco brake fluid (For light duty)
Hydraulic brake fluid SAE J1703
FMVSS 116 DOT.3 grade
LUBRICATION MAKE BRAND / TYPEGRADE
API ACEA
ISUZU GENUINE BESCO ATF II, ATF III
EXXON / ESSO ESSO ATF D (DEXRONÒ
II-D)
Automatic transmission MOBIL MOBIL ATF (DEXRONÒ
III)
Power steering CALTEX ATF HD (DEXRONÒ
II)
SHELL SHELL DONAX TA (DEXRONÒ
II-D)
ELF ELFMATIC G3 (DEXRONÒ
III)
TOTAL TOTAL FLUID IID (DEXRONÒ
II-D)
ISUZU GENUINE
BESCO L-2 GREASE (No.2), L-3 GREASE (No.3)Propeller shaft sliding EXXON / ESSO RONEX MP (No.2)
yoke, Universal joint MOBIL MOBILGREASE HP 222 (No.2)
Grease fittingCALTEX / TEXACOSTARPLEX-2 (No.2)
(General purpose grease)SHELL SHELL RETINAX A (No.2)
TOTAL MULTIS EP2, EP3 (No.2, No.3)
Propeller shaft slidingISUZU GENUINE ONE LUBER MO GREASE
yoke EXXON / ESSO BEACON Q2 (No.2)
Universal joint EXXON / ESSO MULTIPURPOSE GREASE (Moly) (No.2)
General purpose greaseCALTEX MOLYTEX GREASE EP2 (No.2)(in Molybdenum)TOTAL TOTAL MULTIS MS2 (No.2)
ISUZU GENUINE BESCO LLC SUPER TYPE E
TEXACO / CALTEX HAVOLINE EXTENDED LIFE ANTIFREEZE
Engine cooling system COOLANT
HAVOLINE XLC
EXTENDED LIFE COOLANT 6280
NOTE:
When the recommended lubricants are specified in the workshop manual, follow them.
Page 730 of 3573

TRANSFER CASE (STANDARD TYPE)
4D1±9
266RW002
7. Connect the rear propeller shaft to the transfer case
and tighten to the specified torque.
Torque: 63 N´m (6.4kg´m/46 lb ft)
Transfer Case Assembly
Removal
NOTE: Before removing the transmission & transfer
assembly from the vehicle, change the transfer mode to
2WD by pushing button switch on dash panel. (4WD
Switch Model)
1. Disconnect the battery ground cable.
2. Drain the transfer case fluid, if overhauling the
transter case assembly.
3. Remove the exhaust and transfer protectors.
4. Remove the rear and front propeller shafts from the
transfer case side.
5. Remove the transfer control lever knob.
6. Disconnect the harness connectors and remove the
front console.
7. Remove the selector lever assembly. Refer to
Selector Lever in the Section 7A.
8. Remove the transfer control lever.
9. Disconnect the 4WD switch connector, speed sensor
harness connector and 2WD±4WD actuator harness
connector (4WD Switch Model) from the transmission
harness.10. Support the transfer case with a transmission jack.
11. Remove the transmission±transfer bolts and the nut
(M/T).
12. Remove the transfer case assembly from the vehicle.
Page 847 of 3573

5A±37 BRAKE CONTROL SYSTEM
StepNo Ye s
Action
5Is front 4WD controller normal?
Replace EHCU.
Go to Step 9
Replace 4WD
controller or
repair harness.
Go to Step 9
6Is transmission input normal? (Chart C-2 or TC-2)
Go to Step 7
Replace SW or
repair harness
Go to Step 9
7Is front 4WD controller normal?
Go to Step 8
Replace 4WD
controller or
repair harness.
Go to Step 9
8Is hydraulic unit grounded properly?Replace EHCU.
Go to Step 9Correct.
Go to Step 9
9Reconnect all components, ensure all components are properly
mounted.
Was this step finished?Repeat the ªBasic
diagnostic flow
chart.º
Go to Step 9
Chart A-4 Brake Pedal Feed Is Abnormal
StepActionYe sNo
1Is the stop light actuated when the brake pedal is depressed?Go to Step 2Go to Step 3
21. Turn the ignition switch off.
2. Disconnected EHCU connector.
3. Measure voltage between the EHCU connector terminal 10
and 15 when brake pedal is depressed.
Is the voltage equal to the battery voltage?
Go to Step 4
Harness NG
between brake
SW and EHCU.
Go to Step 7
3Is stop light fuse C-14 normal?
Go to Step 5
Replace fuse
C-14.
Go to Step 7
4Is there continuity between EHCU connector terminals, 12 and 15
to body ground?
Go to Step 6
Repair body
grounded
harness.
Go to Step 7
5Is the brake SW normal?Repair stop light
harness.
Go to Step 7Replace brake
SW.
Go to Step 7
6Is the check harness/connector for suspended disconnection?Hydraulic system
leakage or air
entry (Refer to
servicing
ªLeakage or
brake fluidº )
Go to Step 7
Repair harness.
Go to Step 7
7Reconnect all components and ensure all components are
properly mounted.
Was this step finished?Repeat the ªBasic
diagnostic flow
chart.º
Go to Step 7
Page 881 of 3573
POWER ASSISTED BRAKE SYSTEM 5C – 3
BRAKE SYSTEM DIAGNOSIS
ROAD TESTING THE BRAKES
Brake Test
Brakes should be tested on a dry, clean, reasonably
smooth and level roadway. A true test of brake
performance cannot be made if the roadway is wet,
greasy or covered with loose dirt so that all tires do
not grip the road equally. Testing will also be
adversely affected if the roadway is crowned so as to
throw the weight of the vehicle toward wheels on one
side or if the roadway is so rough that wheels tend to
bounce. Test the brakes at different vehicle speeds
with both light and heavy pedal pressure; however,
avoid locking the wheels and sliding the tires. Locked
wheels and sliding tires do not indicate brake
efficiency, since heavily braked but turning wheels
will stop the vehicle in less distance than locked
wheels. More tire-to-road friction is present with a
heavily braked turning tire then with a sliding tire.
The standard brake system is designed and balanced
to avoid locking the wheels except at very high
deceleration levels.
It is designed this way because the shortest stopping
distance and best control is achieved without brake
lock-up.
Because of high deceleration capability, a firmer pedal
may be felt at higher deceleration levels.
External Conditions That Affect Brake
Performance
1. Tires: Tires having unequal contact and grip on the
road will cause unequal braking. Tires must be
equally inflated, identical in size, and the tread
pattern of right and left tires must be
approximately equal.
2. Vehicle loading: A heavily loaded vehicle requires
more braking effort.
3. Wheel Alignment: Misalignment of the wheels,
particularly in regard to excessive camber and
caster, will cause the brakes to pull to one side.
BRAKE FLUID LEAKS
With engine running at idle and the transmission in
“Neutral”, depress the brake pedal and hold a
constant foot pressure on the pedal. If pedal gradually
falls away with the constant pressure, the hydraulic
system may be leaking.
Check the master cylinder fluid level. While a slight
drop in reservoir level will result from normal lining
wear, an abnormally low level in resevoir indicates a
leak in the system. The hydraulic system may be
leaking internally as well as externally. Refer to
“Master Cylinder Inspection”. Also, the system may
appear to pass this test but still have slight leakage. If
fluid level is normal, check the vacuum booster push