1998 ISUZU TROOPER brake fluid
[x] Cancel search: brake fluidPage 16 of 3573
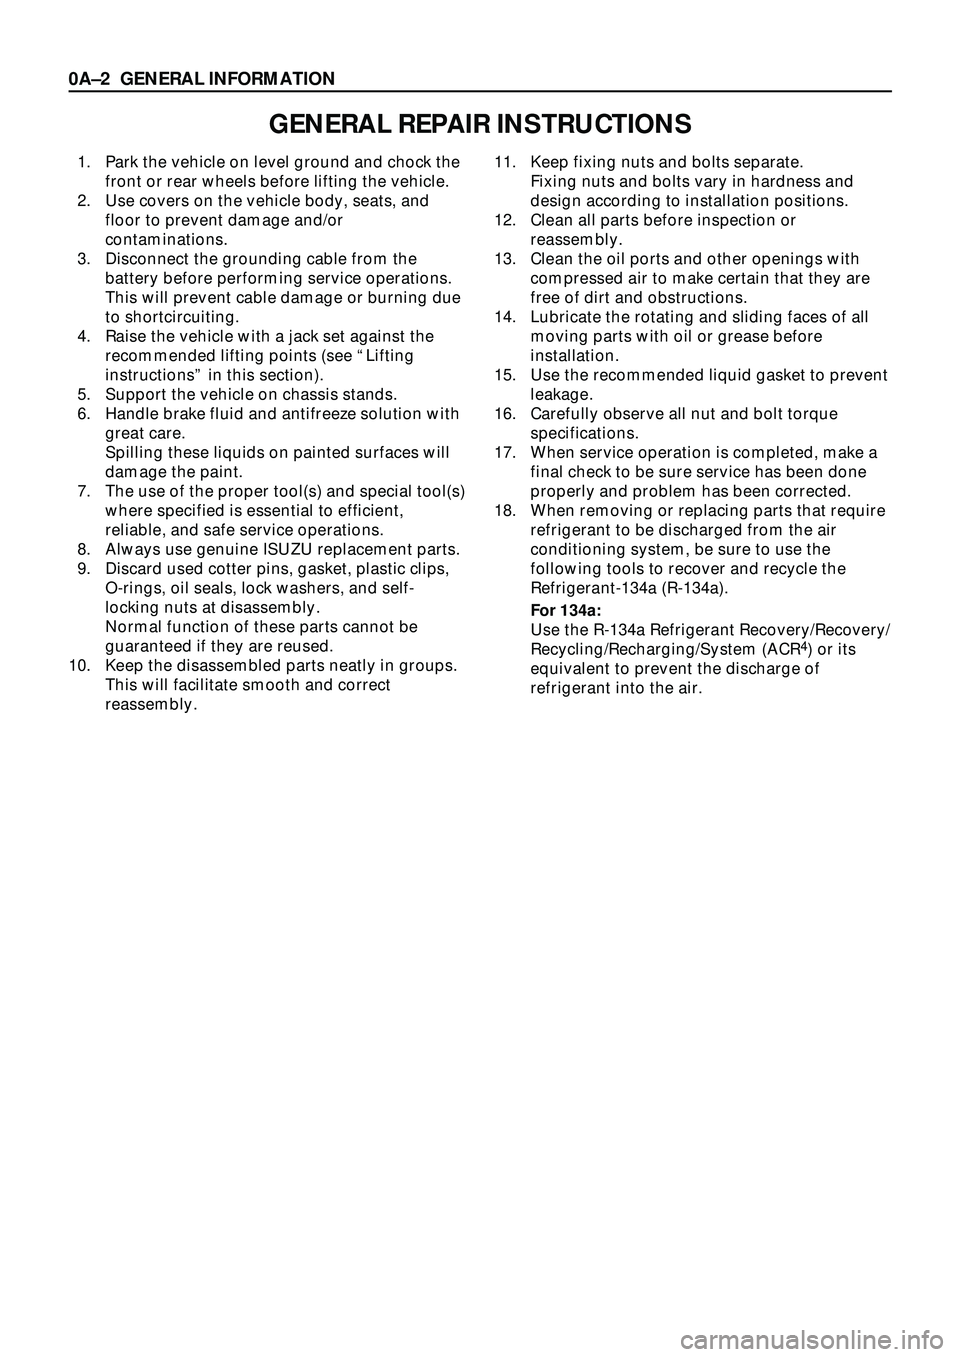
GENERAL REPAIR INSTRUCTIONS
1. Park the vehicle on level ground and chock the
front or rear wheels before lifting the vehicle.
2. Use covers on the vehicle body, seats, and
floor to prevent damage and/or
contaminations.
3. Disconnect the grounding cable from the
battery before performing service operations.
This will prevent cable damage or burning due
to shortcircuiting.
4. Raise the vehicle with a jack set against the
recommended lifting points (see ÒLifting
instructionsÓ in this section).
5. Support the vehicle on chassis stands.
6. Handle brake fluid and antifreeze solution with
great care.
Spilling these liquids on painted surfaces will
damage the paint.
7. The use of the proper tool(s) and special tool(s)
where specified is essential to efficient,
reliable, and safe service operations.
8. Always use genuine ISUZU replacement parts.
9. Discard used cotter pins, gasket, plastic clips,
O-rings, oil seals, lock washers, and self-
locking nuts at disassembly.
Normal function of these parts cannot be
guaranteed if they are reused.
10. Keep the disassembled parts neatly in groups.
This will facilitate smooth and correct
reassembly.11. Keep fixing nuts and bolts separate.
Fixing nuts and bolts vary in hardness and
design according to installation positions.
12. Clean all parts before inspection or
reassembly.
13. Clean the oil ports and other openings with
compressed air to make certain that they are
free of dirt and obstructions.
14. Lubricate the rotating and sliding faces of all
moving parts with oil or grease before
installation.
15. Use the recommended liquid gasket to prevent
leakage.
16. Carefully observe all nut and bolt torque
specifications.
17. When service operation is completed, make a
final check to be sure service has been done
properly and problem has been corrected.
18. When removing or replacing parts that require
refrigerant to be discharged from the air
conditioning system, be sure to use the
following tools to recover and recycle the
Refrigerant-134a (R-134a).
For 134a:
Use the R-134a Refrigerant Recovery/Recovery/
Recycling/Recharging/System (ACR
4) or its
equivalent to prevent the discharge of
refrigerant into the air.
0AÐ2 GENERAL INFORMATION
Page 29 of 3573
0BÐ2 MAINTENANCE AND LUBRICATION
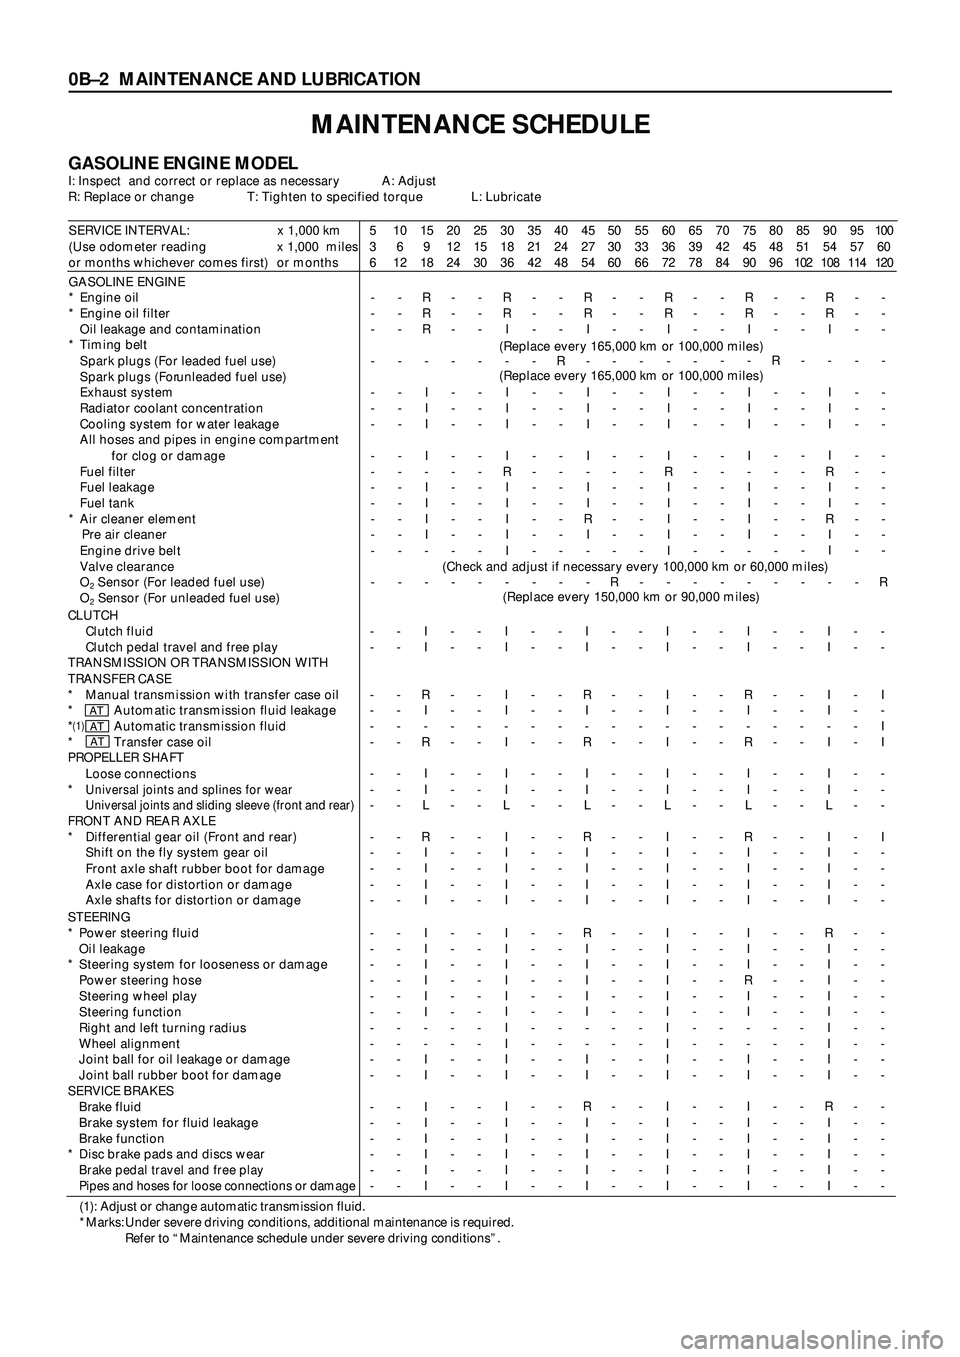
MAINTENANCE SCHEDULE
GASOLINE ENGINE MODELI: Inspect and correct or replace as necessary A: Adjust
R: Replace or change T: Tighten to specified torque L: Lubricate
SERVICE INTERVAL: x 1,000 km
(Use odometer reading x 1,000 miles
or months whichever comes first) or months5
3
610
6
1215
9
1820
12
2425
15
3030
18
3635
21
4240
24
4845
27
5450
30
6055
33
6660
36
7265
39
7870
42
8475
45
9080
48
9685
51
10290
54
10895
57
114100
60
120
GASOLINE ENGINE
* Engine oil
* Engine oil filter
Oil leakage and contamination
* Timing belt
Spark plugs (For leaded fuel use)
Spark plugs (For unleaded fuel use)
Exhaust system
Radiator coolant concentration
Cooling system for water leakage
All hoses and pipes in engine compartment
for clog or damage
Fuel filter
Fuel leakage
Fuel tank
* Air cleaner element
Pre air cleaner
Engine drive belt
Valve clearance
O
2 Sensor (For leaded fuel use)
O
2 Sensor (For unleaded fuel use)-
-
-
-
-
-
-
-
-
-
-
-
-
-
--
-
-
-
-
-
-
-
-
-
-
-
-
-
-R
R
R
-
I
I
I
I
-
I
I
I
I
-
--
-
-
-
-
-
-
-
-
-
-
-
-
-
--
-
-
-
-
-
-
-
-
-
-
-
-
-
-R
R
I
-
I
I
I
I
R
I
I
I
I
I
--
-
-
-
-
-
-
-
-
-
-
-
-
-
--
-
-
R
-
-
-
-
-
-
-
-
-
-
-R
R
I
-
I
I
I
I
-
I
I
R
I
-
--
-
-
-
-
-
-
-
-
-
-
-
-
-
R-
-
-
-
-
-
-
-
-
-
-
-
-
-
-R
R
I
-
I
I
I
I
R
I
I
I
I
I
--
-
-
-
-
-
-
-
-
-
-
-
-
-
--
-
-
-
-
-
-
-
-
-
-
-
-
-
-R
R
I
-
I
I
I
I
-
I
I
I
I
-
--
-
-
R
-
-
-
-
-
-
-
-
-
-
--
-
-
-
-
-
-
-
-
-
-
-
-
-
-R
R
I
-
I
I
I
I
R
I
I
R
I
I
--
-
-
-
-
-
-
-
-
-
-
-
-
-
--
-
-
-
-
-
-
-
-
-
-
-
-
-
R
(Replace every 165,000 km or 100,000 miles)
(Replace every 165,000 km or 100,000 miles)
(Check and adjust if necessary every 100,000 km or 60,000 miles)
(Replace every 150,000 km or 90,000 miles)
CLUTCH
Clutch fluid
Clutch pedal travel and free play
TRANSMISSION OR TRANSMISSION WITH
TRANSFER CASE
* Manual transmission with transfer case oil
* Automatic transmission fluid leakage
*
(1)Automatic transmission fluid
* Transfer case oil
PROPELLER SHAFT
Loose connections
*
Universal joints and splines for wear
Universal joints and sliding sleeve (front and rear)
FRONT AND REAR AXLE
* Differential gear oil (Front and rear)
Shift on the fly system gear oil
Front axle shaft rubber boot for damage
Axle case for distortion or damage
Axle shafts for distortion or damage-
-
-
-
-
-
-
-
-
-
-
-
-
--
-
-
-
-
-
-
-
-
-
-
-
-
-I
I
R
I
-
R
I
I
L
R
I
I
I
I-
-
-
-
-
-
-
-
-
-
-
-
-
--
-
-
-
-
-
-
-
-
-
-
-
-
-I
I
I
I
-
I
I
I
L
I
I
I
I
I-
-
-
-
-
-
-
-
-
-
-
-
-
--
-
-
-
-
-
-
-
-
-
-
-
-
-I
I
R
I
-
R
I
I
L
R
I
I
I
I-
-
-
-
-
-
-
-
-
-
-
-
-
--
-
-
-
-
-
-
-
-
-
-
-
-
-I
I
I
I
-
I
I
I
L
I
I
I
I
I-
-
-
-
-
-
-
-
-
-
-
-
-
--
-
-
-
-
-
-
-
-
-
-
-
-
-I
I
R
I
-
R
I
I
L
R
I
I
I
I-
-
-
-
-
-
-
-
-
-
-
-
-
--
-
-
-
-
-
-
-
-
-
-
-
-
-I
I
I
I
-
I
I
I
L
I
I
I
I
I-
-
-
-
-
-
-
-
-
-
-
-
-
--
-
I
-
I
I
-
-
-
I
-
-
-
-
ATATAT
STEERING
* Power steering fluid
Oil leakage
* Steering system for looseness or damage
Power steering hose
Steering wheel play
Steering function
Right and left turning radius
Wheel alignment
Joint ball for oil leakage or damage
Joint ball rubber boot for damage
SERVICE BRAKES
Brake fluid
Brake system for fluid leakage
Brake function
* Disc brake pads and discs wear
Brake pedal travel and free play
Pipes and hoses for loose connections or damage
-
-
-
-
-
-
-
-
-
-
-
-
-
-
-
--
-
-
-
-
-
-
-
-
-
-
-
-
-
-
-I
I
I
I
I
I
-
-
I
I
I
I
I
I
I
I-
-
-
-
-
-
-
-
-
-
-
-
-
-
-
--
-
-
-
-
-
-
-
-
-
-
-
-
-
-
-I
I
I
I
I
I
I
I
I
I
I
I
I
I
I
I-
-
-
-
-
-
-
-
-
-
-
-
-
-
-
--
-
-
-
-
-
-
-
-
-
-
-
-
-
-
-R
I
I
I
I
I
-
-
I
I
R
I
I
I
I
I-
-
-
-
-
-
-
-
-
-
-
-
-
-
-
--
-
-
-
-
-
-
-
-
-
-
-
-
-
-
-I
I
I
I
I
I
I
I
I
I
I
I
I
I
I
I-
-
-
-
-
-
-
-
-
-
-
-
-
-
-
--
-
-
-
-
-
-
-
-
-
-
-
-
-
-
-I
I
I
R
I
I
-
-
I
I
I
I
I
I
I
I-
-
-
-
-
-
-
-
-
-
-
-
-
-
-
--
-
-
-
-
-
-
-
-
-
-
-
-
-
-
-R
I
I
I
I
I
I
I
I
I
R
I
I
I
I
I-
-
-
-
-
-
-
-
-
-
-
-
-
-
-
--
-
-
-
-
-
-
-
-
-
-
-
-
-
-
-
(1): Adjust or change automatic transmission fluid.
*Marks: Under severe driving conditions, additional maintenance is required.
Refer to “Maintenance schedule under severe driving conditions”.
Page 31 of 3573
0BÐ4 MAINTENANCE AND LUBRICATION
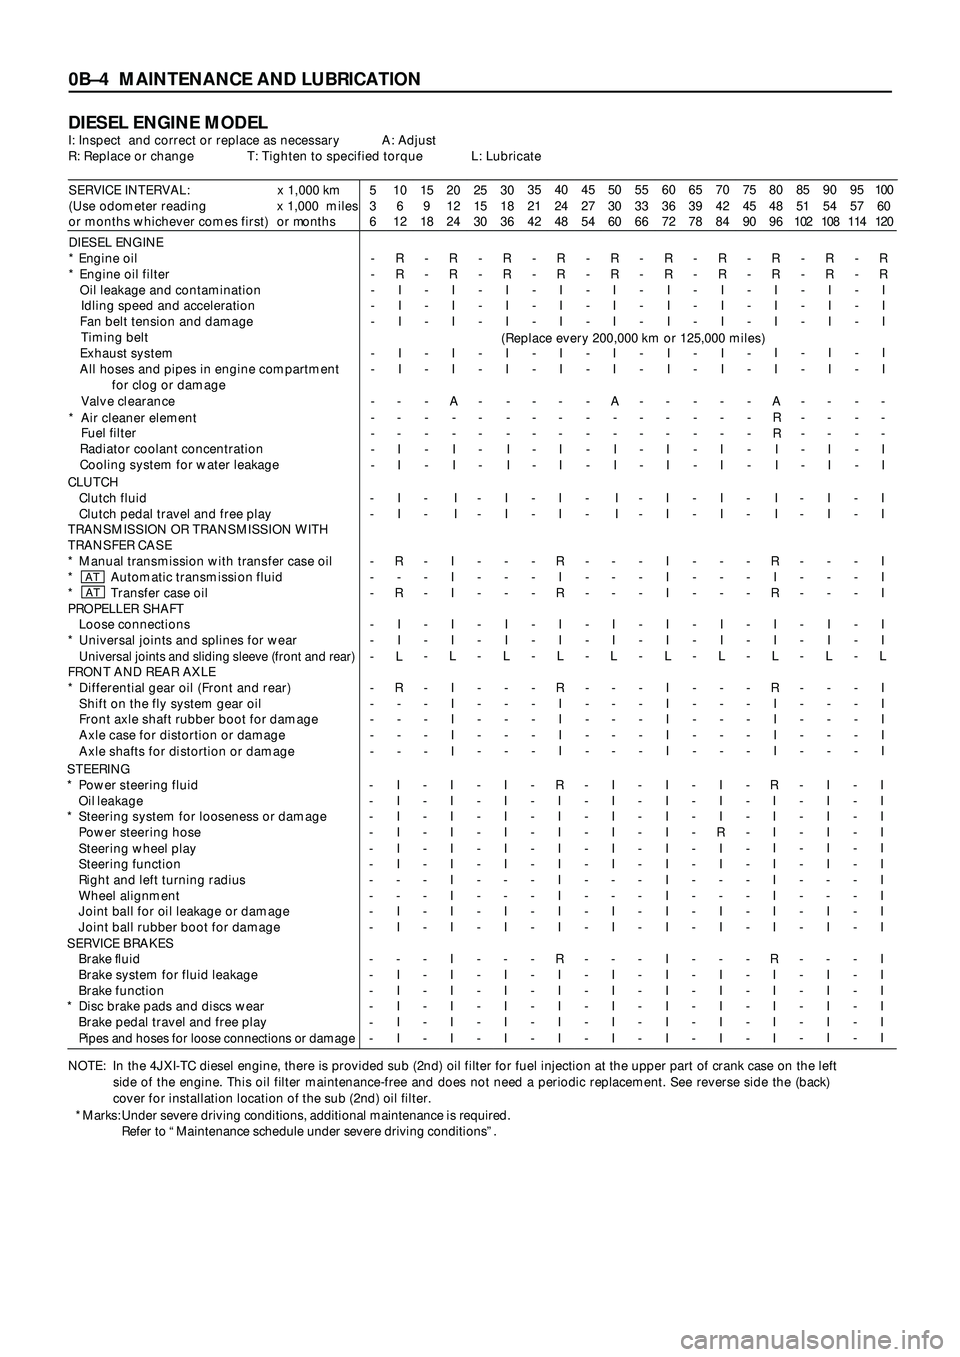
DIESEL ENGINE MODELI: Inspect and correct or replace as necessary A: Adjust
R: Replace or change T: Tighten to specified torque L: Lubricate
SERVICE INTERVAL: x 1,000 km
(Use odometer reading x 1,000 miles
or months whichever comes first) or months5
3
610
6
1215
9
1820
12
2425
15
3030
18
3635
21
4240
24
4845
27
5450
30
6055
33
6660
36
7265
39
7870
42
8475
45
9080
48
9685
51
10290
54
10895
57
114100
60
120
DIESEL ENGINE
* Engine oil
* Engine oil filter
Oil leakage and contamination
Idling speed and acceleration
Fan belt tension and damage
Timing belt
Exhaust system
All hoses and pipes in engine compartment
for clog or damage
Valve clearance
* Air cleaner element
Fuel filter
Radiator coolant concentration
Cooling system for water leakage-
-
-
-
-
-
-
-
-
-
-
-R
R
I
I
I
I
I
-
-
-
I
I-
-
-
-
-
-
-
-
-
-
-
-R
R
I
I
I
I
I
A
-
-
I
I-
-
-
-
-
-
-
-
-
-
-
-R
R
I
I
I
I
I
-
-
-
I
I-
-
-
-
-
-
-
-
-
-
-
-R
R
I
I
I
I
I
-
-
-
I
I-
-
-
-
-
-
-
-
-
-
-
-R
R
I
I
I
I
I
A
-
-
I
I-
-
-
-
-
-
-
-
-
-
-
-R
R
I
I
I
I
I
-
-
-
I
I-
-
-
-
-
-
-
-
-
-
-
-R
R
I
I
I
I
I
-
-
-
I
I-
-
-
-
-
-
-
-
-
-
-
-R
R
I
I
I
I
I
A
R
R
I
I-
-
-
-
-
-
-
-
-
-
-
-R
R
I
I
I
I
I
-
-
-
I
I-
-
-
-
-
-
-
-
-
-
-
-R
R
I
I
I
I
I
-
-
-
I
I
NOTE: In the 4JXI-TC diesel engine, there is provided sub (2nd) oil filter for fuel injection at the upper part of crank case on the left
side of the engine. This oil filter maintenance-free and does not need a periodic replacement. See reverse side the (back)
cover for installation location of the sub (2nd) oil filter.(Replace every 200,000 km or 125,000 miles)
*Marks: Under severe driving conditions, additional maintenance is required.
Refer to “Maintenance schedule under severe driving conditions”. CLUTCH
Clutch fluid
Clutch pedal travel and free play
TRANSMISSION OR TRANSMISSION WITH
TRANSFER CASE
* Manual transmission with transfer case oil
* Automatic transmission fluid
* Transfer case oil
PROPELLER SHAFT
Loose connections
* Universal joints and splines for wear
Universal joints and sliding sleeve (front and rear)FRONT AND REAR AXLE
* Differential gear oil (Front and rear)
Shift on the fly system gear oil
Front axle shaft rubber boot for damage
Axle case for distortion or damage
Axle shafts for distortion or damage-
-
-
-
-
-
-
-
-
-
-
-
-I
I
R
-
R
I
I
L
R
-
-
-
--
-
-
-
-
-
-
-
-
-
-
-
-I
I
I
I
I
I
I
L
I
I
I
I
I-
-
-
-
-
-
-
-
-
-
-
-
-I
I
-
-
-
I
I
L
-
-
-
-
--
-
-
-
-
-
-
-
-
-
-
-
-I
I
R
I
R
I
I
L
R
I
I
I
I-
-
-
-
-
-
-
-
-
-
-
-
-I
I
-
-
-
I
I
L
-
-
-
-
--
-
-
-
-
-
-
-
-
-
-
-
-I
I
I
I
I
I
I
L
I
I
I
I
I-
-
-
-
-
-
-
-
-
-
-
-
-I
I
-
-
-
I
I
L
-
-
-
-
--
-
-
-
-
-
-
-
-
-
-
-
-I
I
R
I
R
I
I
L
R
I
I
I
I-
-
-
-
-
-
-
-
-
-
-
-
-I
I
-
-
-
I
I
L
-
-
-
-
--
-
-
-
-
-
-
-
-
-
-
-
-I
I
I
I
I
I
I
L
I
I
I
I
I
ATAT
STEERING
* Power steering fluid
Oil leakage
* Steering system for looseness or damage
Power steering hose
Steering wheel play
Steering function
Right and left turning radius
Wheel alignment
Joint ball for oil leakage or damage
Joint ball rubber boot for damage
SERVICE BRAKES
Brake fluid
Brake system for fluid leakage
Brake function
* Disc brake pads and discs wear
Brake pedal travel and free play
Pipes and hoses for loose connections or damage
-
-
-
-
-
-
-
-
-
-
-
-
-
-
-
-I
I
I
I
I
I
-
-
I
I
-
I
I
I
I
I-
-
-
-
-
-
-
-
-
-
-
-
-
-
-
-I
I
I
I
I
I
I
I
I
I
I
I
I
I
I
I-
-
-
-
-
-
-
-
-
-
-
-
-
-
-
-I
I
I
I
I
I
-
-
I
I
-
I
I
I
I
I-
-
-
-
-
-
-
-
-
-
-
-
-
-
-
-R
I
I
I
I
I
I
I
I
I
R
I
I
I
I
I-
-
-
-
-
-
-
-
-
-
-
-
-
-
-
-I
I
I
I
I
I
-
-
I
I
-
I
I
I
I
I-
-
-
-
-
-
-
-
-
-
-
-
-
-
-
-I
I
I
I
I
I
I
I
I
I
I
I
I
I
I
I-
-
-
-
-
-
-
-
-
-
-
-
-
-
-
-I
I
I
R
I
I
-
-
I
I
-
I
I
I
I
I-
-
-
-
-
-
-
-
-
-
-
-
-
-
-
-R
I
I
I
I
I
I
I
I
I
R
I
I
I
I
I-
-
-
-
-
-
-
-
-
-
-
-
-
-
-
-I
I
I
I
I
I
-
-
I
I
-
I
I
I
I
I-
-
-
-
-
-
-
-
-
-
-
-
-
-
-
-I
I
I
I
I
I
I
I
I
I
I
I
I
I
I
I
Page 33 of 3573
0BÐ6 MAINTENANCE AND LUBRICATION
Item IntervalCondition
ABCD A+D
Engine oil G : Change every 5,000 km (3,000 miles)
D : Change every 5,000 km (3,000 miles) ll
Engine oil filter G : Replace every 10,000 km (6,000 miles)
D : Replace every 5,000 km (3,000 miles) ll
Air cleaner element G : Replace every 20,000 km (12,000 miles)
D : Replace every 40,000 km (25,000 miles)l
Power steering fluid Replace every 50,000 km (30,000 miles)ll
Steering system for looseness
or damage Inspect every 5,000 km (3,000 miles)l
Universal joints and sleeves Inspect for wear and lubricate every 7,500 km (4,500 miles)ll
Transmission with MT Change every 20,000 km (12,000 miles)
transfer case oil after changing at initial 10,000 km (6,000 miles)l
Transmission :
AT
Change every 32,000 km (20,000 miles) lll l
Transfer:
TF Change every 20,000 km (12,000 miles)
after changing at initial 10,000 km (6,000 miles)l
Differential oil Change every 20,000 km (12,000 miles)
after changing at initial 5,000 km (3,000 miles) l
Disc brake pads and discs Inspect every 5,000 km (3,000 miles)lll
Timing belt G : Replace every 120,000 km (75,000 miles)ll
EXPLANATION OF COMPLETE VEHICLE MAINTENANCE SCHEDULE
Explanations of the services listed in the proceeding
Maintenance Scheduled are presented in ÒService
InformationÓ section of each manual.Replace all questionable parts and note any
necessary repairs as you perform these
maintenance procedures.
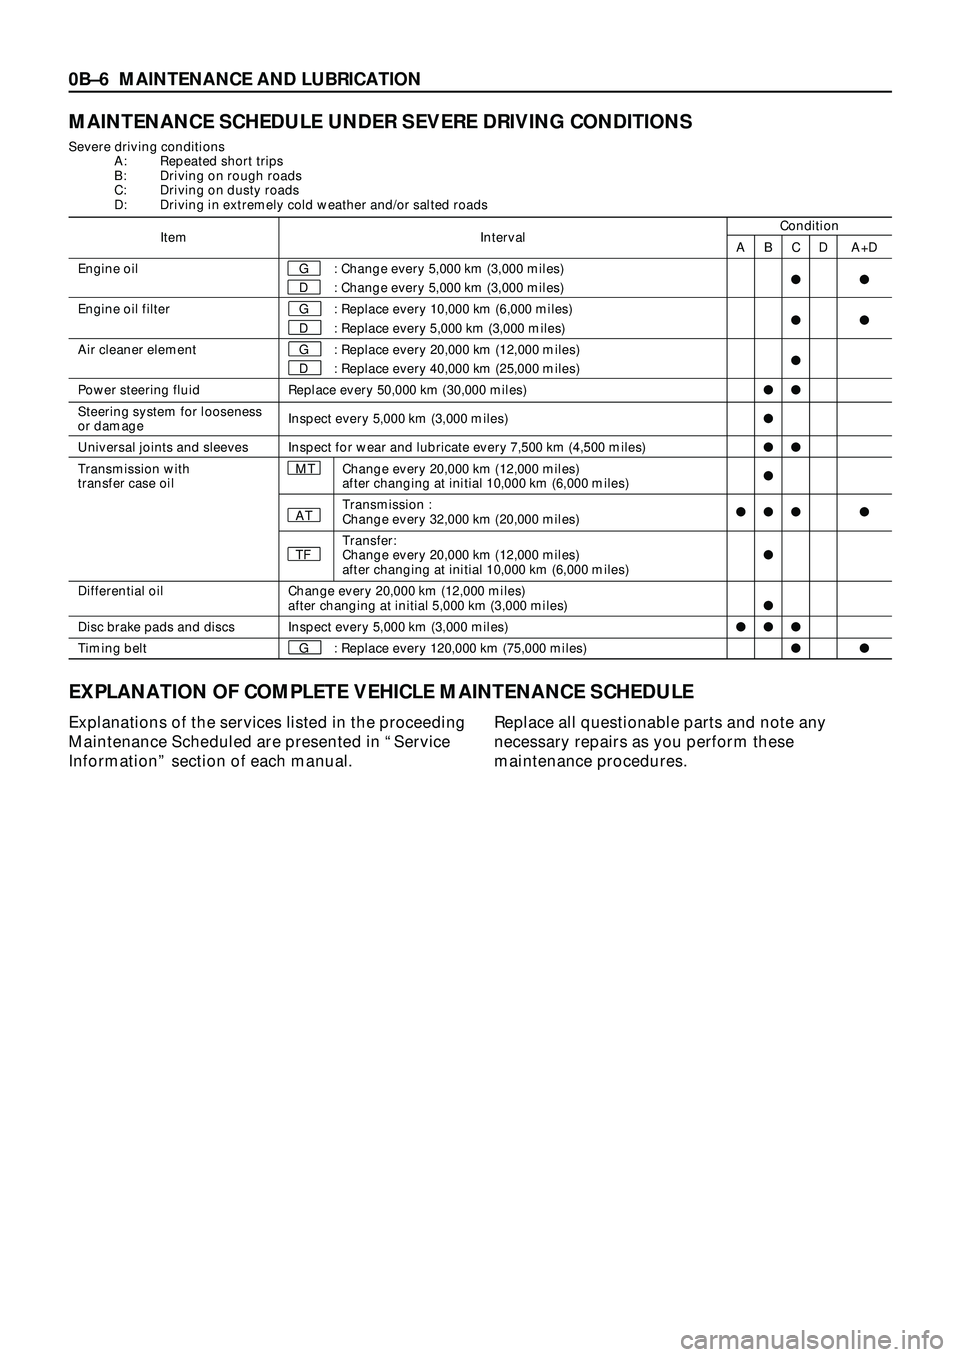
MAINTENANCE SCHEDULE UNDER SEVERE DRIVING CONDITIONS
Severe driving conditions
A: Repeated short trips
B: Driving on rough roads
C: Driving on dusty roads
D: Driving in extremely cold weather and/or salted roads
Page 35 of 3573
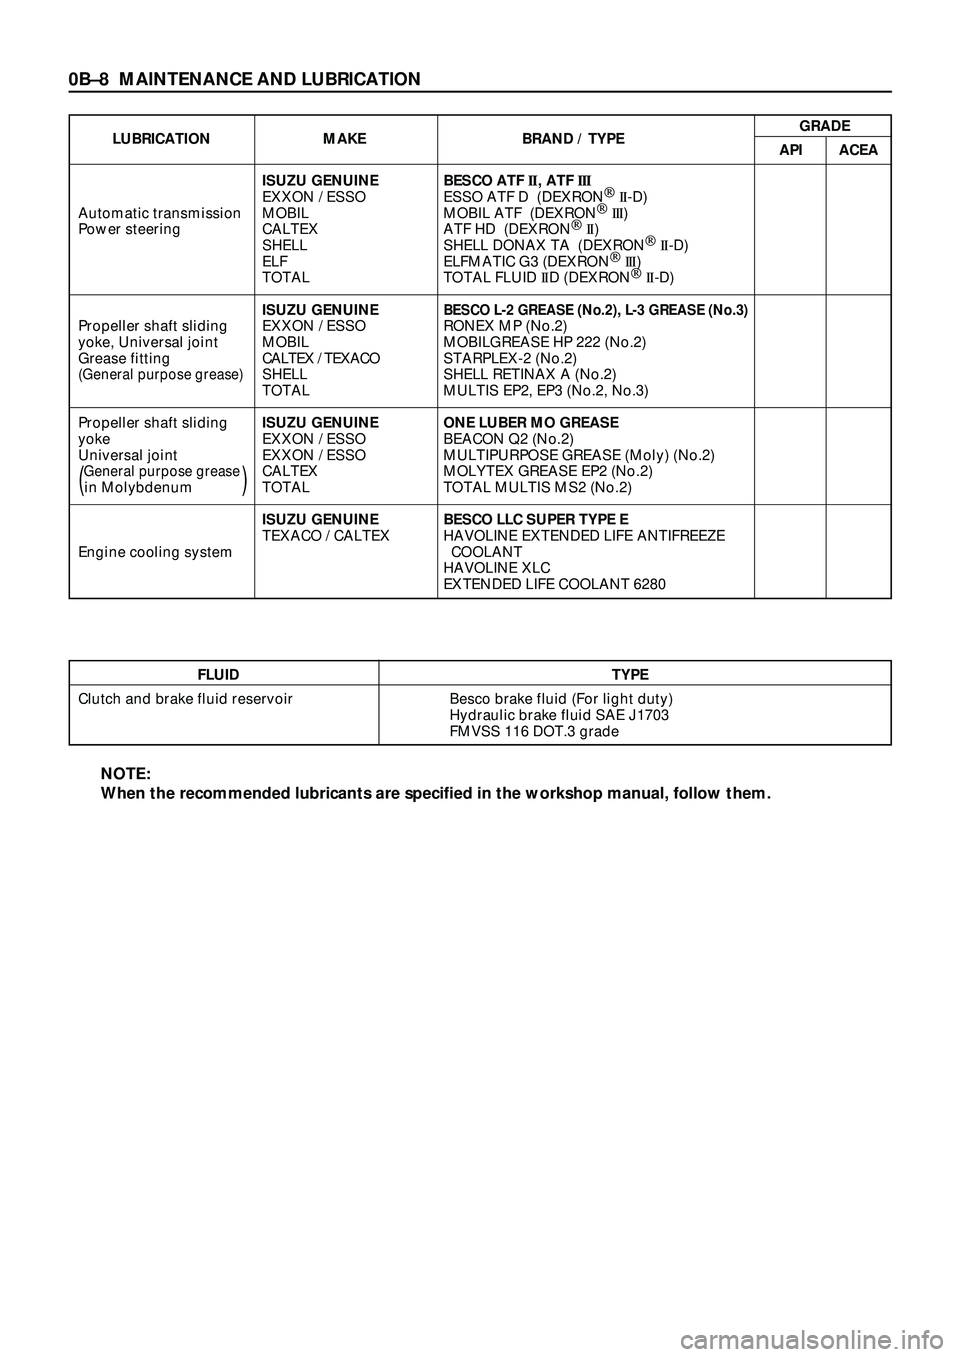
0BÐ8 MAINTENANCE AND LUBRICATION
FLUID TYPE
Clutch and brake fluid reservoir Besco brake fluid (For light duty)
Hydraulic brake fluid SAE J1703
FMVSS 116 DOT.3 grade
LUBRICATION MAKE BRAND / TYPEGRADE
API ACEA
ISUZU GENUINE BESCO ATF II, ATF III
EXXON / ESSO ESSO ATF D (DEXRONÒ
II-D)
Automatic transmission MOBIL MOBIL ATF (DEXRONÒ
III)
Power steering CALTEX ATF HD (DEXRONÒ
II)
SHELL SHELL DONAX TA (DEXRONÒ
II-D)
ELF ELFMATIC G3 (DEXRONÒ
III)
TOTAL TOTAL FLUID IID (DEXRONÒ
II-D)
ISUZU GENUINE
BESCO L-2 GREASE (No.2), L-3 GREASE (No.3)Propeller shaft sliding EXXON / ESSO RONEX MP (No.2)
yoke, Universal joint MOBIL MOBILGREASE HP 222 (No.2)
Grease fittingCALTEX / TEXACOSTARPLEX-2 (No.2)
(General purpose grease)SHELL SHELL RETINAX A (No.2)
TOTAL MULTIS EP2, EP3 (No.2, No.3)
Propeller shaft slidingISUZU GENUINE ONE LUBER MO GREASE
yoke EXXON / ESSO BEACON Q2 (No.2)
Universal joint EXXON / ESSO MULTIPURPOSE GREASE (Moly) (No.2)
General purpose greaseCALTEX MOLYTEX GREASE EP2 (No.2)(in Molybdenum)TOTAL TOTAL MULTIS MS2 (No.2)
ISUZU GENUINE BESCO LLC SUPER TYPE E
TEXACO / CALTEX HAVOLINE EXTENDED LIFE ANTIFREEZE
Engine cooling system COOLANT
HAVOLINE XLC
EXTENDED LIFE COOLANT 6280
NOTE:
When the recommended lubricants are specified in the workshop manual, follow them.
Page 289 of 3573
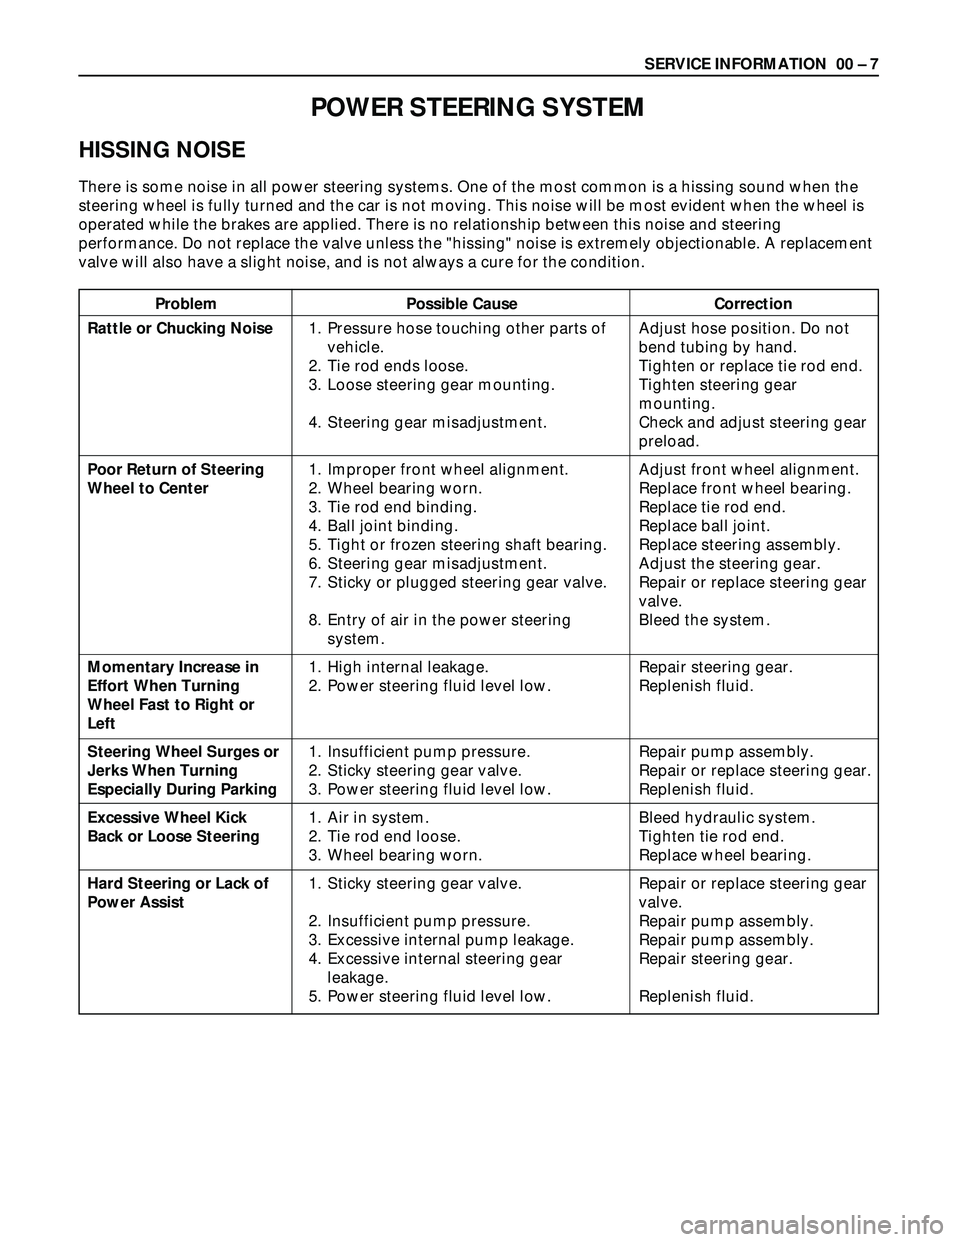
SERVICE INFORMATION 00 – 7
Problem Possible Cause Correction
POWER STEERING SYSTEM
HISSING NOISE
There is some noise in all power steering systems. One of the most common is a hissing sound when the
steering wheel is fully turned and the car is not moving. This noise will be most evident when the wheel is
operated while the brakes are applied. There is no relationship between this noise and steering
performance. Do not replace the valve unless the "hissing" noise is extremely objectionable. A replacement
valve will also have a slight noise, and is not always a cure for the condition.
Rattle or Chucking Noise
Poor Return of Steering
Wheel to Center
Momentary Increase in
Effort When Turning
Wheel Fast to Right or
Left
Steering Wheel Surges or
Jerks When Turning
Especially During Parking
Excessive Wheel Kick
Back or Loose Steering
Hard Steering or Lack of
Power Assist1. Pressure hose touching other parts of
vehicle.
2. Tie rod ends loose.
3. Loose steering gear mounting.
4. Steering gear misadjustment.
1. Improper front wheel alignment.
2. Wheel bearing worn.
3. Tie rod end binding.
4. Ball joint binding.
5. Tight or frozen steering shaft bearing.
6. Steering gear misadjustment.
7. Sticky or plugged steering gear valve.
8. Entry of air in the power steering
system.
1. High internal leakage.
2. Power steering fluid level low.
1. Insufficient pump pressure.
2. Sticky steering gear valve.
3. Power steering fluid level low.
1. Air in system.
2. Tie rod end loose.
3. Wheel bearing worn.
1. Sticky steering gear valve.
2. Insufficient pump pressure.
3. Excessive internal pump leakage.
4. Excessive internal steering gear
leakage.
5. Power steering fluid level low.Adjust hose position. Do not
bend tubing by hand.
Tighten or replace tie rod end.
Tighten steering gear
mounting.
Check and adjust steering gear
preload.
Adjust front wheel alignment.
Replace front wheel bearing.
Replace tie rod end.
Replace ball joint.
Replace steering assembly.
Adjust the steering gear.
Repair or replace steering gear
valve.
Bleed the system.
Repair steering gear.
Replenish fluid.
Repair pump assembly.
Repair or replace steering gear.
Replenish fluid.
Bleed hydraulic system.
Tighten tie rod end.
Replace wheel bearing.
Repair or replace steering gear
valve.
Repair pump assembly.
Repair pump assembly.
Repair steering gear.
Replenish fluid.
Page 471 of 3573

4A2A±4
DIFFERENTIAL (REAR 220mm)
Axle Housing
Axle Housing and Associated Parts
420RW022
Legend
(1) Coil Spring and Insulator
(2) Axle Housing Assembly
(3) ABS Speed Sensor and Harness(if equipped)
(4) Nut
(5) Parking Brake Cable
(6) Bolt and Nut
(7) Antilock Brake System (ABS) Connector and
Bracket (if equipped)
(8) Bolt and Nut(9) Nut
(10) Differential Assembly
(11) Axle Shaft Assembly
(12) Brake Disc
(13) Brake Pipe
(14) Brake Caliper
(15) Nut
(16) Breather Hose
(17) Flare Nut
Removal
1. Raise the vehicle and support it with suitable safety
stands.
The hoist must remain under the rear axle housing.
2. Drain brake fluid. Refer to Hydraulic Brakes in Brake
section.
3. Remove rear wheels and tires. Refer to Wheel in
Suspension section.4. Remove propeller shaft. Refer to Rear Propeller
Shaft in this section.
5. Drain the rear axle oil into a proper container.
6. Remove parking brake cable, release the connection
between the cable fixing clip equalizer. Refer to
Parking Brakes in Brake section.
7. Move the clip aside and pull out the breather hose.
Page 507 of 3573

4A2B±4DIFFERENTIAL (REAR 244mm)
Axle Housing
Axle Housing and Associated Parts
420RW001
Legend
(1) Coil Spring and Insulator
(2) Axle Housing Assembly
(3) ABS Speed Sensor and Harness (if so
equipped)
(4) Nut
(5) Parking Brake Cable
(6) Bolt and Nut
(7) Antilock Brake System (ABS) Connector and
Bracket (if so equipped)(8) Bolt and Nut
(9) Nut
(10) Differential Assembly
(11) Axle Shaft Assembly
(12) Brake Disc
(13) Brake Pipe
(14) Brake Caliper
(15) Nut
(16) Breather Hose
(17) Flare Nut
Removal
1. Raise the vehicle and support it with suitable safety
stands.
The hoist must remain under the rear axle housing.
2. Drain brake fluid. Refer to Hydraulic Brakes in Brakes
section.
3. Remove rear wheels and tires. Refer to Wheel in
Suspension section.4. Remove propeller shaft. Refer to Rear Propeller
Shaft in this section.
5. Drain the rear axle oil into a proper container.
6. Remove parking brake cable, release the connection
between the cable fixing clip equalizer. Refer to
Parking Brakes in Brakes section.
7. Move the clip aside and pull out the breather hose.