Page 201 of 3573
AIR CONDITIONING 1BÐ75
FULL AUTO display
INTAKE indication
(LED)
(switching between
fresh and interior air)
MODE indication
(LED) (Blow port)
AC display (LED)
FAN indication (LED)
FAN KNOB
AUTO SET
REC FRESH SWITCH
TEMP LEVER
(temperature control)
MODE SWITCH
(blow port selection)
AC SWITCH
IN CAR SENSOR
AMBIENT SENSOR
SUN SENSOR
DUCT SENSOR
MIX ACTUATOR
POTENTIOMETER
MODE ACTUATOR
POTENTIOMETER
AIR MIX DOOR
MODE DOOR
INTAKE ACTUATOR
RECINTAKE DOOR
FAN MOTORPOWER
TRANSISTOR
AUTOMATIC HEATER/AIR CONDITIONER CONTROL UNIT (with the built-in micro-computer)
MAX HI RELAY
PRESSURE
SWITCHAIR CONDITIONER
THERMO RELAY
COMPRESSOR
SWITCH MAGNET
CLUTCH
PCM
PRESSURE
SWITCHAIR CONDITIONER
THERMO RELAYMAGNET
CLUTCH
(4JX1engine)
MIX FRESH
FULL AUTOMATIC AIR CONDITIONER BLOCK DIAGRAM
F01RY00009
Page 207 of 3573
AIR CONDITIONING 1BÐ81
C01RY00001
2
1
123
4
10
96 5
87
11
13
B
B
A
C
B
C
A
ABB
A
A
B
A
A
B
B
A
C
A
A
C
CC
B
AB
AABB
Vent DoorMode PositionDisplay of Intake StatusSet Temperature
ONFULL
COLDFULL
HOT 20~30�Æ
�™
BBAA�™
Blue
VENT BI-LEVEL FOOT DEFRed
OFF
Foot Door
DEF Door
Intake Door
Air Mix Door
Sub Air Mix DoorWhite
C
C
B
DEF/FOOT
C
A
Legend
(1) Interior Air Intake
(2) Fresh Air Intake
(3) Pollen Filter
(4) Evaporator Core
(5) Air Mix Door
(6) DEF Door(7) Vent Door
(8) Foot Door
(9) Sub Air Mix Door
(10) Heater Unit
(11) Heater Core
(12) Evaporator Unit
(13) Blower Unit
Air Control Functions
Page 208 of 3573

1BÐ82 AIR CONDITIONING
OPERATION AND FUNCTIONS OF CONTROL PANEL SWITCHES
1. Auto Switch
(1) Pressing this switch turns on the automatic control mode. It resets all manual switches except that
for the fan control. However, when the Manual REC is selected for the intake or the Manual Open is
selected for the C/V, these modes are maintained.
(2) It causes the A/C (air conditioner) to the ON mode (this function, however, available only when the
fan is turned on and also the compressor is turned on because of the given outside air temperature
level).
¥ The AUTO LED comes on.
¥ Currently selected mode for the Mode and Intake are respectively indicated.
2. Mode Switch
(1) Pressing the VENT, B/L or FOOT switch selects the corresponding mode.
(2) When the Auto is selected for the Mode and Intake, pressing the mode switch fixes the Intake to the
immediately preceding status.
¥ Turns off the Auto LED.
¥ Currently selected blow port is indicated.
3. DEF Switch
Press this switch to select the DEF mode.
*1: When the manual REC is selected for the Intake, the manual REC is maintained.
*2: The ON mode is enabled only when the fun is turned on, and also the compressor is turned on
because of the given outside air temperature level.
¥ The Auto LED is turned off.
¥ DEF is indicated for the blow port, A/C LED comes on (only when the fan is turned on), and status
display is provided for the Intake.
Example 1:
4. Intake Switch
Pressing this switch sequentially selects a different intake port in the following order.
Example 1:
Example 2:PUSH
Auto RECFRESHRECPUSHPUSH
PUSHPUSHPUSHAuto REC
MIXRECFRESH
DEF SW:ON
(Selects the DEF
mode)A/C OFF
modeA/C ON
modeA/C ON mode is
maintained.
Mode switches for other than
the DEF mode: ON
(Resets the DEF mode)
Blow port Intake port A/C MIX
DEF Auto FRESH *1 ON mode *2 Auto
Page 209 of 3573

AIR CONDITIONING 1BÐ83
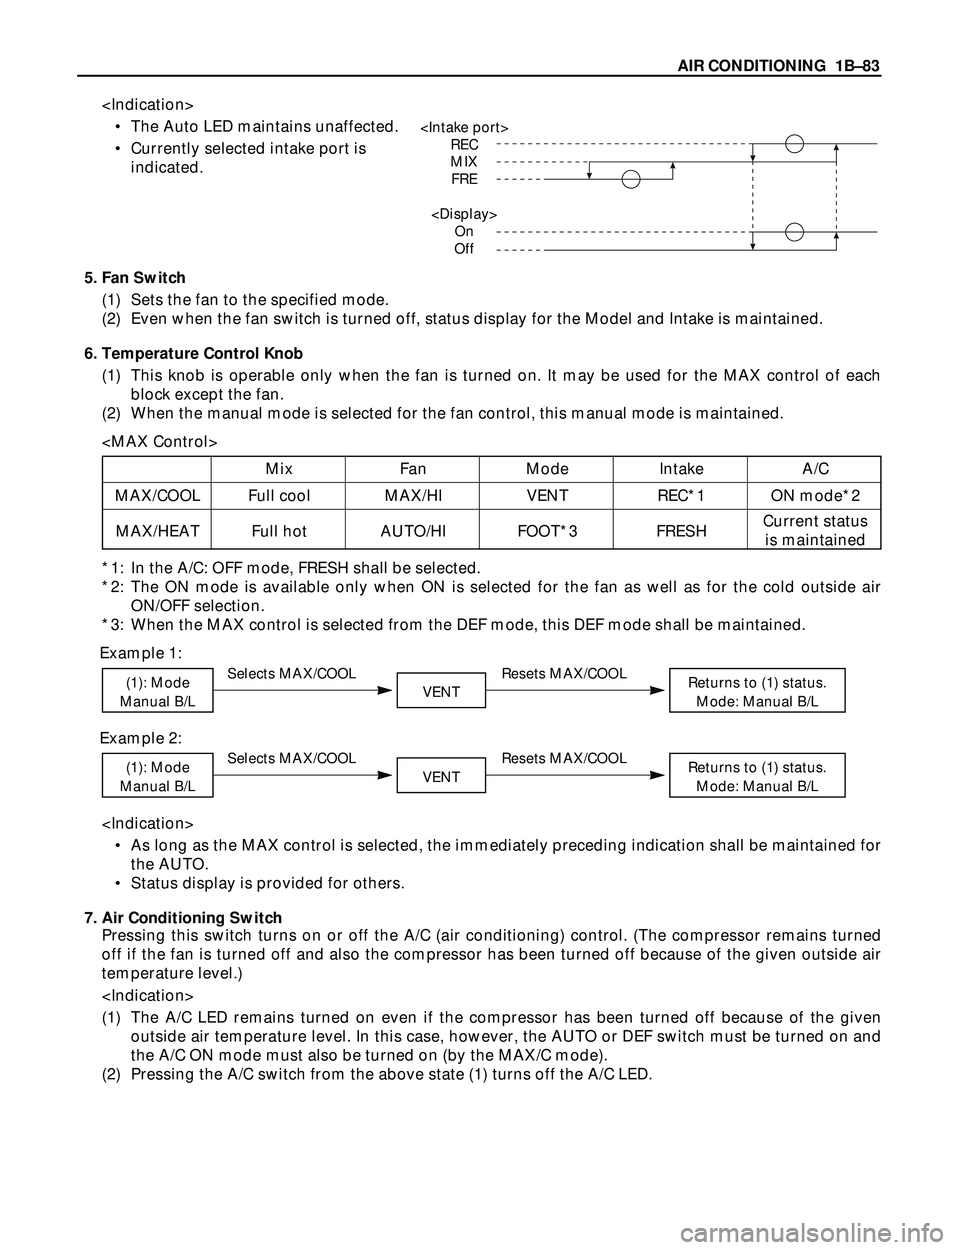
¥ The Auto LED maintains unaffected.
¥ Currently selected intake port is
indicated.
5. Fan Switch
(1) Sets the fan to the specified mode.
(2) Even when the fan switch is turned off, status display for the Model and Intake is maintained.
6. Temperature Control Knob
(1) This knob is operable only when the fan is turned on. It may be used for the MAX control of each
block except the fan.
(2) When the manual mode is selected for the fan control, this manual mode is maintained.
*1: In the A/C: OFF mode, FRESH shall be selected.
*2: The ON mode is available only when ON is selected for the fan as well as for the cold outside air
ON/OFF selection.
*3: When the MAX control is selected from the DEF mode, this DEF mode shall be maintained.
Example 1:
Example 2:
¥ As long as the MAX control is selected, the immediately preceding indication shall be maintained for
the AUTO.
¥ Status display is provided for others.
7. Air Conditioning Switch
Pressing this switch turns on or off the A/C (air conditioning) control. (The compressor remains turned
off if the fan is turned off and also the compressor has been turned off because of the given outside air
temperature level.)
(1) The A/C LED remains turned on even if the compressor has been turned off because of the given
outside air temperature level. In this case, however, the AUTO or DEF switch must be turned on and
the A/C ON mode must also be turned on (by the MAX/C mode).
(2) Pressing the A/C switch from the above state (1) turns off the A/C LED.
REC
MIX
FRE
On
Off
Selects MAX/COOL(1): Mode
Manual B/LVENT
Resets MAX/COOLReturns to (1) status.
Mode: Manual B/L
Selects MAX/COOL(1): Mode
Manual B/LVENT
Resets MAX/COOLReturns to (1) status.
Mode: Manual B/L
Mix Fan Mode Intake A/C
MAX/COOL Full cool MAX/HI VENT REC*1 ON mode*2
MAX/HEAT Full hot AUTO/HI FOOT*3 FRESHCurrent status
is maintained
Page 224 of 3573

1BÐ98 AIR CONDITIONING
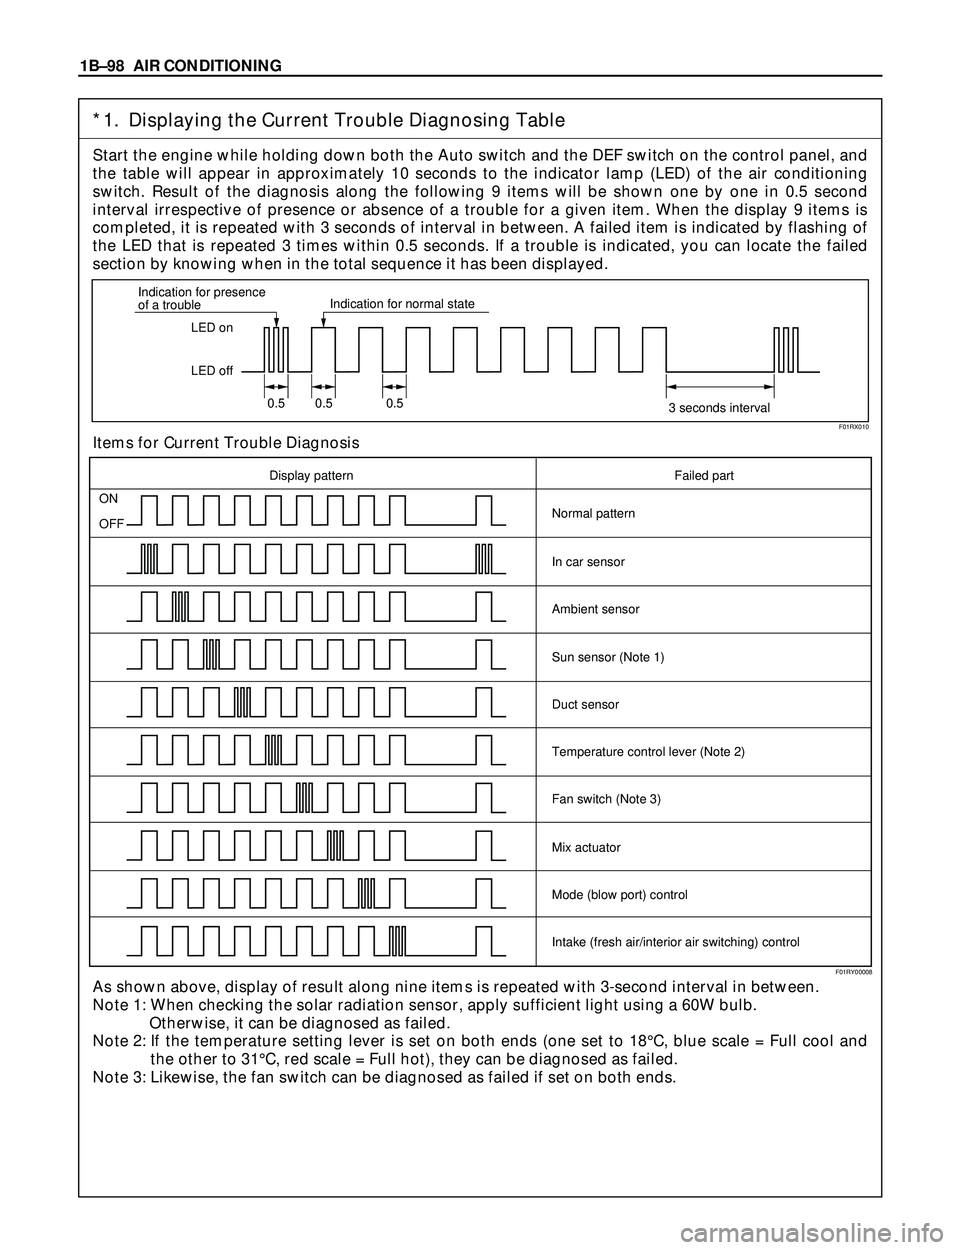
*1. Displaying the Current Trouble Diagnosing Table
Start the engine while holding down both the Auto switch and the DEF switch on the control panel, and
the table will appear in approximately 10 seconds to the indicator lamp (LED) of the air conditioning
switch. Result of the diagnosis along the following 9 items will be shown one by one in 0.5 second
interval irrespective of presence or absence of a trouble for a given item. When the display 9 items is
completed, it is repeated with 3 seconds of interval in between. A failed item is indicated by flashing of
the LED that is repeated 3 times within 0.5 seconds. If a trouble is indicated, you can locate the failed
section by knowing when in the total sequence it has been displayed.
Items for Current Trouble Diagnosis
As shown above, display of result along nine items is repeated with 3-second interval in between.
Note 1: When checking the solar radiation sensor, apply sufficient light using a 60W bulb.
Otherwise, it can be diagnosed as failed.
Note 2: If the temperature setting lever is set on both ends (one set to 18¡C, blue scale = Full cool and
the other to 31¡C, red scale = Full hot), they can be diagnosed as failed.
Note 3: Likewise, the fan switch can be diagnosed as failed if set on both ends.
LED on
LED off Indication for presence
of a troubleIndication for normal state
0.5 0.5 0.5
3 seconds interval
ON
OFF
Display pattern Failed part
Normal pattern
In car sensor
Ambient sensor
Sun sensor (Note 1)
Duct sensor
Temperature control lever (Note 2)
Fan switch (Note 3)
Mix actuator
Mode (blow port) control
Intake (fresh air/interior air switching) control
F01RX010
F01RY00008
Page 225 of 3573

AIR CONDITIONING 1BÐ99
*2. Displaying the Past Trouble Diagnosing Table
The past trouble diagnosis displays only the items on which trouble has recurred 16 times in the past.
If you press the air conditioning switch once while the current trouble diagnosis is taking place, display
of the past trouble diagnosis will appear on the indicator lamp (LED) of the air conditioning switch.
Results of the diagnosis along the following five items are displayed one by one in 0.5 second interval
irrespective of presence or absence of a trouble. A failed item is indicated by flashing of the LED that is
repeated 3 times within 0.5 seconds. You can locate the failed section by counting in what sequence it
has been displayed.
Items for Past Trouble Diagnosis
LED on
LED off Indication for presence of a trouble Indication for normal state
0.5 0.5 0.5
3 second interval
Display pattern
ON
OFFNormal pattern
In car sensor
Ambient sensor
Sun sensor
Duct sensor
Mix actuatorFailed part
F01RX011
F01RY00007
*3. Check of Output Equipment
FAN
MIX
MODE
DOOR
INTAKE
DOOR
SET UP
TEMPERATURE
100
(%)
33.5
F/H
VENT
B/L
FOOT
D/F
DEF
REC
MIX
FRE
F/C 20 21 22 23 24 25 26 27 28 29 30 F/H (%)
F/C
F01RY00001
Page 235 of 3573
AIR CONDITIONING 1BÐ109
Chart B: Mix Actuator Control Failure
NOReplace the actuator.
NOThe harness is disconnected.
NO
NOMix actuator control failure due to the
failed sensor.
YES YES
YES
YES
Turn on the ignition switch (the engine is
started).
Replace the automatic heater/air conditioner
control unit.
Is conduction provided between the
following chassis harness side
connector terminals?
No.3 and No.11 .
No.7 and No.5 .
No.2 and No.15 .
I-33I-45
I-33I-45
I-33I-45
Is sum of the voltages between the
following chassis harness side connector
terminals approximately 5V?
Voltage between No.15 and No.5
plus voltage between No.5
and No.11 .
I-33
I-33I-33
I-33
Does the self-diagnosis function (the
current trouble display) indicate failure
on the mix actuator potentiometer?
Is full stroke of the air mix door available
when you selected FH or FC using the
temperature control lever?Failure on the air mix door or the link
unit.
Page 574 of 3573

4B2±3 DRIVE LINE CONTROL SYSTEM (TOD)
detects the slip condition, determines the optimum torque
based on the feedback control logic, and increases the
torque to the front wheels.
The control unit uses the signal from the throttle position
sensor to predict the future vehicle condition and the
intention of the driver with respect to acceleration and
deceleration, and determines the initial torque distribution
using these data and the information from the speed
sensors.
In case of small circle turning in the parking lot, for
example, the control unit minimizes the clutch pressing
force restrict a braking phenomenon. When the ABS
becomes active, the control unit optimizes the clutch
pressing force to ensure stable braking.
TOD Indicator Control
The TOD indicator on the instrument panel informs the
driver of the current working status of the transfer unit.
The information consists of two items: the drive mode
(2H, TOD, 4L, transition) and the torque split status of the
TOD (torque distribution level). The indicator can display
occasional errors and corresponding error codes.