1998 ISUZU TROOPER change time
[x] Cancel search: change timePage 200 of 3573

1BÐ74 AIR CONDITIONING
FUNCTIONS AND FEATURES
¥ Automatic interior temperature control
This function enables to maintain the interior temperature at the level specified from the temperature
control switch despite of changes in factors such as vehicle speeds, outside air temperature and number
of passengers.
¥ Maximum cooling and heating function
You can select FC (Full cool, namely maximum cooling temperature) or FH (Full heat, maximum heating
temperature) from the temperature control lever.
¥ Automatic air flow control
Air flow is automatically and consecutively fine tuned according to the specified interior temperature and
changes in aperture of the heater unit mix door.
¥ Mode (blow port) control
This function automatically selects either one of the VENT, BI-LEVEL, FOOT or DEP mode for the blow
port according to changes of temperature on the blow port. Using the mode switch allows you to select a
desired blow port manually.
¥ Intake (switching between the fresh air intake and circulation of interior air) control
The intake (switching between fresh air intake and circulation of interior air) mode automatically selects
either FRESH (fresh air intake), MIX or RECIRC (interior air circulation) according to changes of the blow
port temperature. Using the intake switch allows you to select a desired intake port manually (in the
manual operation, FRESH and RECIRC modes alone are available). Pressing the DEF (defrost) mode
switch selects the FRESH (fresh air intake).
¥ Cooler start-up timing control
This function is used for maintaining the air flow at "LOW" level until the evaporator is sufficiently cooled
down. It is intended to prevent a large volume of hot air being blowing into inside of a vehicle when the
cooler is turned on in hot summer season.
¥ Heater start-up timing control
This function is used for maintained the air flow at "LOW" level and also for maintaining the defrost
mode until temperature of coolant in the heater core is sufficiently heated. It is intended to prevent a
large volume of cool air being blown into inside of a vehicle when the heater is turned on in cold winter
season.
¥ Solar radiation quantity offset control
The photodiode on the solar radiation sensor determines solar radiation quantity accurately to offset
interior temperature quickly.
¥ Switch position storing function
This function is used for storing switch positions being selected in the immediately preceding operation,
namely the last time the ignition has been turned off. It simplifies the setup procedures when restarting
the system.
¥ Self-diagnosis function
The self-diagnosis function turned on from the panel switch makes your troubleshooting easier (for detail
of this function, refer to the section titled "Self-Diagnosis").
Page 217 of 3573

AIR CONDITIONING 1BÐ91
6. Heating Start Timing Control
When the automatic heater/air conditioner is
started, heating is turned on under following
conditions.
·The detected temperature of thermo unit is
136¡F or less.
·The temperature setting signal and the total
signal by each sensor meet the condition of
heating.
When the detected temperature by the coolant
temperature sensor is 136¡F or less the blower
fan motor is set to work at low speed and the
"DEF" mode is selected.
When the detected temperature by the coolant
temperature sensor is 77¡F or more, the blow
mode changes automatic control. And the
blower fan speed is controlled to be lineally up
from "LO" to "MAX HI".7. Cooling Start Timing Control
When the automatic heater/air conditioner is
started, cooling is turned on under following
conditions.
·The in car sensor is 86¡F or more.
·The temperature setting signal and the signals
from each sensor meet the specified condition.
The blower fan speed is set to "LO" for
maximum 7 seconds when cooling start
conditions meet, and then, is controlled to be
lineally up to "MAX HI" by 5.32%/S.
Ignition swich
"ON"
Time
Blower voltage to turn
on the cooling
7 SEC maximum3 SEC
100%
(MAX HI)
33.5%
(LO)5.32%/S
C06RY00001
33.5%
(LO)
2.63%/S
Mode
DEF
Auto
Mode
100%
(MAX HI)
Ignition
switch "ON"
Thermo Unit 58¡C(Gasoline)
52¡C(Diesel) Time
840RY00009
Page 261 of 3573

COMPRESSOR OVERHAUL 1D Ð 5
Checking and Adjusting for Compressor
Replacement
150cc (4.2 Imp fl oz) of oil is charged in compressor
(service parts). So it is necessary to drain the proper
amount of oil from the new compressor.
1) Perform oil return operation.
2) Discharge refrigerant and remove the
compressor.
3) Drain the compressor oil and measure the
extracted oil.
4) Check the compressor oil for contamination.
5) Adjust oil level as required.
Amount of oil drained Draining amount of oil
from used compressor from new compressor
less than Same as drained
90cc (2.5 Imp fl oz) amount
more than
90cc (2.5 Imp fl oz)
90cc (2.5 Imp fl oz)
6) Evacuate, charge and perform oil return
operation.
7) Check system operation.
CONTAMINATION OF COMPRESSOR OIL
Unlike engine oil, no cleaning agent is added to the
compressor oil. Even if the compressor runs for a
long period of time (approximately 1 season), the
oil never becomes contaminated as long as there is
nothing wrong with the compressor or its method
of use.
Inspect the extracted oil for any of the following
conditions:
·The capacity of the oil has increased.
·The oil has changed color to red.
·Foreign substances, metal powder, etc., are
present in the oil.
If any of these conditions exists, compressor oil is
contaminated. Whenever contaminated
compressor oil is discovered, the receiver/drier
must be replaced.
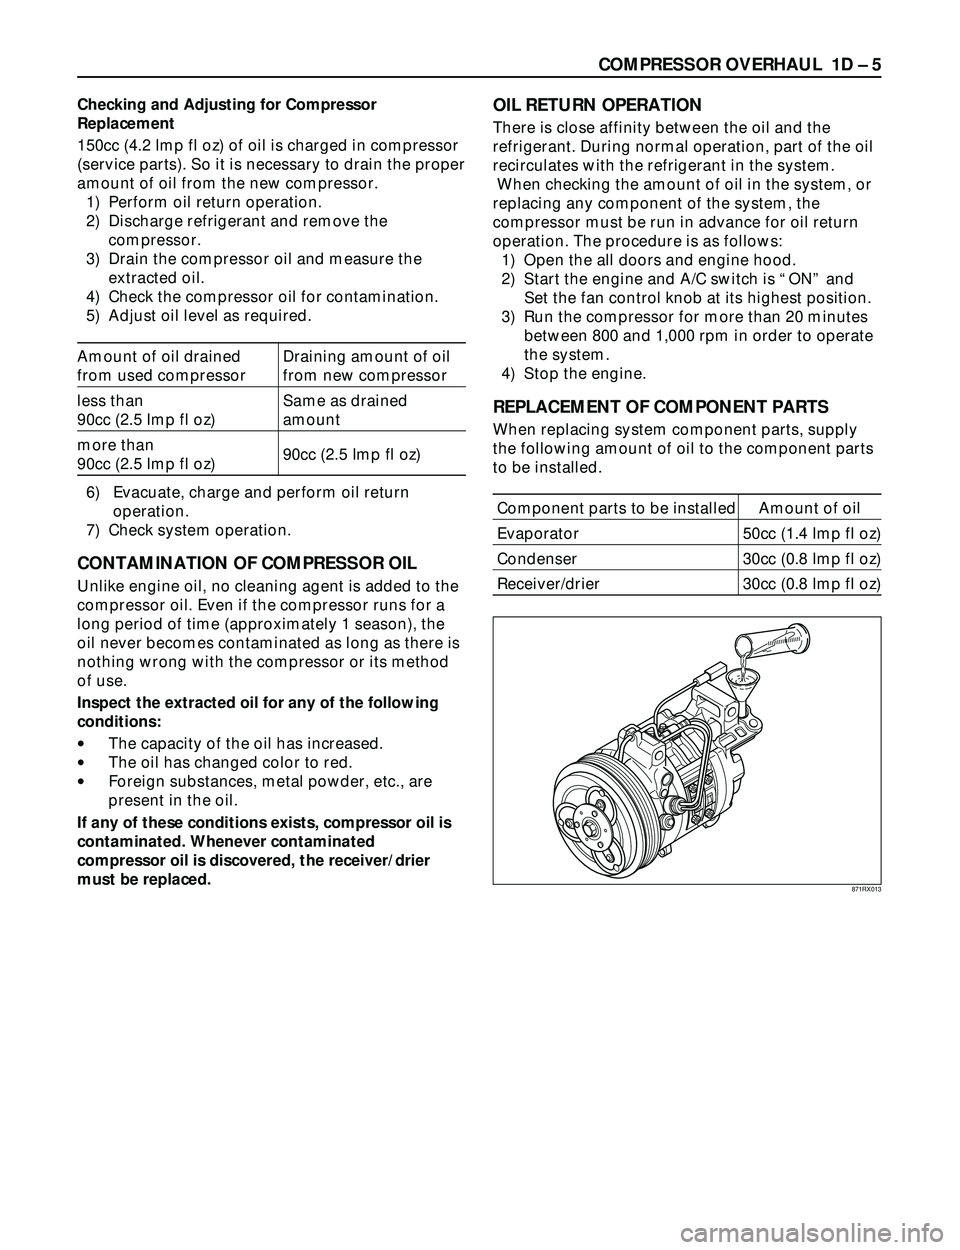
OIL RETURN OPERATION
There is close affinity between the oil and the
refrigerant. During normal operation, part of the oil
recirculates with the refrigerant in the system.
When checking the amount of oil in the system, or
replacing any component of the system, the
compressor must be run in advance for oil return
operation. The procedure is as follows:
1) Open the all doors and engine hood.
2) Start the engine and A/C switch is ÒONÓ and
Set the fan control knob at its highest position.
3) Run the compressor for more than 20 minutes
between 800 and 1,000 rpm in order to operate
the system.
4) Stop the engine.
REPLACEMENT OF COMPONENT PARTS
When replacing system component parts, supply
the following amount of oil to the component parts
to be installed.
Component parts to be installed Amount of oil
Evaporator 50cc (1.4 Imp fl oz)
Condenser 30cc (0.8 Imp fl oz)
Receiver/drier 30cc (0.8 Imp fl oz)
871RX013
Page 281 of 3573

COMPRESSOR OVERHAUL 1D Ð 25
1. Perform oil return operation.
2. Discharge and recover the refrigerant and remove
the compressor.
3. Drain the compressor oil and measure the extracted
oil.
4. Check the compressor oil for contamination.
5. Adjust the oil level as required.
6. Evacuate, charge and perform the oil return
operation.
7. Check the system operation.
Contamination of Compressor Oil
Unlike engine oil, no cleaning agent is added to the
compressor oil. Even if the compressor runs for a long
period of time (approximately one season), the oil never
becomes contaminated as long as there is nothing
wrong with the compressor or its method of use.
Inspect the extracted oil for any of the following
conditions:
·The capacity of the oil has increased.
·The oil has changed to red.
·Foreign substances, metal powder, etc., are present
in the oil.
If any of these conditions exists, the compressor
oil is contaminated. Whenever contaminated
compressor oil is discovered, the receiver/drier
must be replaced.
Oil Return Operation
There is close affinity between the oil and the
refrigerant. During normal operation, part of the oil
recirculates with the refrigerant in the system. When
checking the amount of oil in the system, or replacing
any component of the system, the compressor must be
run in advance for oil return operation. The procedure
is as follows:
1. Open all the doors and the engine hood.
2. Start the engine and air conditioning switch to "ON"
and set the fan control knob at its highest position.
3. Run the compressor for more than 20 minutes
between 800 and 1,000 rpm in order to operate the
system.
4. Stop the engine.
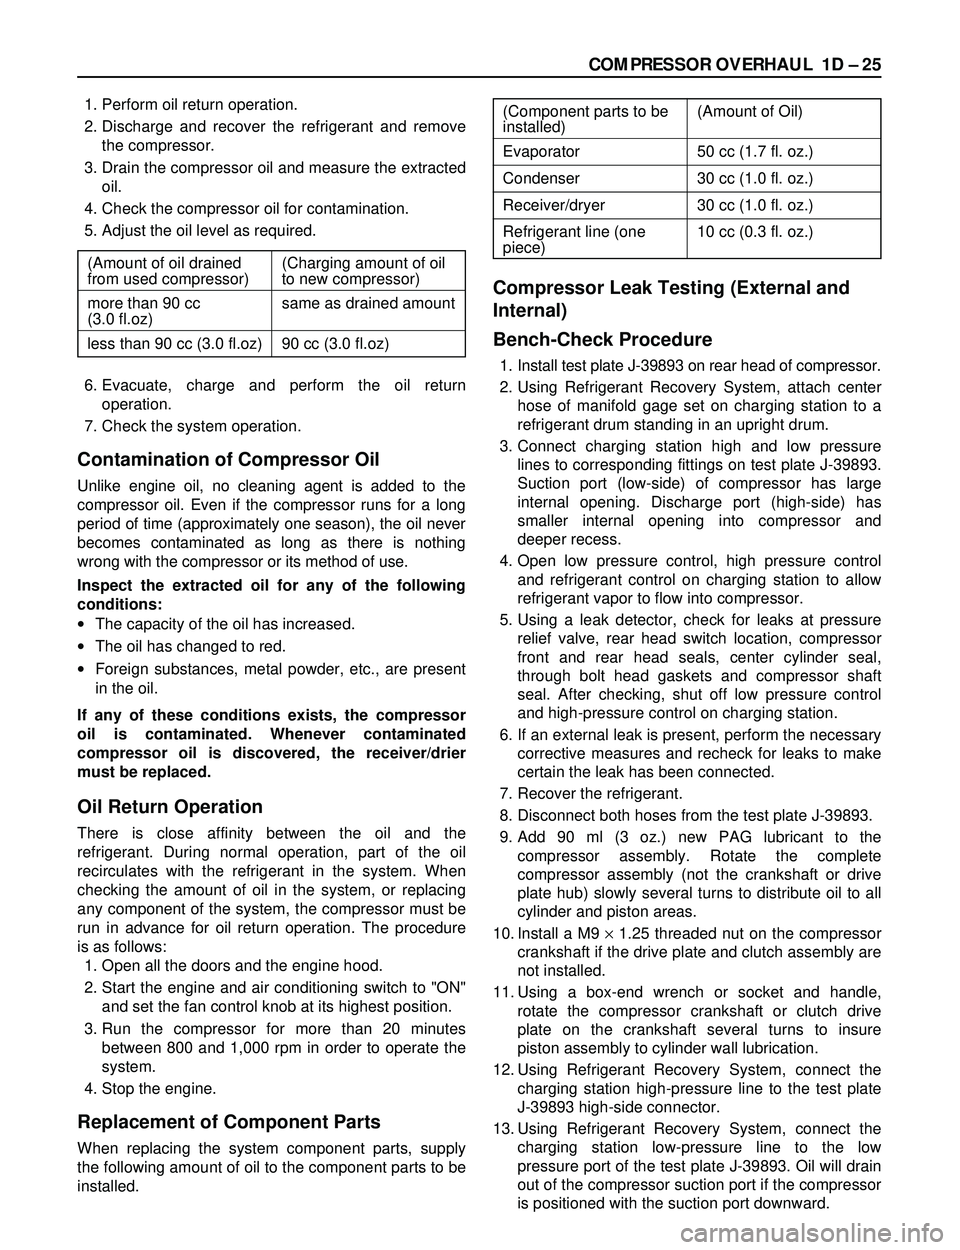
Replacement of Component Parts
When replacing the system component parts, supply
the following amount of oil to the component parts to be
installed.
Compressor Leak Testing (External and
Internal)
Bench-Check Procedure
1. Install test plate J-39893 on rear head of compressor.
2. Using Refrigerant Recovery System, attach center
hose of manifold gage set on charging station to a
refrigerant drum standing in an upright drum.
3. Connect charging station high and low pressure
lines to corresponding fittings on test plate J-39893.
Suction port (low-side) of compressor has large
internal opening. Discharge port (high-side) has
smaller internal opening into compressor and
deeper recess.
4. Open low pressure control, high pressure control
and refrigerant control on charging station to allow
refrigerant vapor to flow into compressor.
5. Using a leak detector, check for leaks at pressure
relief valve, rear head switch location, compressor
front and rear head seals, center cylinder seal,
through bolt head gaskets and compressor shaft
seal. After checking, shut off low pressure control
and high-pressure control on charging station.
6. If an external leak is present, perform the necessary
corrective measures and recheck for leaks to make
certain the leak has been connected.
7. Recover the refrigerant.
8. Disconnect both hoses from the test plate J-39893.
9. Add 90 ml (3 oz.) new PAG lubricant to the
compressor assembly. Rotate the complete
compressor assembly (not the crankshaft or drive
plate hub) slowly several turns to distribute oil to all
cylinder and piston areas.
10. Install a M9 ´1.25 threaded nut on the compressor
crankshaft if the drive plate and clutch assembly are
not installed.
11. Using a box-end wrench or socket and handle,
rotate the compressor crankshaft or clutch drive
plate on the crankshaft several turns to insure
piston assembly to cylinder wall lubrication.
12. Using Refrigerant Recovery System, connect the
charging station high-pressure line to the test plate
J-39893 high-side connector.
13. Using Refrigerant Recovery System, connect the
charging station low-pressure line to the low
pressure port of the test plate J-39893. Oil will drain
out of the compressor suction port if the compressor
is positioned with the suction port downward. (Component parts to be (Amount of Oil)
installed)
Evaporator 50 cc (1.7 fl. oz.)
Condenser 30 cc (1.0 fl. oz.)
Receiver/dryer 30 cc (1.0 fl. oz.)
Refrigerant line (one 10 cc (0.3 fl. oz.)
piece)
(Amount of oil drained (Charging amount of oil
from used compressor) to new compressor)
more than 90 cc same as drained amount
(3.0 fl.oz)
less than 90 cc (3.0 fl.oz) 90 cc (3.0 fl.oz)
Page 305 of 3573

INSPECTION
Before making any adjustments affecting caster, camber
or toe-in, the following front end inspection should be
made.
INSPECT
1. Tires for proper inflation pressure. Refer to “Wheels
and Tires” in section 3E.
2. Front wheel bearings for proper adjustment. Refer to
“Front Wheel Drive” in section 4C.
3. Ball joints, tie rod ends and relay rods. If excessive
looseness is noted, correct before adjusting. Refer to
“Steering Linkage” in section 2A.
4. Wheel and tires for run-out. Refer to “Wheels and
Tires”in section 3E.
5. Trim height. If not within specifications, the
correction must be made before adjusting caster.
6. Steering gear for looseness at the frame.
7. Shock absorbers for leaks or any noticeable noise.
Refer to “Front Suspension” in section 3C.
8. Control arms or stabilizer bar attachment for
looseness. Refer to “Front Suspension“ in section 3C.
9. Alignment equipment. Follow the manufacturer’s
instructions.
10. Level of the vehicle. The vehicle must be on a level
surface.
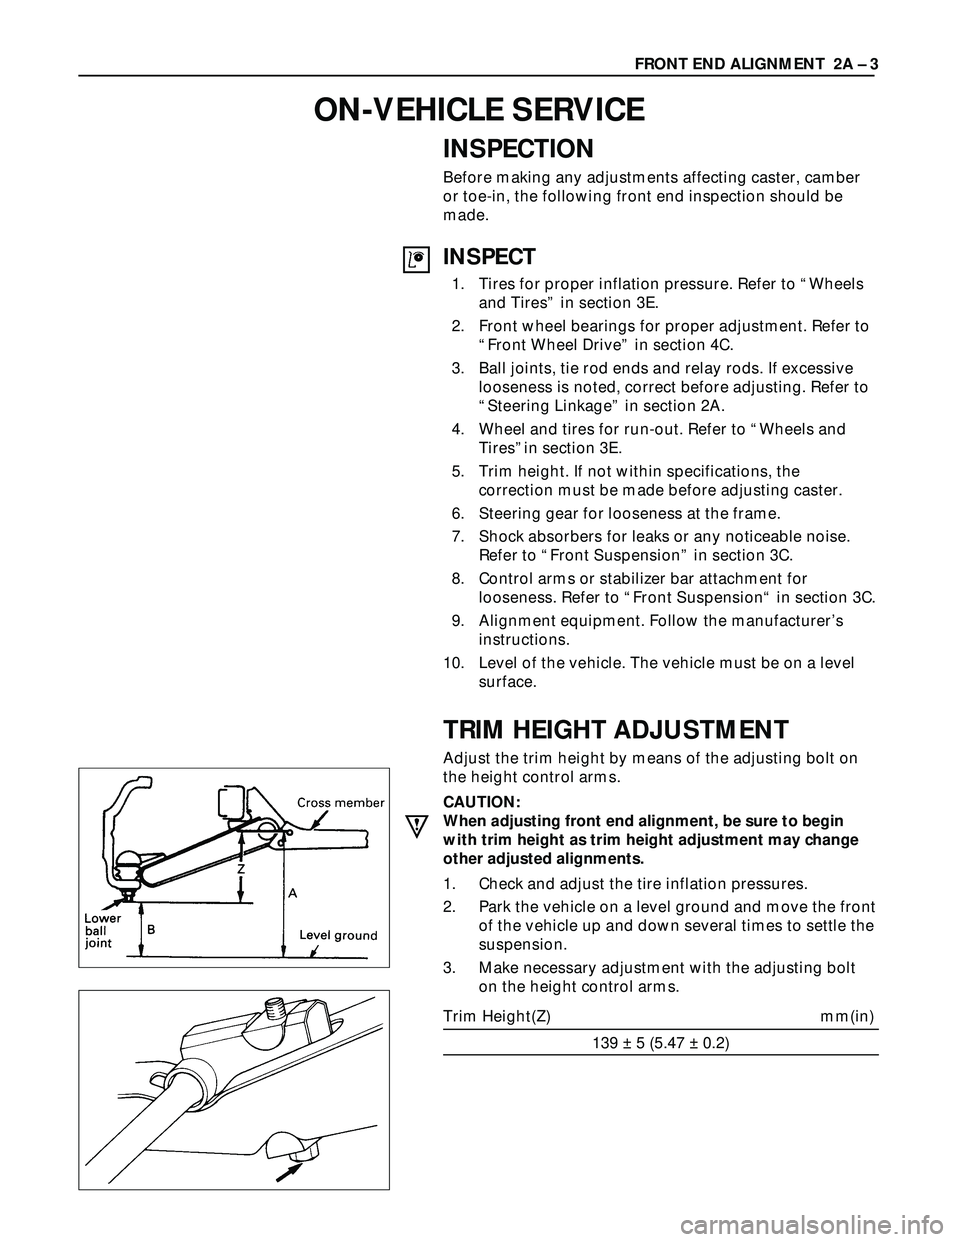
TRIM HEIGHT ADJUSTMENT
Adjust the trim height by means of the adjusting bolt on
the height control arms.
CAUTION:
When adjusting front end alignment, be sure to begin
with trim height as trim height adjustment may change
other adjusted alignments.
1. Check and adjust the tire inflation pressures.
2. Park the vehicle on a level ground and move the front
of the vehicle up and down several times to settle the
suspension.
3. Make necessary adjustment with the adjusting bolt
on the height control arms.
Trim Height(Z) mm(in)
139 ± 5 (5.47 ± 0.2)FRONT END ALIGNMENT 2A – 3
ON-VEHICLE SERVICE
Page 541 of 3573

4B1±8
DRIVE LINE CONTROL SYSTEM (SHIFT ON THE FLY)
Normal Operation
The motor actuator mounted on transfer rear case is
driven by signal from 4WD switch on instrument panel.
After complete the connecting transfer front output gear
to, or disconnecting it from, front propeller shaft, conditionof the transfer position switch changes. The vacuum
solenoid valve (VSV) is driven by the signal from transfer
position switch and the vacuum actuator connects front
wheels to, or disconnect them from, front axles.
Time Chart of Shifting Under Normal Condition
F04RW002
Page 542 of 3573

4B1±9 DRIVE LINE CONTROL SYSTEM (SHIFT ON THE FLY)
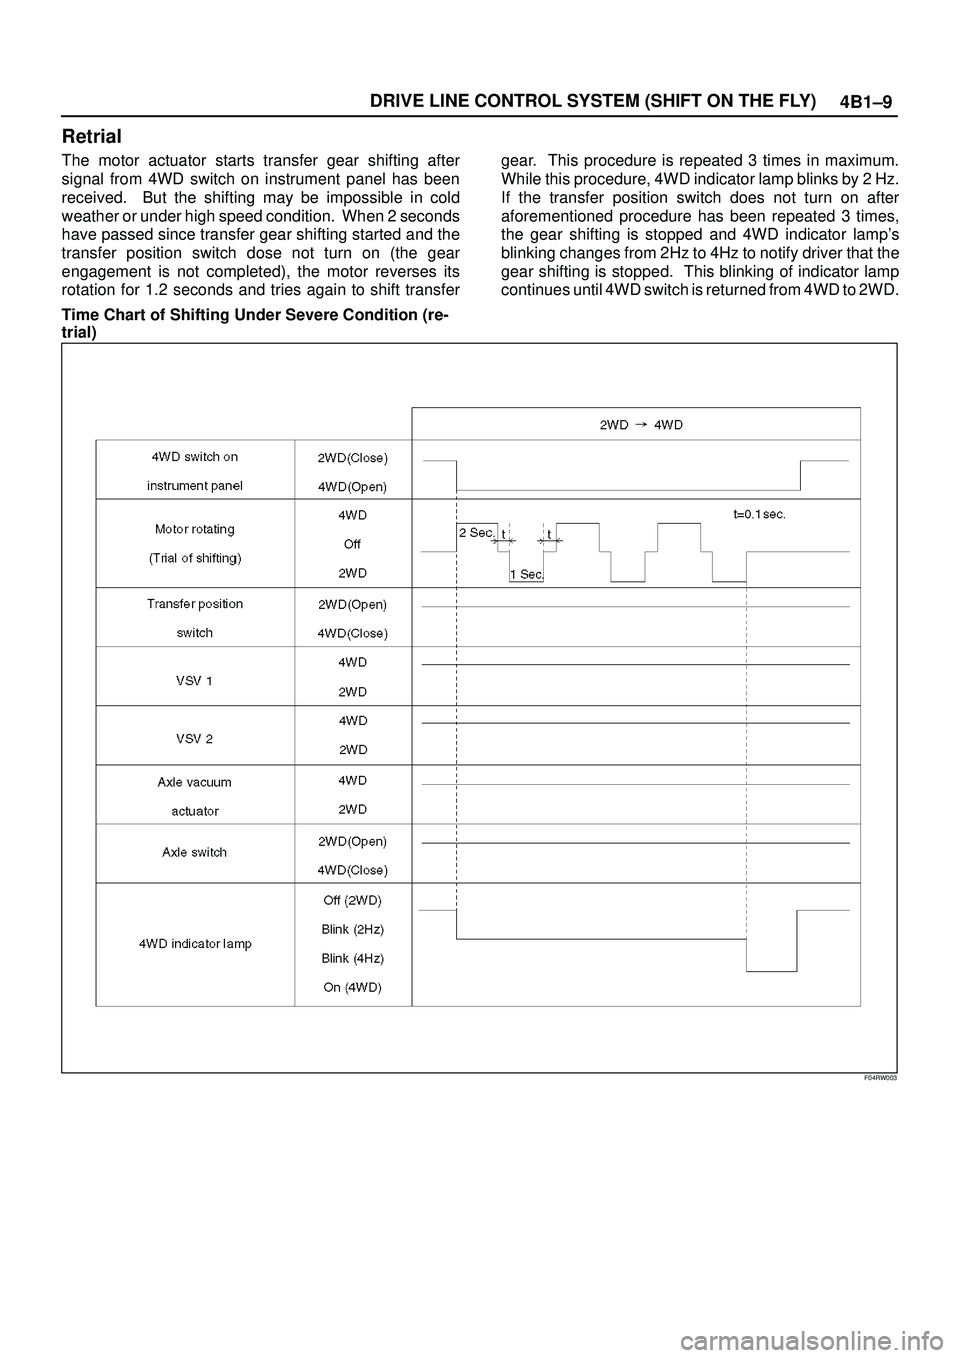
Retrial
The motor actuator starts transfer gear shifting after
signal from 4WD switch on instrument panel has been
received. But the shifting may be impossible in cold
weather or under high speed condition. When 2 seconds
have passed since transfer gear shifting started and the
transfer position switch dose not turn on (the gear
engagement is not completed), the motor reverses its
rotation for 1.2 seconds and tries again to shift transfergear. This procedure is repeated 3 times in maximum.
While this procedure, 4WD indicator lamp blinks by 2 Hz.
If the transfer position switch does not turn on after
aforementioned procedure has been repeated 3 times,
the gear shifting is stopped and 4WD indicator lamp's
blinking changes from 2Hz to 4Hz to notify driver that the
gear shifting is stopped. This blinking of indicator lamp
continues until 4WD switch is returned from 4WD to 2WD.
Time Chart of Shifting Under Severe Condition (re-
trial)
F04RW003
Page 543 of 3573

4B1±10
DRIVE LINE CONTROL SYSTEM (SHIFT ON THE FLY)
Warning at ª4Lº position :In view of the shifting
mechanism of transfer, the gear shifting from 4WD to
2WD at ª4Lº condition is impossible. Therefore, the
transfer position switch can not be turned off by 4WDswitch when vehicle is in ª4Lº condition. In the case this
condition continues for 2 seconds, the shifting to 2WD is
stopped and the indicator lamp's blinking changes from
2Hz to 4Hz to notify driver of wrong operation.
Time Chart of Shifting from 4WD to 2WD at ª4Lº
Condition
F04RW005
4WD out signal to other Electronic Hydraulic Control
Unit : 4WDcontrol unit sends 4WD out signal to other
Electronic Hydraulic Control Unit as below.
4WD out signal
(Period)
Vehicle ConditionTransfer position switchFront axle switch
120 ms2WD2WD (Open)2WD (Open)
240 ms4WD4WD (Close)4WD (Close)