Page 154 of 272

Towing a Trailer
Mirrors
Many states and provinces have laws
requiring special outside mirrors
when you are towing a trailer. Check
the laws in your area. You may want
to install mirrors, even if they are not
required. Hook up the trailer and see
how much it obscures your ability to see behind you with the standard
mirrors. If you cannot see directly
behind you, or have a large blind spot next to the trailer or the vehicle,
you should install mirrors intended for towing. Connecting the Trailer
Most trailers that have a gross
weight of 1,000 Ibs (450 kg) do not
have their own braking system. If
you are thinking of getting a trailer that does have brakes, make sure
they are electrically-operated. Thereare no provisions in your vehicle to
tap into its hydraulic braking system.
Any attempt to attach the trailer's brakes to your vehicle's hydraulicsystem, no matter how successful it
may seem, will lower braking effectiveness and create a potential
hazard.
Always use a safety chain when
towing a trailer. Connect the safetychain securely at both ends. Make
sure the chain crosses under the
tongue so it will catch the trailer if it becomes unhitched. Leave enoughslack in the chain so it can't bind in a
sharp turn. Do not let it drag on the
ground.
DrivingProCarManuals.comMain Menu Table of Contents s t
Page 155 of 272

Towing a Trailer
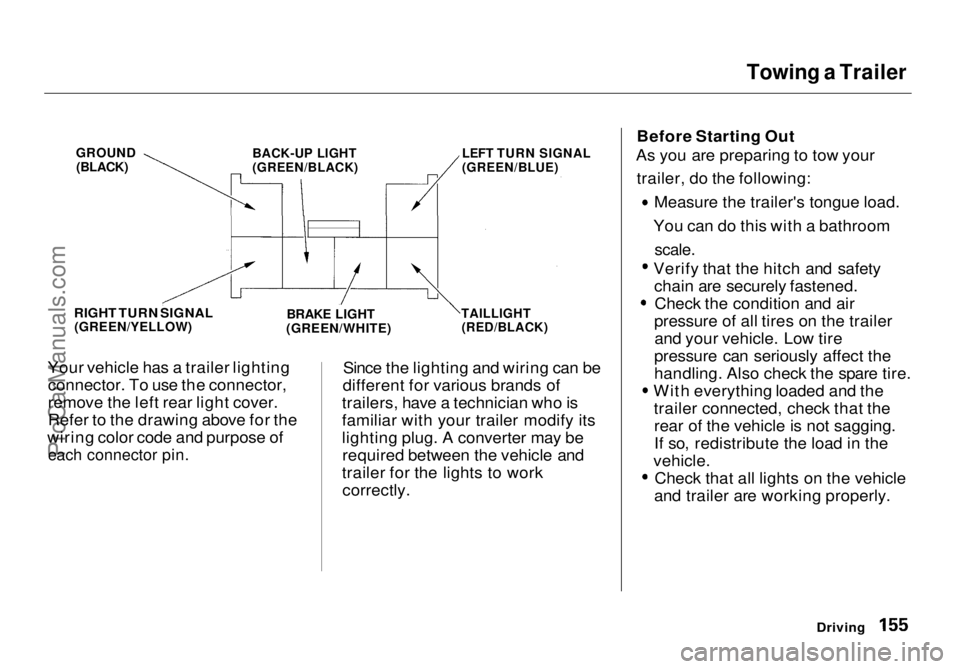
Your vehicle has a trailer lighting connector. To use the connector,
remove the left rear light cover.
Refer to the drawing above for the
wiring color code and purpose of
each connector pin.
Since the lighting and wiring can be
different for various brands of
trailers, have a technician who is
familiar with your trailer modify its
lighting plug. A converter may be required between the vehicle and
trailer for the lights to work correctly. Before Starting Out
As you are preparing to tow your
trailer, do the following: Measure the trailer's tongue load.
You can do this with a bathroom
scale.
Verify that the hitch and safety
chain are securely fastened. Check the condition and air
pressure of all tires on the trailer and your vehicle. Low tire
pressure can seriously affect the
handling. Also check the spare tire. With everything loaded and the
trailer connected, check that therear of the vehicle is not sagging.
If so, redistribute the load in the
vehicle. Check that all lights on the vehicle
and trailer are working properly.
Driving
GROUND
(BLACK)
BACK-UP LIGHT
(GREEN/BLACK)
LEFT TURN SIGNAL
(GREEN/BLUE)
RIGHT TURN SIGNAL
(GREEN/YELLOW)
BRAKE LIGHT
(GREEN/WHITE)
TAILLIGHT
(RED/BLACK)ProCarManuals.comMain Menu Table of Contents s t
Page 172 of 272

Engine Oil
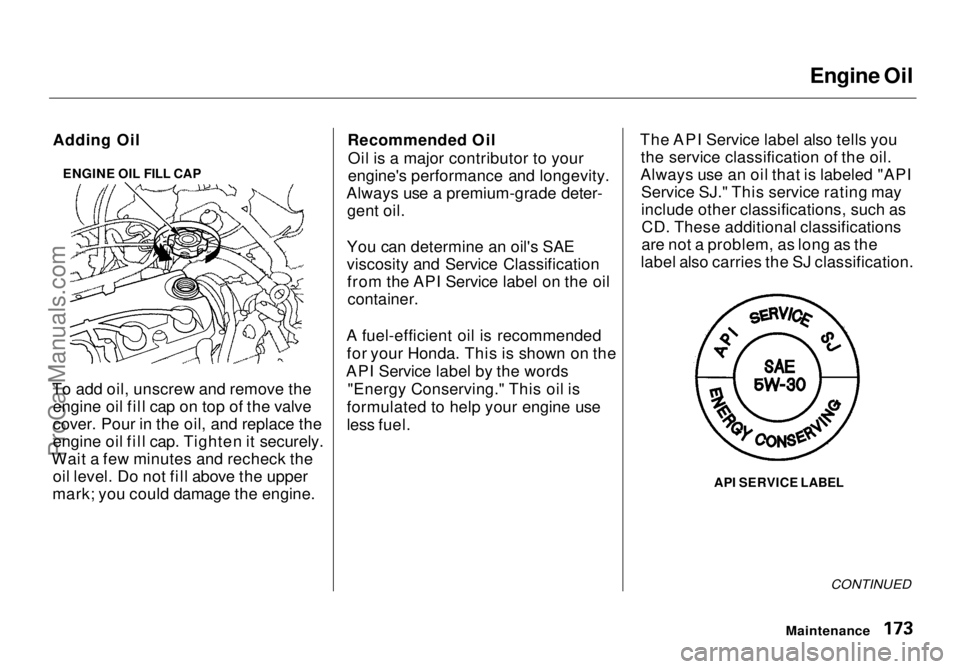
ENGINE OIL FILL CAP
To add oil, unscrew and remove the engine oil fill cap on top of the valve
cover. Pour in the oil, and replace the
engine oil fill cap. Tighten it securely.
Wait a few minutes and recheck the oil level. Do not fill above the upper
mark; you could damage the engine. Recommended Oil
Oil is a major contributor to your
engine's performance and longevity.
Always use a premium-grade deter- gent oil.
You can determine an oil's SAE
viscosity and Service Classification from the API Service label on the oilcontainer.
A fuel-efficient oil is recommended for your Honda. This is shown on the
API Service label by the words "Energy Conserving." This oil is
formulated to help your engine use
less fuel. The API Service label also tells you
the service classification of the oil.
Always use an oil that is labeled "API Service SJ." This service rating may
include other classifications, such asCD. These additional classifications
are not a problem, as long as the
label also carries the SJ classification.
API SERVICE LABEL
CONTINUED
Maintenance
Adding OilProCarManuals.comMain Menu Table of Contents s t
Page 179 of 272

Cooling System
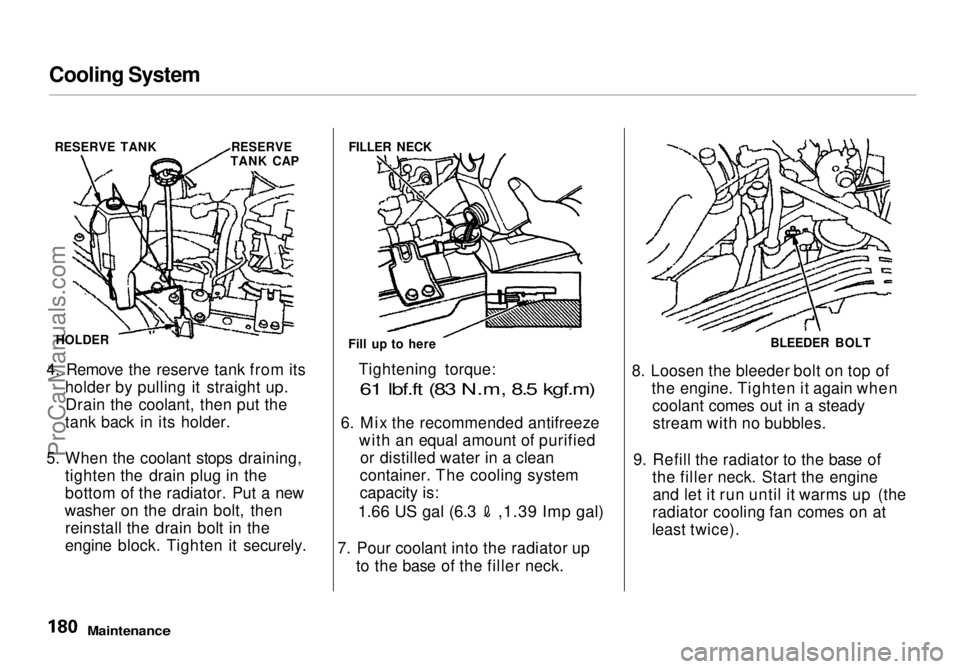
4. Remove the reserve tank from its holder by pulling it straight up.Drain the coolant, then put the
tank back in its holder.
5. When the coolant stops draining, tighten the drain plug in the
bottom of the radiator. Put a new
washer on the drain bolt, then reinstall the drain bolt in the
engine block. Tighten it securely. Tightening torque:
61 lbf.ft (83 N.m, 8.5 kgf.m)
6. Mix
the recommended antifreeze
with an equal amount of purified or distilled water in a clean
container. The cooling system
capacity is:
1.66 US gal (6.3 ,1.39 Imp gal)
7. Pour coolant into the radiator up
to the base of the filler neck. 8. Loosen the bleeder bolt on top of
the engine. Tighten it again whencoolant comes out in a steadystream with no bubbles.
9. Refill the radiator to the base of the filler neck. Start the engineand let it run until it warms up (the
radiator cooling fan comes on at
least twice).
Maintenance
RESERVE TANK RESERVE
TANK CAP
HOLDER FILLER NECK
Fill up to here BLEEDER BOLT
ProCarManuals.comMain Menu Table of Contents s t
Page 185 of 272
Air Cleaner Element
3. Loosen the four bolts and remove the air cleaner housing cover.
Remove the maintenance hole capso you can reach the right front
bolt through the hole.
4. Remove the old air cleaner
element.
Clean the inside of the air cleaner
housing with a damp rag. 5. Place the new air cleaner element
in the air cleaner housing.
6. Reinstall the air cleaner housing cover, tighten the four bolts.
7. Reinstall the air intake cover. Reinstall the two pins and secure
them by pushing on the heads
until they lock. 8. Reinstall the air duct on the air
cleaner housing cover.
Reinstall the maintenance hole cap.
Maintenance
MAINTENANCE
HOLE CAP
BOLTS
AIR CLEANER ELEMENTProCarManuals.comMain Menu Table of Contents s t
Page 192 of 272
Wiper Blades
4. Slide the blade out of the holder.
5. Slide the new blade into the holder.
Make sure it is engaged in the slot
along its full length. 6. Insert both ends of the blade into
the holder slots. Make sure they
are secure.
7. Slide the wiper blade assembly onto the wiper arm. Make sure it
locks in place.
8. Lower the wiper arm.
MaintenanceProCarManuals.comMain Menu Table of Contents s t
Page 206 of 272
Lights
Replacing the Front Side Marker/
Turn Signal and Parking Light Bulb
1. Use a Phillips-head screwdriver to remove the screw from the top of
the fender.
2. Move the side marker light assembly forward until it slides out
of the body. 3. Turn the socket one-quarter turn
counterclockwise to remove it
from the lens.
4. Remove the bulb by pushing it in slightly and turning it counter-
clockwise.
5. Install the new bulb in the socket.
Turn it clockwise to lock it in place.
6. Insert the socket back into the lens. Turn it clockwise to lock it in
place.
7. Put the side marker assembly back into the body. Align the fourtabs and push on the front edge
until it snaps into place.
Install the mounting screw and
tighten it securely.
Maintenance
SCREWProCarManuals.comMain Menu Table of Contents s t
Page 208 of 272
Lights
Replacing a Rear License Bulb
1. Remove the two screws and remove the lens.
2. Pull the bulb straight out of its socket. Push the new bulb in until
it bottoms in the socket.
3. Turn on the parking lights and check that the new bulb is
working.
4. Reinstall the lens. Reinstall the
two screws and tighten them
securely.
Replacing Bulbs in the Interior
Lights
The courtesy lights in the doors, tailgate and ceiling come apart thesame way. They do not all use the
same bulb.
1. Remove the lens by carefully prying on the edge of the lens witha fingernail file or a small flat-tipscrewdriver. Do not pry on the
edge of the housing around the
lens.
Door light: pry on the bottom middle of the
lens.
Ceiling light:
Pry on the front edge of the lens
in the middle. 2. Remove the bulb by pulling it
straight out of its metal tabs.
3. Push the new bulb into the metal
tabs. Snap the lens back in place.
CONTINUED
MaintenanceProCarManuals.comMain Menu Table of Contents s t