Page 1129 of 1681

lgnition Switch
Electrical Switch Replacement
SRS comoonents are located in this ar8a. Review thE
SRS component locations, precautions, and procedures
in the SRS section (23) before performing repairs or ser-
vice.
NOTE: The original radio has a coded thett protection
circuit, Be sure to get the customer's code number before- disconnecting the battery.- removing th6 No. 47 (7.5 A) tuse from the under-hood
tuse/relav box,- removing the radio.
After service, reconnect oower to the radio and turn it
on. When the word "CODE" is displayed, enter the cus-
tomer's s-digit code to restore radio operation.
1. Disconnect the negative cable from the battery.
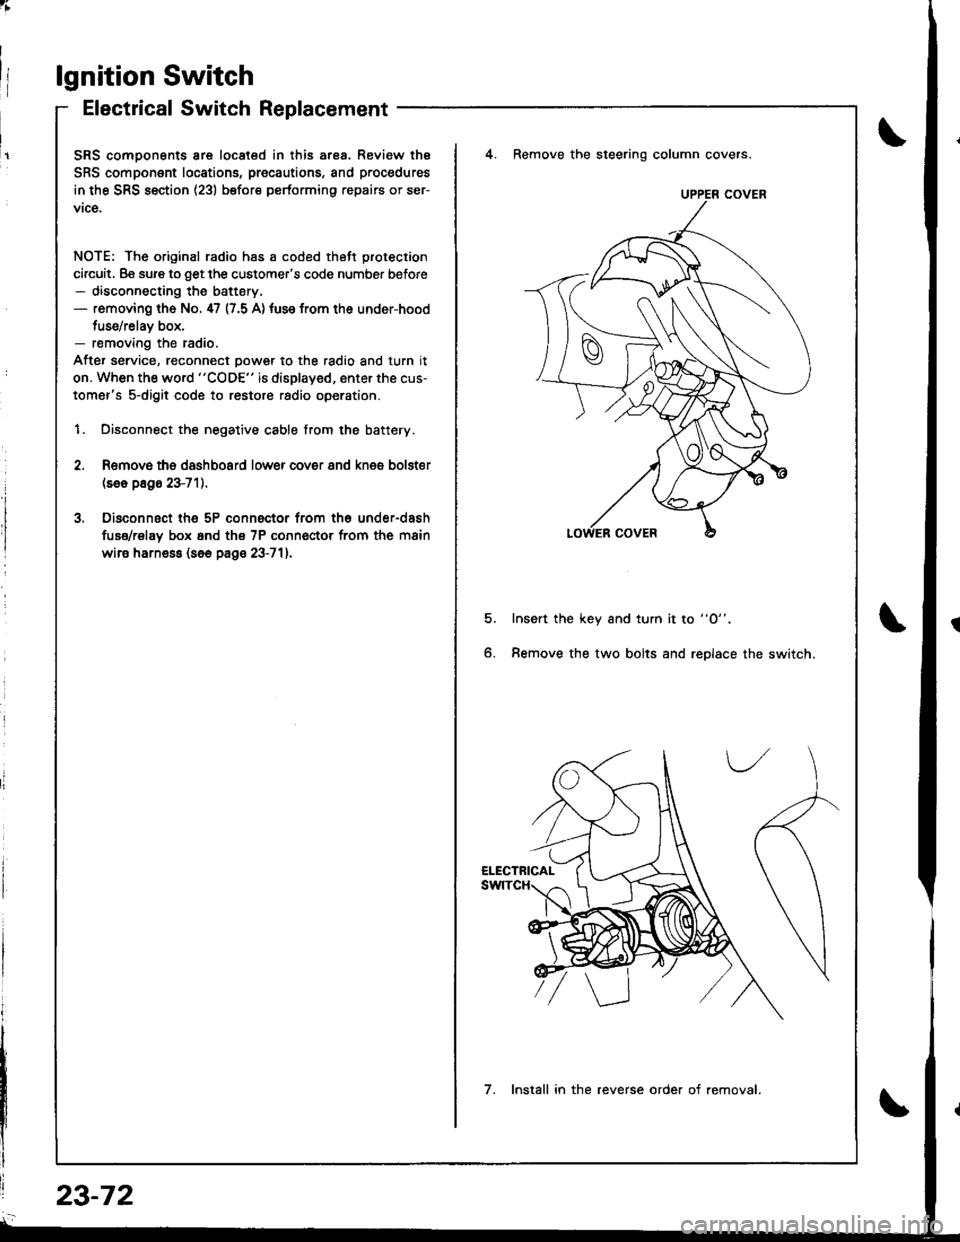
4. Remove the steering column covers.
Romovs ths dashboard lower cover 8nd knes bolster(se6 p8g6 23-71).
Disconnsct th6 5P connector from th6 under-dash
fuse/rel8y box 6nd th€ 7P conn€ctor from the main
wire harne$ (s6e page 23-711.
5.Insert the key and turn it to "O".
Remove the two bolts and replace the switch6.
UPPER COVER
7. Install in the reverse order of removal.
23-72
Page 1130 of 1681

;
Steering Lock Replacement
SRS components are located in this area. Review the
SRS component locations, precautions, and procedures
in the SRS section (23) before performing repairs or ser-
vice.
NOTE: The original radio has a coded theft protection
circuit. Be sure to get the customer's code number before- disconnecting the battery.- removing the No. 47 (7.5 A) fuse trom the under-hood
fuse/relav box.- removing the radio.
After service, reconnect power to the radio and turn it
on. When the word "CODE" is displayed. enter the cus-
tomer's 5-digit code to restore radio operation.
1. Disconnect the negative cable from the battery.
2. Remove ths dsshboard lower cover and knee bolster(s6o p8ge 23-72).
3, Disconnect the 5P connector from the under-dash
fuse/relay box and the 7P connsctor from th€ main
wire harness (see page 23-72l.,
4. Remove the steering column covars (see page
23-721.
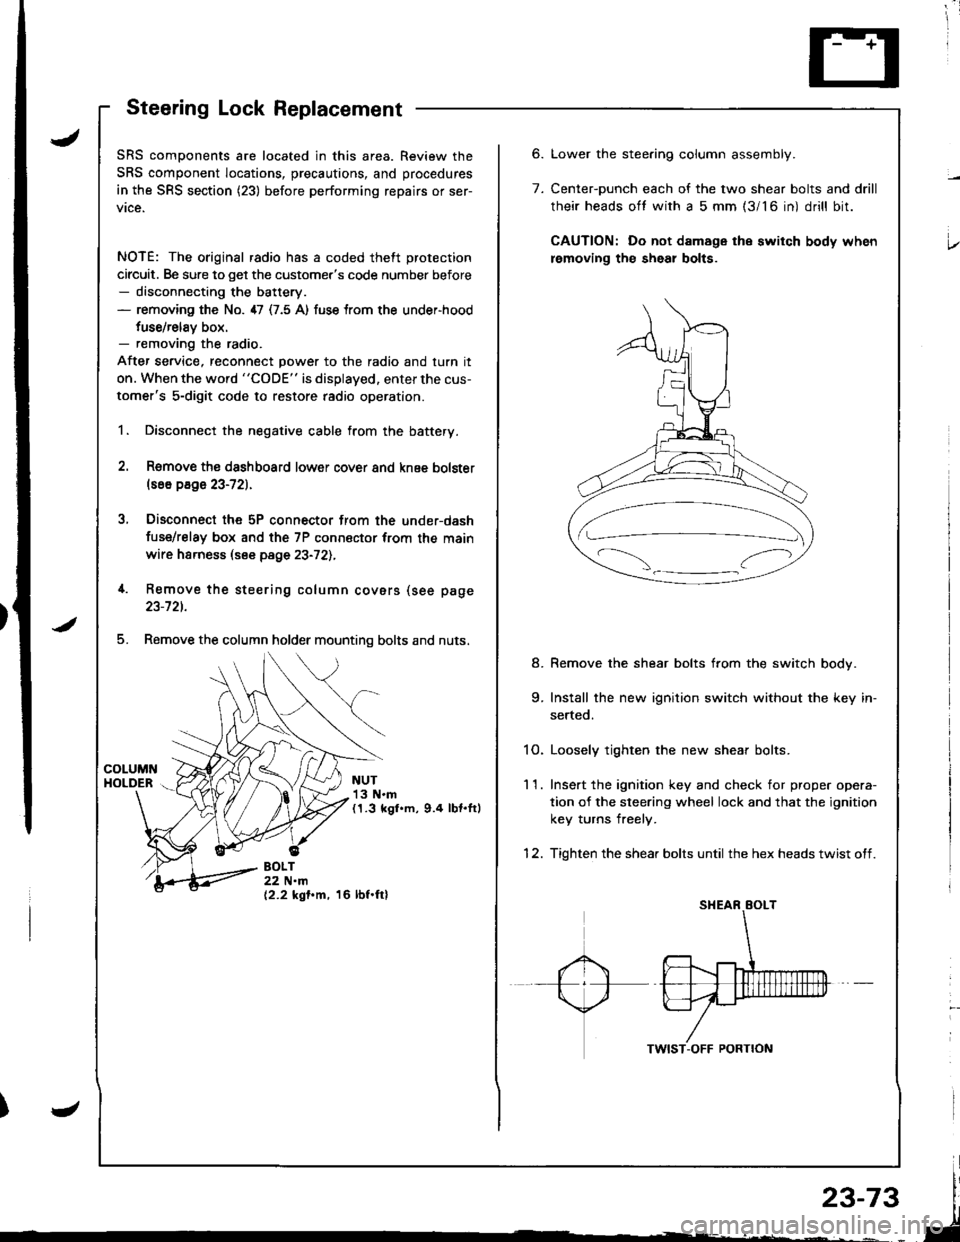
5. Remove the column holder mounting bolts and nuts.
NUT13 N.m(1.3 kgl.m, 9.4 lbt.ftl
BOLT22 N.m(2.2 kgf.m, 16 lbf.ftl
6.
7.
Lower the stee.ing column assembly.
Center-ounch each of the two shear bolts and drill
their heads oft with a 5 mm {3/16 in) drill bit.
CAUTION: Do not damage the switch body when
lemoving th€ sheal bolts.
Remove the shear bolts from the switch body.
Install the new ignition switch without the key in-
serted.
1O. Loosely tighten the new shear bolts.
11. Ins€rt the ignition key and check for proper opera-
tion of the sleering wheel lock and that the ignition
key turns freely.
12. Tighten the shear bolts until the hex heads twist off.
8.
Page 1137 of 1681
Starting System
Starter Replacement
NOTE: The original radio has a coded theft protection
citcuit. Be sure to get the customer's code number before- disconnecting the battery.- removing the No. 47 {7.5 A) fuse from the under-hood
fuse/rslav box.- removing the radio.
After service, reconnect power to the radio and turn it
on. When the word "CODE" is displayed. enter the cus-
tomer's 5-digit code to restore radio operation.
Disconnect the negative cable trom the battery.
Remove the intake air duct.
AIR CLEANERHOUSING
R€move the engine wire harness and starter cables
from their brackets.
1.
3.
INTAKE AIR DUCT
ENGINE WIRE HARNESS
CABLES
23-80
5.
Disconnect the starter cable from the B terminal on
rhe solenoid, then disconnect the BLK/WHT wire
from the S terminal.
Remove the two bolts holding the starter, then re-
move the starter.
UPPER MOUNTING BOLT44 N.m (4.5 kgf.m, 33 lbt.fr)
STARTER CABLE
TERMINAL
BLK/WHT WIRE
6. Install in the reverse order of removal.
Page 1138 of 1681
I
,.
u
J
/
Starter Overhaul
CAUTION: Disconnect th€ banery negative cable botore
removing the starter.
NOTE: The original radio has a coded theft protection
citcuit. Be sure to get the customer's code number before- disconnecting the baftery.- removing the No. ,17 (7.5 A) fuse from the under-hood
fuse/relav box.- removing the radio.
After service, reconnect power to the radio and turn it
on. When the word "CODE" is displayed, enter the cus-
tomer's 5-digit code to restore radio operation.
BRUSH HOLDERTest, page 23-82
BRUSHInspectaon, page 23-82
SOLENOID HOUSING
STEEL BALL
install steel ballfrom clutch side.
-.''.!k.��rt{l{
MOLYBDENUMDISULFIDE
OVERRUNNING CLUTCH ASSEMBLYInspection, page 23-85
PINTON GEAB IDLER GEAR
\
HARNE'SBRA.KET
-\l
-
^,1FIELD WINDING/ 'A \
f:$i:y5J*"""
*\s
SOLENOIDPLUNGER
STARTEBSOLENOID
inspection,
BRUSH HOLDER
Test, page 23-79
OVERRUNNINGCLUTCH ASSEMBLY
ARMATURE
O-RING
COVER
I
6
%
-@t
MOLYBDENUMDISULFIDE
END COVER
GEAR HOUSING
Page 1139 of 1681

Staning System
Starter Brush Holder TestStarterInspection
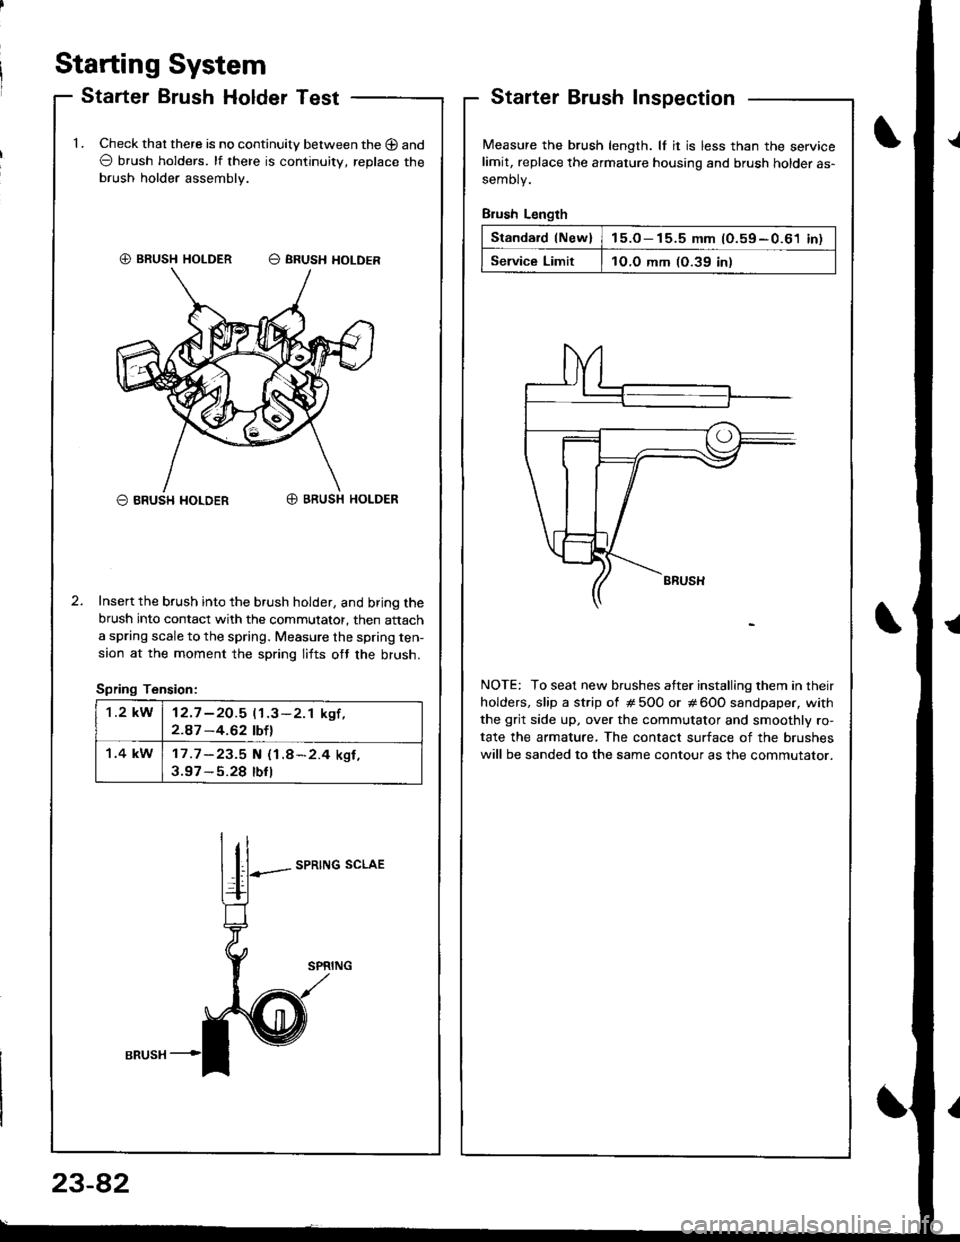
Measure the brush length. lf it is less than the servicelimit, replace the armature housing and brush holder as-
semoty.
Brush Length
Standard lNew)15.o- 15.5 mm (O.59-0.61 inl
Service Limit1O.O mm (O.39 in)
NOTE: To seat new brushes atter installing them in their
holders, slip a strip of # 5O0 or # 600 sandpaper, with
the grit side up, over the commutator and smoothly ro-
tate the armature, The contact surface of the brushes
will be sanded to the same contour as the commutator.
1.Check that there is no continuity between the O and
O brush holders. lf there is continuitv, replace the
brush holder assembly.
O BRUSH I{OLDERO BRUSH HOLDER
Insert the brush into the brush holder, and bring the
brush into contact with the commutator, then attach
a spring scale to the spring. Measure the spring ten-
saon at the moment the spring lifts ott the brush.
Spring Tension:
SPRING SCLAE
€) BRUSH HOLDER O SRUSH HOLDER
1.2 kW12.7 -2O.5 11.3-2.1 kgf ,2.A7 -4.62 tbtl
1.4 kW17 .7 -23.5 N (1.8*2.4 ksf ,3.97 - 5.28 tbfl
I
23-82
Page 1140 of 1681
J
Armature Inspection and Test
Inspect the armature tor wear
contact with the field winding.
damage, replace the armature.
or damage due to
lf there is wear or
/)
2. Check comrnutator surface and diameter.
. lf the surface is dirty or burnt, resurface with emery
cloth or a lathe within the following specifications,
or recondition with #500 or #600 sandpaper.
gt
Inspsct for damage
. lf commutator diameter is below the service limit,
replace the armature.
Commutator Diameter
Measure the commutator runout.
. lf the commutator runout is within the service
limit, check the commutator lor carbon dust or
brass chips between the segments.
. lf the commutator runout is not within the ser-
vice limit, replace the armature.
Commutator Runout
(cont'd)
23-83
Standard (NEW)Service Limil
29.9 - 30.0 mm
(1.177 - 1.181 in)
29.0 mm
(1.14 in l
VERI{ER CAI|PEN
Standard (NEW)Service Limit
0 - 0.02 mm
(0 - 0.0008 in)
u-(J5 mm
(0.002 in)
Page 1141 of 1681
Starting System
Armature Inspection and Test (cont'd)
4.Check the mica depth. lf necessary, undercut the micawith a hacksaw blade to achieve proper depth. lf theservice limit cannot be maintained, replace the arma-ture.
Place the armature on an armature tester. Hold a
hacksaw blade on the armature core. lf the blade is
attracted to the core or vibrates while the core is
turned, the armature is shorted. Beplace the arma-
ture.
M|cA D€PTH
Commutator Mica Deoth
5.Check for continuity between the segments of thecommutator. lf an open circuit exists between anvsegments, replace the armature.7.With an ohmmeter, check for continuity between
the commutator and armature coil core, and
between the commutator and armature shaft. lf
there is continuity, replace the armature.
HGH
Standard {NEW)Service Limit
u.5 - u,6 mm(0.02 - 0.03 in)
0.20 mm(0.008 inlARMATURE
Page 1145 of 1681
lgnition System
23-88
Component Location lndex
rGNlTroN TTMTNG COJTRqL SYSTEM
. lnspection and sefting, page 23-90
DISTRIBUTORTop End lnspeclion, page 23-92Removal/lnstallation, pages 23-92, 93Overhaul, page 23 94Reassembly, page 23-95lgnition Coil TesvReplacement, page 23 96lgnition Control Module (lCM) lnput Test, page 23-97
PLUGSInspection, pago 23-98
IGN'TION WIRESInspection, page 23-95
SERVICE CHECK CONNECTOR I2PIIWi]6 coloEi BRN/WHT I
land BLK j