1998 HONDA CIVIC COUPE coolant temperature
[x] Cancel search: coolant temperaturePage 58 of 251
Gauges
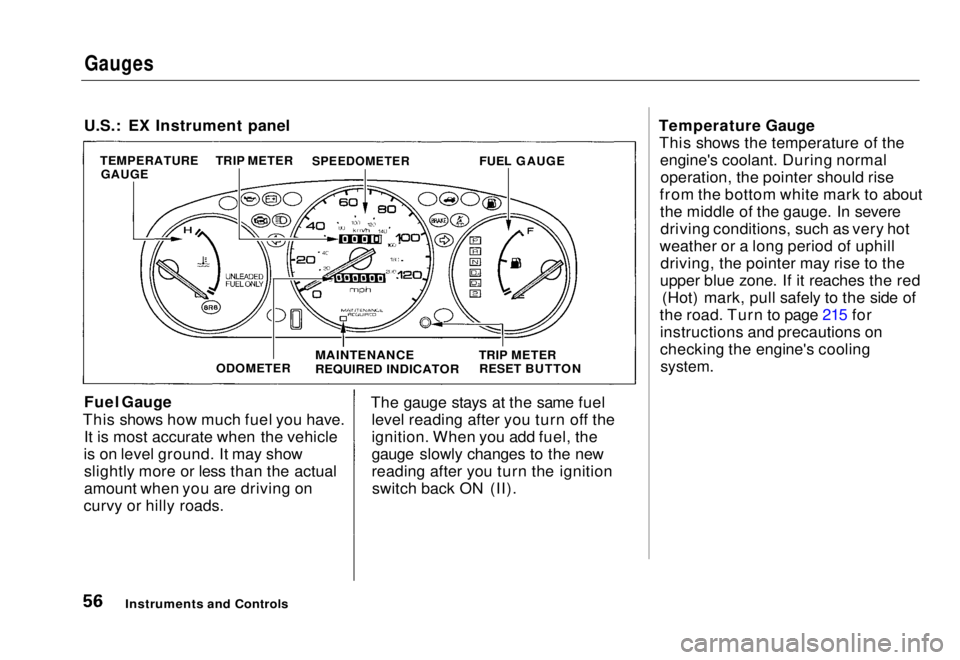
U.S.: EX Instrument panel
Fuel Gauge
This shows how much fuel you have. It is most accurate when the vehicle
is on level ground. It may show slightly more or less than the actual
amount when you are driving on
curvy or hilly roads. The gauge stays at the same fuel
level reading after you turn off the
ignition. When you add fuel, the
gauge slowly changes to the new
reading after you turn the ignitionswitch back ON (II). Temperature Gauge
This shows the temperature of the engine's coolant. During normaloperation, the pointer should rise
from the bottom white mark to about the middle of the gauge. In severedriving conditions, such as very hot
weather or a long period of uphill driving, the pointer may rise to the
upper blue zone. If it reaches the red (Hot) mark, pull safely to the side of
the road. Turn to page 215 for instructions and precautions on
checking the engine's cooling
system.
Instruments and Controls
TEMPERATURE
GAUGE TRIP METER
SPEEDOMETER
FUEL GAUGE
ODOMETER
MAINTENANCE
REQUIRED INDICATOR
TRIP METER
RESET BUTTONMain Menu Table of Contents s t
Page 90 of 251
Heating and Cooling
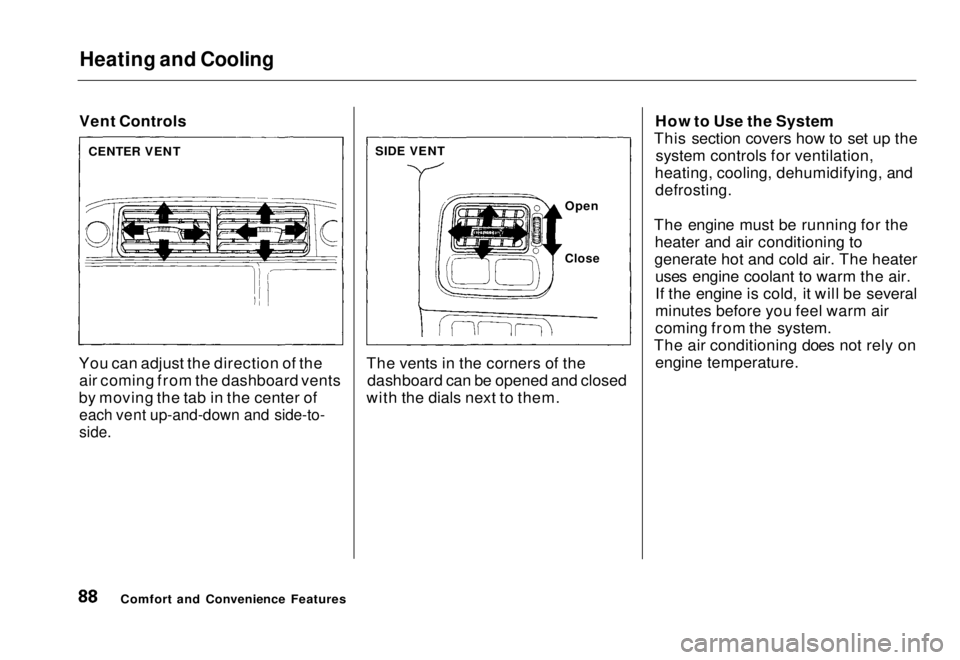
Vent Controls
You can adjust the direction of the air coming from the dashboard vents
by moving the tab in the center of
each vent up-and-down and side-to-
side.
The vents in the corners of the
dashboard can be opened and closed
with the dials next to them. How to Use the System
This section covers how to set up the system controls for ventilation,
heating, cooling, dehumidifying, and defrosting.
The engine must be running for the heater and air conditioning to
generate hot and cold air. The heater uses engine coolant to warm the air.
If the engine is cold, it will be several
minutes before you feel warm air
coming from the system.
The air conditioning does not rely on engine temperature.
Comfort and Convenience Features
CENTER VENT
SIDE VENT
Open
CloseMain Menu Table of Contents s t
Page 92 of 251
Heating and Cooling
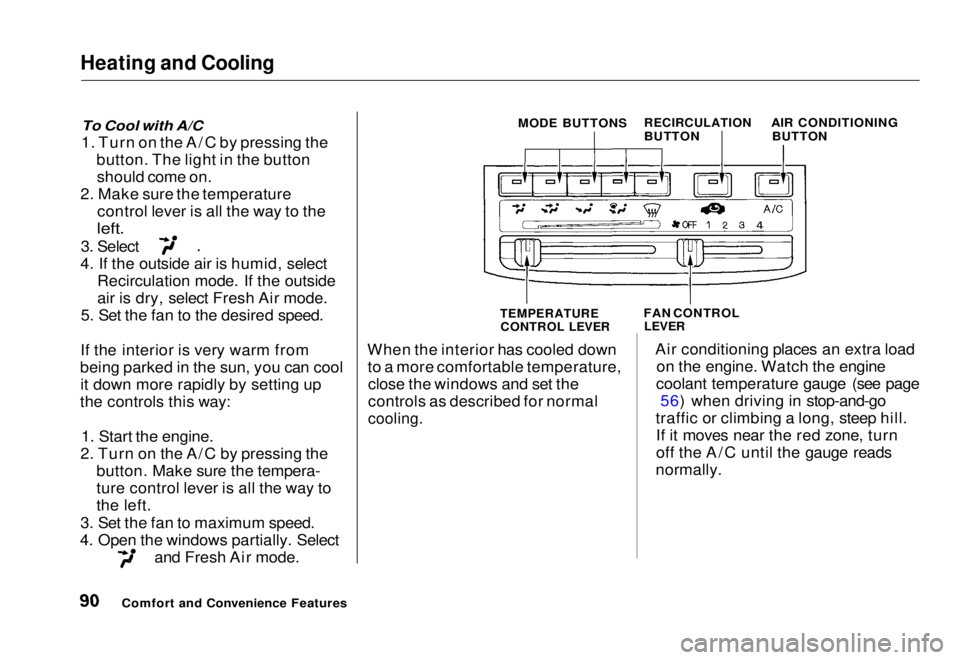
To Cool with A/C
1. Turn on the A/C by pressing the button. The light in the buttonshould come on.
2. Make sure the temperature control lever is all the way to the
left.
3. Select
4. If the outside air is humid, select Recirculation mode. If the outside
air is dry, select Fresh Air mode.
5. Set the fan to the desired speed.
If the interior is very warm from
being parked in the sun, you can cool it down more rapidly by setting up
the controls this way:
1. Start the engine.
2. Turn on the A/C by pressing the button. Make sure the tempera-
ture control lever is all the way to
the left.
3. Set the fan to maximum speed.
4. Open the windows partially. Select and Fresh Air mode. When the interior has cooled down
to a more comfortable temperature,close the windows and set the
controls as described for normal
cooling.
Air conditioning places an extra load
on the engine. Watch the engine
coolant temperature gauge (see page 56) when driving in stop-and-go
traffic or climbing a long, steep hill. If it moves near the red zone, turn
off the A/C until the gauge reads
normally.
Comfort and Convenience Features MODE BUTTONS
RECIRCULATION
BUTTON AIR CONDITIONING
BUTTON
TEMPERATURE CONTROL LEVER
FAN CONTROL
LEVERMain Menu Table of Contents s t
Page 95 of 251

Heating and Cooling
These settings direct all the air flow to the defroster vents at the base of
the windshield and the side windowdefroster vents. The air flow will get
warmer and clear the windows faster as the engine warms up. You can
close the side vents with the dial
beside each vent. This will send
more warm air to the windshield defroster vents.
For safety, make sure you have a
clear view through all the windows
before driving away. To Turn Everything Off
To shut off the system temporarily, slide the fan speed and temperature
control levers all the way to the left.
You should shut the system completely off only for the first few
minutes of driving in cold weather,
until the engine coolant warms upenough to operate the heater. Keep
the fan on at all other times so stale air does not build up in the interior.
Comfort and Convenience FeaturesMain Menu Table of Contents s t
Page 162 of 251
Cooling System
Replacing Engine Coolant
The cooling system should be completely drained and refilled with
new coolant according to the time and distance recommendations in
the maintenance schedule. Only use Genuine Honda antifreeze/coolant.
Draining the coolant requires access
to the underside of the vehicle. Unless you have the tools and
knowledge, you should have this maintenance done by a skilled
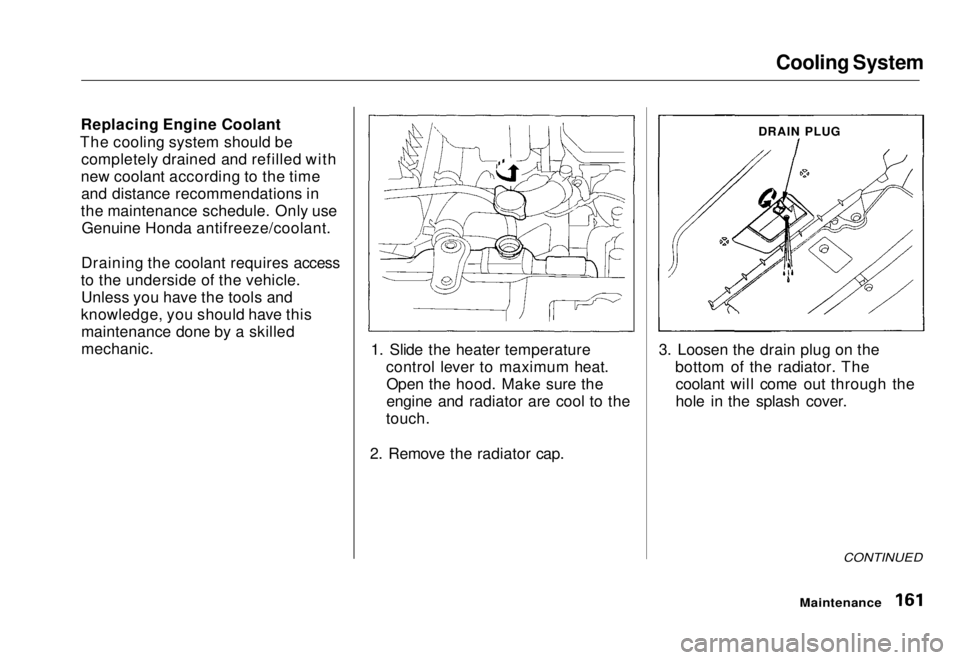
mechanic. 1. Slide the heater temperature
control lever to maximum heat.Open the hood. Make sure the
engine and radiator are cool to the
touch.
2. Remove the radiator cap. 3. Loosen the drain plug on the
bottom of the radiator. Thecoolant will come out through the
hole in the splash cover.
CONTINUED
Maintenance
DRAIN PLUGMain Menu Table of Contents s t
Page 215 of 251
If Your Engine Overheats
The pointer of your vehicle's temperature gauge should stay in
the midrange under most conditions.It may go higher if you are driving up
a long steep hill on a very hot day. If
it climbs to the red mark, you should
determine the reason.
Driving with the temperature gauge-
pointer at the red mark can cause serious damage to your engine. Your vehicle can overheat for several
reasons, such as lack of coolant or a
mechanical problem. The only
indication may be the temperature
gauge climbing to or above the red
mark. Or you may see steam or
spray coming from under the hood.
In either case, you should take
immediate action.
1. Safely pull to the side of the road.
Put the transmission in Neutral or
Park and set the parking brake.
Turn off the heating and cooling system and all other accessories.
Turn on the hazard warning
indicators.
2. If you see steam and/or spray coming from under the hood, turnoff the engine.
3. If you do not see steam or spray, leave the engine running and
watch the temperature gauge. If
the high heat is due to overloading (climbing a long, steep hill on a
hot day with the A/C running, for
example), the engine should start
to cool down almost immediately. If it does, wait until the tempera-
ture gauge comes down to the mid-
point then continue driving.
CONTINUED
Taking Care of the Unexpected
NOTICE
Steam and spray from an
overheated engine can
seriously scald you.Do not open the hood if steam
is coming out.Main Menu Table of Contents s t
Page 216 of 251
If Your Engine Overheats
4. If the temperature gauge stays at
the red mark, turn off the engine.
5. Wait until you see no more signs of steam or spray, then open the
hood.
6. Look for any obvious coolant leaks, such as a split radiator hose.
Everything is still extremely hot, so use caution. If you find a leak, it
must be repaired before you continue driving (see Emergency
Towing on page 227).
7. If you don't find an obvious leak, check the coolant level in the
radiator reserve tank (see page112). If the level is below the
MIN mark, add coolant to halfway
between the MIN and MAX marks.
8. If there was no coolant in the reserve tank, you may also have to
add coolant to the radiator. Let the
engine cool down until the pointer reaches the middle of the tempera-
ture gauge, or lower, before check- ing the radiator.
9. Using gloves or a large heavy cloth, turn the radiator cap
counterclockwise, without pushingdown, to the first stop. This
releases any remaining pressure in
the cooling system. After the
pressure releases, push down on
the cap and turn it until it comes off. 10.Start the engine and set the
temperature control lever tomaximum. Add coolant to the
radiator up to the base of the filler
neck. If you do not have the
proper coolant mixture available,
you can add plain water. Remember to have the coolingsystem drained and refilled with
the proper mixture as soon as you
can.
11.Put the radiator cap back on tightly. Run the engine and watch
the temperature gauge. If it goes
back to the red mark, the engineneeds repair. (See EmergencyTowing on page 227).
12.1f the temperature stays normal, check the coolant level in the
radiator reserve tank. If it has
gone down, add coolant to the MAX mark. Put the cap back on
tightly.
Taking Care of the Unexpected
Removing the radiator cap
while the engine is hot can
cause the coolant to spray out,
seriously scalding you.
Always let the engine and radiator cool down before
removing the radiator cap.Main Menu Table of Contents s t
Page 249 of 251
Index
Compact Spare............................... 206
Consumer Information*................ 244
Controls, Instruments and.............. 49
Coolant
Adding......................................... 155
Checking..................................... 112
Proper Solution.......................... 159
Replacing.................................... 161
Temperature Gauge.................... 56
Corrosion Protection..................... 203
Crankcase Emissions Control
System......................................... 240
Cruise Control Operation............... 64
Customer Relations Office........... 244
DANGER, Explanation of................. ii
Dashboard........................................ 50
Daytime Running Lights................. 59
Dead Battery, What to Do............ 213
Defects, Reporting Safety............. 248
Defog and Defrost........................... 91
Defogger, Rear Window................. 62
Defrosting the Windows................. 91
DEXRON
®
III Automatic
Transmission Fluid.................... 165
Dimensions..................................... 232
Dimming the Headlights................ 59
Dipstick Automatic Transmission........... 165
Engine Oil................................... 112
Directional Signals........................... 60
Disabled, Towing Your Car If...... 227
Disc Brake Wear Indicators......... 134
Disposal of Used Oil...................... 158
Doors
Locking and Unlocking............... 68
Power Door Locks....................... 69
DOT Tire Quality Grading........... 236
Downshifting, 5-speed Manual Transmission.............................. 122
Driver and Passeneer Safety............ 3
Drive Belts.................................... 178
Driving............................................ 119
Economy..................................... 113
In Bad Weather.......................... 138
In Foreign Countries................. 239
Economy, Fuel............................... 113
Emergencies on the Road............. 205
Battery, Jump Starting.............. 213
Brake System Indicator............ 220Changing a Flat Tire................. 207
Charging System Indicator ...... 218
Checking the Fuses................... 223
Low Oil Pressure Indicator...... 217
Malfunction Indicator Lamp .... 219
Manually Closing Moonroof.... 219Overheated Engine................... 211
Emergency Brake............................ 80 Emergency Flashers....................... 62
Emissions Controls........................ 240
Engine
Coolant Temperature Gauge ..... 56
Malfunction Indicator
Lamp.................................
54, 219
Oil Pressur e
Indicator......... 53,
217
Oil, Wha
t
Kind to Use............... 155
Overheating................................ 215
Specifications............................. 232
CONTINUEDMain Menu s t