1998 HONDA CIVIC COUPE seat adjustment
[x] Cancel search: seat adjustmentPage 51 of 251
Instruments and Controls
This section gives information about the controls and displays that
contribute to the daily operation of
your Honda. All the essential
controls are within easy reach.
Control Locations............................ 50
Indicator Lights................................ 51
Gauges.............................................. 55
Speedometer................................ 55
Tachometer.................................. 55 Odometer...................................... 55
Trip Meter.................................... 55 Fuel Gauge................................... 56
Temperature Gauge.................... 56
Maintenance Required
Indicator.................................... 57
Controls Near the Steering
Wheel........................................58
Headlights.................................... 59
Daytime Running Lights............. 59
Instrument Panel Brightness..... 60
Turn Signals................................. 60
Windshield Wipers...................... 61
Windshield Washers................... 61
Hazard Warning........................... 62
Rear Window Defogger.............. 62
Steering Wheel Adjustment....... 63
Steering Wheel Controls ................ 64
Cruise Control.............................. 64
Keys and Locks................................ 67
Keys...............................................67
Ignition Switch............................. 67
Door Locks................................... 68
Power Door Locks....................... 69
Remote Transmitter.................... 70
Trunk............................................ 73
Seat Adjustments............................. 74
Front Seat Adjustments.............. 74
Rear Seat Access......................... 75
Head Restraints........................... 75
Folding Rear Seat............................ 76
Power Windows............................... 77
Moonroof.......................................... 79
Mirrors.............................................. 79
Adjusting the Power Mirrors..... 80
Parking Brake.................................. 80
Glove Box......................................... 81
Beverage Holder.............................. 82
Accessory Power Socket................ 83
Ashtrays............................................ 83
Interior Light.................................... 84
Instruments and ControlsMain Menu s t
Page 76 of 251
Seat Adjustments
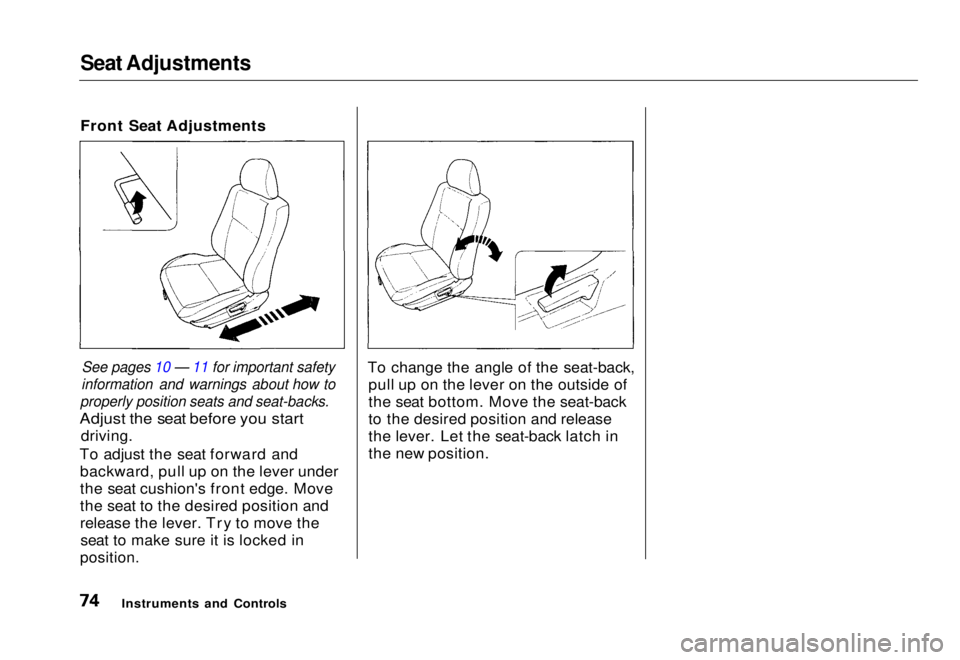
Front Seat Adjustments
See pages 10 — 11 for important safety
information and warnings about how to
properly position seats and seat-backs.
Adjust the seat before you start
driving.
To adjust the seat forward and backward, pull up on the lever under
the seat cushion's front edge. Move
the seat to the desired position and
release the lever. Try to move theseat to make sure it is locked in
position.
To change the angle of the seat-back,
pull up on the lever on the outside of
the seat bottom. Move the seat-back
to the desired position and release
the lever. Let the seat-back latch in
the new position.
Instruments and ControlsMain Menu Table of Contents s t
Page 77 of 251
Seat Adjustments
Rear Seat Access
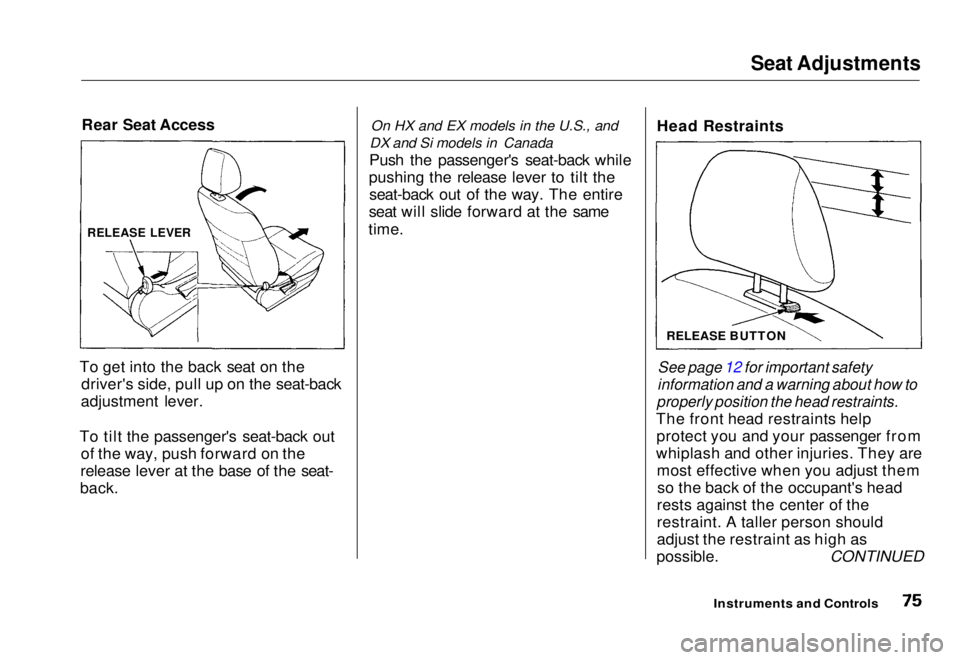
To get into the back seat on the driver's side, pull up on the seat-back
adjustment lever.
To tilt the passenger's seat-back out of the way, push forward on the
release lever at the base of the seat-
back. On HX and EX models in the U.S., and
DX and Si models in Canada
Push the passenger's seat-back while
pushing the release lever to tilt the seat-back out of the way. The entire
seat will slide forward at the same
time. Head Restraints
See page 12 for important safety
information and a warning about how to
properly position the head restraints.
The front head restraints help protect you and your passenger from
whiplash and other injuries. They are most effective when you adjust themso the back of the occupant's head
rests against the center of the
restraint. A taller person should
adjust the restraint as high as
possible. CONTINUED
Instruments and Controls
RELEASE LEVER
RELEASE BUTTONMain Menu Table of Contents s t
Page 78 of 251
Seat Adjustments, Folding Rear Seat
The front head restraints adjust for height. You need both hands to
adjust the restraint. Do not attempt
to adjust it while driving. To raise it, pull upward. To lower the restraint,
push the release button sideways and push the restraint down.
To remove a head restraint for cleaning or repair, pull it up as far as
it will go. Push the release buttonand pull the restraint out of the seat-
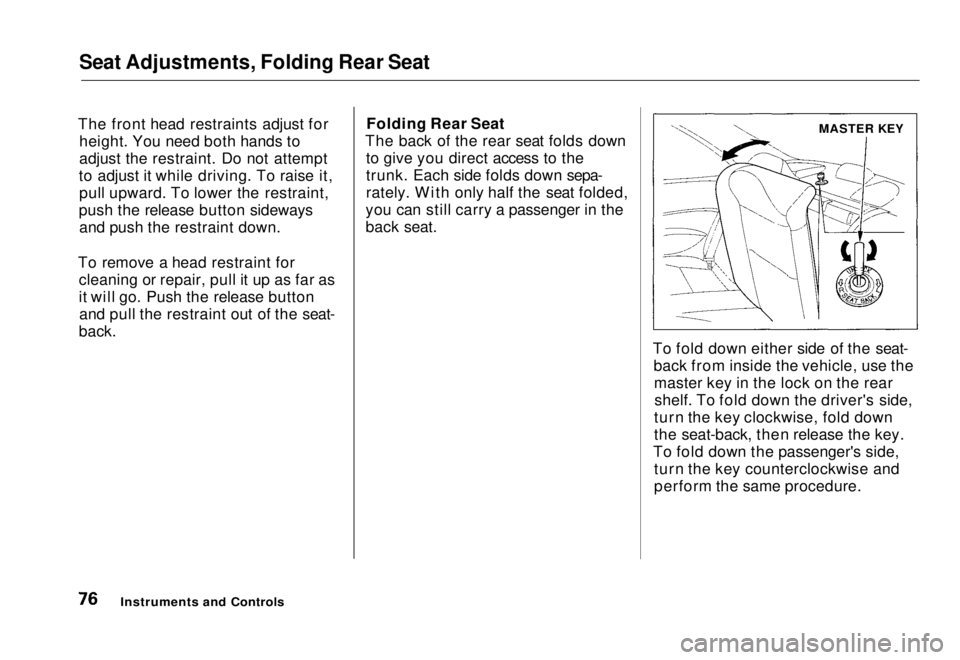
back. Folding Rear Seat
The back of the rear seat folds down to give you direct access to the
trunk. Each side folds down sepa-
rately. With only half the seat folded,
you can still carry a passenger in the
back seat.
To fold down either side of the seat-back from inside the vehicle, use themaster key in the lock on the rearshelf. To fold down the driver's side,
turn the key clockwise, fold down
the seat-back, then release the key.
To fold down the passenger's side, turn the key counterclockwise and
perform the same procedure.
Instruments and Controls
MASTER KEYMain Menu Table of Contents s t
Page 122 of 251
Preparing to Drive
You should do the following checks and adjustments every day before
you drive your vehicle.
1. Make sure all windows, mirrors, and outside lights are clean and
unobstructed. Remove frost, snow, or ice.
2. Check that the hood and trunk are fully closed.
3. Visually check the tires. If a tire looks low, use a gauge to check its
pressure.
4. Check that any items you may be
carrying with you inside are stored
properly or fastened down
securely.
5. Check the adjustment of the seat (see page 74).
6. Check the adjustment of the inside and outside mirrors (see
page 79).
7. Check the adjustment of the steering wheel (see page 63).
8. Make sure the doors are securely closed and locked. 9. Fasten your seat belt. Check that
your passengers have fastened
their seat belts (see page 7).
10. Turn the ignition switch ON (II). Check the indicator lights in the
instrument panel.
11. Start the engine (see page 121).
12. Check the gauges and indicator lights in the instrument panel (see
page 33).
DrivingMain Menu Table of Contents s t
Page 189 of 251
Lights
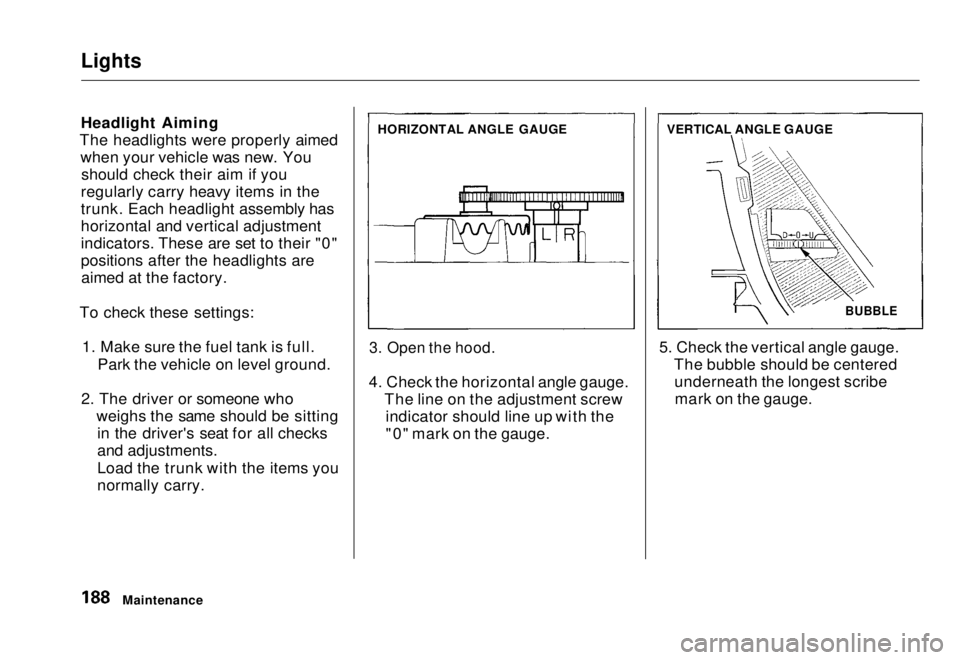
Headlight Aiming
The headlights were properly aimed when your vehicle was new. Youshould check their aim if you
regularly carry heavy items in the
trunk. Each headlight assembly has
horizontal and vertical adjustment
indicators. These are set to their "0"
positions after the headlights are aimed at the factory.
To check these settings: 1. Make sure the fuel tank is full. Park the vehicle on level ground.
2. The driver or someone who weighs the same should be sittingin the driver's seat for all checks
and adjustments.
Load the trunk with the items you
normally carry.
3. Open the hood.
4. Check the horizontal angle gauge. The line on the adjustment screwindicator should line up with the
"0" mark on the gauge. 5. Check the vertical angle gauge.
The bubble should be centeredunderneath the longest scribemark on the gauge.
Maintenance HORIZONTAL ANGLE GAUGE
VERTICAL ANGLE GAUGE
BUBBLEMain Menu Table of Contents s t
Page 247 of 251
Index
Accessories and Modifications.... 114 Accessories................................. 114
Additional Safety Precaution.... 115Modifications............................. 115
ACCESSORY (Ignition Key Position)........................................ 68
Accessory Power Socket................ 83
Adding Automatic Transmission
Fluid........................................ 164
Brake Fluid................................. 167 Clutch Fluid................................ 167
Engine Coolant........................... 159
Engine Oil................................... 155
Manual Transmission Fluid..... 166Power Steering Fluid................. 168
Windshield Washer Fluid......... 164
Additional Information About Your Seat Belts........................ 40
Lap Belt......................................... 41
Lap/Shoulder Belt....................... 40
Seat Belt Maintenance................ 42
Seat Belt System Components... 40 Additional Information About
Your SRS................................... 43
Additional Safety Precautions.... 46 How Your Airbags Work............ 43
How Your SRS Indicator
Works........................................ 45
SRS Components......................... 43
Additives, Engine Oil..................... 156
Adjustments
Headlights.................................. 188
Head Restraints........................... 75
Mirrors.......................................... 79
Seats.............................................. 74
Steering Wheel............................ 63
Airbag (SRS)...................................... 7
Air Cleaner Element...................... 169
Air Conditioning............................... 86 Maintenance............................... 177
Usage............................................. 86
Air Outlets (Vents).......................... 88
Air Pressure, Tires........................ 180 High Speed Driving................... 236
Normal Driving.......................... 180
Alcohol in Gasoline........................ 238
Antifreeze....................................... 159
Anti-lock Brakes (ABS)
Indicator Light.....................
53, 137
Operation.................................... 13 6
Anti-thef
t Steering Column
Lock...............................................68
Appearance Care........................... 199
Ashtrays (Optional)......................... 83
Audio System................................... 94
Automatic Speed Control................ 64
Automatic Transmission............... 124
Capacity, Fluid........................... 233
Checking Fluid Level................ 164
Shifting........................................ 125
Shift Lever Position Indicator.. 124
Shift Lever Positions................. 125
Shift Lock Release..................... 128
Battery Charging SystemIndicator............................ 53,
218
Jump Starting............................ .
213
Maintenance............................... 173
Specifications............................. 234
CONTINUEDMain Menu s t