1998 HONDA CIVIC COUPE trunk
[x] Cancel search: trunkPage 49 of 251
Carbon Monoxide Hazard
Your vehicle's exhaust contains carbon monoxide gas. You should
have no problem with carbon
monoxide entering the vehicle in
normal driving if you maintain your
vehicle properly.
Have the exhaust system inspected
for leaks whenever:
The vehicle is raised for an oilchange.
You notice a change in the sound of the exhaust. The vehicle was in an accident
that may have damaged the under-
side.
High levels of carbon monoxide can
collect rapidly in enclosed areas,
such as a garage. Do not run the
engine with the garage door closed.
Even with the door open, run the
engine only long enough to move the
vehicle out of the garage. With the trunk lid open, air flow can
pull exhaust gas into your vehicle'sinterior and create a hazardous
condition. If you must drive with the
trunk lid open, open all the windows and set the heating and coolingsystem as shown below.
If you must sit in your parked vehicle,
even in an unconfined area, with the
engine running, adjust the heating and cooling system as follows:
1. Select the Fresh Air mode. 2. Select the mode.
3. Turn the fan on high speed.
4. Set the temperature control to a comfortable setting.
Driver and Passenger Safety
Carbon monoxide gas is toxic.
Breathing it can cause
unconsciousness and even kill
you.
Avoid any enclosed areas oractivities that expose you to
carbon monoxide.Main Menu Table of Contents s t
Page 51 of 251
Instruments and Controls
This section gives information about the controls and displays that
contribute to the daily operation of
your Honda. All the essential
controls are within easy reach.
Control Locations............................ 50
Indicator Lights................................ 51
Gauges.............................................. 55
Speedometer................................ 55
Tachometer.................................. 55 Odometer...................................... 55
Trip Meter.................................... 55 Fuel Gauge................................... 56
Temperature Gauge.................... 56
Maintenance Required
Indicator.................................... 57
Controls Near the Steering
Wheel........................................58
Headlights.................................... 59
Daytime Running Lights............. 59
Instrument Panel Brightness..... 60
Turn Signals................................. 60
Windshield Wipers...................... 61
Windshield Washers................... 61
Hazard Warning........................... 62
Rear Window Defogger.............. 62
Steering Wheel Adjustment....... 63
Steering Wheel Controls ................ 64
Cruise Control.............................. 64
Keys and Locks................................ 67
Keys...............................................67
Ignition Switch............................. 67
Door Locks................................... 68
Power Door Locks....................... 69
Remote Transmitter.................... 70
Trunk............................................ 73
Seat Adjustments............................. 74
Front Seat Adjustments.............. 74
Rear Seat Access......................... 75
Head Restraints........................... 75
Folding Rear Seat............................ 76
Power Windows............................... 77
Moonroof.......................................... 79
Mirrors.............................................. 79
Adjusting the Power Mirrors..... 80
Parking Brake.................................. 80
Glove Box......................................... 81
Beverage Holder.............................. 82
Accessory Power Socket................ 83
Ashtrays............................................ 83
Interior Light.................................... 84
Instruments and ControlsMain Menu s t
Page 52 of 251
Control Locations
Instruments and Controls
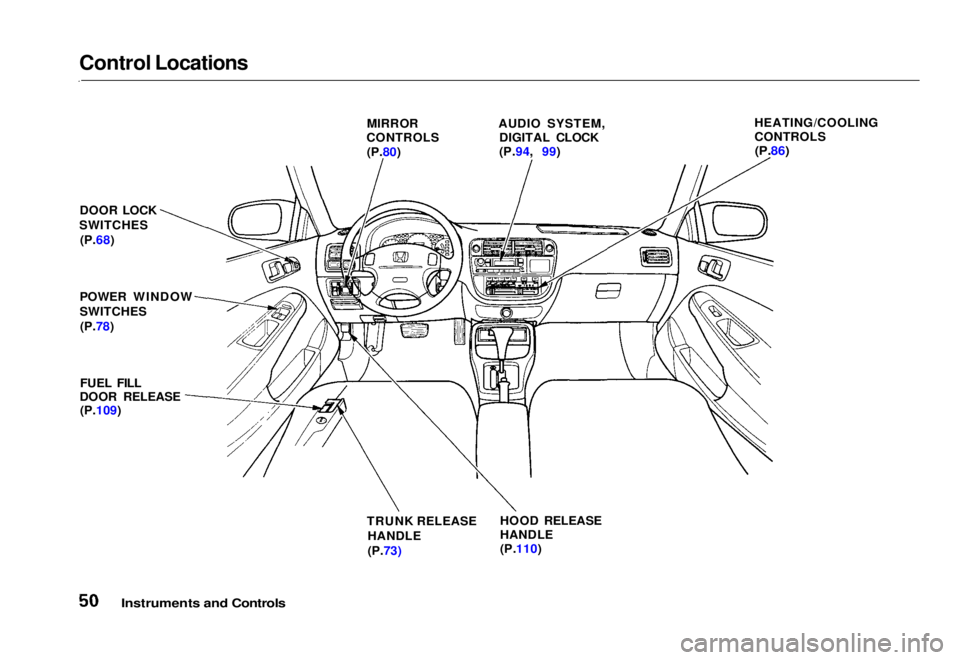
MIRROR
CONTROLS
(P.80) AUDIO SYSTEM,
DIGITAL CLOCK
(P.94, 99) HEATING/COOLING
CONTROLS
(P.86)
DOOR LOCK
SWITCHES (P.68)
POWER WINDOW
SWITCHES (P.78)
FUEL FILL
DOOR RELEASE (P.109)
TRUNK RELEASE
HANDLE
(P.73) HOOD RELEASE
HANDLE
(P.110)Main Menu Table of Contents s t
Page 53 of 251
Indicator Lights
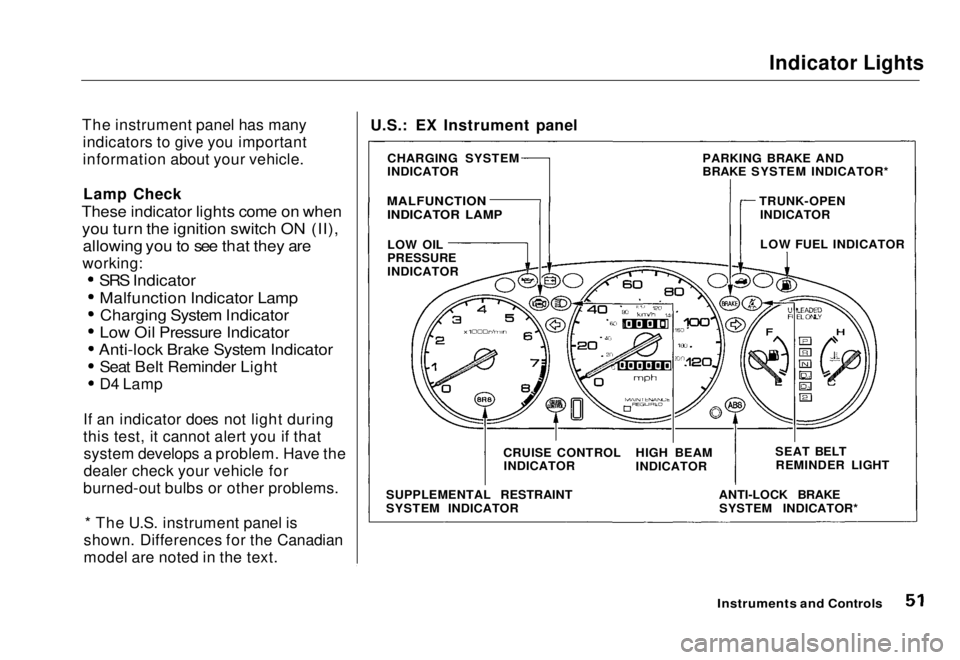
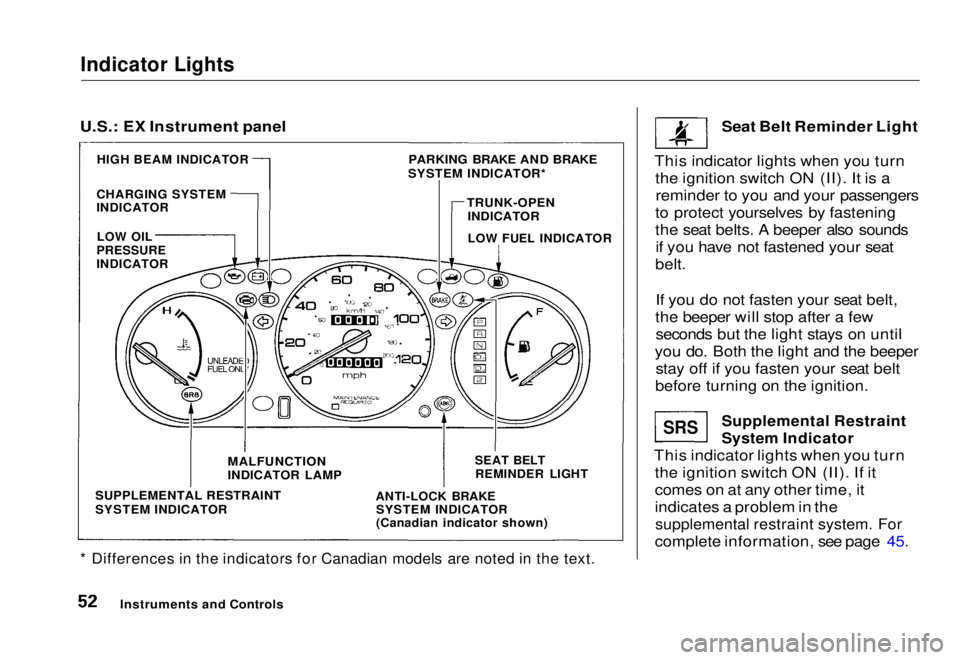
The instrument panel has many indicators to give you important
information about your vehicle.
Lamp Check
These indicator lights come on when
you turn the ignition switch ON (II), allowing you to see that they are
working:
SRS Indicator
Malfunction Indicator LampCharging System Indicator
Low Oil Pressure Indicator
Anti-lock Brake System Indicator
Seat Belt Reminder Light
D4 Lamp
If an indicator does not light during
this test, it cannot alert you if that system develops a problem. Have the
dealer check your vehicle for
burned-out bulbs or other problems.
* The U.S. instrument panel is
shown. Differences for the Canadian
model are noted in the text.
Instruments and Controls
U.S.: EX Instrument panel
CHARGING SYSTEM
INDICATOR
MALFUNCTION
INDICATOR LAMP
LOW OIL
PRESSURE
INDICATOR
SUPPLEMENTAL RESTRAINT
SYSTEM INDICATOR CRUISE CONTROL
INDICATOR HIGH BEAM
INDICATOR
ANTI-LOCK BRAKESYSTEM INDICATOR* SEAT BELT
REMINDER LIGHT
LOW FUEL INDICATOR
PARKING BRAKE AND
BRAKE SYSTEM INDICATOR*
TRUNK-OPENINDICATORMain Menu Table of Contents s t
Page 54 of 251
Indicator Lights
* Differences in the indicators for Canadian models are noted in the text.
Seat Belt Reminder Light
This indicator lights when you turn the ignition switch ON (II). It is areminder to you and your passengers
to protect yourselves by fastening
the seat belts. A beeper also sounds if you have not fastened your seat
belt.
If you do not fasten your seat belt,
the beeper will stop after a few seconds but the light stays on until
you do. Both the light and the beeper stay off if you fasten your seat belt
before turning on the ignition.
Supplemental Restraint
System Indicator
This indicator lights when you turn the ignition switch ON (II). If it
comes on at any other time, it
indicates a problem in the
supplemental restraint system. For
complete information, see page 45.
Instruments and Controls
SRS
U.S.: EX Instrument panel
PARKING BRAKE AND BRAKE
SYSTEM INDICATOR*
HIGH BEAM INDICATOR
CHARGING SYSTEM
INDICATOR
TRUNK-OPEN
INDICATOR
LOW FUEL INDICATOR
LOW OIL
PRESSURE
INDICATOR
SUPPLEMENTAL RESTRAINT
SYSTEM INDICATOR
MALFUNCTION
INDICATOR LAMP
ANTI-LOCK BRAKE
SYSTEM INDICATOR
(Canadian indicator shown)
SEAT BELT
REMINDER LIGHTMain Menu Table of Contents s t
Page 56 of 251
Indicator Lights
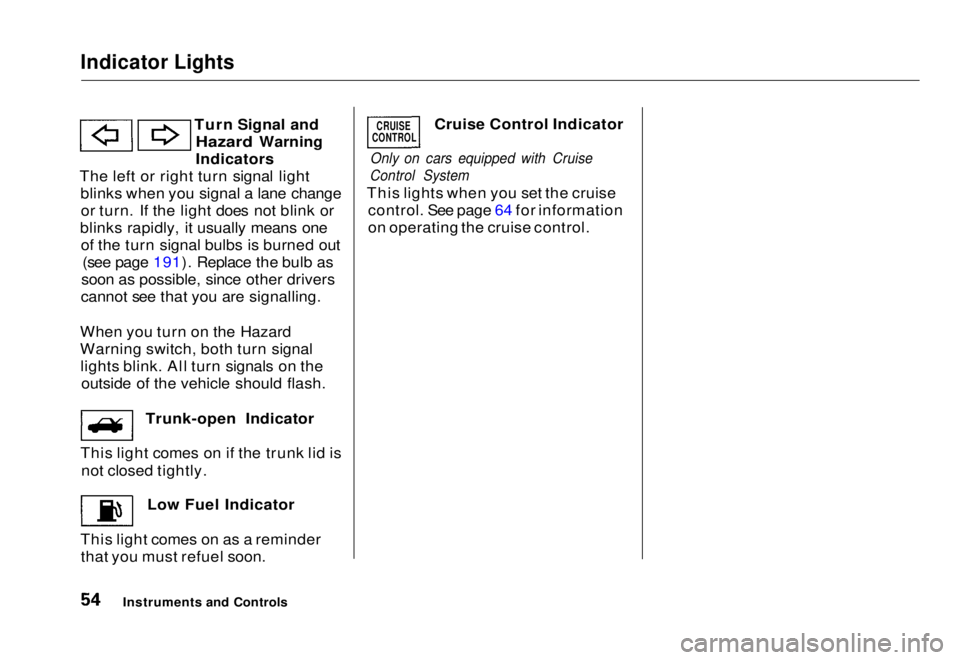
Turn Signal and
Hazard Warning
Indicators
The left or right turn signal light blinks when you signal a lane changeor turn. If the light does not blink or
blinks rapidly, it usually means one of the turn signal bulbs is burned out (see page 191). Replace the bulb as
soon as possible, since other drivers
cannot see that you are signalling.
When you turn on the Hazard
Warning switch, both turn signal lights blink. All turn signals on the outside of the vehicle should flash. Trunk-open Indicator
This light comes on if the trunk lid is not closed tightly. Low Fuel Indicator
This light comes on as a reminder that you must refuel soon. Cruise Control Indicator
Only on cars equipped with Cruise
Control System
This lights when you set the cruise control. See page 64 for information
on operating the cruise control.
Instruments and Controls
CRUISE
CONTROLMain Menu Table of Contents s t
Page 69 of 251

Keys and Locks
Keys
Your vehicle comes with two kinds
of keys: a master key and a valet key.
The master key fits all the locks on
your vehicle:
Ignition
Doors
Trunk
Trunk release handle Rear seat trunk access
The valet key works only in the
ignition and the door locks. You can
keep the trunk, trunk release handle and rear seat trunk access locked
when you leave your vehicle and
valet key at a parking facility. (See
Trunk, page 55.)
You should have received a key number plate with your set of keys.
You will need this key number if you ever have to get a lost key replaced.
Keep the plate stored in a safe place.
When replacing keys, use only Honda-approved key blanks.
Remote Transmitter On U.S. EX model
Your vehicle also comes with two remote transmitters; see page 52 foran explanation of the operation. Ignition Switch
The ignition switch is on the right side of the steering column. It has
four positions:
LOCK (0)
ACCESSORY (I)
ON (ID START (III)
CONTINUED
Instruments and Controls
KEY
NUMBER
PLATE
VALET
KEY MASTER
KEYMain Menu Table of Contents s t
Page 74 of 251
Keys and Locks
Reinstall the 0-ring. Align the
mark on the cover with the mark on the transmitter,
then set the cover in place and turn it
clockwise.
After the battery is changed, the transmitter must be synchronized
with the main unit. With the doors and trunk lid closed, press either theLOCK or UNLOCK button six times.
Test the transmitter by locking and unlocking the doors several times. Transmitter Care
Avoid severe shock to the trans- mitter, such as dropping or throwing
it. Also, protect it from extreme hotor cold temperatures.
Clean the transmitter case with a
soft cloth. Do not use strong
cleaners or solvents that could harm
the case. Immersing the transmitter in any liquid will harm the trans-
mitter and cause it to not function
properly.
Use the ring on the transmitter to
attach it to your main key ring. You
could damage the transmitter if you
try to use its ring as a key ring. If you lose a transmitter, you will
need to have the replacement
programmed to your vehicle's
system by your Honda dealer. Any
other transmitters you have will also
need to be reprogrammed.
As required by the FCC: This device complies with Part 15 of the
FCC rules. Operation is subject to the
following two conditions: (1) This device may not cause harmful interference, and (2) this device must accept any
interference received, including
interference that may cause undesired operation.
Changes or modifications not expressly
approved by the party responsible for
compliance could void the user's
authority to operate the equipment.
Instruments and ControlsMain Menu Table of Contents s t