Page 75 of 251
Keys and Locks
Trunk
You can open the trunk in two ways: Pull the trunk release handle to
the left of the driver's seat.
Use the master key to open the
trunk lock. The valet key does not
work in this lock. To close the trunk, press down on
the trunk lid.
See page 98 for cargo loading and
weight limit information. Keep the trunk lid closed at all times whiledriving to avoid damaging the lid,
and to prevent exhaust gas from
gettin
g
into the interior. See Carbon
Monoxide Hazar d
on page 47.To protect items in the trunk when
you need to give the key to someoneelse, lock the trunk release handle
with the master key and give the other person the valet key.
Instruments and Controls
MASTER KEY
MASTER KEY
TRUNK RELEASE HANDLEMain Menu Table of Contents s t
Page 78 of 251

Seat Adjustments, Folding Rear Seat
The front head restraints adjust for height. You need both hands to
adjust the restraint. Do not attempt
to adjust it while driving. To raise it, pull upward. To lower the restraint,
push the release button sideways and push the restraint down.
To remove a head restraint for cleaning or repair, pull it up as far as
it will go. Push the release buttonand pull the restraint out of the seat-
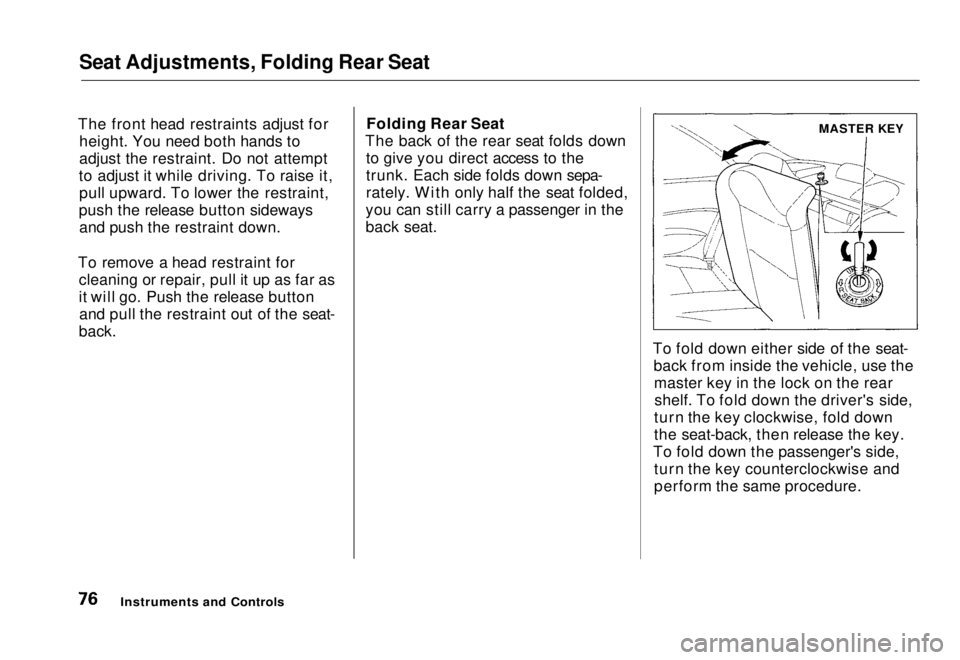
back. Folding Rear Seat
The back of the rear seat folds down to give you direct access to the
trunk. Each side folds down sepa-
rately. With only half the seat folded,
you can still carry a passenger in the
back seat.
To fold down either side of the seat-back from inside the vehicle, use themaster key in the lock on the rearshelf. To fold down the driver's side,
turn the key clockwise, fold down
the seat-back, then release the key.
To fold down the passenger's side, turn the key counterclockwise and
perform the same procedure.
Instruments and Controls
MASTER KEYMain Menu Table of Contents s t
Page 79 of 251

Folding Rear Seat, Power Windows
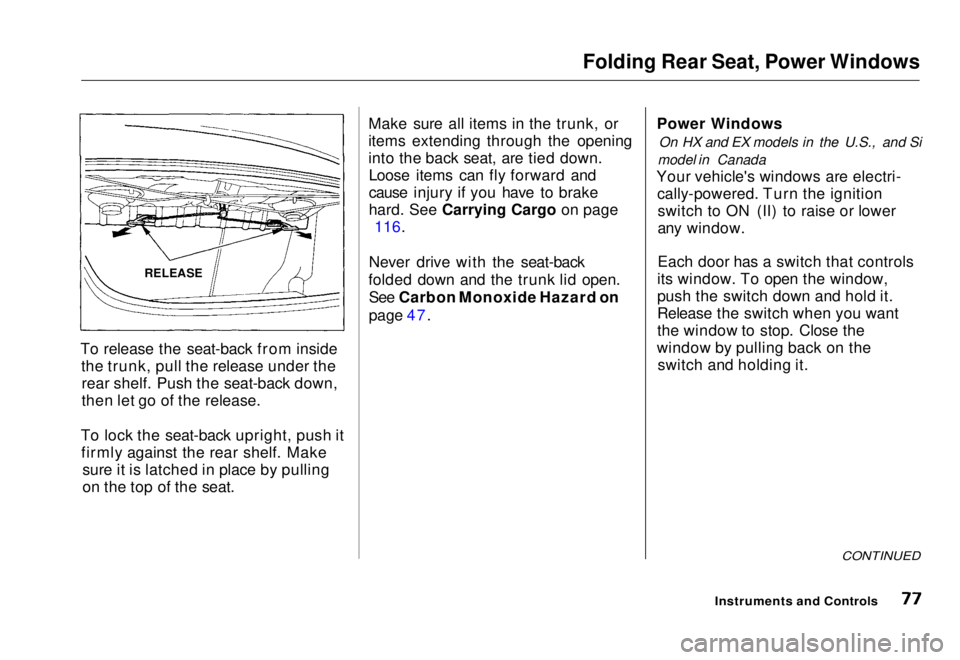
To release the seat-back from inside the trunk, pull the release under therear shelf. Push the seat-back down,
then let go of the release.
To lock the seat-back upright, push it firmly against the rear shelf. Make sure it is latched in place by pulling
on the top of the seat. Make sure all items in the trunk, or
items extending through the opening
into the back seat, are tied down.
Loose items can fly forward and
cause injury if you have to brake
hard
.
See Carrying Cargo on page
116.
Never drive with the seat-back
folded down and the trunk lid open. See Carbon Monoxide Hazard on
page 47. Power Windows
On HX and EX models in the U.S., and Si
model in Canada
Your vehicle's windows are electri- cally-powered. Turn the ignitionswitch to ON (II) to raise or lower
any window.
Each door has a switch that controls
its window. To open the window,
push the switch down and hold it.
Release the switch when you want
the window to stop. Close the
window by pulling back on the switch and holding it.
CONTINUED
Instruments and Controls
RELEASEMain Menu Table of Contents s t
Page 118 of 251
Carrying Cargo
Your vehicle has several convenientstorage areas so you can stow cargo
safely.
The glove box, and the pockets in the front doors and seat-backs, aredesigned for small, lightweight items.
The trunk is intended for larger, heavier items. In addition, the backseat can be folded down to allow you
to carry more cargo or longer items.
However, carrying too much cargo,
or improperly storing it, can affect
your vehicle's handling, stability and operation and make it unsafe. Before
carrying any type of cargo, be sure to
read the following pages.
Before Driving
CONSOLE COMPARTMENT
FRONT DOOR POCKET
SEAT-BACK POCKET
GLOVE BOX
TRUNKMain Menu Table of Contents s t
Page 120 of 251
Carrying Cargo
Carrying Cargo in the Trunk or on
a Roof Rack
Distribute cargo
evenly on the
floor of the trunk, placing the
heaviest items on the bottom and as far forward as possible.
If you fold down the back seat, tie
down items that could be thrown
about the vehicle during a crash or
sudden stop.
If you carry large items that
prevent you from closing the
hatch, exhaust gas can enter the
passenger area. To avoid the
possibility of carbon monoxide poisoning, follow the instructions on page 47. If you can carry any items on a
roof rack, be sure the total weight
of the rack and the items does not
exceed the maximum allowable
weight. Please contact your Honda dealer.
Before DrivingMain Menu Table of Contents s t
Page 122 of 251

Preparing to Drive
You should do the following checks and adjustments every day before
you drive your vehicle.
1. Make sure all windows, mirrors, and outside lights are clean and
unobstructed. Remove frost, snow, or ice.
2. Check that the hood and trunk are fully closed.
3. Visually check the tires. If a tire looks low, use a gauge to check its
pressure.
4. Check that any items you may be
carrying with you inside are stored
properly or fastened down
securely.
5. Check the adjustment of the seat (see page 74).
6. Check the adjustment of the inside and outside mirrors (see
page 79).
7. Check the adjustment of the steering wheel (see page 63).
8. Make sure the doors are securely closed and locked. 9. Fasten your seat belt. Check that
your passengers have fastened
their seat belts (see page 7).
10. Turn the ignition switch ON (II). Check the indicator lights in the
instrument panel.
11. Start the engine (see page 121).
12. Check the gauges and indicator lights in the instrument panel (see
page 33).
DrivingMain Menu Table of Contents s t
Page 135 of 251

Parking
Always use the parking brake when you park your vehicle. The indicator on the instrument panel shows that
the parking brake is not fully
released; it does not indicate that the
parking brake is firmly set. Make sure the parking brake is set firmly
or your vehicle may roll if it is
parked on an incline.
If your vehicle has an automatic
transmission, set the parking brake
before you put the transmission in Park. This keeps the vehicle from
moving and putting pressure on the
parking mechanism in the
transmission — making it easier to move the shift lever out of Park
when you want to drive away. If the vehicle is facing uphill, turn
the front wheels away from the curb.
If you have a manual transmission,
put it in first gear.
If the vehicle is facing downhill, turn
the front wheels toward the curb. If
you have a manual transmission, put it in reverse gear.
Make sure the parking brake is fully
released before driving away.
Driving with the parking brake
partially set can overheat or damage
the rear brakes. Parking Tips Make sure the moonroof and the
windows are closed. Turn off the lights.
Place any packages, valuables, etc.,
in the trunk or take them with you. Lock the doors with the key or the
remote transmitter. Never park over dry leaves, tall
grass, or other flammable materials. The three way catalytic
converter gets very hot, and could
cause these materials to catch on
fire.
DrivingMain Menu Table of Contents s t
Page 189 of 251
Lights
Headlight Aiming
The headlights were properly aimed when your vehicle was new. Youshould check their aim if you
regularly carry heavy items in the
trunk. Each headlight assembly has
horizontal and vertical adjustment
indicators. These are set to their "0"
positions after the headlights are aimed at the factory.
To check these settings: 1. Make sure the fuel tank is full. Park the vehicle on level ground.
2. The driver or someone who weighs the same should be sittingin the driver's seat for all checks
and adjustments.
Load the trunk with the items you
normally carry.
3. Open the hood.
4. Check the horizontal angle gauge. The line on the adjustment screwindicator should line up with the
"0" mark on the gauge. 5. Check the vertical angle gauge.
The bubble should be centeredunderneath the longest scribemark on the gauge.
Maintenance HORIZONTAL ANGLE GAUGE
VERTICAL ANGLE GAUGE
BUBBLEMain Menu Table of Contents s t