1998 CHEVROLET CORVETTE FLUID
[x] Cancel search: FLUIDPage 273 of 378
Downloaded from www.Manualslib.com manuals search engine Adding Washer Fluid
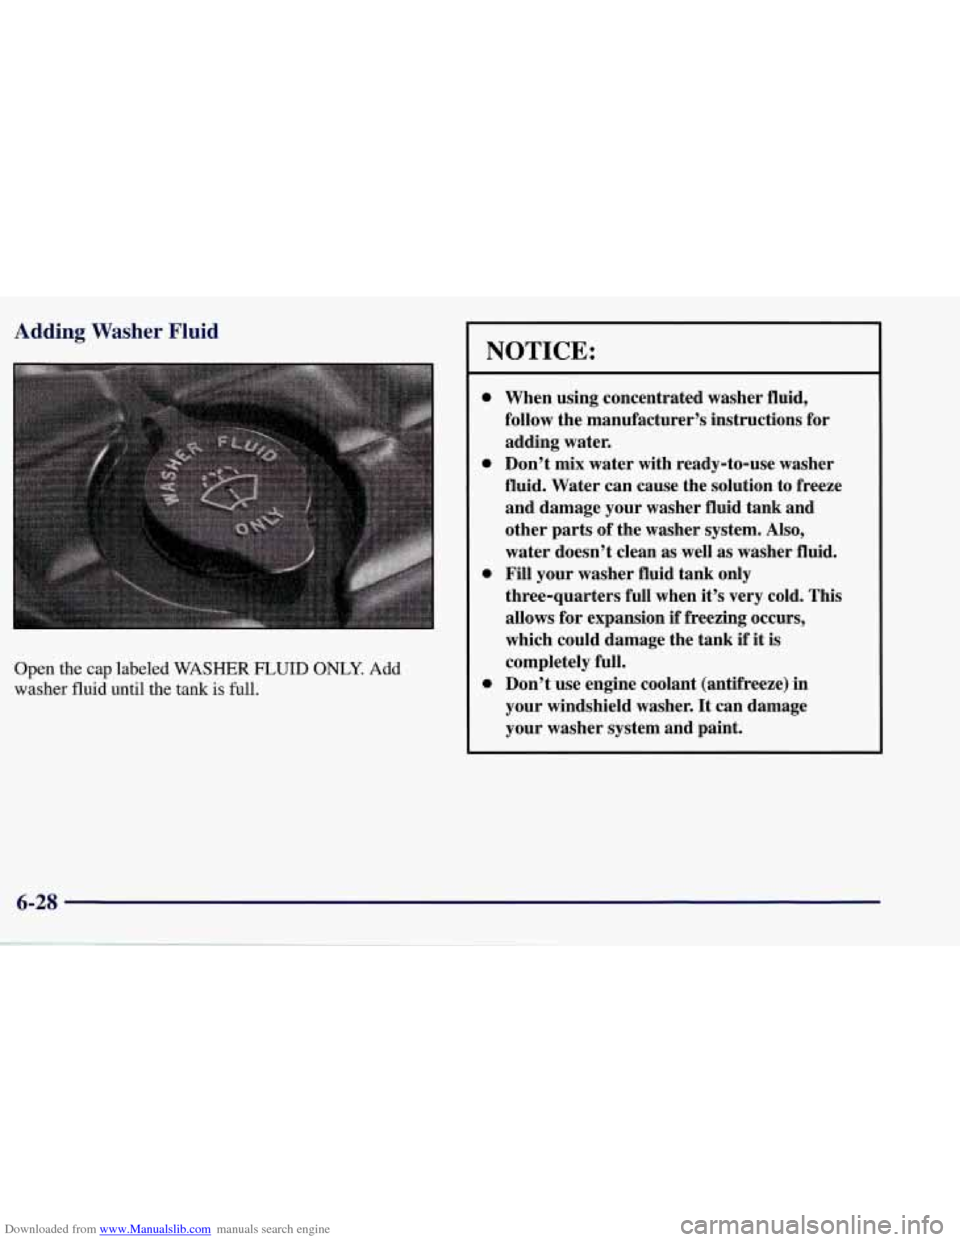
Open the cap labeled WASHER FL,UID ONLY. Add
washer
fluid until the tank is full.
NOTICE:
e
0
e
e
When using concentrated washer fluid,
follow the manufacturer’s instructions for
adding water.
Don’t mix water with ready-to-use washer
fluid. Water can cause the solution to freeze
and damage your washer fluid tank and
other parts of the washer system. Also,
water doesn’t clean as well as washer fluid.
Fill your washer fluid tank only
three-quarters full when it’s very cold. This
allows for expansion if freezing occurs,
which could damage the tank if it is
completely full.
Don’t use engine coolant (antifreeze) in
your windshield washer. It can damage
your washer system and paint.
6-28
Page 274 of 378
Downloaded from www.Manualslib.com manuals search engine Brakes
Brake Fluid
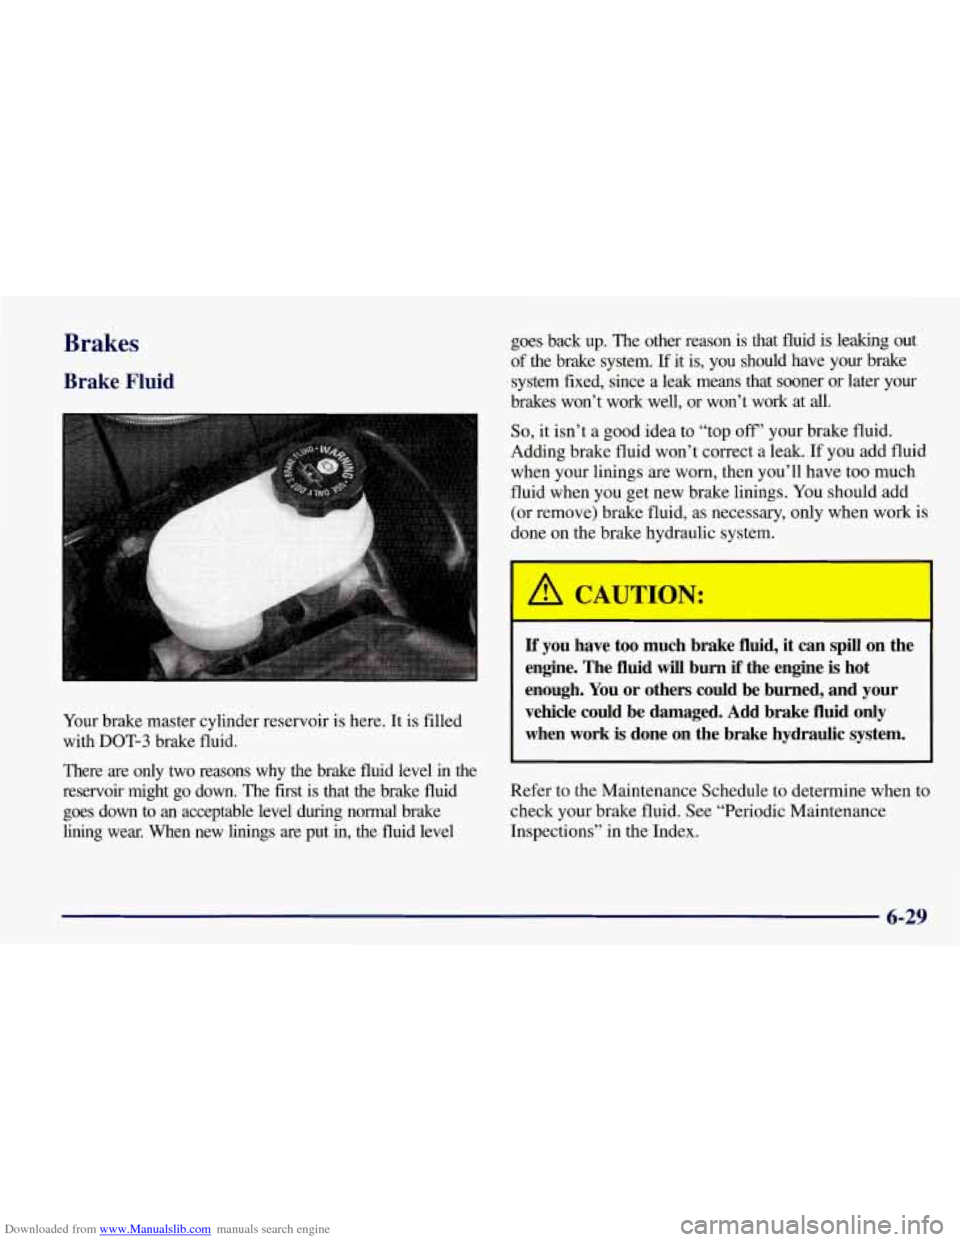
Your brake master cylinder reservoir is here. It is filled
with
DOT-3 brake fluid.
There are only two reasons why the brake fluid level
in the
reservoir might go down. The first is that
the brake fluid
goes down to an acceptable level during normal brake
lining wear. When new linings are put in, the fluid level goes back
up. The
other reason is that fluid is leaking out
of the brake system.
If it is, you should have your brake
system fixed, since a leak means that sooner or later your
brakes won’t work well, or won’t work at
all.
So, it isn’t a good idea to “top off’ your brake fluid.
Adding brake fluid won’t correct a leak. If you add fluid
when your linings are worn, then you’ll have too much
fluid when you get new brake linings.
You should add
(or remove) brake fluid, as necessary, only when work is
done on the brake hydraulic system.
If you have too much brake fluid, it can spill on the
engine. The fluid
will burn if the engine is hot
enough.
You or others could be burned, and your
vehicle could be damaged. Add brake fluid
only
when work is done on the brake hydraulic system.
Refer to the Maintenance Schedule to determine when to
check your brake fluid. See “Periodic Maintenance
Inspections” in the Index.
6-29
Page 275 of 378
Downloaded from www.Manualslib.com manuals search engine Checking Brake Fluid
You can check the brake fluid without taking off the cap.
Just look at the brake fluid reservoir. The
fluid level should
be above the
MIN mark on the reservoir. If it isn’t, have
your brake system checked
to see if there is a leak.
After work is done on the brake hydraulic system, make
sure the level is between the
MIN and MAX marks.
What to Add
When you do need brake fluid, use only DOT-3 brake
fluid
-- such as Delco Supreme 11 @ (GM Part
No. 12377967). Use new brake fluid from a sealed
container only.
Always clean the brake fluid reservoir cap and the area around the cap before removing it.
This will help keep
dirt from entering the reservoir.
With the wrong kind of fluid in your brake
system, your brakes may not work well, or they
may not even work at all. This could cause a
crash. Always use the proper brake fluid.
NOTICE:
Using the wrong fluid can badly damage
brake system parts. For example, just a few
drops
of mineral-based oil, such as engine
oil, in your brake system can damage brake
system parts
so badly that they’ll have to be
replaced. Don’t let someone put
in the
wrong kind of fluid.
If you spill brake fluid on your vehicle’s
painted surfaces, the paint finish can be
damaged. Be careful not to spill brake fluid
on your vehicle.
If you do, wash it off
immediately. See “Appearance Care” in
the Index.
Page 300 of 378
Downloaded from www.Manualslib.com manuals search engine Cleaning the Outside of the
Windshield and Wiper Blades
If the windshield is not clear after using the windshield
washer, or if the wiper blade chatters when running,
wax, sap or other material may be on the blade
or windshield.
Clean the outside of the windshield with GM
Windshield Cleaner, Bon Ami@ Powder (non-scratching
glass cleaning powder), GM Part
No. 105001 1. The
windshield is clean
if beads do not form when you rinse
it with water.
If you use a glass treatment or conditioner containing
ethyl alcohol or ethyl sulfate on your glass, be sure
to
remove the acrylic roof panel, if so equipped. These
products may damage the panel.
Grime from the windshield will stick to the wiper blades
and affect their performance. Clean the blade by wiping
vigorously with a cloth soaked in full-strength
windshield washer solvent. Then rinse the blade
with water.
Check the wiper blades and clean them as necessary;
replace blades that look worn.
Weatherstrips
Silicone grease on weatherstrips will make them last
longer, seal better, and not stick or squeak. Apply
silicone grease with a clean cloth at least every
six months. During very cold, damp weather more
frequent application may be required. (See
“Recommended Fluids and Lubricants” in the Index.)
Cleaning a Removable Roof Panel
Special care is necessary when cleaning, removing
and/or storing the roof panel.
Flush with water to remove dust and dirt, then dry
the panel.
Clean the panel with GM Glass Cleaner. Leave the
cleaner
on the panel for one minute, then wipe the
panel with a soft, lint-free cloth.
Don’t use abrasive cleaning materials.
If water drops are frequently allowed to dry on the roof
panel, impurities in the water will adhere to the top.
These impurities may etch or mar the finish. When the
panel gets wet, you should dry it off.
6-55
Page 306 of 378
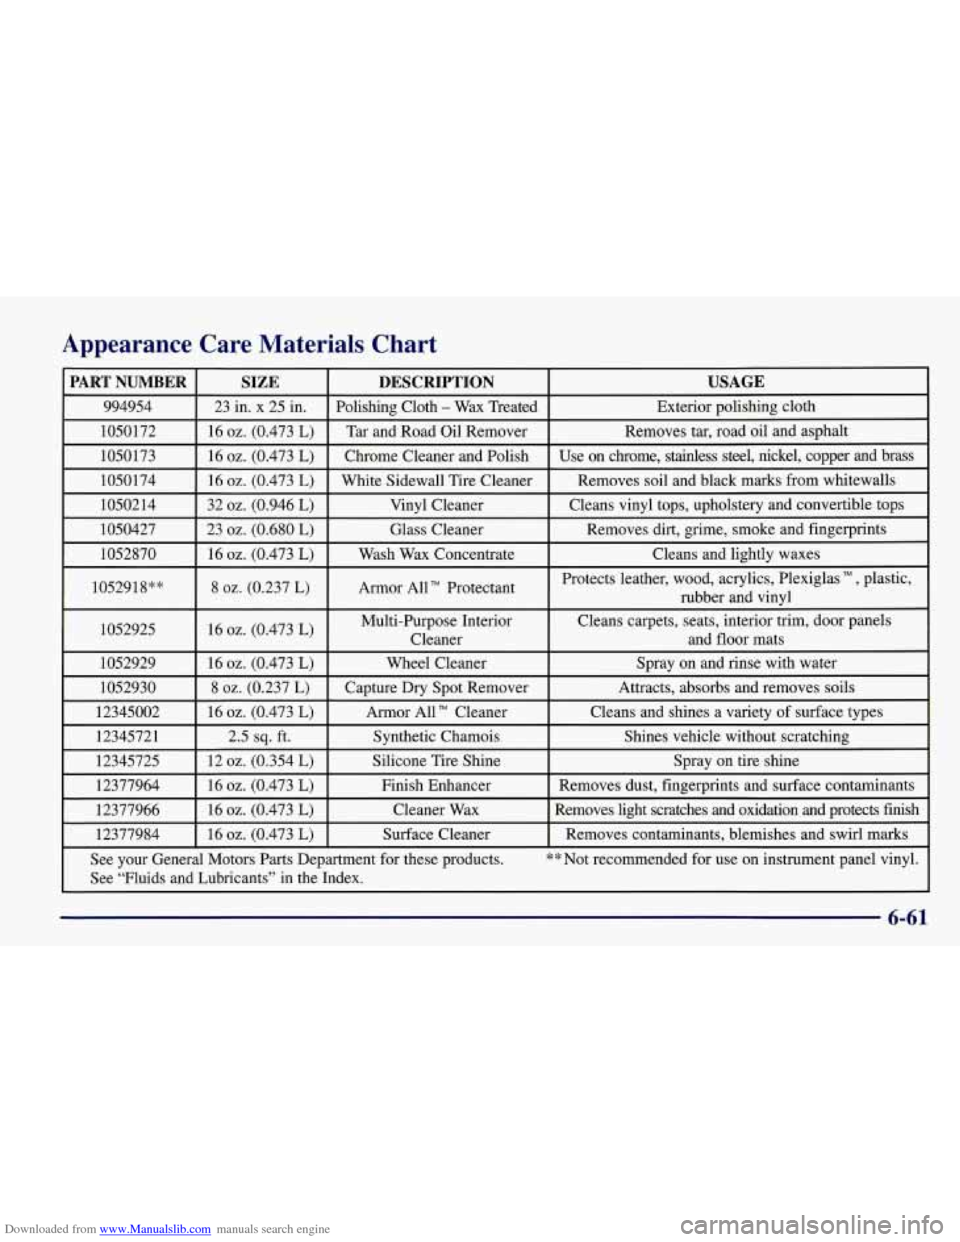
Downloaded from www.Manualslib.com manuals search engine Appearance Care Materials Chart
PART NUMBER USAGE DESCRIPTION
SIZE
994954
Exterior polishing cloth
Polishing Cloth - Wax
Treated
23 in. x 25 in.
1050172
Use on chrome, stainless steel, nickel, copper and brass
Chrome Cleaner and Polish 16
02. (0.473 L) 1050173 Removes
tar, road oil and asphalt
Tar and Road Oil Remover
16 02. (0.473 L)
1050174
I 16 oz. (0.473 L) I White Sidewall Tire Cleaner I Removes soil and black marks from whitewalls
1050214
I 32 oz. (0.946 L) I Vinyl Cleaner I Cleans vinyl tops, upholstery and convertible tops I
1050427 I 23 02. (0.680 L) I Glass Cleaner I Removes dirt, grime, smoke and fingerprints
1052870
I 16 02. (0.473 L) I Wash Wax Concentrate I Cleans and lightly waxes
1052918**
I 8 02. (0.237 L) I Armor AUT’ Protectant I
Protects leather, wood, acrylics, Plexiglas , plastic,
rubber and vinyl
1052925
I 16 02. (0.473 L) I Multi-Purpose Interior Cleans carpets,
seats, interior trim, door panels
I Cleaner and floor mats
1052929
I 16 oz. (0.473 L) I Wheel Cleaner I Spray on and rinse with water
1052930
Shines vehicle without scratching Synthetic Chamois
2.5 sq. ft.
12345721 Cleans and
shines a variety
of surface types Armor
All TM Cleaner
16 oz. (0.473 L)
12345002 Attracts, absorbs and
removes soils
Capture
Dry Spot Remover 8 02. (0.237 L)
12345725
See your General Motors Parts Department for these products.
** Not recommended for use on instrument panel vinyl.
Removes
contaminants, blemishes and swirl marks Surface Cleaner
16
oz. (0.473 L) 12377984 Removes light scratches and oxidation and protects finish Cleane\
r
Wax 16 02. (0.473 L)
12377966 Removes
dust, fingerprints and surface contaminants
Finish Enhancer
16
02. (0.473 L)
12377964 Spray
on tire shine Silicone
Tire Shine 12 02. (0.354 L)
See “Fluids and Lubricants” in the Index.
6-61
Page 316 of 378
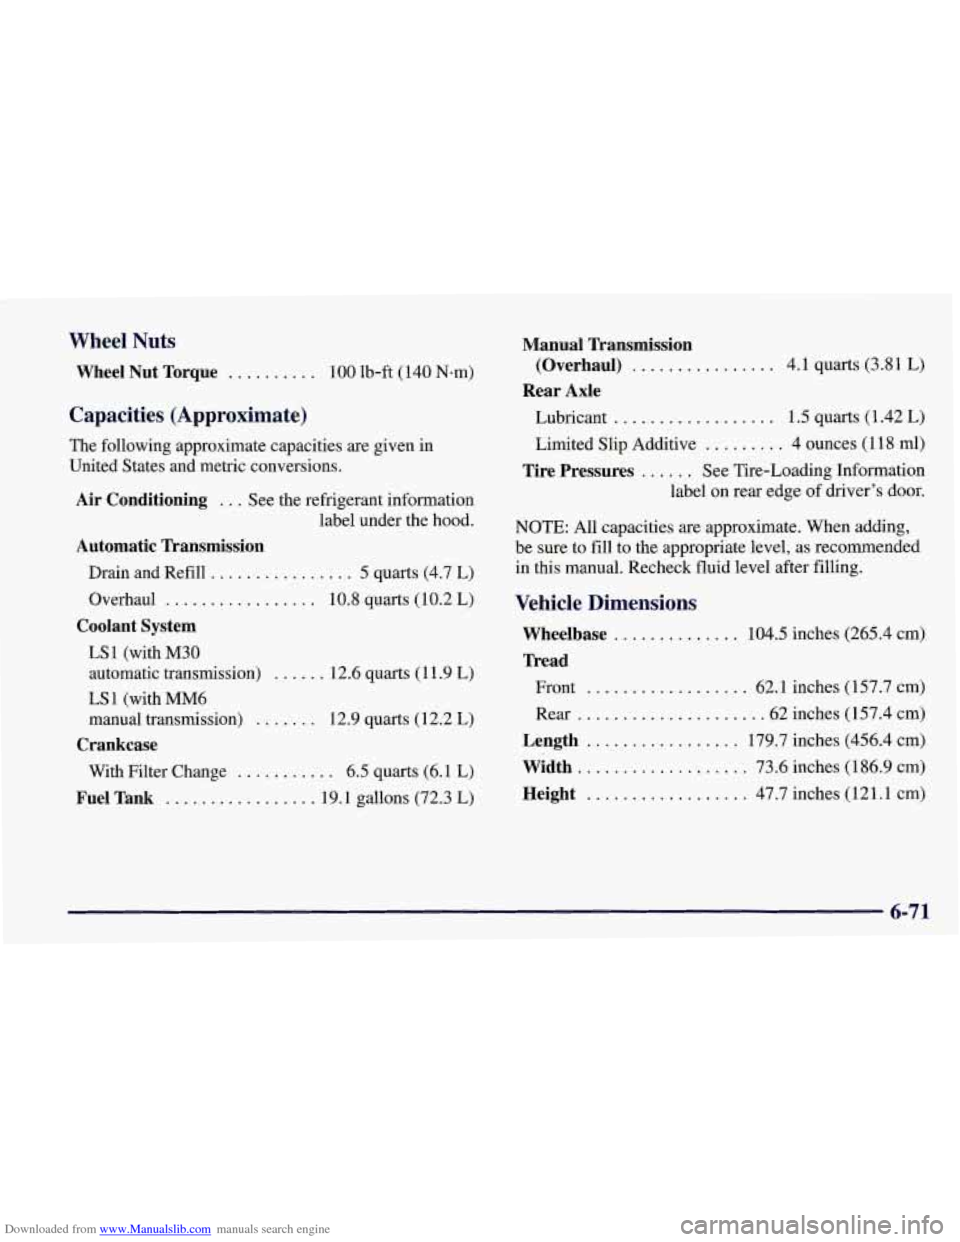
Downloaded from www.Manualslib.com manuals search engine Wheel Nuts
Wheel Nut Torque .......... 100 lb-ft (140 N-m)
Capacities (Approximate)
The following approximate capacities are given in
United States and metric conversions.
Air Conditioning ... See the refrigerant information
label under the hood.
Automatic Transmission
Drain and Refill ................ 5 quarts (4.7 L)
Overhaul
................. 10.8 quarts (10.2 L)
Coolant System
LS 1 (with M30
automatic transmission)
...... 12.6 quarts (1 1.9 L)
LS 1 (with "6
manual transmission)
....... 12.9 quarts ( 12.2 L)
Crankcase
With Filter Change ........... 6.5 quarts (6.1 L)
Fuel Tank ................. 19.1 gallons (72.3 L)
Manual Transmission
Rear Axle (Overhaul)
................ 4.1
quarts (3.8 1 L)
Lubricant
.................. 1.5 quarts (1 -42 L)
Limited Slip Additive ......... 4 ounces (1 18 ml)
Tire Pressures ...... See Tire-Loading Information
label on rear edge of driver's door.
NOTE: All capacities are approximate. When adding,
be sure to fill to the appropriate level, as recommended
in this manual. Recheck fluid level after filling.
Vehicle Dimensions
Wheelbase .............. 104.5 inches (265.4 cm)
Tread
Front .................. 62.1 inches (157.7 cm)
Rear
.................... .62 inches (157.4 cm)
Length ................. 179.7 inches (456.4 cm)
Width ................... 73.6 inches (1 86.9 cm)
Height .................. 47.7 inches (1 21.1 cm)
6-71
Page 320 of 378
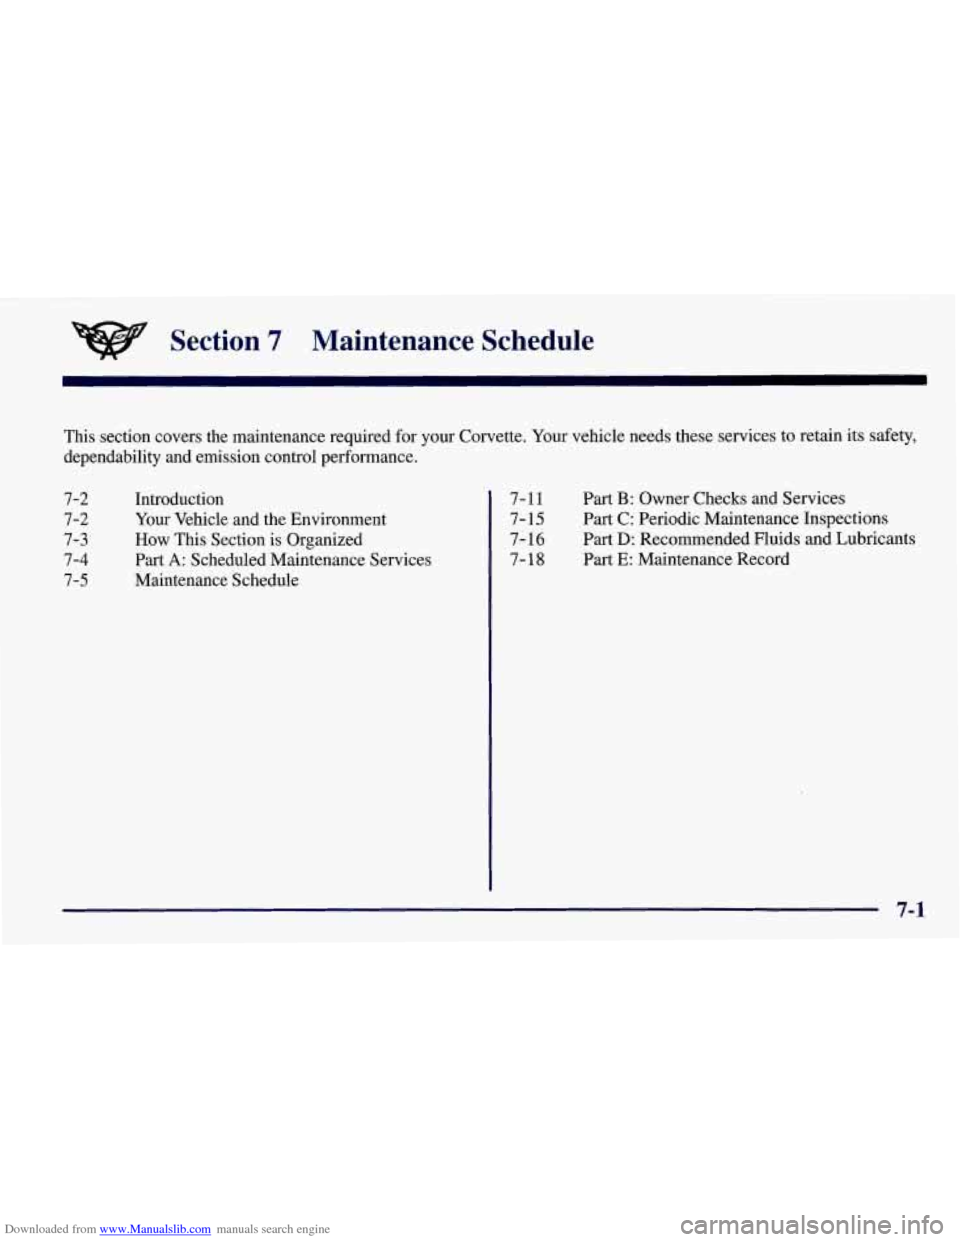
Downloaded from www.Manualslib.com manuals search engine Section 7 Maintenance Schedule
This section covers the maintenance required for your Corvette. Your vehicle needs these services to retain its safety,
dependability and emission control performance.
7-2
7-2
7-3
7-4
7-5 Introduction
Your Vehicle
and the Environment
How This Section is Organized
Part
A: Scheduled Maintenance Services
Maintenance Schedule 7-11
7-15
7- 16 7-18
Part B: Owner Checks and Services
Part C: Periodic Maintenance Inspections
Part
D: Recommended Fluids and Lubricants
Part
E: Maintenance Record
7-1
Page 321 of 378
Downloaded from www.Manualslib.com manuals search engine Introduction
IMPORTANT.
KEEP ENGINE OIL
AT THE PROPER
-EVEL
AND CHANGE
RECOMMENDED
protection I
Plan
Your Vehicle and the Environment
Proper vehicle maintenance not only helps to keep your
vehicle in good working condition, but also helps the
environment. All recommended maintenance procedures
are important. Improper vehicle maintenance can even
affect the quality
of the air we breathe. Improper fluid
levels or the wrong tire inflation can increase the level
of emissions from your vehicle.
To help protect our
environment, and to keep your vehicle in good
condition, please maintain your vehicle properly.
Have you purchased the GM Protection Plan? The Plan
supplements your new vehicle warranties, See your
Warranty and Owner Assistance booklet, or your
GM
dealer for details.
7-2