Page 1371 of 1807

REPLACEMENT
CAUTION:
�Prolonged and repeated contact with mineral oil will
result in the")
LU0JZ-01
P12280
P12205
SST
Z04118
LU-4
- LUBRICATIONOIL AND FILTER
1451 Author�: Date�:
1997 SUPRA (RM502U)
REPLACEMENT
CAUTION:
�Prolonged and repeated contact with mineral oil will
result in the removal of natural fats from the skin,
leading to dryness, irritation and dermatitis. In addi-
tion, used engine oil contains potentially harmful
contaminants which may cause skin cancer.
�Exercise caution in order to minimize the length and
frequency of contact of your skin to used oil. Wear
protective clothing and gloves. Wash your skin thor-
oughly with soap and water, or use water-less hand
cleaner, to remove any used engine oil. Do not use
gasoline, thinners, or solvents.
�In order to preserve the environment, used oil and
used oil filters must be disposed of only at desig-
nated disposal sites.
1. DRAIN ENGINE OIL
(a) Remove the oil filler cap.
(b) Remove the oil drain plug, and drain the oil into a contain-
er.
2. REPLACE OIL FILTER
(a) Using SST, remove the oil filter.
SST 09228-07501
(b) Check and clean the oil filter installation surface.
(c) Apply clean engine oil to the gasket of a new oil filter.
Page 1372 of 1807

5.0 Iiters
(5.3 US qts,
4.4 Imp. qts)
4.9 Iiters
(5.2 US")
P12212
P12206
Additional
3/4 Turn
Z13415
w/ Oil filter
Changew/o Oil filter
ChangeDry fill
2JZ-GE
2JZ-GTE5.2 Iiters
(5.5 US qts,
4.6 Imp. qts)
5.0 Iiters
(5.3 US qts,
4.4 Imp. qts)
4.9 Iiters
(5.2 US qts,
4.3 Imp. qts)6.5 Iiters
(6.9 US qts,
5.7 Imp. qts)
4.7 Iiters
(5.0 US qts,
4.1 Imp. qts)6.5 Iiters
6.9 US qts,
5.7 Imp. qts)
- LUBRICATIONOIL AND FILTER
LU-5
1452 Author�: Date�:
1997 SUPRA (RM502U)
(d) Lightly screw the oil filter into place, and tighten it until the
gasket contacts the seat.
(e) Using SST, tighten it an additional 3/4 turn.
SST 09228-07501
3. REFILL WITH ENGINE OIL
(a) To wipe off oil that has dripped onto the engine under cov-
er, remove the 4 screws and bend the under cover down-
ward.
NOTICE:
�To avoid damaging the silencer, do not bend the en-
gine under cover more than 150 mm (5.91 in.).
�If oil gets on the silencer, wipe it off with a dry rag.
(b) Clean and install the oil drain plug with a new gasket.
Torque: 38 N´m (375 kgf´cm, 27 ft´lbf)
(c) Fill with fresh engine oil.
(d) Reinstall the oil filler cap.
4. START ENGINE AND CHECK FOR OIL LEAKS
5. RECHECK ENGINE OIL LEVEL
Page 1376 of 1807

REMOVAL
HINT:
When repairing the oil pump, the oil pan and strainer should be
removed and cleaned.
1. REMOVE ENGIN")
LU0K0-01
P11911
- LUBRICATIONOIL PUMP
LU-9
1456 Author�: Date�:
1997 SUPRA (RM502U)
REMOVAL
HINT:
When repairing the oil pump, the oil pan and strainer should be
removed and cleaned.
1. REMOVE ENGINE WITH TRANSMISSION
(2JZ-GE: See page EM-57)
(2JZ-GTE: See page EM-58)
2. SEPARATE ENGINE AND TRANSMISSION
(2JZ-GE: See page AT-20)
(2JZ-GTE: See page EM-58)
3. INSTALL ENGINE TO ENGINE STAND FOR REMOVAL
4. REMOVE GENERATOR (See page CH-8)
5. REMOVE CRANKSHAFT POSITION SENSOR
(a) Disconnect the sensor connector from the clamp bracket.
(b) Disconnect the sensor connector from the wiring connec-
tor.
(c) 2JZ-GTE:
Disconnect the wire clamp from the cylinder block.
(d) Remove the bolt and position sensor.
6. REMOVE TIMING BELT
(2JZ-GE: See page EM-13)
(2JZ-GTE: See page EM-15)
7. 2JZ-GTE M/T:
REMOVE DRIVE BELT TENSIONER BRACKET
Remove the 2 nuts and tensioner bracket.
8. REMOVE IDLER PULLEY AND CRANKSHAFT TIMING
PULLEY
(2JZ-GE: See page EM-13)
(2JZ-GTE: See page EM-15)
9. REMOVE OIL DIPSTICK AND GUIDE
(a) Remove the bolt.
(b) Pull out the dipstick guide together with the dipstick.
(c) Remove the O-ring from the dipstick guide.
10. REMOVE OIL LEVEL SENSOR
(a) Disconnect the level sensor connector.
(b) Remove the 4 bolts and level sensor.
(c) Remove the gasket from the level sensor.
NOTICE:
Be careful not to drop the oil level sensor when removing
it.
Page 1380 of 1807

INSPECTION
1. INSPECT RELIEF VALVE
Coat the valve with engine oil and check that i")
LU04X-02
P02149
P02186
Mark
ºº
P02294
P02157
- LUBRICATIONOIL PUMP
LU-13
1460 Author�: Date�:
1997 SUPRA (RM502U)
INSPECTION
1. INSPECT RELIEF VALVE
Coat the valve with engine oil and check that it falls smoothly
into the valve hole under its own weight.
If it doesn't, replace the relief valve. If necessary, replace the oil
pump assembly.
2. PLACE DRIVE AND DRIVEN ROTORS INTO OIL PUMP
BODY
(a) Place drive and driven rotors into oil pump body
HINT:
Place the drive and driven rotors into the oil pump body with the
mark facing upward.
3. INSPECT ROTOR TIP CLEARANCE
Using a feeler gauge, measure the clearance between the drive
and driven rotors.
Standard tip clearance:
2JZ-GE: 0.060 - 0.240 mm (0.0024 - 0.0094 in.)
2JZ-GTE: 0.056 - 0.326 mm (0.0022 - 0.0128 in.)
Maximum tip clearance:
2JZ-GE: 0.30 mm (0.0118 in.)
2JZ-GTE: 0.40 mm (0.0157 in.)
If the tip clearance is greater than maximum, replace the rotors
as a set.
4. INSPECT ROTOR BODY CLEARANCE
Using a feeler gauge, measure the clearance between the driv-
en rotor and pump body.
Standard body clearance:
2JZ-GE: 0.100 - 0.175 mm (0.0039 - 0.0069 in.)
2JZ-GTE: 0.080 - 0.135 mm (0.0031 - 0.0053 in.)
Maximum body clearance:
2JZ-GE: 0.20 mm (0.0079 in.)
2JZ-GTE: 0.16 mm (0.0063 in.)
If the body clearance is greater than maximum, replace the ro-
tors as a set. If necessary, replace the oil pump assembly.
Page 1384 of 1807

(b) Apply seal packing to the No.2 oil pan as shown in the il-
lustration.
Seal")
Z17257
Seal WidthAB
4 - 5 mmA
B
P02404
New Gasket LU-18
- LUBRICATIONOIL PUMP
1465 Author�: Date�:
1997 SUPRA (RM502U)
(b) Apply seal packing to the No.2 oil pan as shown in the il-
lustration.
Seal packing:
Part No. 08826-00080 or equivalent
�Install a nozzle that has been cut to a 4 - 5 mm (0.16
- 0.20 in.) opening.
HINT:
Avoid applying an excessive amount to the surface.
�Parts must be assembled within 5 minutes of ap-
plication. Otherwise the material must be removed
and reapplied.
�Immediately remove nozzle from the tube and rein-
stall cap.
(c) Install the No.2 oil pan with the 14 bolts and 2 nuts.
Torque: 8.8 N´m (90 kgf´cm, 78 in.´lbf)
7. INSTALL OIL LEVEL SENSOR
(a) Install a new gasket to the level sensor.
(b) Install the level sensor with the 4 bolts.
Torque: 5.4 N´m (55 kgf´cm, 48 in.´lbf)
(c) Connect the level sensor connector.
8. INSTALL OIL DIPSTICK GUIDE AND DIPSTICK
(a) Install a new O-ring on the dipstick guide.
(b) Apply new oil to the O-ring.
(c) Connect the dipstick guide end to the dipstick tube of the
oil pan.
(d) Install the dipstick guide with the bolt.
(e) Install the dipstick.
9. INSTALL CRANKSHAFT TIMING PULLEY AND IDLER
PULLEY
(2JZ-GE: See page EM-19)
(2JZ-GTE: See page EM-21)
10. 2JZ-GTE M/T:
INSTALL DRIVE BELT TENSIONER BRACKET
Torque: 27 N´m (280 kgf´cm, 20 ft´lbf)
11. INSTALL TIMING BELT
(2JZ-GE: See page EM-19)
(2JZ-GTE: See page EM-21)
12. INSTALL CRANKSHAFT POSITION SENSOR
Torque: 9.0 N´m (90 kgf´cm, 80 in.´lbf)
13. INSTALL GENERATOR (See page CH-18)
14. REMOVE ENGINE STAND FROM ENGINE
15. ASSEMBLY ENGINE AND TRANSMISSION
(2LZ-GE: See page AT-24)
(2JZ-GTE: See page EM-65)
16. INSTALL ENGINE WITH TRANSMISSION
(2JZ-GE: See page EM-57)
(2JZ-GTE: See page EM-65)
Page 1385 of 1807
LU04Q-01
B02884
Water Bypass HosePS Oil Reservoir
Engine Wire Protector
� O-Ring
Oil Cooler
Plate Washer
Relief Valve
Oil Filter
� Non-reusable part
- LUBRICATIONOIL COOLER (2JZ-GTE)
LU-19
1466 Author�: Date�:
1997 SUPRA (RM502U)
OIL COOLER (2JZ-GTE)
COMPONENTS
Page 1386 of 1807
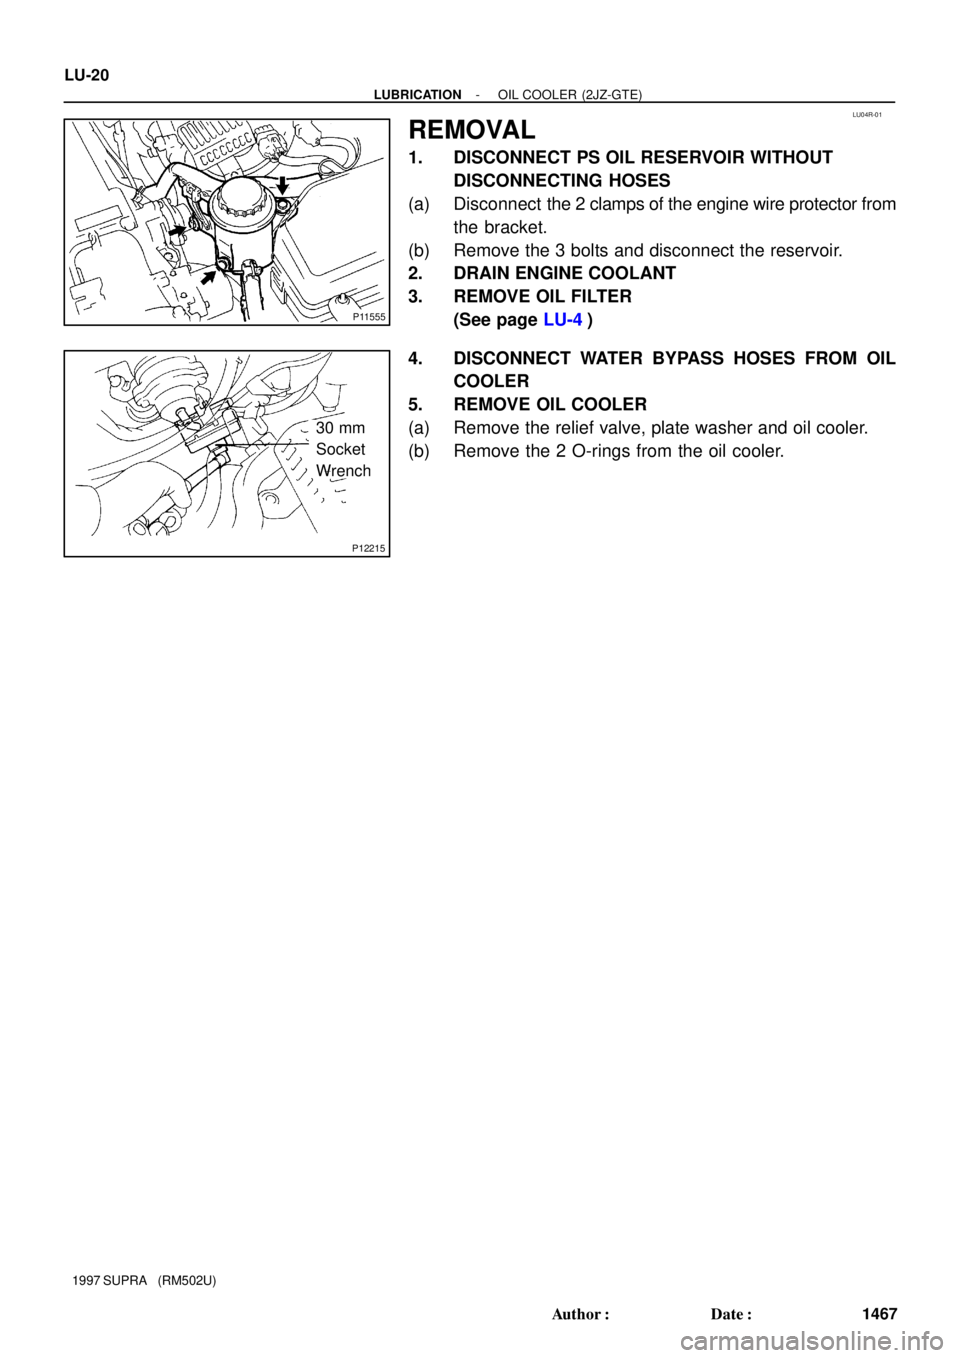
LU04R-01
P11555
P12215
30 mm
Socket
Wrench LU-20
- LUBRICATIONOIL COOLER (2JZ-GTE)
1467 Author�: Date�:
1997 SUPRA (RM502U)
REMOVAL
1. DISCONNECT PS OIL RESERVOIR WITHOUT
DISCONNECTING HOSES
(a) Disconnect the 2 clamps of the engine wire protector from
the bracket.
(b) Remove the 3 bolts and disconnect the reservoir.
2. DRAIN ENGINE COOLANT
3. REMOVE OIL FILTER
(See page LU-4)
4. DISCONNECT WATER BYPASS HOSES FROM OIL
COOLER
5. REMOVE OIL COOLER
(a) Remove the relief valve, plate washer and oil cooler.
(b) Remove the 2 O-rings from the oil cooler.
Page 1388 of 1807
LU04T-02
P11208
New O-Ring LU-22
- LUBRICATIONOIL COOLER (2JZ-GTE)
1469 Author�: Date�:
1997 SUPRA (RM502U)
INSTALLATION
1. INSTALL OIL COOLER
(a) Install 2 new O-rings to the oil cooler.
(b) Apply a light coat of engine oil on the threads and under
the head of the relief valve.
(c) Temporarily install the oil cooler with the plate washer and
relief valve.
(d) Tighten the relief valve.
Torque: 78 N´m (800 kgf´cm, 58 ft´lbf)
2. CONNECT WATER BYPASS HOSES TO OIL
COOLER
3. CONNECT PS OIL RESERVOIR
4. INSTALL OIL FILTER
5. FILL WITH ENGINE COOLANT
6. START ENGINE AND CHECK FOR LEAKS
7. CHECK ENGINE OIL LEVEL