Page 1605 of 3342
3) Lower door glass 10 to 15 mm (0.39 to 0.59 in) from
fully closed position. While applying outward pressure
(load) to upper edge of glass above midpoint of two outer
stabilizers, press inner stabilizer until it just touches the
glass, then secure it.
Load: F
Front door glass 39 N (4 kg, 9 lb)
Rear door glass 34.3 N (3.5 kg, 7.7 lb)
G5M0498
�Remedy for unequal dimensions, between upper,
lower and center pillar sides
1) Close front door and raise door glass.
2) Make sure of unequal dimensions.
B5M0073A
3) If glass tilts to far rearward, loosen adjusting nut�Cand
adjust glass to be parallel with center pillar, then after
adjustment, tighten adjusting nut�
C.
B5M0074A
�Remedy for improper glass to center pillar clearance
1) Close front door and raise door glass.
2) Make sure of improper clearance.
23
5-2SERVICE PROCEDURE
2. Door
Page 1606 of 3342

B5M0075A
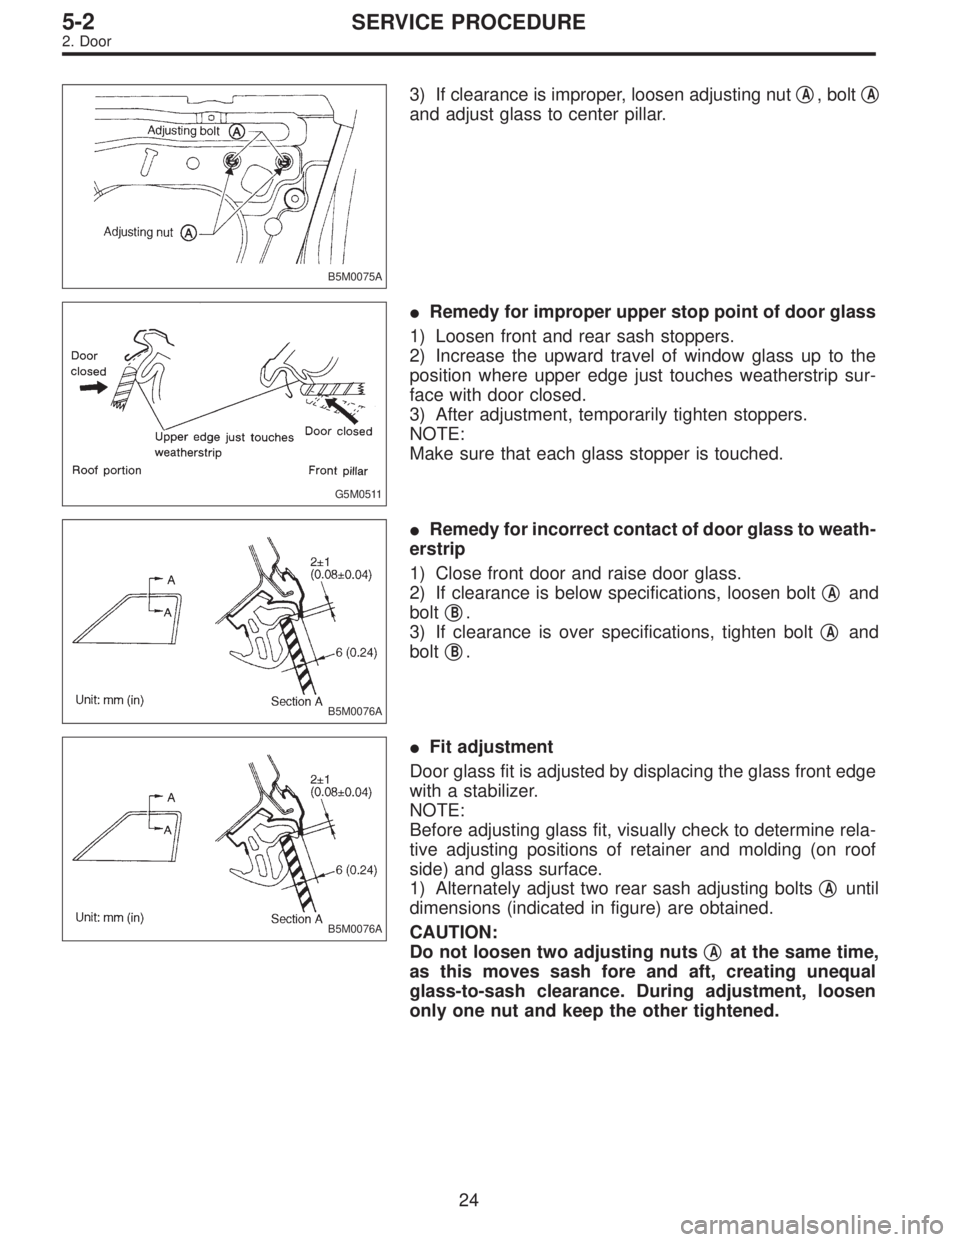
3) If clearance is improper, loosen adjusting nut�A, bolt�A
and adjust glass to center pillar.
G5M0511
�Remedy for improper upper stop point of door glass
1) Loosen front and rear sash stoppers.
2) Increase the upward travel of window glass up to the
position where upper edge just touches weatherstrip sur-
face with door closed.
3) After adjustment, temporarily tighten stoppers.
NOTE:
Make sure that each glass stopper is touched.
B5M0076A
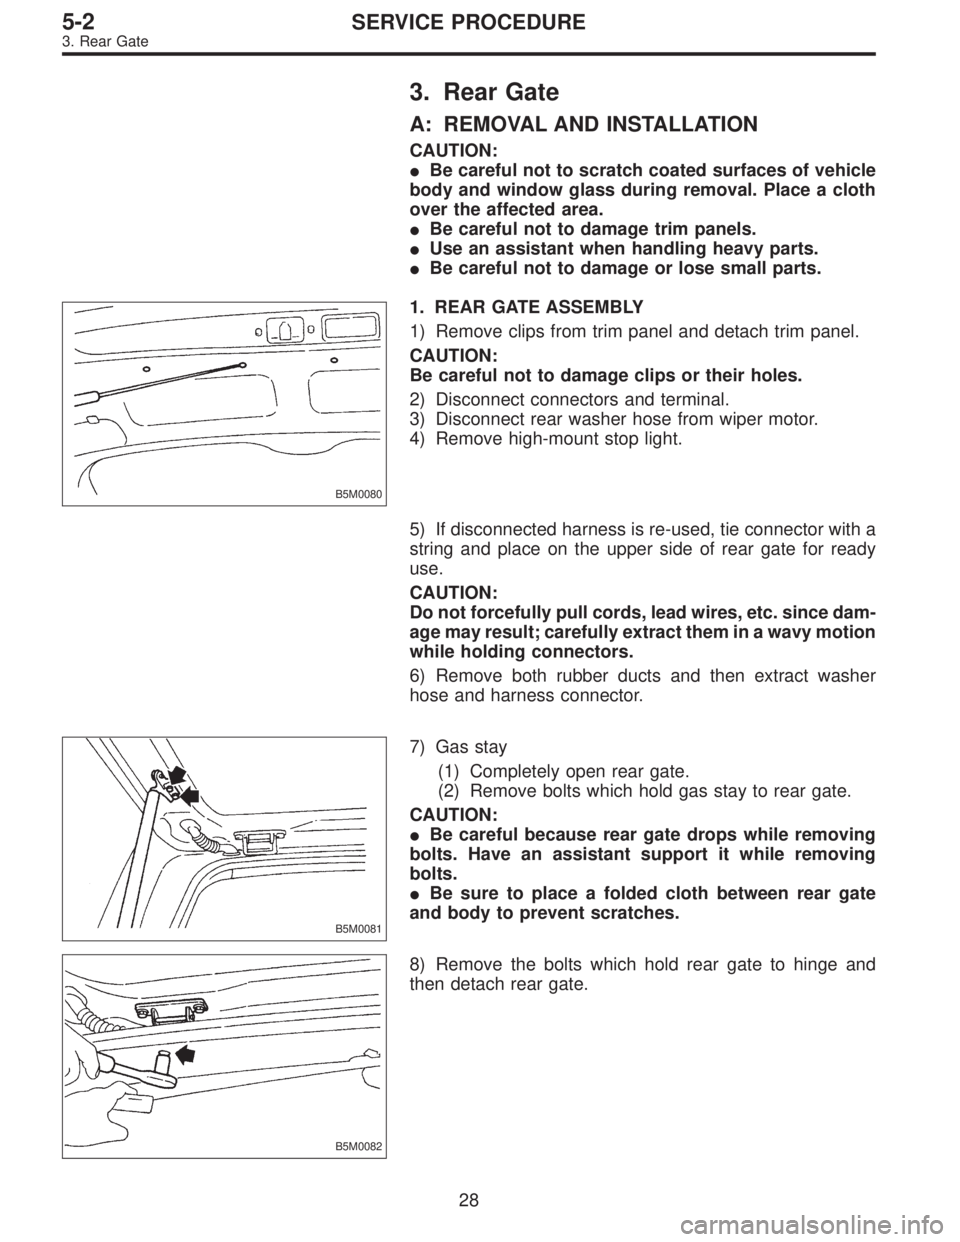
�Remedy for incorrect contact of door glass to weath-
erstrip
1) Close front door and raise door glass.
2) If clearance is below specifications, loosen bolt�
Aand
bolt�
B.
3) If clearance is over specifications, tighten bolt�
Aand
bolt�
B.
B5M0076A
�Fit adjustment
Door glass fit is adjusted by displacing the glass front edge
with a stabilizer.
NOTE:
Before adjusting glass fit, visually check to determine rela-
tive adjusting positions of retainer and molding (on roof
side) and glass surface.
1) Alternately adjust two rear sash adjusting bolts�
Auntil
dimensions (indicated in figure) are obtained.
CAUTION:
Do not loosen two adjusting nuts�
Aat the same time,
as this moves sash fore and aft, creating unequal
glass-to-sash clearance. During adjustment, loosen
only one nut and keep the other tightened.
24
5-2SERVICE PROCEDURE
2. Door
Page 1607 of 3342
B5M0077A
NOTE:
Always adjust two rear sash adjusting bolts�
Aby the same
amount. Do not adjust the adjusting bolts with sash bracket
inclined toward inner panel, as this increases effort
required to operate regulator.
2) Adjust front sash fit using rear sash adjustment proce-
dure outlined above as a guide. Two adjusting bolts must
be adjusted by the same amount.
NOTE:
Front and rear sash adjustment procedures are basically
the same; however, the amount of adjustment is not always
the same due to alignment dispersion of individual doors.
Adjust front and rear sash fit, as equally as possible.
Otherwise, effort required to operate regulator may
increase.
3) After adjusting front sash-to-glass fit, secure front sash.
25
5-2SERVICE PROCEDURE
2. Door
Page 1608 of 3342
4. REAR DOOR GLASS
Alignment of rear door glass is basically the same as for
the front door glass. Due to slight difference in adjustment
dimensions for fore-aft, up-down, and in-out alignments,
key points for rear door adjustment are described below.
B5M0078A
B5M0074A
�Fore-aft adjustment
1) Door glass alignment must be adjusted so that glass-
to-center pillar fit is equal at all points. Always use dimen-
sions (indicated in figure) as a guide during adjustment.
NOTE:
If dimensions are smaller than those indicated, glass will be
caught in weatherstrip and may not raise to the fully closed
position.
2) After making fore-aft adjustment, raise and lower glass
to ensure it is free from any binding.
26
5-2SERVICE PROCEDURE
2. Door
Page 1609 of 3342
B5M0076A
�Fit adjustment
Increasing contact pressure causes rear door glass to be
caught in center pillar upper and lower weatherstrip; this
will cause premature weatherstrip wear. For this reason,
always use dimensions indicated below as a guide during
glass fit adjustment.
C: INSPECTION
1. FRONT AND REAR DOOR GLASS
1) Close front door and make sure of all clearances.
B5M0079A
2) If any clearance is not correct, adjust affected parts.
Re-check all clearances.
CAUTION:
�Repeatedly adjust parts until all clearances are cor-
rect.
�After clearance adjustment, make sure that all
adjusting bolts and nuts are tightened.
27
5-2SERVICE PROCEDURE
2. Door
Page 1610 of 3342

3. Rear Gate
A: REMOVAL AND INSTALLATION
CAUTION:
�Be careful not to scratch coated surfaces of vehicle
body and window glass during removal. Place a cloth
over the affected area.
�Be careful not to damage trim panels.
�Use an assistant when handling heavy parts.
�Be careful not to damage or lose small parts.
B5M0080
1. REAR GATE ASSEMBLY
1) Remove clips from trim panel and detach trim panel.
CAUTION:
Be careful not to damage clips or their holes.
2) Disconnect connectors and terminal.
3) Disconnect rear washer hose from wiper motor.
4) Remove high-mount stop light.
5) If disconnected harness is re-used, tie connector with a
string and place on the upper side of rear gate for ready
use.
CAUTION:
Do not forcefully pull cords, lead wires, etc. since dam-
age may result; carefully extract them in a wavy motion
while holding connectors.
6) Remove both rubber ducts and then extract washer
hose and harness connector.
B5M0081
7) Gas stay
(1) Completely open rear gate.
(2) Remove bolts which hold gas stay to rear gate.
CAUTION:
�Be careful because rear gate drops while removing
bolts. Have an assistant support it while removing
bolts.
�Be sure to place a folded cloth between rear gate
and body to prevent scratches.
B5M0082
8) Remove the bolts which hold rear gate to hinge and
then detach rear gate.
28
5-2SERVICE PROCEDURE
3. Rear Gate
Page 1611 of 3342

G5M0551
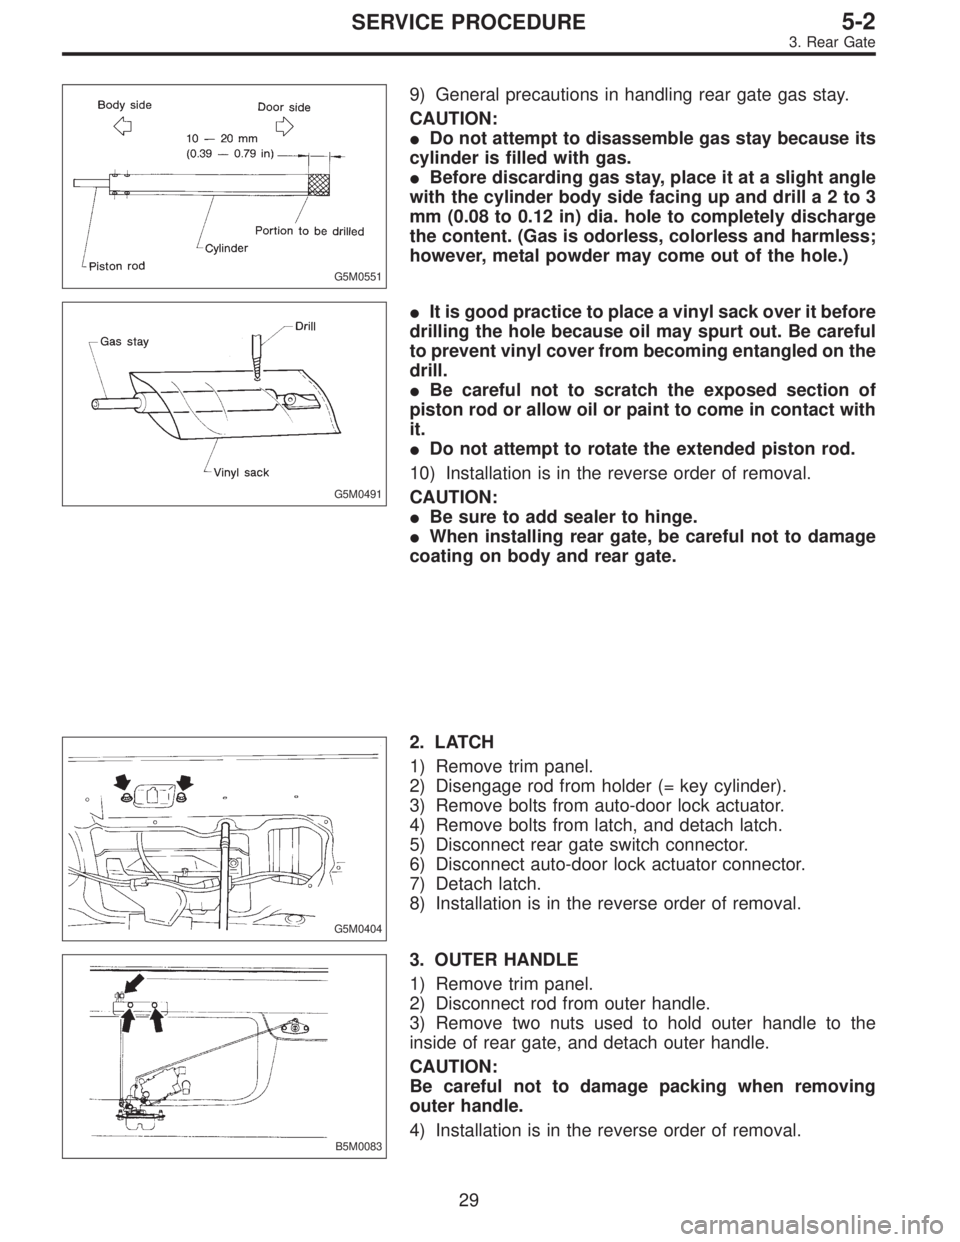
9) General precautions in handling rear gate gas stay.
CAUTION:
�Do not attempt to disassemble gas stay because its
cylinder is filled with gas.
�Before discarding gas stay, place it at a slight angle
with the cylinder body side facing up and drilla2to3
mm (0.08 to 0.12 in) dia. hole to completely discharge
the content. (Gas is odorless, colorless and harmless;
however, metal powder may come out of the hole.)
G5M0491
�It is good practice to place a vinyl sack over it before
drilling the hole because oil may spurt out. Be careful
to prevent vinyl cover from becoming entangled on the
drill.
�Be careful not to scratch the exposed section of
piston rod or allow oil or paint to come in contact with
it.
�Do not attempt to rotate the extended piston rod.
10) Installation is in the reverse order of removal.
CAUTION:
�Be sure to add sealer to hinge.
�When installing rear gate, be careful not to damage
coating on body and rear gate.
G5M0404
2. LATCH
1) Remove trim panel.
2) Disengage rod from holder (= key cylinder).
3) Remove bolts from auto-door lock actuator.
4) Remove bolts from latch, and detach latch.
5) Disconnect rear gate switch connector.
6) Disconnect auto-door lock actuator connector.
7) Detach latch.
8) Installation is in the reverse order of removal.
B5M0083
3. OUTER HANDLE
1) Remove trim panel.
2) Disconnect rod from outer handle.
3) Remove two nuts used to hold outer handle to the
inside of rear gate, and detach outer handle.
CAUTION:
Be careful not to damage packing when removing
outer handle.
4) Installation is in the reverse order of removal.
29
5-2SERVICE PROCEDURE
3. Rear Gate
Page 1612 of 3342
B5M0084A
4. KEY CYLINDER
1) Remove trim panel.
2) Disengage rod from holder�
1.
3) Remove nut from key cylinder, and detach key cylinder.
4) Installation is in the reverse order of removal.
B5M0085
5. STRIKER
Remove two bolts from striker and detach striker.
G5M0492
6. WEATHERSTRIP
1) Place weatherstrip so that its joints meet at lower cen-
ter of vehicle body, and install by inserting flanged portion
from below, as shown in section A—A in figure.
2) Tap along entire length with a rubber hammer to firmly
insert body flange into weatherstrip.
CAUTION:
�Be careful not to install in wrong direction.
�Install weatherstrip carefully and firmly.
G5M0552
B5M0086
B: ADJUSTMENT
1) Loosen striker screw.
2) For lateral adjustment, align striker and latch at their
centers.
30
5-2SERVICE PROCEDURE
3. Rear Gate