Page 1165 of 3342
B4M0691A
5) Install boot projecting portion to UFJ groove.
�
1UFJ
�
2Large boot band
�
3Boot
6) Set large boot band in place.
B4M0692A
7) Align the boot end of the smaller diameter with the 3rd
groove in the drive shaft as shown in the figure.
�
1Boot
�
2Small boot band
�
3Shaft
B4M0693A
8) Tighten boot bands using ST, torque wrench and socket
flex handle.
ST 28099AC000 BOOT BAND PLIER
�
1Large boot band
�
2Boot
�
3Torque wrench
�
4Socket flex handle
�
5UFJ
Tightening torque:
Large boot band
152 N⋅m (16.0 kg-m, 116 ft-lb) or more
Small boot band
133 N⋅m (13.6 kg-m, 98 ft-lb) or more
9) Place DOJ boot at the center of shaft.
G4M0284
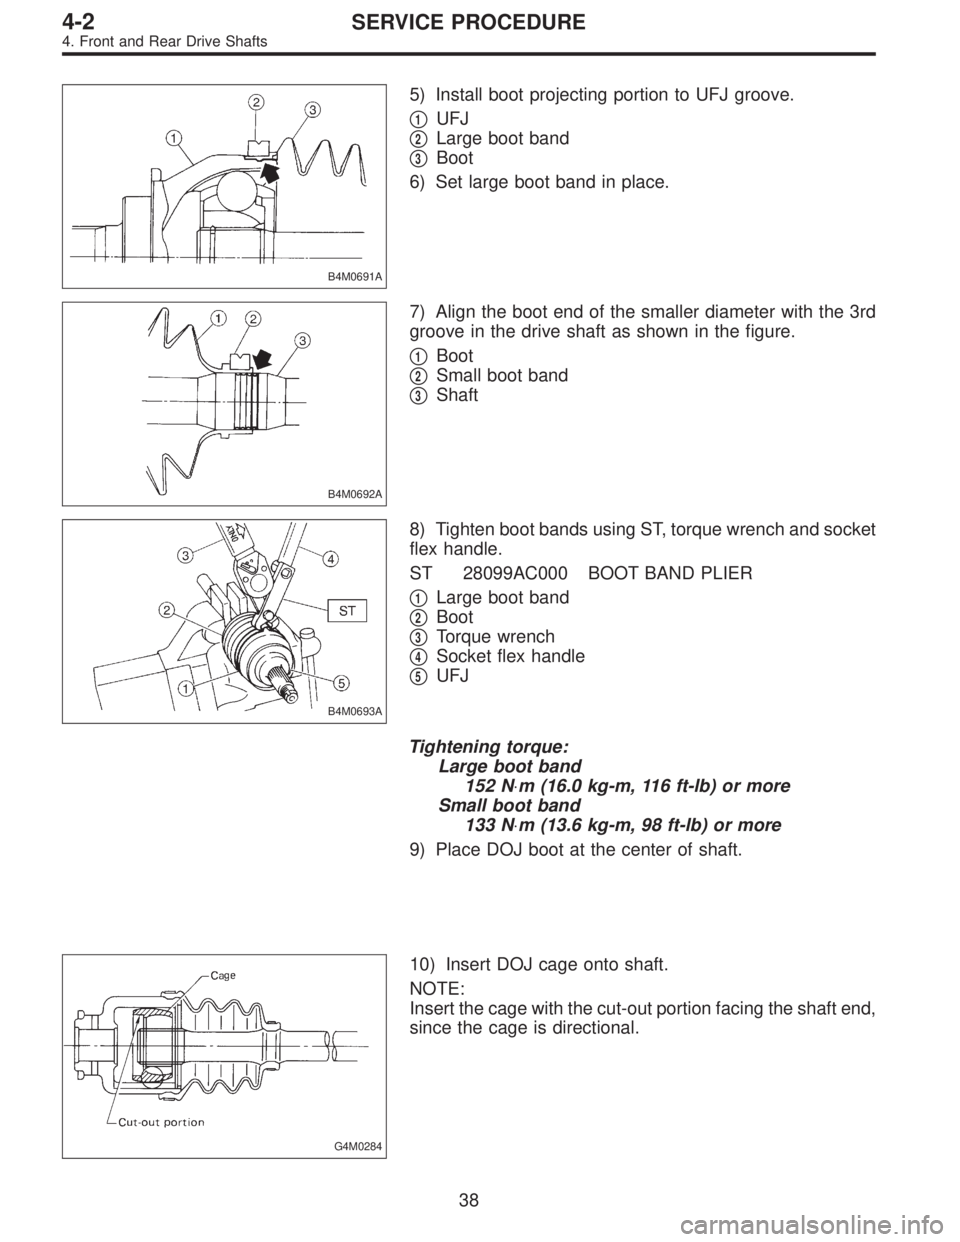
10) Insert DOJ cage onto shaft.
NOTE:
Insert the cage with the cut-out portion facing the shaft end,
since the cage is directional.
38
4-2SERVICE PROCEDURE
4. Front and Rear Drive Shafts
Page 1166 of 3342
 Install DOJ inner race on shaft and fit snap ring with
pliers.
NOTE:
Confirm that the snap ring is completely fitted in the shaft
groove.
B4M0228A
12) Install cage, which was previously fi")
G4M0285
11) Install DOJ inner race on shaft and fit snap ring with
pliers.
NOTE:
Confirm that the snap ring is completely fitted in the shaft
groove.
B4M0228A
12) Install cage, which was previously fitted, to inner race
fixed upon shaft.
NOTE:
Fit the cage with the protruded part aligned with the track
on the inner race and then turn by a half pitch.
�
1Inner race
�
2Cage
B4M0227A
13) Put 80 to 90 g (2.82 to 3.17 oz) of specified grease into
the interior of DOJ outer race.
14) Apply a coat of specified grease to the cage pocket
and six balls.
15) Insert six balls into the cage pocket.
16) Align the outer race track and ball positions and place
in the part where shaft, inner race, cage and balls are pre-
viously installed, and then fit outer race.
�
1Outer race
�
2Grease
G4M0282
17) Install circlip in the groove on DOJ outer race.
NOTE:
�Assure that the balls, cage and inner race are com-
pletely fitted in the outer race of DOJ.
�Exercise care not to match the open end of circlip in the
ball groove of outer race.
�Pull the shaft lightly and assure that the circlip is com-
pletely fitted in the groove.
18) Apply an even coat of specified grease [20 to 30 g
(0.71 to 1.06 oz)] to the entire inner surface of boot. Also
apply grease to shaft.
19) Install DOJ boot taking care not to twist it.
NOTE:
�The inside of the larger end of DOJ boot and the boot
groove shall be cleaned so as to be free from grease and
other substances.
�When installing DOJ boot, position outer race of DOJ at
center of its travel.
39
4-2SERVICE PROCEDURE
4. Front and Rear Drive Shafts
Page 1167 of 3342
20) Put a band through the clip and wind twice in align-
ment with band groove of boot.
CAUTION:
Use a new band.
21) Pinch the end of band with pliers. Hold the clip and
tighten securely.
NOTE:
When tightening boot, exercise care so that the air within
the boot is appropriate.
G4M0289
22) Tighten band by using ST.
ST 925091000 BAND TIGHTENING TOOL
NOTE:
Tighten band until it cannot be moved by hand.
G4M0290
23) Tap on the clip with the punch provided at the end of
ST.
ST 925091000 BAND TIGHTENING TOOL
CAUTION:
Tap only to the extent that the boot underneath is not
damaged.
24) Cut off band with an allowance of about 10 mm (0.39
in) left from the clip and bend this allowance over the clip.
CAUTION:
Be careful so that the end of the band is in close con-
tact with clip.
25) Fix up boot on UFJ in the same manner.
NOTE:
Extend and retract DOJ to provide equal grease coating.
40
4-2SERVICE PROCEDURE
4. Front and Rear Drive Shafts
Page 1168 of 3342
3. FTJ
CAUTION:
Use specified grease.
BJ side:
NTG2218 (Part No. 28093AA020)
FTJ side:
SSG 6003
CAUTION:
Be sure to wrap shaft splines with vinyl tape to prevent
boot from scratches.
1) Install BJ boot in specified position and fill it with 60 to
70 g (2.12 to 2.47 oz) of specified grease.
CAUTION:
The inside of the larger end of BJ boot and the boot
groove must be cleaned so as to be free from grease
and other substances.
2) Place FTJ boot at the center of shaft.
B4M0778
3) Align alignment marks and install trunnion on shaft.
4) Install snap ring to shaft.
CAUTION:
Confirm that the snap ring is completely fitted in the
shaft groove.
5) Fill 100 to 110 g (3.53 to 3.88 oz) of specified grease
into the interior of FTJ outer race.
6) Apply a coat of specified grease to free ring and trun-
nion.
B4M0777
7) Align alignment marks on free ring and trunnion and
install free ring.
41
4-2SERVICE PROCEDURE
4. Front and Rear Drive Shafts
Page 1169 of 3342
 Align alignment marks on shaft and outer race, and
install outer race.
9) Install circlip in the groove on FTJ outer race.
CAUTION:
Pull the shaft lightly and assure that the circlip is com")
B4M0774
8) Align alignment marks on shaft and outer race, and
install outer race.
9) Install circlip in the groove on FTJ outer race.
CAUTION:
Pull the shaft lightly and assure that the circlip is com-
pletely fitted in the groove.
10) Apply an even coat of the specified grease 30 to 40 g
(1.06 to 1.41 oz) to the entire inner surface of boot.
11) Install FTJ boot taking care not to twist it.
CAUTION:
�The inside of the larger end of FTJ boot and the boot
groove shall be cleaned so as to be free from grease
and other substances.
�When installing FTJ boot, position outer race of DOJ
at center of its travel.
12) Put a band through the clip and wind twice in align-
ment with band groove of boot.
CAUTION:
Use a new band.
13) Pinch the end of band with pliers. Hold the clip and
tighten securely.
NOTE:
When tightening boot, exercise care so that the air within
the boot is appropriate.
G4M0289
14) Tighten band by using ST.
ST 925091000 BAND TIGHTENING TOOL
NOTE:
Tighten band until it cannot be moved by hand.
G4M0290
15) Tap on the clip with the punch provided at the end of
ST.
ST 925091000 BAND TIGHTENING TOOL
CAUTION:
Tap to an extent that the boot underneath is not dam-
aged.
42
4-2SERVICE PROCEDURE
4. Front and Rear Drive Shafts
Page 1170 of 3342
16) Cut off band with an allowance of about 10 mm (0.39
in) left from the clip and bend this allowance over the clip.
CAUTION:
Be careful to that the end of the band is in close con-
tact with clip.
17) Fix up boot on BJ in the same manner.
NOTE:
Extend and retract FTJ to provide equal grease coating.
G4M0291
E: INSTALLATION
1. FRONT DRIVE SHAFT
1) Insert UFJ (Under cut Free Joint) into hub splines.
CAUTION:
Be careful not to damage inner oil seal lip.
2) Using ST1 and ST2, pull drive shaft into place.
ST1 922431000 AXLE SHAFT INSTALLER
ST2 927390000 ADAPTER
CAUTION:
Do not hammer drive shaft when installing it.
3) Tighten axle nut temporarily.
G4M0279
4) Install DOJ on transmission spindle and drive spring pin
into place.
CAUTION:
Always use a new spring pin.
43
4-2SERVICE PROCEDURE
4. Front and Rear Drive Shafts
Page 1171 of 3342
 Connect transverse link to housing.
Tightening torque (self-locking nut):
49±10 N⋅m (5.0±1.0 kg-m, 36±7 ft-lb)
CAUTION:
Use a new self-locking nut.
6) Install stabilizer bracket.
7) While depr")
5) Connect transverse link to housing.
Tightening torque (self-locking nut):
49±10 N⋅m (5.0±1.0 kg-m, 36±7 ft-lb)
CAUTION:
Use a new self-locking nut.
6) Install stabilizer bracket.
7) While depressing brake pedal, tighten axle nut to the
specified torque.
Tightening torque:
186±20 N⋅m (19±2 kg-m, 137±14 ft-lb)
CAUTION:
�Use a new axle nut.
�Always tighten axle nut before installing wheel on
vehicle. If wheel is installed and comes in contact with
ground when axle nut is loose, wheel bearings may be
damaged.
�Be sure to tighten axle nut to specified torque. Do
not overtighten it as this may damage wheel bearing.
8) After tightening axle nut, lock it securely.
G4M0293
2. REAR DRIVE SHAFT
1) Insert BJ into rear housing splines.
CAUTION:
Be careful not to damage inner oil seal lip.
2) Using ST1 and ST2, pull drive shaft into place.
ST1 922431000 AXLE SHAFT INSTALLER
ST2 927390000 ADAPTER
CAUTION:
Do not hammer drive shaft when installing it.
3) Tighten axle nut temporarily.
B4M0549A
4) Using ST, install DOJ into differential.
ST 28099PA090 SIDE OIL SEAL PROTECTOR
B4M0550A
5) Insert DOJ spline end into bore of side oil seal, and
remove ST.
CAUTION:
Do not allow DOJ splines to damage side oil seal.
ST 28099PA090 SIDE OIL SEAL PROTECTOR
44
4-2SERVICE PROCEDURE
4. Front and Rear Drive Shafts
Page 1172 of 3342
 Align DOJ and differential splines.
7) Push housing to insert DOJ into differential.
NOTE:
Make sure DOJ is inserted properly.
8) Connect crossmember reinforcement lower to cross-
member (4")
G3M0050
6) Align DOJ and differential splines.
7) Push housing to insert DOJ into differential.
NOTE:
Make sure DOJ is inserted properly.
8) Connect crossmember reinforcement lower to cross-
member (4 door model only).
9) Connect rear housing assembly to trailing link
assembly, and tighten self-locking nut.
Tightening torque:
113±15 N⋅m (11.5±1.5 kg-m, 83±11 ft-lb)
10) Connect rear housing assembly to lateral link
assembly, and tighten self-locking nut.
Tightening torque:
137±20 N⋅m (14±2 kg-m, 101±14 ft-lb)
11) Install stabilizer bracket.
12) While depressing brake pedal, tighten axle nut using
a socket wrench.
Tightening torque:
186±20 N⋅m (19±2 kg-m, 137±14 ft-lb)
CAUTION:
�Use a new axle nut.
�Always tighten axle nut before installing wheel on
vehicle. If wheel is installed and comes in contact with
ground when axle nut is loose, wheel bearings may be
damaged.
�Be sure to tighten axle nut to specified torque. Do
not overtighten it as this may damage wheel bearing.
13) After tightening axle nut, lock it securely.
45
4-2SERVICE PROCEDURE
4. Front and Rear Drive Shafts
 Put a band through the clip and wind twice in align-
ment with band groove of boot.
CAUTION:
Use a new band.
21) Pinch the end of band with pliers. Hold the clip and
tighten securely.
NOTE:
When t")

FTJ side:
SSG 6003
CAUTION:
Be sure to wrap shaft splines with vinyl tape to prevent
boot from scratches.
1) Install BJ boo")
 Cut off band with an allowance of about 10 mm (0.39
in) left from the clip and bend this allowance over the clip.
CAUTION:
Be careful to that the end of the band is in close con-
tact with clip.
1")