1997 SSANGYONG KORANDO ESP
[x] Cancel search: ESPPage 1281 of 2053
5A-186 AUTOMATIC TRANSMISSION
SSANGYONG MY2002
KAA5A0X0
C1 Clutch Overdrive Shaft and Input Shaft
Assembly
Tools Required
0555-336260Clutch Pack Clearance Kit
Notice:
Ensure that the snap rings are fitted correctly.
Check pistons for cracks, especially the C1 piston.
Do not mix clutch piston return springs.
If the C1/C2 clutch packs separate from the C3
clutch pack, make sure the No. 6 bearing doesn’t
drop out of the bearing retainer.
1. Check the overdrive shaft grooves for any defect.
2. Coat the sealing rings, large and small, with petro-
leum jelly and fit them to the overdrive shaft. The
sealing rings may be held in place with a small
amount of petroleum jelly.
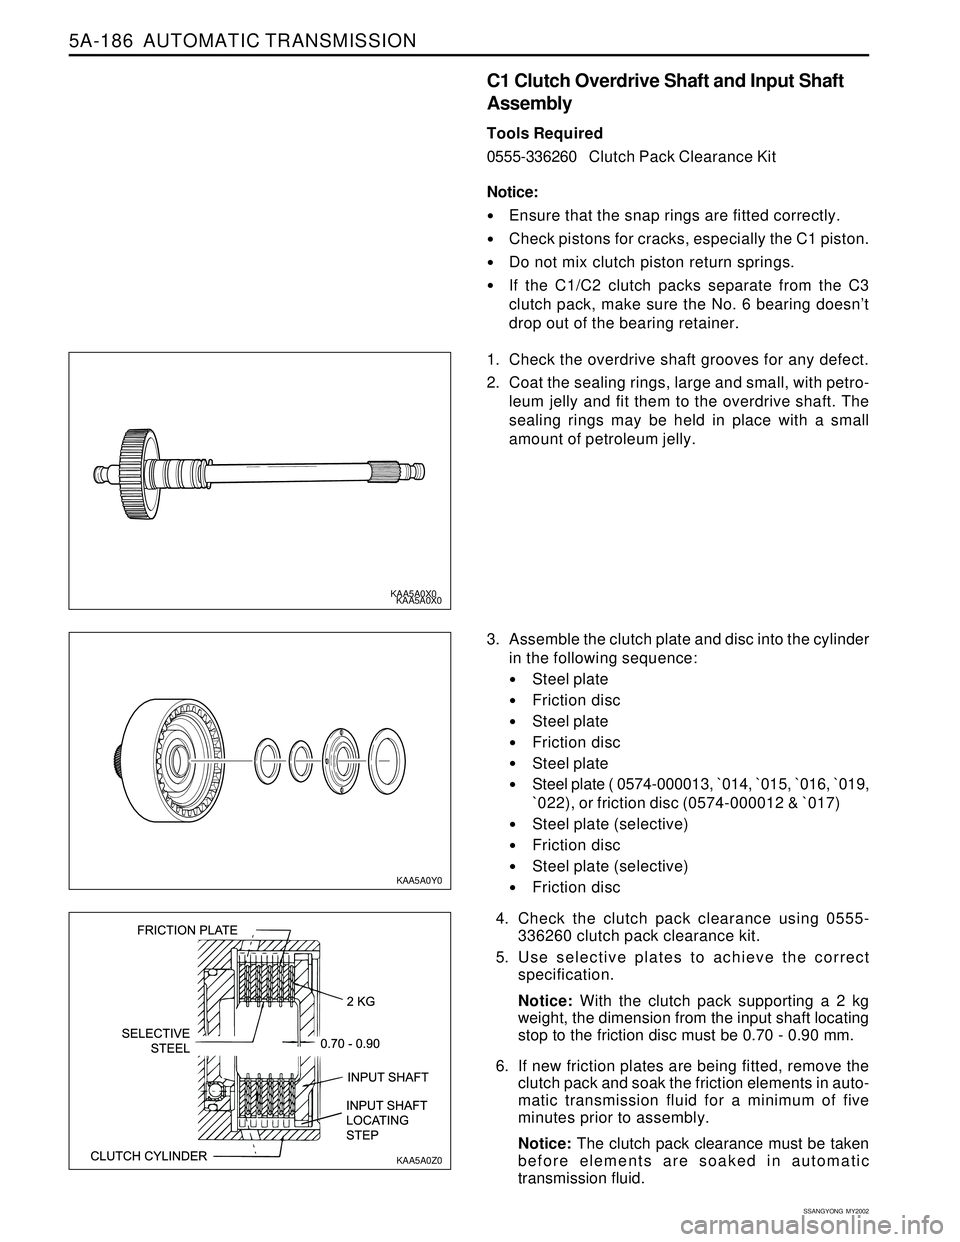
3. Assemble the clutch plate and disc into the cylinder
in the following sequence:
Steel plate
Friction disc
Steel plate
Friction disc
Steel plate
Steel plate ( 0574-000013, `014, `015, `016, `019,
`022), or friction disc (0574-000012 & `017)
Steel plate (selective)
Friction disc
Steel plate (selective)
Friction disc
4. Check the clutch pack clearance using 0555-
336260 clutch pack clearance kit.
5. Use selective plates to achieve the correct
specification.
Notice: With the clutch pack supporting a 2 kg
weight, the dimension from the input shaft locating
stop to the friction disc must be 0.70 - 0.90 mm.
6. If new friction plates are being fitted, remove the
clutch pack and soak the friction elements in auto-
matic transmission fluid for a minimum of five
minutes prior to assembly.
Notice: The clutch pack clearance must be taken
before elements are soaked in automatic
transmission fluid.
KAA5A0X0
KAA5A0Y0
KAA5A0Z0
Page 1374 of 2053
SSANGYONG MY2002
5D1-4 TRANSFER CASE
COMPONENTS OF THE TOD
TRANSFER CASE SYSTEM
Shift Motor
It locates backside transfer case, which drives rotary
helical cam. When mode select switch changes to 4L,
shift fork is on position for 2.48 : 1 by rotation of helical
cam.
Rear Speed Sensor
A hall effect speed sensor which produces a square
wave. 0 to 5 volts direct current signal in response to
a rotating 30-tooth wheel coupled to the rear propeller
shaft inside the transfer case. Each rotation of the rear
propeller shaft will result in 30 speed sensor pulse.
Front Speed Sensor
A hall effect speed sensor which produces a square
wave. 0 to 5 volts direct current signal in response to
a rotating 30-tooth wheel coupled to the front propeller
shaft inside the transfer case. Each rotation of the front
propeller shaft will result in 30 speed sensor pulse.
Electro-Magnetic Clutch
An electromagnetic clutch used to control the amount
of torque applied to the front propeller shaft.
Position Encoder
A set of 4 gray code switches which provide feedback
to the TCCU indicating the position of the shift motor.
Clutch Pedal Position Switch
A switch on vehicles equipped with a manual transmis-
sion which indicates that the clutch pedal is depressed
Park/Neutral Position Switch
A switch on vehicles equipped with an automatic trans-
mission which indicates that the transmission is in neu-
tral.
4H/4L Switch
A switch selects the desired gear ratio.
DEFINITION OF TERMINOLOGY
Shift Inhibit Speed
The vehicle speed limit, which transfer case shifts, is
disallowed. Vehicle speed is indicated by propeller
shaft speed measurement.
Duty Cycle
Duty cycle is the time the electromagnetic clutch is on
divided by the period in which it is being modulated.
Touch-off
A minimum amount of duty cycle applied to the electro
magnetic clutch.
Front Overrun
A condition where the front propeller shaft is turning at
a rate which is faster than the rear propeller shaft.
Rear Overrun
A condition where the rear propeller shaft is turning at
a rate which is faster than the front propeller shaft.
High Range
The highest (numerically lowest = 1 : 1) gear ratio be-
tween the input and outputs of the transfer case.
Low Range
The lowest (numerically highest = 2.48 : 1) gear ratio
between the input and outputs of the transfer case.
OPERATION OF THE TOD
TRANSFER CASE SYSTEM
Initial Operation of TOD Control Unit
When ignition switch is turned to ON, 4WD LOW and
4WD CHECK lamp illuminates for 0.6 second to check
bulb in instrument panel, then perform diagnosis of
system. Refer to “Self-Diagnosis Test” in this section.
Electric Shift System Operation
The electric shift system is responsible for changing
the transfer case gear ratio by controlling the electric
shift motor. The TCCU monitors the 4H/4L switch, park/
neutral position switch, speed sensors, position
encoder, and ignition switch.
A range change is initiated when:
The 4H/4L switch is changed from 4H to 4L or from
4L to 4H.
The motor position (as indicated by the position
encoder) does not match the 4H/4L switch
immediately after the ignition is turned on.
Shift Criteria
When a range change is initiated a diagnostic test will
be completed on the motor, speed sensors, and
position encoder. If the diagnostic test fails, the shift
will not be attempted. If all components are operating
properly, the TCCU will attempt a range change after
the following shift criteria are met:
The transmission is in neutral for 2 seconds after
the shift is requested.
Both propeller shaft speeds are below 87 rpm (2580
pulses/minute). If the transmission is taken out of
neutral before 2 seconds has passed, or either
propeller shaft speed increases above the limit, the
shift will be suspended and the 4L indicator will
continue to blink until the criteria are met again or
the 4H/4L switch is returned to the original position.
Range Change
When the shift criteria are met, the motor is rotated in
the appropriate direction (as determined by the selector
switch) until one of the following occurs:
Page 1375 of 2053
TRANSFER CASE 5D1-5
SSANGYONG MY2002
The motor reaches its destination.
The motor is on for 5 seconds without reaching its
destination. The shift has failed and the TCCU will
respond as default mode.
A fault occurs with either the motor or position
encoder. Refer to the diagnosis requirement.
When the motor is energized, the Ignition, 4H/4L
switch, propeller shaft speeds, and transmission
neutral inputs are ignored.
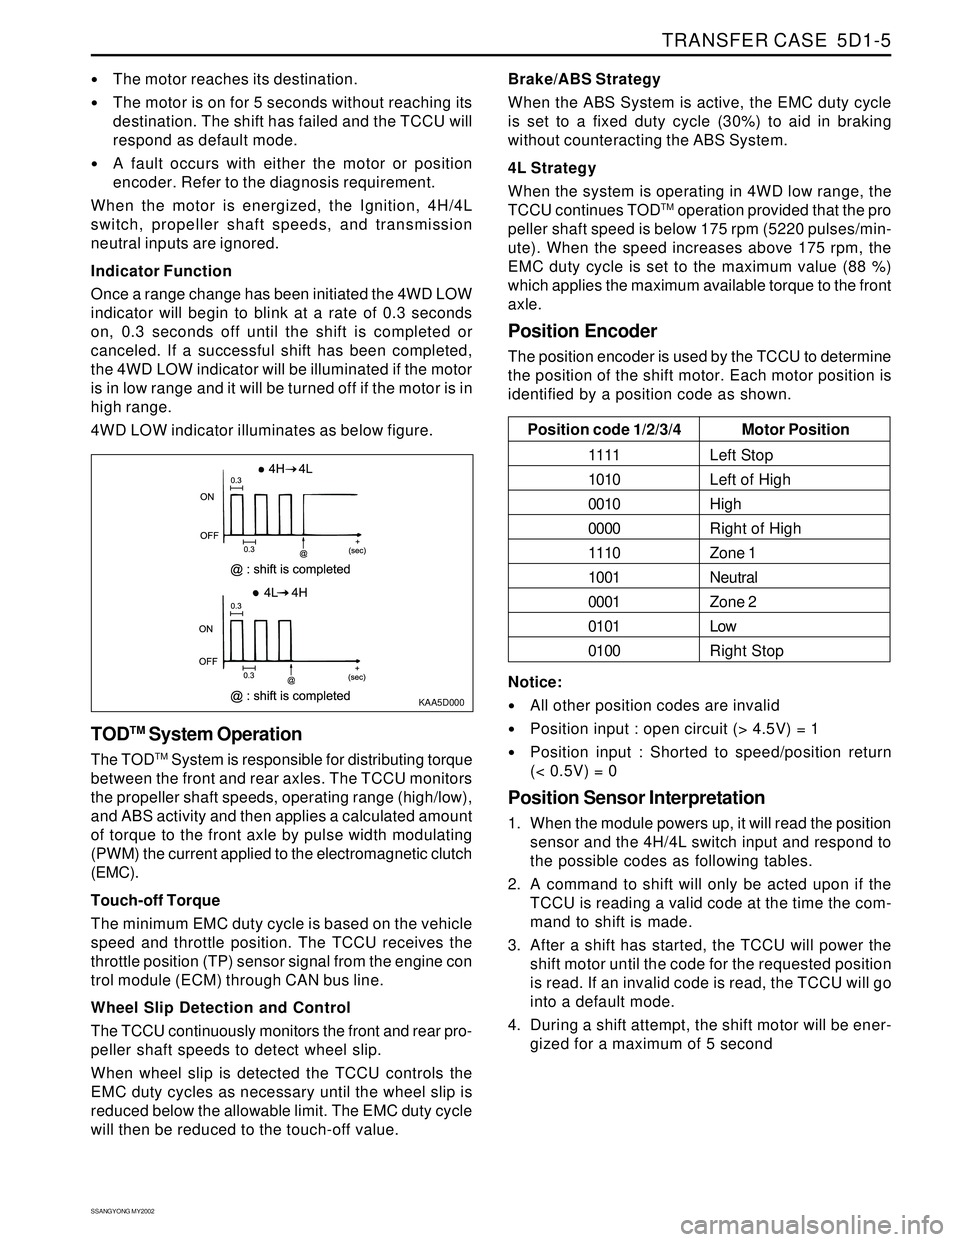
Indicator Function
Once a range change has been initiated the 4WD LOW
indicator will begin to blink at a rate of 0.3 seconds
on, 0.3 seconds off until the shift is completed or
canceled. If a successful shift has been completed,
the 4WD LOW indicator will be illuminated if the motor
is in low range and it will be turned off if the motor is in
high range.
4WD LOW indicator illuminates as below figure.
KAA5D000
TODTM System Operation
The TODTM System is responsible for distributing torque
between the front and rear axles. The TCCU monitors
the propeller shaft speeds, operating range (high/low),
and ABS activity and then applies a calculated amount
of torque to the front axle by pulse width modulating
(PWM) the current applied to the electromagnetic clutch
(EMC).
Touch-off Torque
The minimum EMC duty cycle is based on the vehicle
speed and throttle position. The TCCU receives the
throttle position (TP) sensor signal from the engine con
trol module (ECM) through CAN bus line.
Wheel Slip Detection and Control
The TCCU continuously monitors the front and rear pro-
peller shaft speeds to detect wheel slip.
When wheel slip is detected the TCCU controls the
EMC duty cycles as necessary until the wheel slip is
reduced below the allowable limit. The EMC duty cycle
will then be reduced to the touch-off value.Brake/ABS Strategy
When the ABS System is active, the EMC duty cycle
is set to a fixed duty cycle (30%) to aid in braking
without counteracting the ABS System.
4L Strategy
When the system is operating in 4WD low range, the
TCCU continues TOD
TM operation provided that the pro
peller shaft speed is below 175 rpm (5220 pulses/min-
ute). When the speed increases above 175 rpm, the
EMC duty cycle is set to the maximum value (88 %)
which applies the maximum available torque to the front
axle.
Position Encoder
The position encoder is used by the TCCU to determine
the position of the shift motor. Each motor position is
identified by a position code as shown.
Motor Position
Left Stop
Left of High
High
Right of High
Zone 1
Neutral
Zone 2
Low
Right Stop Position code 1/2/3/4
1111
1010
0010
0000
1110
1001
0001
0101
0100
Notice:
All other position codes are invalid
Position input : open circuit (> 4.5V) = 1
Position input : Shorted to speed/position return
(< 0.5V) = 0
Position Sensor Interpretation
1. When the module powers up, it will read the position
sensor and the 4H/4L switch input and respond to
the possible codes as following tables.
2. A command to shift will only be acted upon if the
TCCU is reading a valid code at the time the com-
mand to shift is made.
3. After a shift has started, the TCCU will power the
shift motor until the code for the requested position
is read. If an invalid code is read, the TCCU will go
into a default mode.
4. During a shift attempt, the shift motor will be ener-
gized for a maximum of 5 second
Page 1381 of 2053
TRANSFER CASE 5D1-11
SSANGYONG MY2002
DIAGNOSIS
While the transfer case control unit (TCCU) is active it
periodically monitors its inputs and outputs. If a fault
is detected the 4WD CHECK lamp is illuminated and a
fault code is stored in the TCCU memory.
When requested, fault codes are downloaded to scan
tool through a diagnostic connector (K-line) serial com
munication.
SELF-DIAGNOSTIC TESTS
TCCU Internal Function
When the ignition is turned on the TCCU tests its read
only memory (ROM) and random access memory
(RAM). If there is a fault, the TCCU immediately resets
itself and re-tests the ROM and RAM. If the fault
persists the TCCU continues to reset and re-test until
the fault is corrected or the ignition is turned off. All
TCCU functions are inhibited until the fault is corrected.
The 4WD CHECK lamp is not illuminated if there is a
ROM or RAM fault.
If the ROM/RAM passes the electronically erasable
programmable read only memory (EEPROM) is tested.
If there is a fault the 4WD CHECK lamp is illuminated
and the TCCU continues to operate using the default
calibration data stored in ROM. Fault codes are not
stored when there is an EEPROM fault.
An EEPROM fault can only be cleared by cycling
ignition OFF-ON.
Shift Motor Assembly Test
If the TCCU detects a shift motor or position encoder
fault continuously for one second the 4WD CHECK
lamp is turned on and the appropriate fault code is
stored in memory.
1. A shift motor fault when the motor is off is defined
as follows:
Motor HI-LO circuits are shorted to ground.
Motor LO-HI circuits are shorted to ground.
Motor circuits are open.
2. A shift motor fault when the motor is energized is
defined as follows:
Motor HI-LO circuits are shorted to ground.
Motor LO-HI circuits are shorted to ground.
Motor HI-LO circuits are shorted to motor LO
HI circuits.
Motor circuits are open.
3. A position encoder fault is defined as follows:
Any position code which does not correspond
to the valid 9 codes.
A short to ground on any of the encoder lines.
4. If no shifts are in progress when a failure occurs
the TCCU will not respond to any shift commands.5. If a shift command has been received but not
acted upon when a failure occurred the TCCU
would cancel the command and not respond to
any subsequent shift commands.
6. If a shift command is in progress when an invalid
position code is confirmed it will be halted and
the TCCU will turn the motor toward the high
position. Afterwards the TCCU will not respond to
any shift commands.
7. If the shift motor or position encoder assembly
failures, other than a motor failure which occurs
when the motor is energized, recovers continuously
for one second the TCCU will function normally.
The 4WD CHECK lamp is turned off but the fault
code will remain in memory.
8. A motor failure (i.e. open or short circuit) which
occurs when the motor is energized can only be
cleared by cycling the ignition OFF-ON.
Front Speed Sensor Test
If a front speed sensor fault is detected continuously
for 0.5 second the 4WD CHECK lamp is illuminated.
The TCCU then responds as follows:
1. If the system is in high range the TCCU uses the
rear speed sensor to determine the EMC touch off
level and wheel slip control is suspended.
2. If the system is in low range, the EMC duty cycle
is set to maximum, independent of vehicle speed,
until the system is shifted out of low range.
3. All electric shift activity is halted until the Ignition
is cycled. If a shift is in progress it will be
completed.
If the front speed sensor recovers continuously for O.5
second the TCCU will function normally. The 4WD
CHECK lamp is turned off but the fault code will remain
in memory.
Rear Speed Sensor Test
If a rear speed sensor fault is detected continuously
for 0.5 second the 4WD CHECK lamp is illuminated.
The TCCU then responds as follows:
1. If the system is in high range the TCCU uses the
front speed sensor to determine the EMC touch
off level and wheel slip control is suspended.
2. If the system is in low range, the EMC duty cycle
is set to maximum independent of vehicle speed
until the system is shifted out of low range.
3. All electric shift activity is halted until the Ignition
is cycled. If a shift is in progress it will be
completed.
4. If the rear speed sensor recovers continuously for
0.5 second the TCCU will function normally. The
4WD CHECK lamp is turned off but the fault code
will remain in memory.
Page 1382 of 2053
SSANGYONG MY2002
5D1-12 TRANSFER CASE
Both Speed Sensor Faulty
If both the front and rear speed sensors are faulty con
tinuously for 0.5 seconds the 4WD CHECK lamp is
illuminated. The TCCU then responds as follows:
1. If the system is in high range the TCCU sets the
EMC touch off level based on a vehicle speed of
0 and wheel slip control is suspended.
2. If the system is in low range, the EMC duty cycle
is set to maximum until the system is shifted out
of low range.
3. All electric shift activity is halted until the Ignition
is cycled. If a shift is in progress it will be
completed.
If both speed sensors recover continuously for 0.5 sec-
ond the TCCU will function normally. The 4WD CHECK
lamp is turned off but the fault code will remain in
memory.
Electro-Magnetic Clutch Test
The electromagnetic clutch (EMC) is tested for open
circuit or short circuit to ground. If a fault is detected
continuously for 0.8 second the 4WD CHECK lamp is
turned on and all TODTM activity is halted.
If the EMC recovers continuously for 0.8 second the
TCCU will function normally. The 4WD CHECK lamp is
turned off but the fault code will remain in memory.
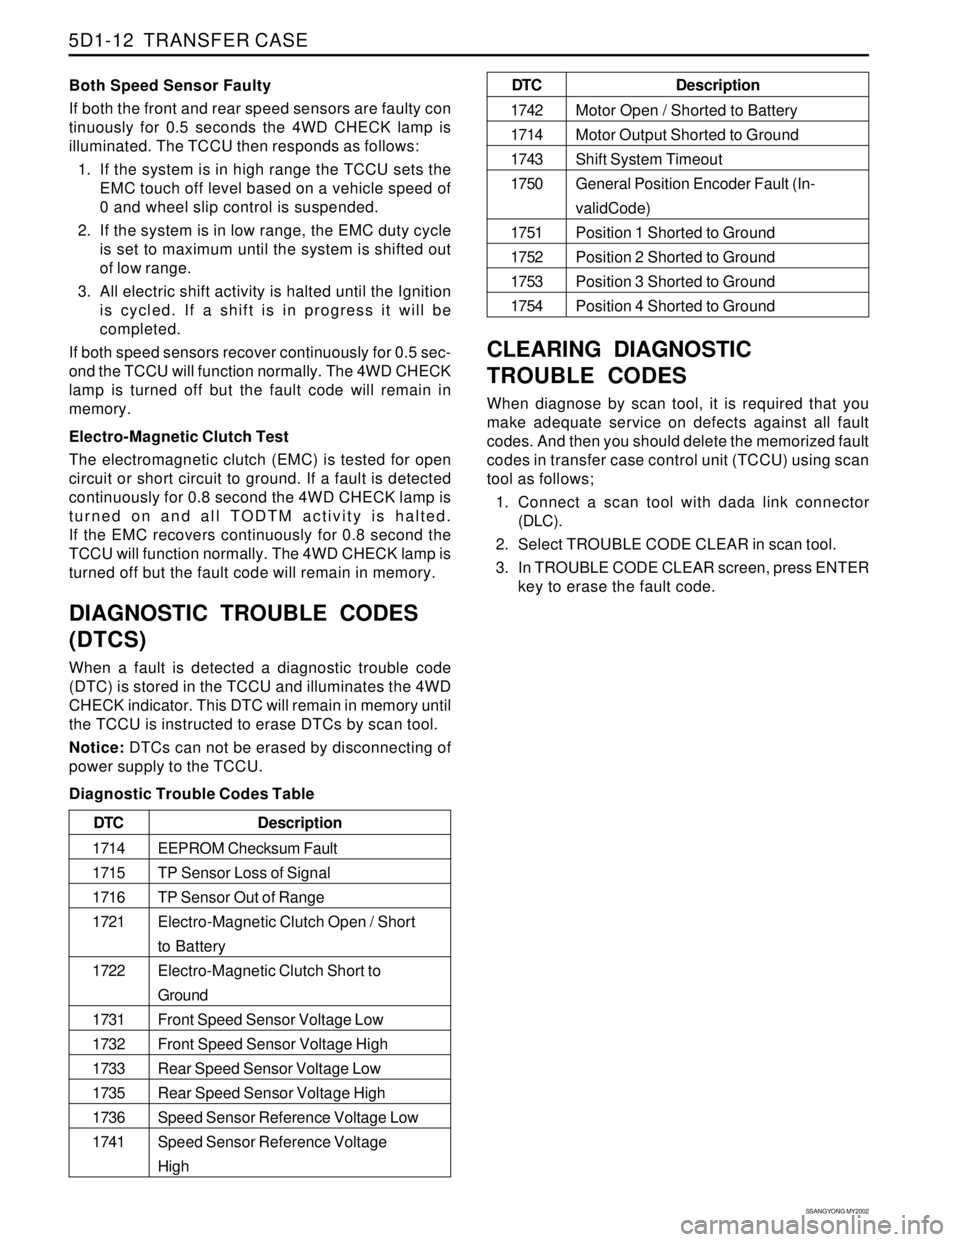
DIAGNOSTIC TROUBLE CODES
(DTCS)
When a fault is detected a diagnostic trouble code
(DTC) is stored in the TCCU and illuminates the 4WD
CHECK indicator. This DTC will remain in memory until
the TCCU is instructed to erase DTCs by scan tool.
Notice: DTCs can not be erased by disconnecting of
power supply to the TCCU.
Diagnostic Trouble Codes Table
CLEARING DIAGNOSTIC
TROUBLE CODES
When diagnose by scan tool, it is required that you
make adequate service on defects against all fault
codes. And then you should delete the memorized fault
codes in transfer case control unit (TCCU) using scan
tool as follows;
1. Connect a scan tool with dada link connector
(DLC).
2. Select TROUBLE CODE CLEAR in scan tool.
3. In TROUBLE CODE CLEAR screen, press ENTER
key to erase the fault code.
Description
EEPROM Checksum Fault
TP Sensor Loss of Signal
TP Sensor Out of Range
Electro-Magnetic Clutch Open / Short
to Battery
Electro-Magnetic Clutch Short to
Ground
Front Speed Sensor Voltage Low
Front Speed Sensor Voltage High
Rear Speed Sensor Voltage Low
Rear Speed Sensor Voltage High
Speed Sensor Reference Voltage Low
Speed Sensor Reference Voltage
High DTC
1714
1715
1716
1721
1722
1731
1732
1733
1735
1736
1741
Description
Motor Open / Shorted to Battery
Motor Output Shorted to Ground
Shift System Timeout
General Position Encoder Fault (In-
validCode)
Position 1 Shorted to Ground
Position 2 Shorted to Ground
Position 3 Shorted to Ground
Position 4 Shorted to Ground DTC
1742
1714
1743
1750
1751
1752
1753
1754
Page 1389 of 2053
TRANSFER CASE 5D1-67
SSANGYONG MY2002
KAA5D260
KAA5D270
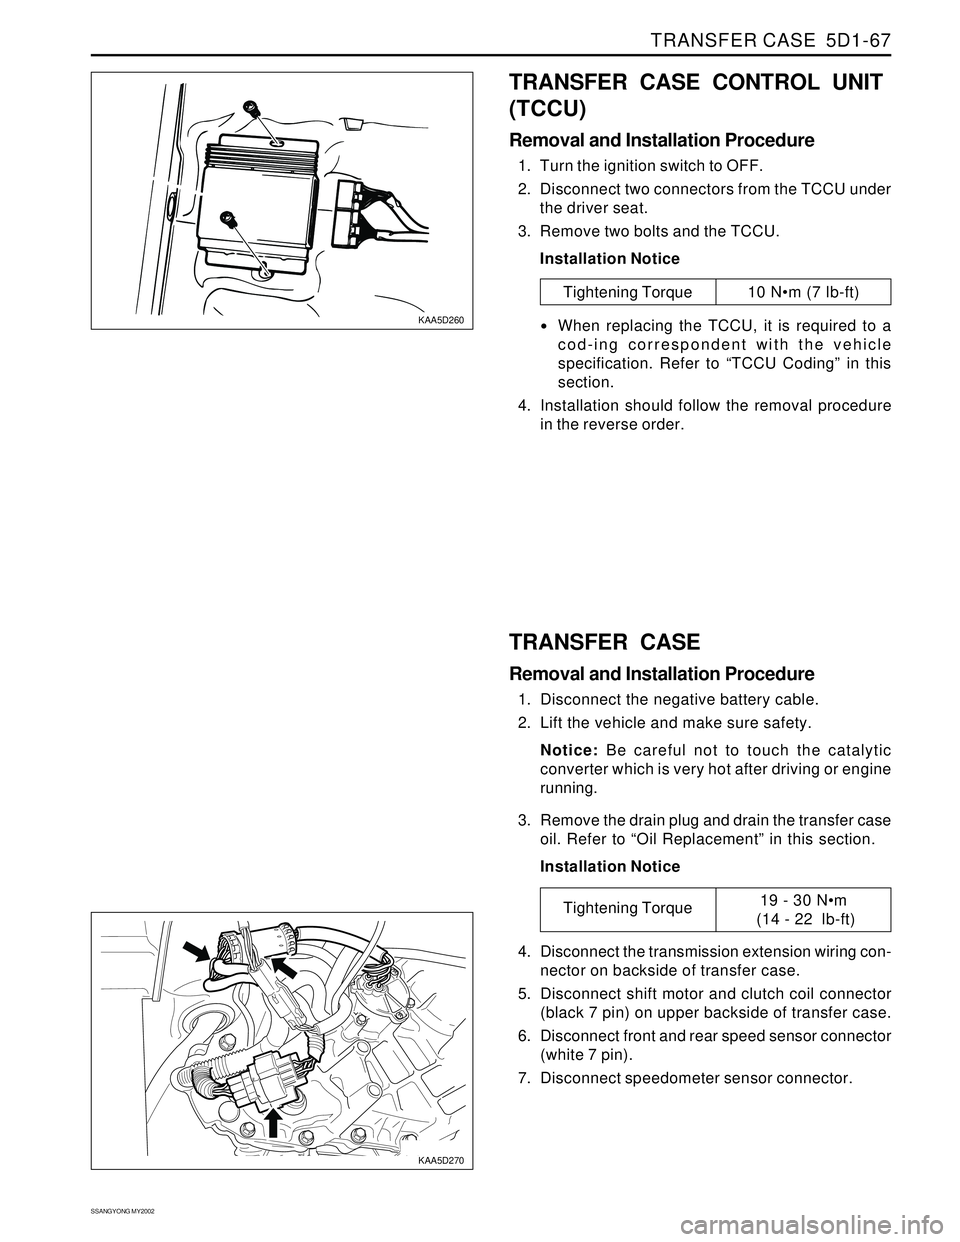
TRANSFER CASE CONTROL UNIT
(TCCU)
Removal and Installation Procedure
1. Turn the ignition switch to OFF.
2. Disconnect two connectors from the TCCU under
the driver seat.
3. Remove two bolts and the TCCU.
Installation Notice
Tightening Torque 10 Nm (7 lb-ft)
When replacing the TCCU, it is required to a
cod-ing correspondent with the vehicle
specification. Refer to “TCCU Coding” in this
section.
4. Installation should follow the removal procedure
in the reverse order.
TRANSFER CASE
Removal and Installation Procedure
1. Disconnect the negative battery cable.
2. Lift the vehicle and make sure safety.
Notice: Be careful not to touch the catalytic
converter which is very hot after driving or engine
running.
3. Remove the drain plug and drain the transfer case
oil. Refer to “Oil Replacement” in this section.
Installation Notice
4. Disconnect the transmission extension wiring con-
nector on backside of transfer case.
5. Disconnect shift motor and clutch coil connector
(black 7 pin) on upper backside of transfer case.
6. Disconnect front and rear speed sensor connector
(white 7 pin).
7. Disconnect speedometer sensor connector.
Tightening Torque19 - 30 Nm
(14 - 22 lb-ft)
Page 1473 of 2053
POWER STEERING GEAR 6C-5
SSANGYONG MY2002
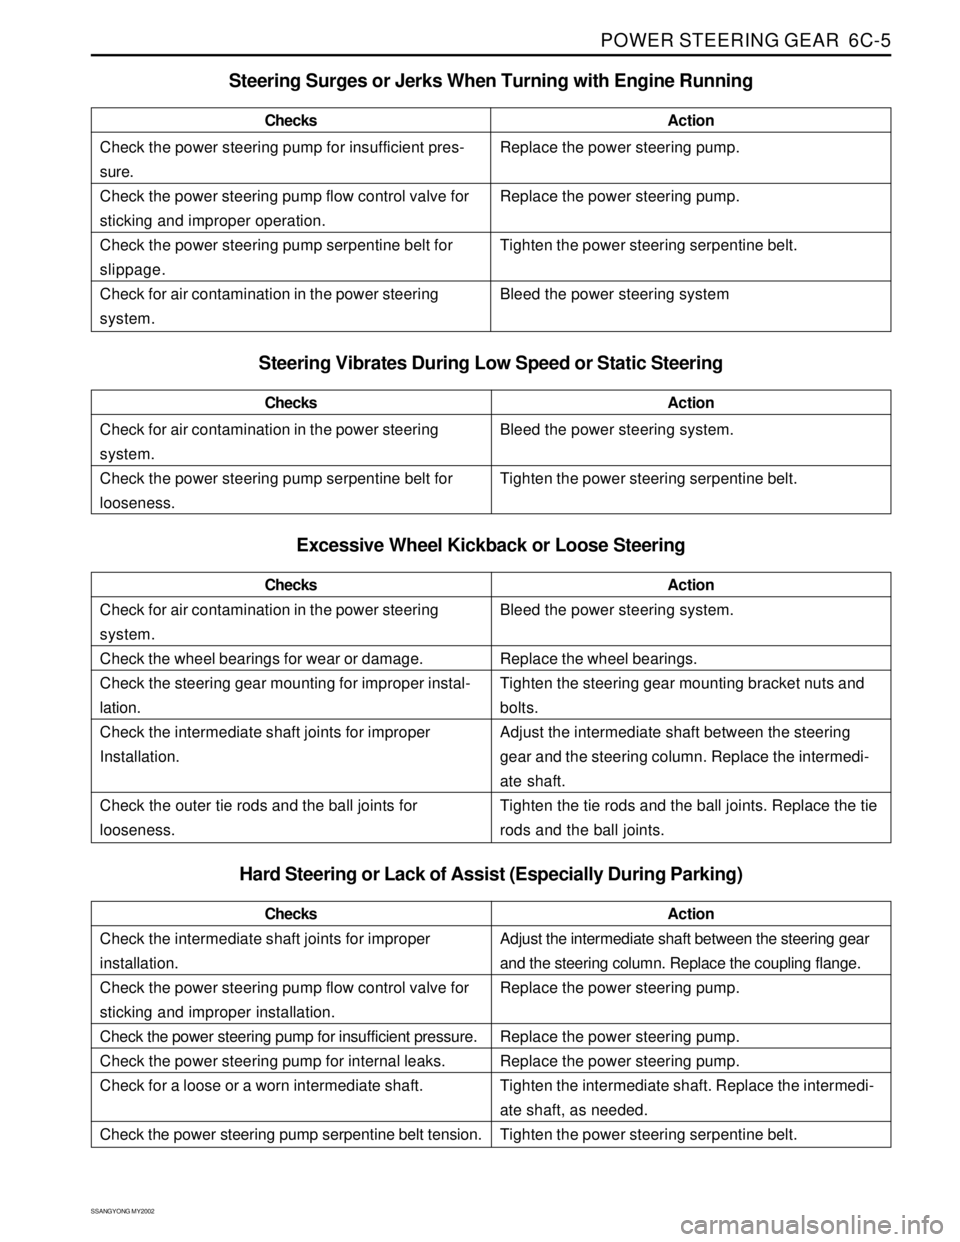
Check the power steering pump for insufficient pres-
sure.
Check the power steering pump flow control valve for
sticking and improper operation.
Check the power steering pump serpentine belt for
slippage.
Check for air contamination in the power steering
system.ChecksActionReplace the power steering pump.
Replace the power steering pump.
Tighten the power steering serpentine belt.
Bleed the power steering system
Steering Surges or Jerks When Turning with Engine Running
Check for air contamination in the power steering
system.
Check the power steering pump serpentine belt for
looseness.ChecksActionBleed the power steering system.
Tighten the power steering serpentine belt.
Steering Vibrates During Low Speed or Static Steering
Excessive Wheel Kickback or Loose Steering
Check for air contamination in the power steering
system.
Check the wheel bearings for wear or damage.
Check the steering gear mounting for improper instal-
lation.
Check the intermediate shaft joints for improper
Installation.
Check the outer tie rods and the ball joints for
looseness.ChecksActionBleed the power steering system.
Replace the wheel bearings.
Tighten the steering gear mounting bracket nuts and
bolts.
Adjust the intermediate shaft between the steering
gear and the steering column. Replace the intermedi-
ate shaft.
Tighten the tie rods and the ball joints. Replace the tie
rods and the ball joints.
Hard Steering or Lack of Assist (Especially During Parking)
Check the intermediate shaft joints for improper
installation.
Check the power steering pump flow control valve for
sticking and improper installation.
Check the power steering pump for insufficient pressure.
Check the power steering pump for internal leaks.
Check for a loose or a worn intermediate shaft.
Check the power steering pump serpentine belt tension.ChecksActionAdjust the intermediate shaft between the steering gear
and the steering column. Replace the coupling flange.
Replace the power steering pump.
Replace the power steering pump.
Replace the power steering pump.
Tighten the intermediate shaft. Replace the intermedi-
ate shaft, as needed.
Tighten the power steering serpentine belt.
Page 1595 of 2053
SSANGYONG MY2002
8B-10 SUPPLEMENTAL RESTRAINTS SYSTEM
SRS DIAGNOSTIC SYSTEM CHECK
Notice: If the vehicle interior has been exposed to
extensive water intrusion such as water leaks, driving
through high water, flooding, or other caucuses, the
sensing and diagnostic module (SDM) and SDM
connector may be need to be replaced. With ignition
OFF, inspect the area around the SDM, including the
carpet. If any significant soaking or evidence of previous
soaking is detected, the water must be removed, water
damage repaired, and the SDM and SDM connector must
be replaced. Before attempting any of these repairs, the
supplemental restraint system (SRS) must be disabled.
Refer to “Disabling the SRS” and “Sensing and
Diagnostic Module (SDM)” in this section.
The SRS Diagnostic System Check must always be
the starting point for any SRS system diagnosis. The
SRS Diagnostic System Check reveals diagnostic
trouble codes (DTCs) through the use of scan tool.
The diagnostic procedures used in this section are
designed to find and repair SRS conditions. To get
the best results, it is important to use the diagnostic
charts and follow the sequence listed below.
1. Perform the SRS Diagnostic System Check, which
reveals diagnostic trouble codes (DTCs) through
the use of scan tool. It also checks for proper airbag
indicator operation.
2. Refer to the proper diagnostic chart as directed by
SRS Diagnostic System Check. Bypassing these
procedures may result in extended diagnostic time,
incorrect diagnosis, and incorrect parts
replacement.3. Repeat the SRS Diagnostic System Check after any
repair or diagnostic procedures have been
performed to ensure that the repair has beenmade
correctly and that no other malfunction exists.
Circuit Description
When the ignitions witch is first turned to ON, ignition
voltage is supplied from airbag fuse to the SDM at
input terminal 5. The SDM responds by turning on the
airbag indicator for 4.5 seconds and then turning it off
while the SDM performs tests on the SRS system.
Diagnostic Aids
The order in which DTCs are diagnosed is very
important. Failure to diagnose the DTCs in the order
specified may result in extended diagnostic time,
incorrect diagnosis, and incorrect parts replacement.
Test Description
The numbers below refer to steps on the diagnostic
table.
2. This test differentiates between an indicator that
will not come on and an indicator that stays on when
it should be off.
3. Refer to the first caution below
5. This test, along with step 6, differentiates internal
or external faults of SDM.
9. Refer to the cautions below.