1997 SSANGYONG KORANDO maintenance
[x] Cancel search: maintenancePage 137 of 2053

D AEW OO M Y_2000
SECTION 1D1
M162 ENGINE COOLING
CAUTION: Disconnect the negative battery cable before removing or installing any electrical unit or when a
tool or equipment could easily come in contact with exposed electrical terminals. Disconnecting this cable
will help prevent personal injury and damage to the vehicle. The ignition must also be in LOCK unless other -
wise noted.
TABLE OF CONTENTS
Specifications 1D1 -- 2............................
General Specifications 1D1-- 2....................
Fastener Tightening Specifications 1D1 -- 2..........
Special Tools 1D1 -- 3.............................
Special Tools Table 1D1-- 3.......................
Diagnosis 1D1 -- 4.................................
System Leakage Test 1D1-- 4.....................
Maintenance and Repair 1D1 -- 5...................
On-- Vehicle Service 1D1-- 5.........................Coolant Drain and Fill Up 1D1 -- 5..................
Coolant Connection Fitting 1D1 -- 7.................
Wat er Pum p 1D1 -- 8.............................
Thermostat 1D1 -- 10.............................
Oil Cooler Pipe Line 1D1 -- 11.....................
Cooling Fan and Viscous Clutch 1D1 -- 12...........
Cooling Fan Shroud 1D1 -- 14.....................
Radiator 1D1-- 15................................
Page 141 of 2053

M162 ENGINE COOLING 1D1 -- 5
D AEW OO M Y_2000
MAINTENANCE AND REPAIR
ON-VEHICLE SERVICE
COOLANT DRAIN AND FILL UP
Draning & Filling up Procedure
1. Loosen the cap a little and release pressure and re-
move the cap.
Notice:For the risk of scalding, the cap must not be
opened unless the coolant temperature is below 90°C.
2. Loosen the radiator lower drain cock and drain the
coolant.
Notice:Collect the coolant by using a proper container.
3. Drain the coolant from the crankcase by inserting a
hose (dia. 14mm) onto the drain bolt on the side of
crankcase (exhaust manifold) and by loosening the
plug.
Notice
DJust loosen the drain plug to drain the coolant and do
not remove the plug completely.
DCollect the coolant by using the proper container.
4. After complete draining of the coolant, remove the
hose connector to drain plug and reinstall the drain
plug.
Installation Notice
Tightening Torque
30 NSm (22 lb-ft)
5. Tighten the radiator lower drain cock.
Page 153 of 2053

D AEW OO M Y_2000
SECTION 1E1
M162 ENGINE ELECTRICAL
CAUTION: Disconnect the negative battery cable before removing or installing any electrical unit or when a
tool or equipment could easily come in contact with exposed electrical terminals. Disconnecting this cable
will help prevent personal injury and damage to the vehicle. The ignition must also be in LOCK unless other -
wise noted.
TABLE OF CONTENTS
Specifications 1E1 -- 2............................
Generator Specifications 1E1-- 2..................
Starting Motor Specifications 1E1-- 2...............
Battery Specifications 1E1-- 2.....................
Fastener Tightening Specifications 1E1 -- 2..........
Maintenance and Repair 1E1 -- 3...................
On-- Vehicle Service 1E1-- 3.........................Generator 1E1-- 3...............................
Starting Motor 1E1--4...........................
Battery 1E1--5.................................
Spark Plug 1E1 -- 6..............................
Ignition Cable 1E1-- 8............................
Unit Repair 1E1 -- 11..............................
Battery 1E1--11.................................
Page 155 of 2053

M162 ENGINE ELECTRICAL 1E 1 -- 3
D AEW OO M Y_2000
MAINTENANCE AND REPAIR
ON-VEHICLE SERVICE
GENERATOR
Preceding Work : Removal of the drivebelt
Removal & Installation Procedure
1. Disconnect the negative battery terminal.
2. Unscrew the nut and disconnect the terminal (1).
Installation Notice
Tightening Torque
14 -- 18 NSm (10 -- 13 lb-ft)
3. Unscrew the nut and disconnect the terminal (2).
Installation Notice
Tightening Torque
4--5NSm (35 -- 44 lb-in)
1 Terminal (B+)
2 Terminal (D+)
4. Unscrew the generator mounting bolt (3).
Installation Notice
Tightening Torque
25 NSm (18 lb-ft)
5. Remove the generator.
6. Installation should follow the removal procedure in
the reverse order.
3 Generator Mounting Bolt
4 Generator
Page 162 of 2053

1E 1 -- 10 M162 ENGINE ELECTRICAL
D AEW OO M Y_2000
Circuit Diagram
Inspection & Maintenance Procedure (for
MSE)
1. While the ignition switch is in ’OFF’ position, remove
the wiring connectors (1 and 15) from ignition coil and
measure the primary resistance between terminal
No.1 and No.15.
Specified Value
0.9 -- 1.6Ω(20°C)
Notice:If out of specified value, replace the ignition coil.
2. During engine cranking, measure primary voltage
(T1/1) between ECU terminal No. 71 and No. 69.
Specified Value
200 -- 350 V
Notice
DMeasure remaining cables.
-- T1/2 : No. 72 and 69.
-- T1/3 : No. 70 and 69.
DIf out of specified value, check ignition cable and
ECU.
3. Using a multi-- tester, measure the secondary coil re-
sistance between 5a and 5b.
Specified Value
6--8.5kΩ
Page 164 of 2053

D AEW OO M Y_2000
SECTION 1F1
ENGINE CONTROLS
CAUTION: Disconnect the negative battery cable before removing or installing any electrical unit or when a
tool or equipment could easily come in contact with exposed electrical terminals. Disconnecting this cable
will help prevent personal injury and damage to the vehicle. The ignition must also be in LOCK unless other -
wise noted.
TABLE OF CONTENTS
Engine and ECM Problem Check Report 1F1 -- 2....
Specifications 1F1 -- 3............................
Engine Data Display Table 1F1 -- 3.................
Fastener Tightening Specifications 1F1 -- 4..........
Fuel System Specification 1F1 -- 5.................
Temperature vs Resistance 1F1 -- 5................
Special Tools and Equipment 1F1 -- 6..............
Special Tools Table 1F1 -- 6.......................
Schematic and Routing Diagrams 1F1 -- 7..........
ECM Wiring Diagram
(3.2L DOHC -- MSE 3.62S) 1F1 -- 7..............
Diagnosis 1F1 -- 14................................
Failure Code Diagnosis 1F1 -- 14.....................
Clearing Failure Codes 1F1 -- 14...................
Failure Codes Table 1F1 -- 14.....................
Ignition System 1F1 -- 18...........................
Ignition Coil 1F1 -- 20.............................
Crankshaft Position (CKP) Sensor 1F1 -- 22.........
Camshaft Position (CMP) Sensor 1F1 -- 26..........
Camshaft Actuator 1F1 -- 30......................
Knock Sensor (KS) 1F1 -- 32......................
Spark Plug 1F1 -- 34.............................
System Voltage 1F1 -- 38.........................
Ignition Switch 1F1 -- 39..........................
Fuel System 1F1 -- 40..............................
Fuel Pump 1F1 -- 42.............................
Fuel Injector 1F1 -- 46............................
Purge Control Valve 1F1 -- 50.....................
Fuel Rail 1F1 -- 52...............................
Fuel Pressure Regulator 1F1 -- 54.................
Induction System 1F1 -- 56..........................
Throttle Valve Actuator 1F1 -- 56...................
Hot Film Air Mass (HFM) Sensor 1F1 -- 60..........
Engine Coolant Temperature (ECT) Sensor 1F1 -- 64.
Accelerator Pedal Module 1F1 -- 68................
Clutch Switch 1F1 -- 71...........................Cooling Fan 1F1 -- 72............................
A/C Compressor Relay 1F1 -- 73...................
Cruise Control Switch 1F1 -- 74....................
Traction Control System (TCS) 1F1 -- 75............
Resonance Flap 1F1 -- 76.........................
Stop Lamp Switch 1F1 -- 77.......................
Engine RPM 1F1 -- 78............................
Exhaust System 1F1 -- 79...........................
Catalytic Converter 1F1 -- 79......................
Oxygen Sensor 1F1 -- 80.........................
Engine Control Module 1F1 -- 86.....................
Serial Data Communication 1F1--88...............
Internal Failure 1F1 -- 90..........................
Electronic Throttle Controller Safety
Malfunction 1F1 -- 92...........................
Immobilizer 1F1 -- 94.............................
Maintenance and Repair 1F1 -- 95..................
On -- Vehicle Service 1F1 -- 95........................
Discharging the Pressure in Fuel System 1F1 -- 95...
Fuel Pump 1F1 -- 95.............................
Fuel Filter 1F1 -- 96..............................
Fuel Tank 1F1 -- 97..............................
Fuel Pressure Regulator 1F1 -- 98.................
Fuel Rail and Injector 1F1 -- 99....................
Engine Coolant Temperature Sensor 1F1 -- 100......
Throttle Body (Integrated with the
Actuator) 1F1 -- 101............................
Hot Film Air Mass (HFM) Sensor 1F1 -- 102.........
Knock Sensor 1F1 -- 102..........................
Pedal Position Sensor 1F1 -- 103...................
Oxygen Sensor 1F1 -- 103........................
Purge Control Valve 1F1 -- 104....................
Canister 1F1 -- 104...............................
Camshaft Position Sensor 1F1 -- 104...............
Crankshaft Position Sensor 1F1 -- 105..............
Engine Control Module 1F1 -- 105..................
Page 184 of 2053

M162 ENGINE CONTROLS 1F1 -- 21
D AEW OO M Y_2000
KAB1F140
Failure
CodeDescriptionTrouble AreaMaintenance Hint
64
No ignition voltage
output (No. 1 ignition
coil)DInspectiontheECMpin70(71and72)
about short circuit or open with bad
contact
DInspectionthepowersourcetoignition
65
No ignition voltage
output (No. 2 ignition
coil)Malfunction of ignition circuit
Primary current values or
secondary short circuit
DInspectionthepowersourcetoignition
coil
DInspection the ignition coil, high
tension cords etc.
DInspectionthesparkplug(wetcracks
66
No ignition voltage
output (No. 3 ignition
coil)DInspection the spark plug (wet, cracks,
wear, improper gap, burned
electrodes, heavy deposit)
DInspection the ECM
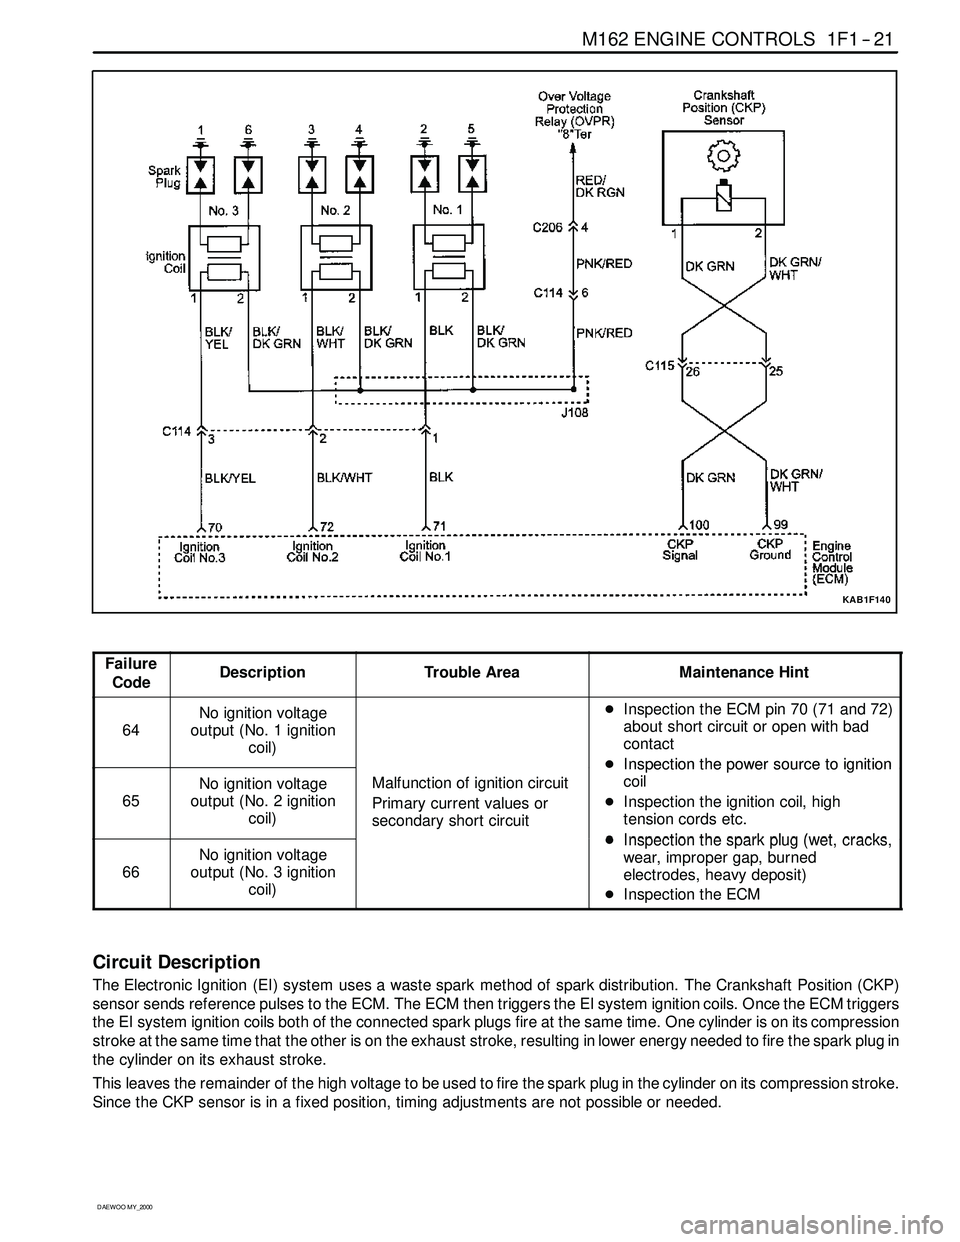
Circuit Description
The Electronic Ignition (EI) system uses a waste spark method of spark distribution. The Crankshaft Position (CKP)
sensor sends reference pulses to the ECM. The ECM then triggers the EI system ignition coils. Once the ECM triggers
the EI system ignition coils both of the connected spark plugs fire at the same time. One cylinder is on its compression
stroke at the same time that the other is on the exhaust stroke, resulting in lower energy needed to fire the spark plug in
the cylinder on its exhaust stroke.
This leaves the remainder of the high voltage to be used to fire the spark plug in the cylinder on its compression stroke.
Since the CKP sensor is in a fixed position, timing adjustments are not possible or needed.
Page 186 of 2053

M162 ENGINE CONTROLS 1F1 -- 23
D AEW OO M Y_2000
KAB1F150
Failure
CodeDescriptionTrouble AreaMaintenance Hint
17
Crankshaft position
sensor signal failure (no
engine revolution signal)Even through cam position
recognition is normal, no
crankshaft position signal
recognition
DMonitoring the actual rpm through or
scan tool
18
Crankshaft position
sensor signal failure
(rpm > max. value)When more than applicable
revolution values or
implausibleto60–2teeth
scantool
DInspection the ECM pin 100, 99 about
short circuit with bad contact
DInspection the CKP sensor
20
Crankshaft position
sensor signal failure
(gap recognition failure)
When implausible recognition
of cam and crank angle signal
or intermittent sensing the
signal or error count of
undetected gap.
p
DInspection the air gap between sensor
and drive plate
DInspection the drive plate (teeth
condition)
DInspection the ECM
67Crankshaft position
sensor adaptation failureWhen faulty crank angle
sensor adaption
p
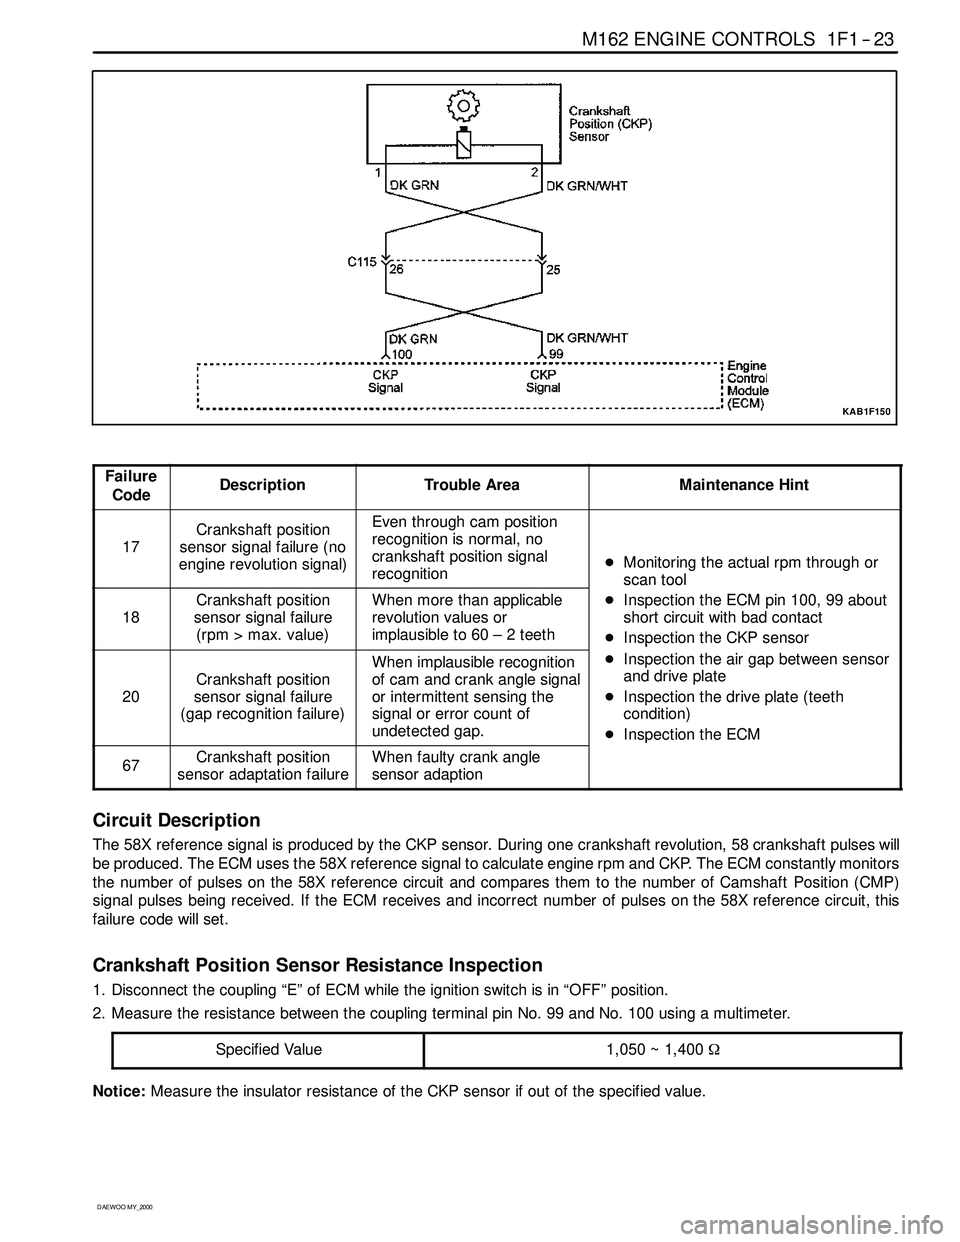
Circuit Description
The 58X reference signal is produced by the CKP sensor. During one crankshaft revolution, 58 crankshaft pulseswill
be produced. The ECM uses the 58X reference signal to calculate engine rpm and CKP. The ECM constantly monitors
the number of pulses on the 58X reference circuit and compares them to the number of Camshaft Position (CMP)
signal pulses being received. If the ECM receives and incorrect number of pulses on the 58X reference circuit, this
failure code will set.
Crankshaft Position Sensor Resistance Inspection
1. Disconnect the coupling “E” of ECM while the ignition switch is in “OFF” position.
2. Measure the resistance between the coupling terminal pin No. 99 and No. 100 using a multimeter.
Specified Value
1,050 ~ 1,400Ω
Notice:Measure the insulator resistance of the CKP sensor if out of the specified value.