Page 795 of 2053
1F3 -- 38 OM600 ENGINE CONTROLS
D AEW OO M Y_2000
Digital Tester, RIV Method
(Connection Diagram for Testers Without Adapter)
1 Fuel Injection Pump
2 Rl Sensor
3 Digital Tester4 TDC Pulse Sender Unit
5 Battery
Page 796 of 2053
OM600 ENGINE CONTROLS 1F3 -- 39
D AEW OO M Y_2000
(Connection Diagram for Testers With Adapter)
1 Fuel Injection Pump
2 Rl Sensor
3 Digital Tester4 TDC Pulse Sender Unit
5 Battery
6 Rl Pulse Generator
Service Data
Start of Delivery (RIV)AT DC 1 4_-- 1 6_
Idle SpeedOM661LA : 720 -- 820 rpm, OM662LA : 750 -- 850 rpm
Page 921 of 2053

SECTION 4A
HYDRAULIC BRAKES
CAUTION: Disconnect the negative battery cable before removing or installing any electrical unit or when
a tool or equipment could easily come in contact with exposed electrical terminals. Disconnecting this
cable will help prevent personal injury and damage to the vehicle. The ignition must also be in LOCK
unless otherwise noted.
TABLE OF CONTENTS
Description and Operation...................................4A-2
General Description.............................................4A-2
Diagnostic Information and Procedures..............4A-3
Brake System Testing ..........................................4A-3
Brake Hose Inspection.........................................4A-3
Brake Warning Lamp Circuit Description..............4A-4
Brake Warning Lamp Diagnosis...........................4A-5
LCRV (Load Conscious Reducing Valve)..............4A-8
Repair Instructions..............................................4A-10On-Vehicle Service...............................................4A-10
Manual Bleeding The Brakes.............................4A-10
Front Brake Hose...............................................4A-13
Rear Brake Hose...............................................4A-13
Stoplamp Switch................................................4A-14
Brake Pedal.......................................................4A-14
Specifications.....................................................4A-15
General Specification .........................................4A-15
Fastener Tightening Specifications.....................4A-16
Page 1001 of 2053
SSANGYONG MY2002
4F-18 ABS AND TCS
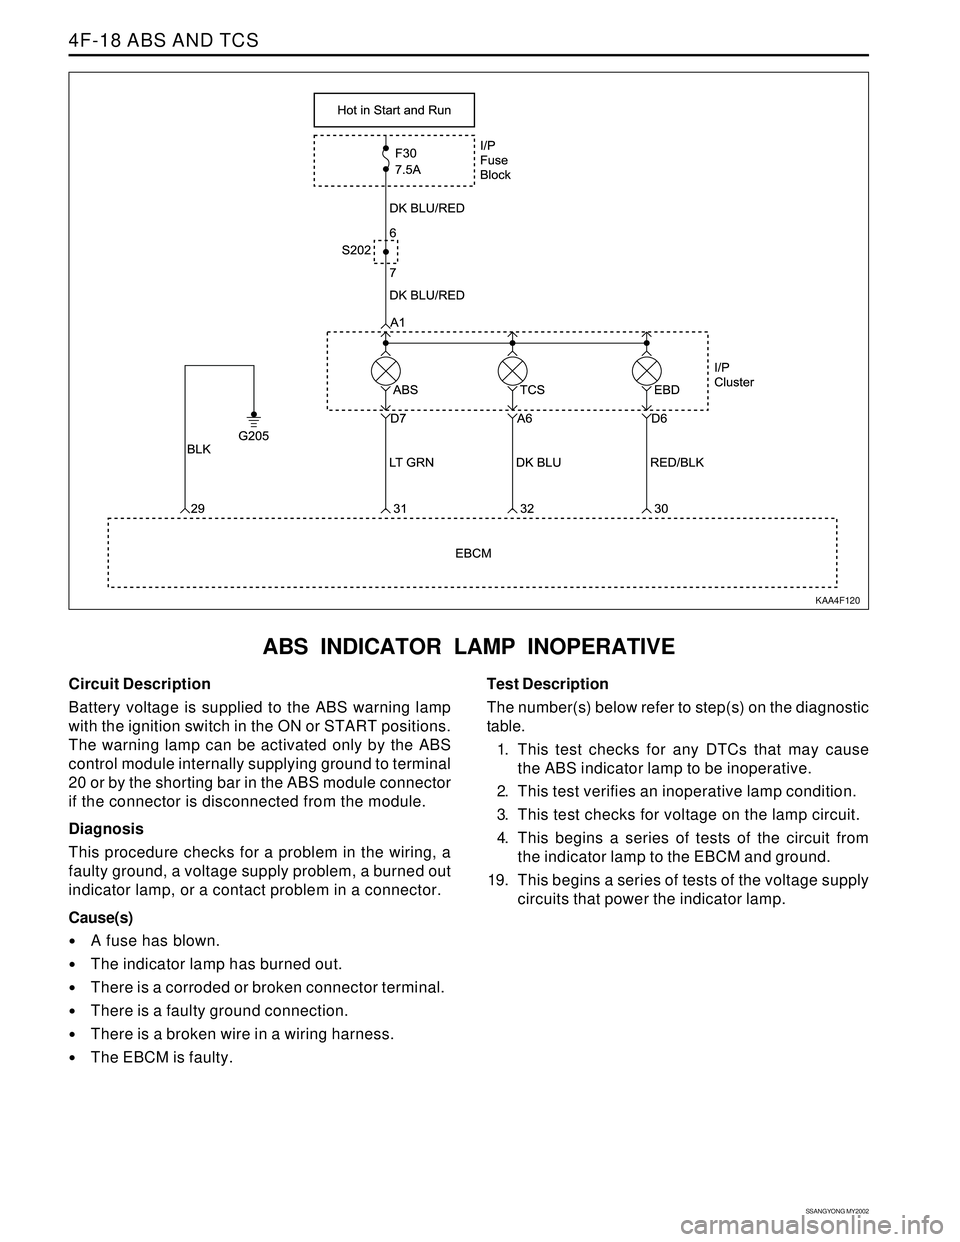
ABS INDICATOR LAMP INOPERATIVE
KAA4F120
Circuit Description
Battery voltage is supplied to the ABS warning lamp
with the ignition switch in the ON or START positions.
The warning lamp can be activated only by the ABS
control module internally supplying ground to terminal
20 or by the shorting bar in the ABS module connector
if the connector is disconnected from the module.
Diagnosis
This procedure checks for a problem in the wiring, a
faulty ground, a voltage supply problem, a burned out
indicator lamp, or a contact problem in a connector.
Cause(s)
A fuse has blown.
The indicator lamp has burned out.
There is a corroded or broken connector terminal.
There is a faulty ground connection.
There is a broken wire in a wiring harness.
The EBCM is faulty.Test Description
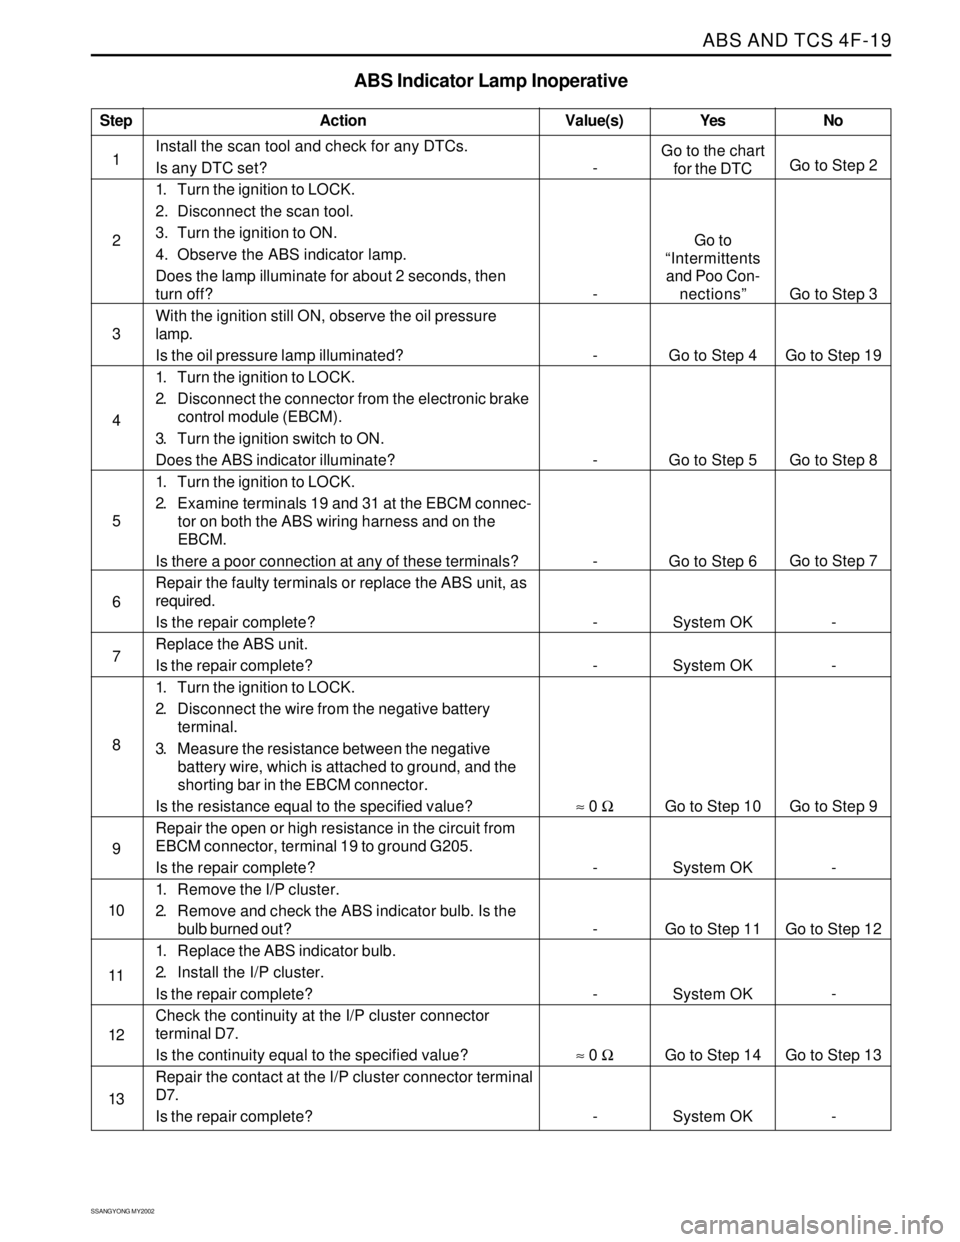
The number(s) below refer to step(s) on the diagnostic
table.
1. This test checks for any DTCs that may cause
the ABS indicator lamp to be inoperative.
2. This test verifies an inoperative lamp condition.
3. This test checks for voltage on the lamp circuit.
4. This begins a series of tests of the circuit from
the indicator lamp to the EBCM and ground.
19. This begins a series of tests of the voltage supply
circuits that power the indicator lamp.
Page 1002 of 2053
ABS AND TCS 4F-19
SSANGYONG MY2002
Step
1
2
3
4
5
6
7
8
9
10
11
12
13
ABS Indicator Lamp Inoperative
Action Yes
Go to the chart
for the DTC
Go to
“Intermittents
and Poo Con-
nections”
Go to Step 4
Go to Step 5
Go to Step 6
System OK
System OK
Go to Step 10
System OK
Go to Step 11
System OK
Go to Step 14
System OKNo
Go to Step 2
Go to Step 3
Go to Step 19
Go to Step 8
Go to Step 7
-
-
Go to Step 9
-
Go to Step 12
-
Go to Step 13
- Value(s)
Install the scan tool and check for any DTCs.
Is any DTC set?
1. Turn the ignition to LOCK.
2. Disconnect the scan tool.
3. Turn the ignition to ON.
4. Observe the ABS indicator lamp.
Does the lamp illuminate for about 2 seconds, then
turn off?
With the ignition still ON, observe the oil pressure
lamp.
Is the oil pressure lamp illuminated?
1. Turn the ignition to LOCK.
2. Disconnect the connector from the electronic brake
control module (EBCM).
3. Turn the ignition switch to ON.
Does the ABS indicator illuminate?
1. Turn the ignition to LOCK.
2. Examine terminals 19 and 31 at the EBCM connec-
tor on both the ABS wiring harness and on the
EBCM.
Is there a poor connection at any of these terminals?
Repair the faulty terminals or replace the ABS unit, as
required.
Is the repair complete?
Replace the ABS unit.
Is the repair complete?
1. Turn the ignition to LOCK.
2. Disconnect the wire from the negative battery
terminal.
3. Measure the resistance between the negative
battery wire, which is attached to ground, and the
shorting bar in the EBCM connector.
Is the resistance equal to the specified value?
Repair the open or high resistance in the circuit from
EBCM connector, terminal 19 to ground G205.
Is the repair complete?
1. Remove the I/P cluster.
2. Remove and check the ABS indicator bulb. Is the
bulb burned out?
1. Replace the ABS indicator bulb.
2. Install the I/P cluster.
Is the repair complete?
Check the continuity at the I/P cluster connector
terminal D7.
Is the continuity equal to the specified value?
Repair the contact at the I/P cluster connector terminal
D7.
Is the repair complete?
-
-
-
-
-
-
-
≈ 0 Ω
-
-
-
≈ 0 Ω
-
Page 1005 of 2053
SSANGYONG MY2002
4F-22 ABS AND TCS
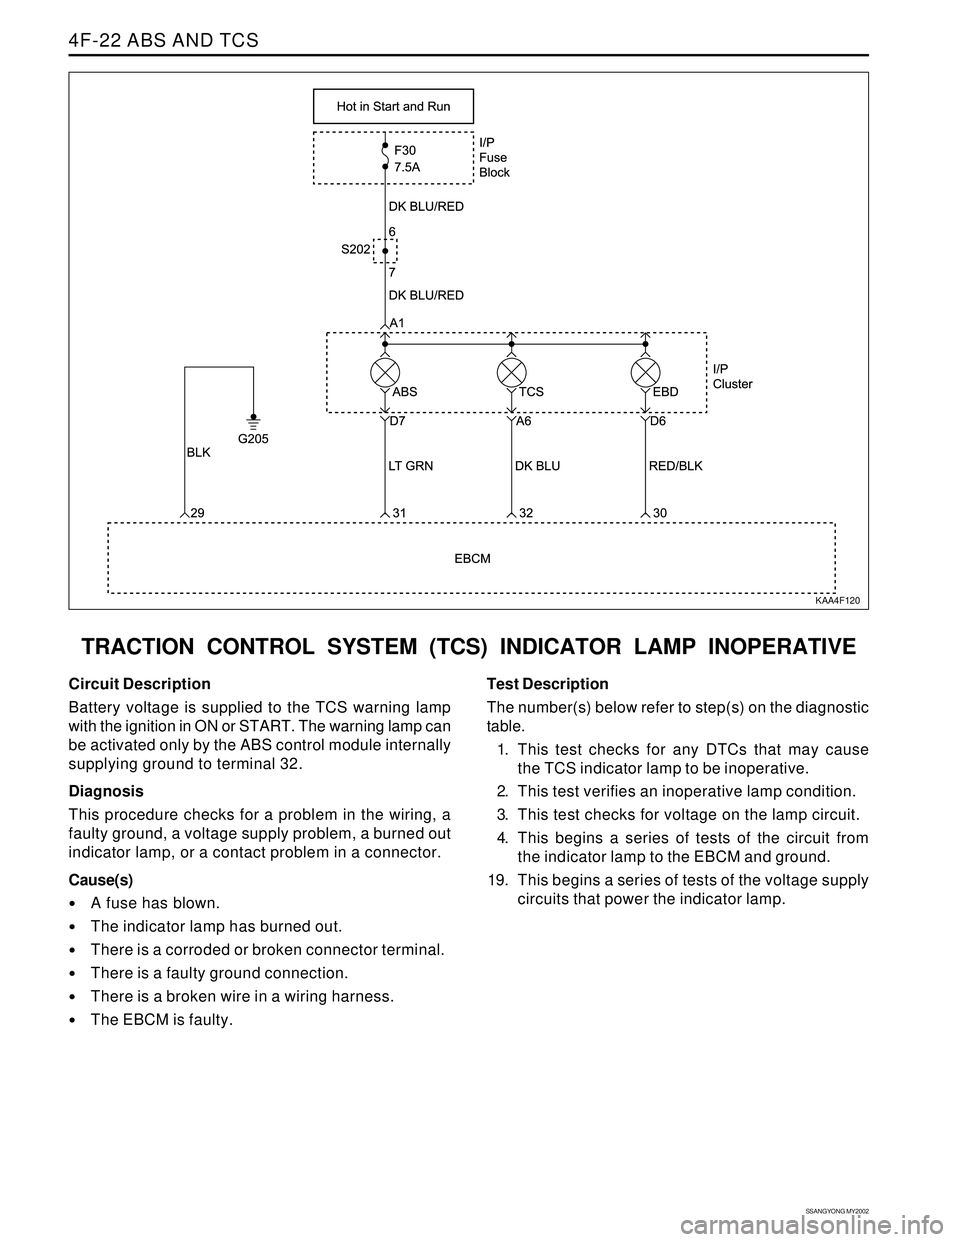
TRACTION CONTROL SYSTEM (TCS) INDICATOR LAMP INOPERATIVE
KAA4F120
Circuit Description
Battery voltage is supplied to the TCS warning lamp
with the ignition in ON or START. The warning lamp can
be activated only by the ABS control module internally
supplying ground to terminal 32.
Diagnosis
This procedure checks for a problem in the wiring, a
faulty ground, a voltage supply problem, a burned out
indicator lamp, or a contact problem in a connector.
Cause(s)
A fuse has blown.
The indicator lamp has burned out.
There is a corroded or broken connector terminal.
There is a faulty ground connection.
There is a broken wire in a wiring harness.
The EBCM is faulty.Test Description
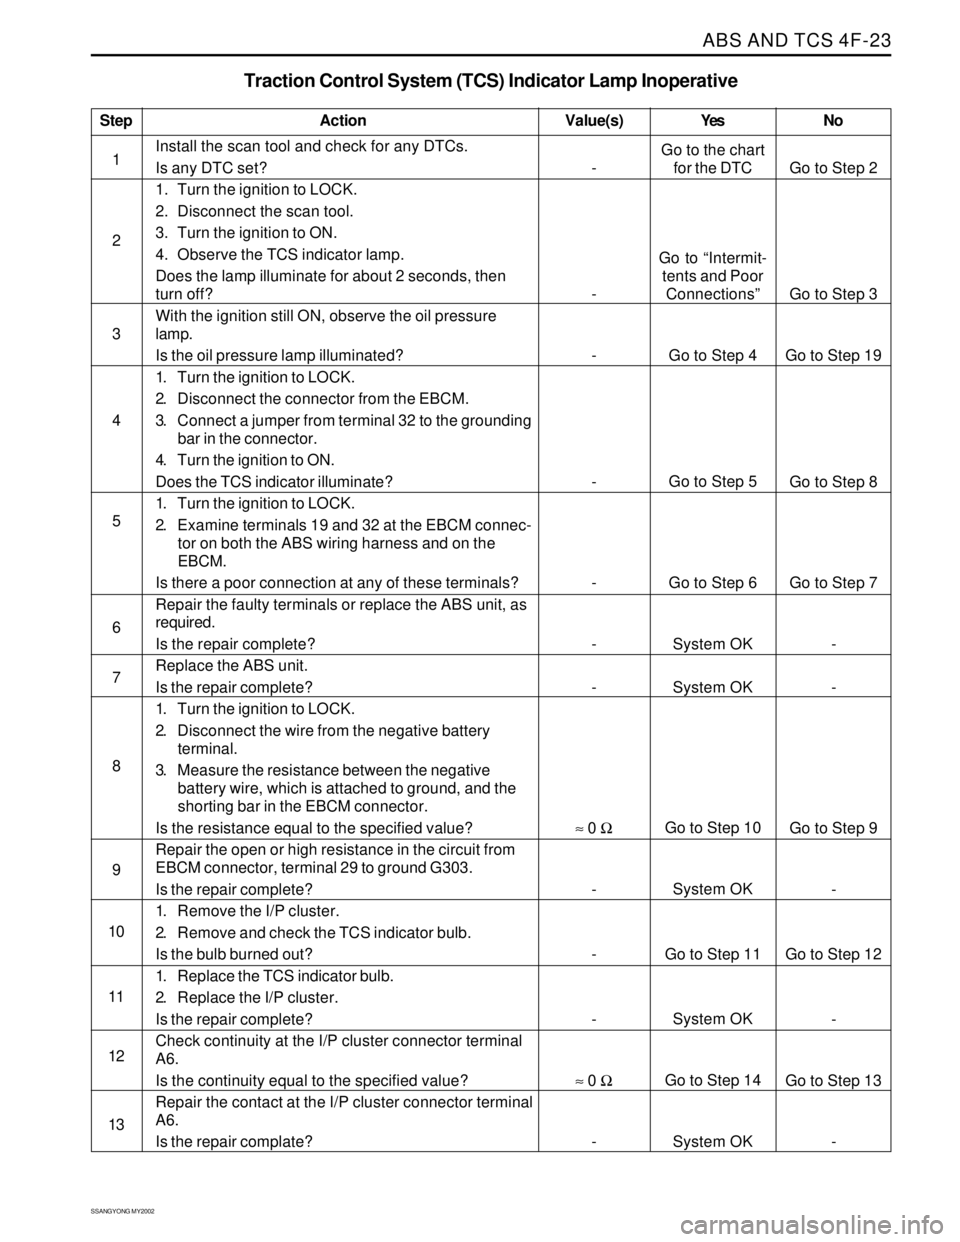
The number(s) below refer to step(s) on the diagnostic
table.
1. This test checks for any DTCs that may cause
the TCS indicator lamp to be inoperative.
2. This test verifies an inoperative lamp condition.
3. This test checks for voltage on the lamp circuit.
4. This begins a series of tests of the circuit from
the indicator lamp to the EBCM and ground.
19. This begins a series of tests of the voltage supply
circuits that power the indicator lamp.
Page 1006 of 2053
ABS AND TCS 4F-23
SSANGYONG MY2002
Step
1
2
3
4
5
6
7
8
9
10
11
12
13
Traction Control System (TCS) Indicator Lamp Inoperative
Action Yes NoValue(s)
Install the scan tool and check for any DTCs.
Is any DTC set?
1. Turn the ignition to LOCK.
2. Disconnect the scan tool.
3. Turn the ignition to ON.
4. Observe the TCS indicator lamp.
Does the lamp illuminate for about 2 seconds, then
turn off?
With the ignition still ON, observe the oil pressure
lamp.
Is the oil pressure lamp illuminated?
1. Turn the ignition to LOCK.
2. Disconnect the connector from the EBCM.
3. Connect a jumper from terminal 32 to the grounding
bar in the connector.
4. Turn the ignition to ON.
Does the TCS indicator illuminate?
1. Turn the ignition to LOCK.
2. Examine terminals 19 and 32 at the EBCM connec-
tor on both the ABS wiring harness and on the
EBCM.
Is there a poor connection at any of these terminals?
Repair the faulty terminals or replace the ABS unit, as
required.
Is the repair complete?
Replace the ABS unit.
Is the repair complete?
1. Turn the ignition to LOCK.
2. Disconnect the wire from the negative battery
terminal.
3. Measure the resistance between the negative
battery wire, which is attached to ground, and the
shorting bar in the EBCM connector.
Is the resistance equal to the specified value?
Repair the open or high resistance in the circuit from
EBCM connector, terminal 29 to ground G303.
Is the repair complete?
1. Remove the I/P cluster.
2. Remove and check the TCS indicator bulb.
Is the bulb burned out?
1. Replace the TCS indicator bulb.
2. Replace the I/P cluster.
Is the repair complete?
Check continuity at the I/P cluster connector terminal
A6.
Is the continuity equal to the specified value?
Repair the contact at the I/P cluster connector terminal
A6.
Is the repair complate?
-
-
-
-
-
-
-
≈ 0 Ω
-
-
-
≈ 0 Ω
-Go to the chart
for the DTC
Go to “Intermit-
tents and Poor
Connections”
Go to Step 4
Go to Step 5
Go to Step 6
System OK
System OK
Go to Step 10
System OK
Go to Step 11
System OK
Go to Step 14
System OKGo to Step 2
Go to Step 3
Go to Step 19
Go to Step 8
Go to Step 7
-
-
Go to Step 9
-
Go to Step 12
-
Go to Step 13
-
Page 1009 of 2053
SSANGYONG MY2002
4F-26 ABS AND TCS
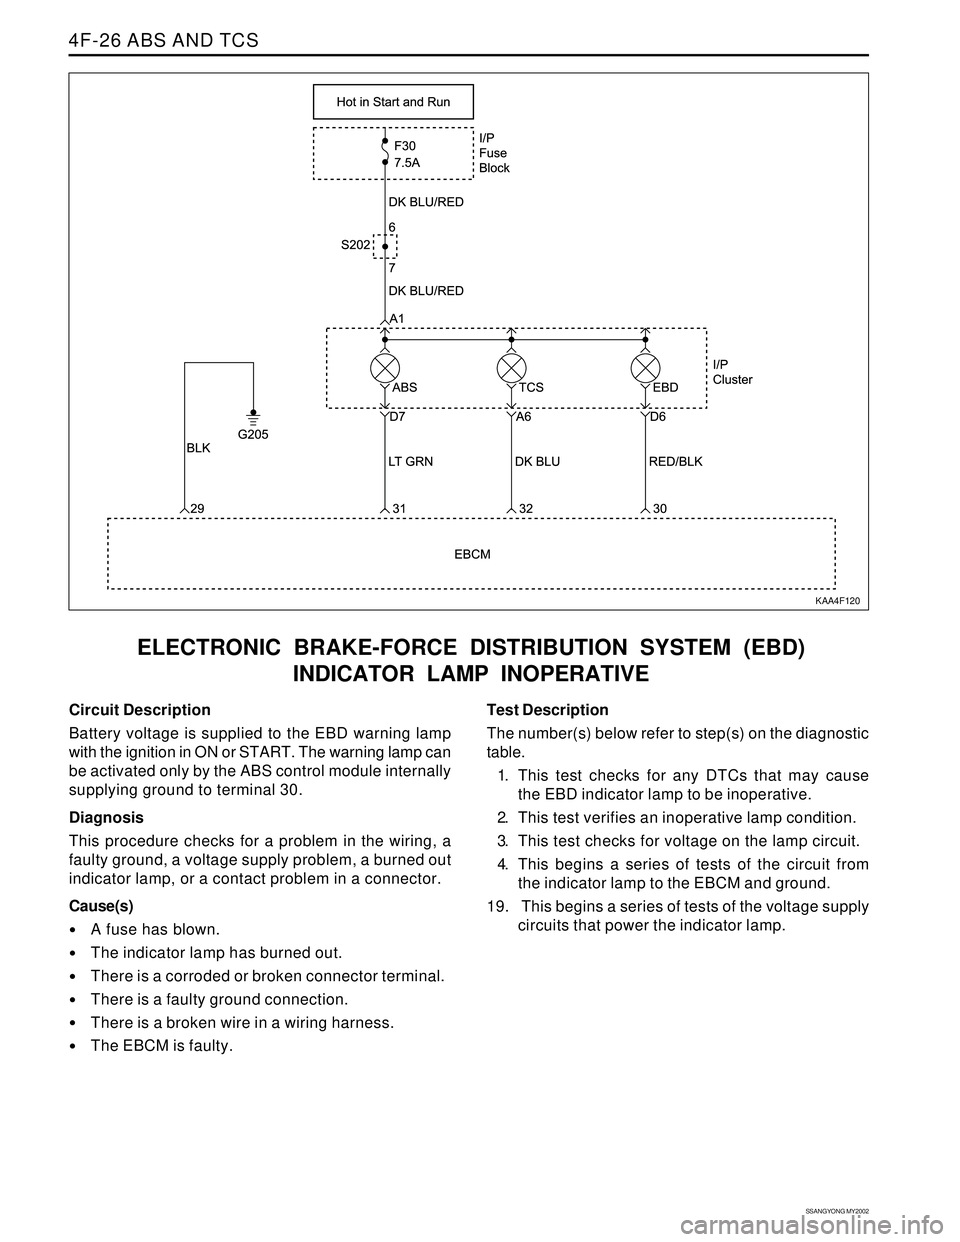
ELECTRONIC BRAKE-FORCE DISTRIBUTION SYSTEM (EBD)
INDICATOR LAMP INOPERATIVE
KAA4F120
Circuit Description
Battery voltage is supplied to the EBD warning lamp
with the ignition in ON or START. The warning lamp can
be activated only by the ABS control module internally
supplying ground to terminal 30.
Diagnosis
This procedure checks for a problem in the wiring, a
faulty ground, a voltage supply problem, a burned out
indicator lamp, or a contact problem in a connector.
Cause(s)
A fuse has blown.
The indicator lamp has burned out.
There is a corroded or broken connector terminal.
There is a faulty ground connection.
There is a broken wire in a wiring harness.
The EBCM is faulty.Test Description
The number(s) below refer to step(s) on the diagnostic
table.
1. This test checks for any DTCs that may cause
the EBD indicator lamp to be inoperative.
2. This test verifies an inoperative lamp condition.
3. This test checks for voltage on the lamp circuit.
4. This begins a series of tests of the circuit from
the indicator lamp to the EBCM and ground.
19. This begins a series of tests of the voltage supply
circuits that power the indicator lamp.