1997 MERCEDES-BENZ ML500 seat adjustment
[x] Cancel search: seat adjustmentPage 3186 of 4133
AP82.10-P-8260GH
Check and correct headlamp adjustment
2.7.97
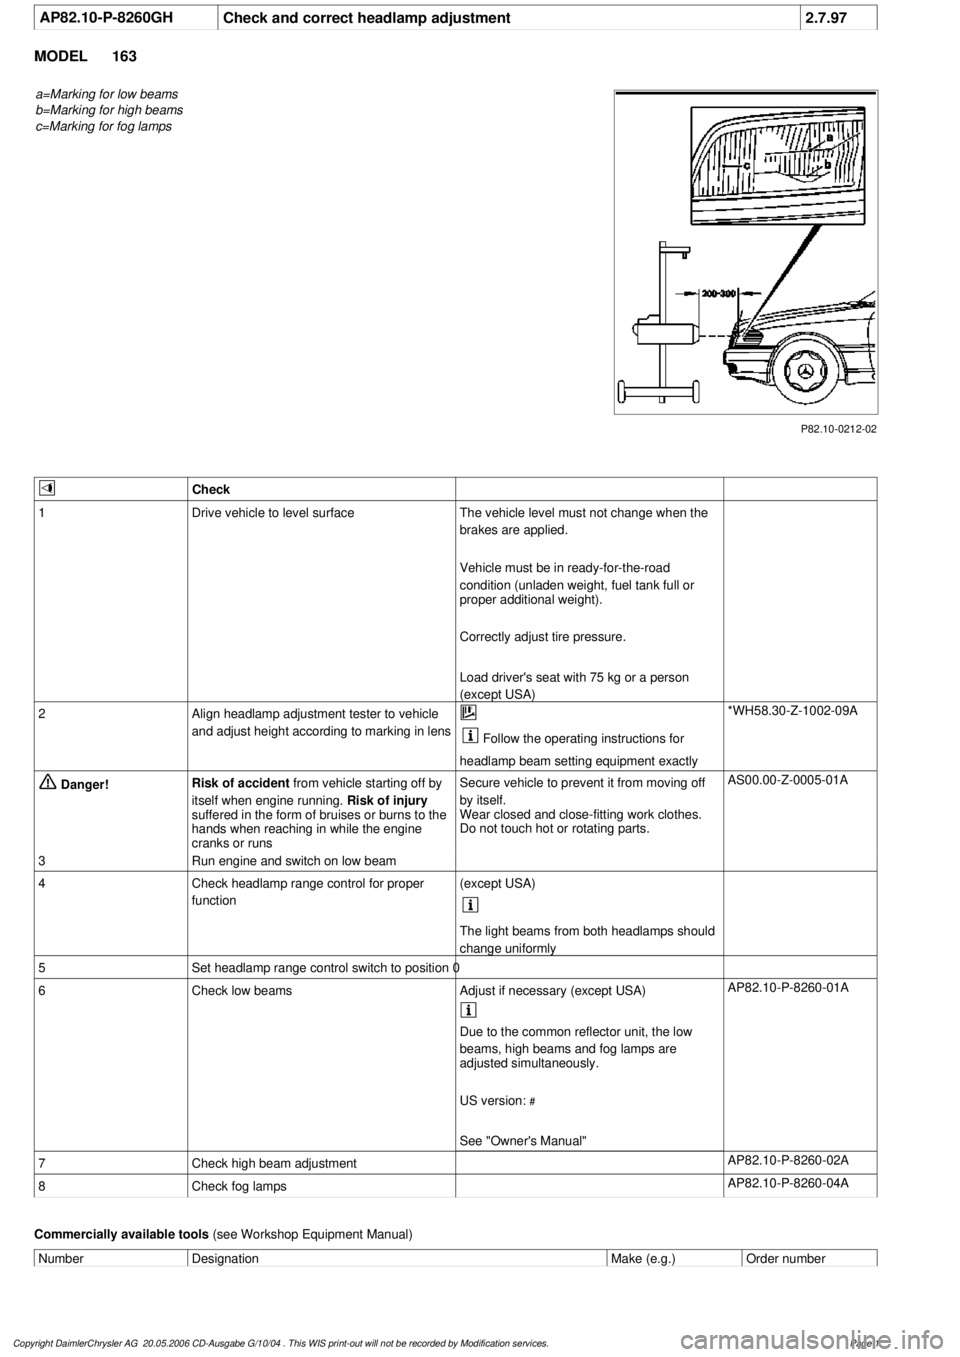
MODEL
163
a=Marking for low beams
b=Marking for high beams
c=Marking for fog lamps
P82.10-0212-02
Check
1
Drive vehicle to level surface
The vehicle level must not change when the
brakes are applied.
Vehicle must be in ready-for-the-road
condition (unladen weight, fuel tank full or
proper additional weight).
Correctly adjust tire pressure.
Load driver's seat with 75 kg or a person
(except USA)
2
Align headlamp adjustment tester to vehicle
and adjust height according to marking in lens
Follow the operating instructions for
headlamp beam setting equipment exactly
*WH58.30-Z-1002-09A
Danger!
Risk of accident
from vehicle starting off by
itself when engine running.
Risk of injury
suffered in the form of bruises or burns to the
hands when reaching in while the engine
cranks or runs
Secure vehicle to prevent it from moving off
by itself.
Wear closed and close-fitting work clothes.
Do not touch hot or rotating parts.
AS00.00-Z-0005-01A
3
Run engine and switch on low beam
4
Check headlamp range control for proper
function
(except USA)
The light beams from both headlamps should
change uniformly
5
Set headlamp range control switch to position 0
6
Check low beams
Adjust if necessary (except USA)
AP82.10-P-8260-01A
Due to the common reflector unit, the low
beams, high beams and fog lamps are
adjusted simultaneously.
US version:
#
See "Owner's Manual"
7
Check high beam adjustment
AP82.10-P-8260-02A
8
Check fog lamps
AP82.10-P-8260-04A
Commercially available tools
(see Workshop Equipment Manual)
Number
Designation
Make (e.g.)
Order number
Copyright DaimlerChrysler AG 20.05.2006 CD-Ausgabe G/10/04 . This WIS print-out will not be recorde
d by Modification services.
Page 1
Page 3789 of 4133
AR91.29-P-0008GH
Remove/install seat adjustment control module
23.6.99
MODEL
163.113 /128,
163.136 /154 as of 1.9.99,
163.157,
163.172 as of 1.9.99,
163.175
with CODE (241) Memory for electrically adjustable left front seat
with CODE (242a) Memory for electrically adjustable right front seat
MODEL
163.174
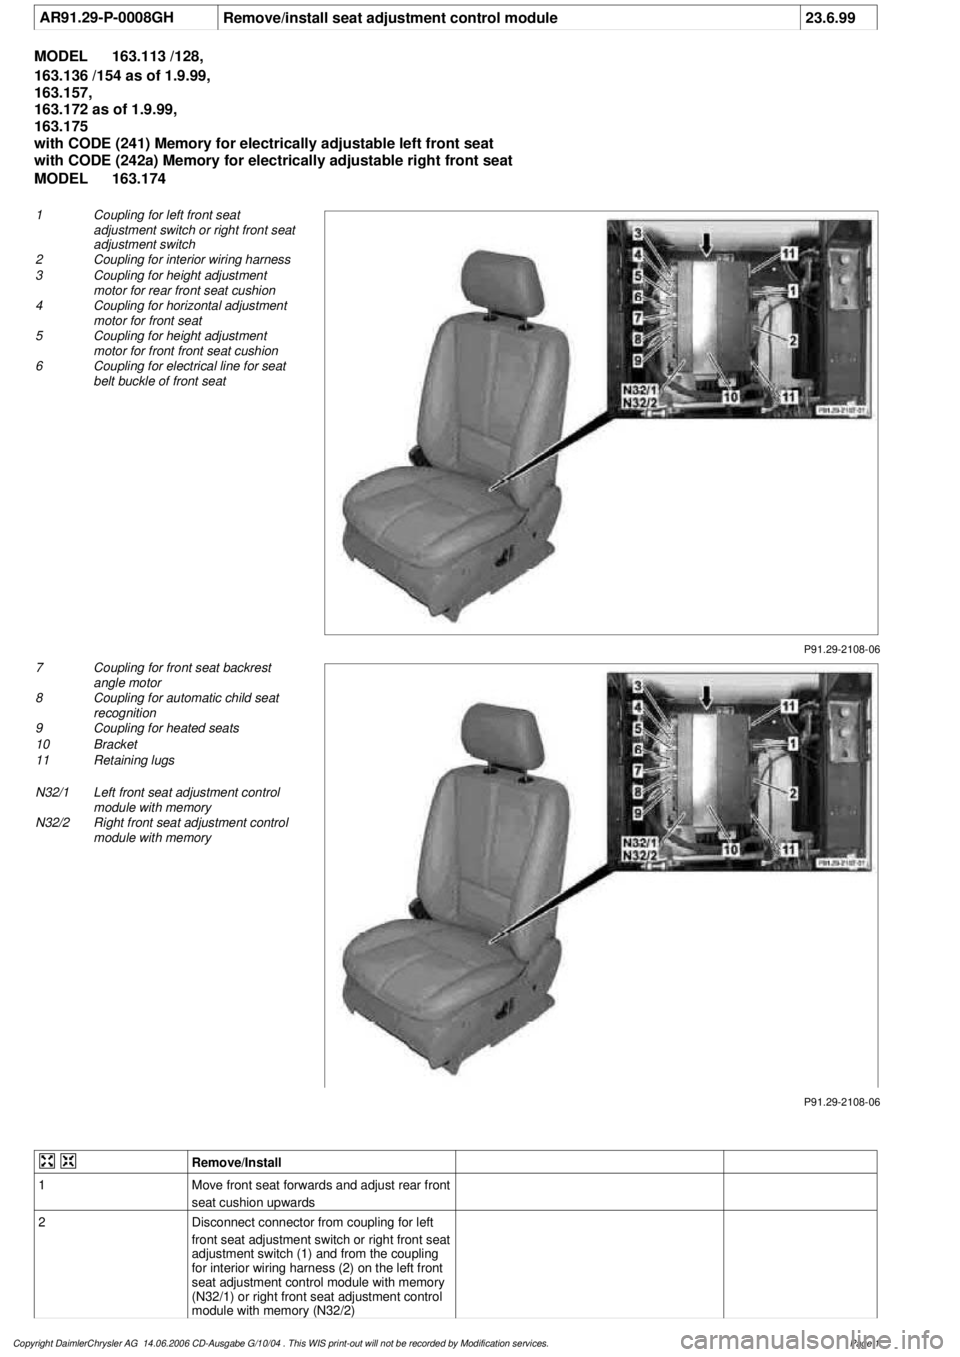
P91.29-2108-06
1
Coupling for left front seat
adjustment switch or right front seat
adjustment switch
2
Coupling for interior wiring harness
3
Coupling for height adjustment
motor for rear front seat cushion
4
Coupling for horizontal adjustment
motor for front seat
5
Coupling for height adjustment
motor for front front seat cushion
6
Coupling for electrical line for seat
belt buckle of front seat
P91.29-2108-06
7
Coupling for front seat backrest
angle motor
8
Coupling for automatic child seat
recognition
9
Coupling for heated seats
10
Bracket
11
Retaining lugs
N32/1
Left front seat adjustment control
module with memory
N32/2
Right front seat adjustment control
module with memory
Remove/Install
1
Move front seat forwards and adjust rear front
seat cushion upwards
2
Disconnect connector from coupling for left
front seat adjustment switch or right front seat
adjustment switch (1) and from the coupling
for interior wiring harness (2) on the left front
seat adjustment control module with memory
(N32/1) or right front seat adjustment control
module with memory (N32/2)
Copyright DaimlerChrysler AG 14.06.2006 CD-Ausgabe G/10/04 . This WIS print-out will not be recorde
d by Modification services.
Page 1
Page 3790 of 4133

3
Unscrew bolt (arrow) from bracket (10),
unhook front bracket and remove
4
Remove left front seat adjustment control
module with memory (N32/1) or right front
seat adjustment control module with memory
(N32/2) from bracket on front seat frame
Unhook two retaining lugs (11) on the side.
5
Disconnect the remaining connectors on the
left front seat adjustment control module with
memory (N32/1) or right front seat adjustment
control module with memory (N32/2)
6
Remove left front seat adjustment control
module with memory (N32/1) or right front
seat adjustment control module with memory
(N32/2)
7
Install in the reverse order
8
Perform function check
Copyright DaimlerChrysler AG 14.06.2006 CD-Ausgabe G/10/04 . This WIS print-out will not be recorde
d by Modification services.
Page 2
Page 3791 of 4133
AR91.29-P-0003GI
Remove/install seat adjustment switch unit on front seat
1.10.02
MODEL
163.113,
163.136 #A as of 051500,
163.136 #X as of 708319,
163.154 #A as of 051500,
163.154 #X as of 708319,
163.157 /172 with CODE (221b) Electrically adjustable driver and passenger seat
MODEL
163.128 /174 /175
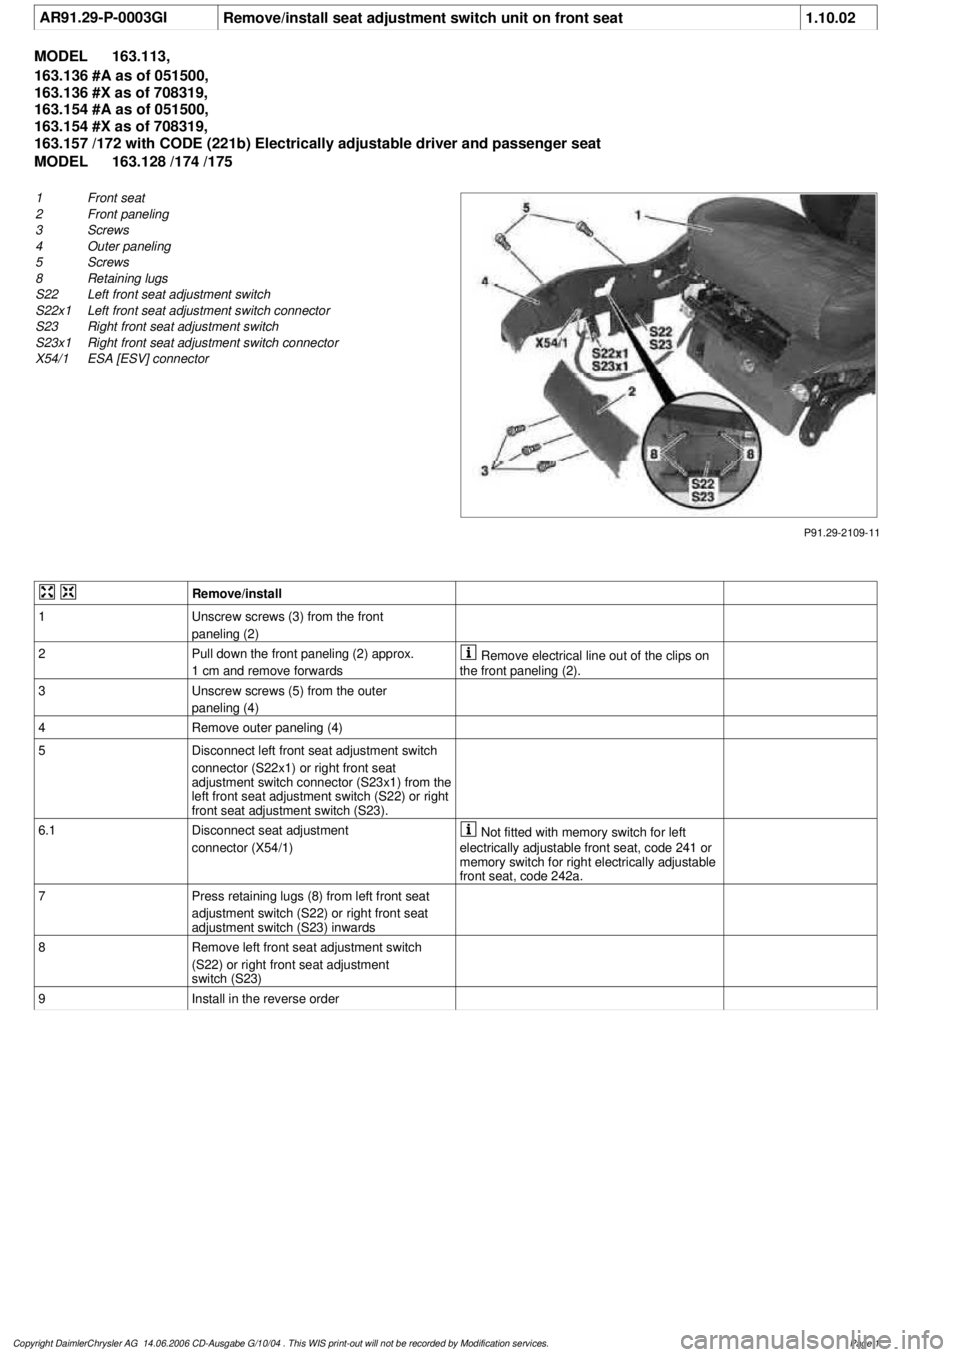
P91.29-2109-11
1
Front seat
2
Front paneling
3
Screws
4
Outer paneling
5
Screws
8
Retaining lugs
S22
Left front seat adjustment switch
S22x1
Left front seat adjustment switch connector
S23
Right front seat adjustment switch
S23x1
Right front seat adjustment switch connector
X54/1
ESA [ESV] connector
Remove/install
1
Unscrew screws (3) from the front
paneling (2)
2
Pull down the front paneling (2) approx.
1 cm and remove forwards
Remove electrical line out of the clips on
the front paneling (2).
3
Unscrew screws (5) from the outer
paneling (4)
4
Remove outer paneling (4)
5
Disconnect left front seat adjustment switch
connector (S22x1) or right front seat
adjustment switch connector (S23x1) from the
left front seat adjustment switch (S22) or right
front seat adjustment switch (S23).
6.1
Disconnect seat adjustment
connector (X54/1)
Not fitted with memory switch for left
electrically adjustable front seat, code 241 or
memory switch for right electrically adjustable
front seat, code 242a.
7
Press retaining lugs (8) from left front seat
adjustment switch (S22) or right front seat
adjustment switch (S23) inwards
8
Remove left front seat adjustment switch
(S22) or right front seat adjustment
switch (S23)
9
Install in the reverse order
Copyright DaimlerChrysler AG 14.06.2006 CD-Ausgabe G/10/04 . This WIS print-out will not be recorde
d by Modification services.
Page 1
Page 3792 of 4133
AR91.10-P-1060GH
Remove and install front seat backrest
5.3.97
MODEL
163.113 /136 /154 /157 /172
with CODE (221b) Electrically adjustable driver and passenger seat
with CODE (241) Memory for electrically adjustable left front seat
with CODE (242a) Memory for electrically adjustable right front seat
MODEL
163.128 /175
with CODE (241) Memory for electrically adjustable left front seat
with CODE (242a) Memory for electrically adjustable right front seat
MODEL
163.174
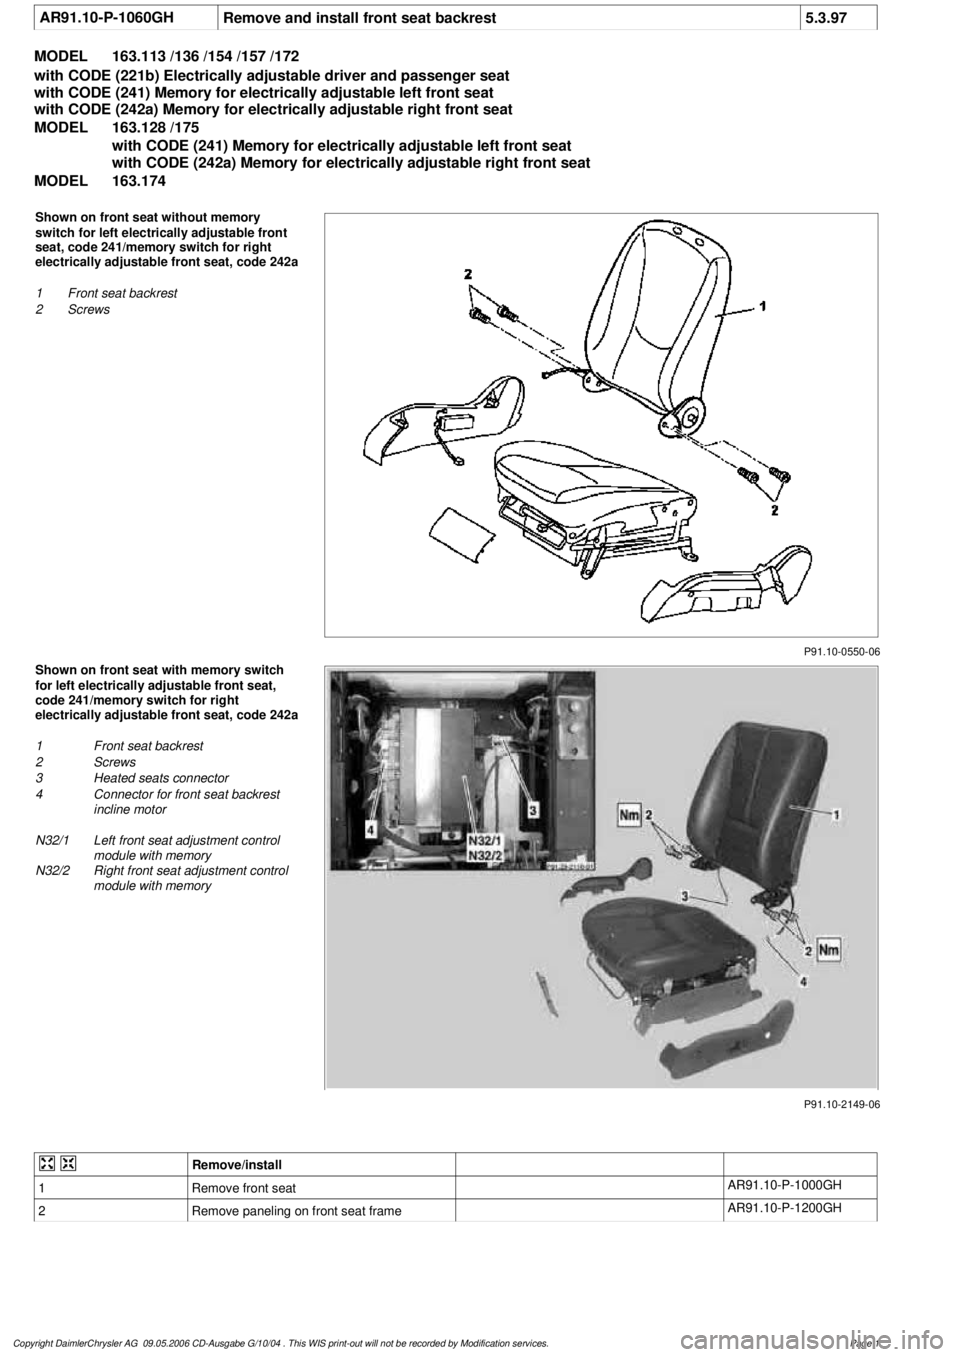
P91.10-0550-06
Shown on front seat without memory
switch for left electrically adjustable front
seat, code 241/memory switch for right
electrically adjustable front seat, code 242a
1
Front seat backrest
2
Screws
P91.10-2149-06
Shown on front seat with memory switch
for left electrically adjustable front seat,
code 241/memory switch for right
electrically adjustable front seat, code 242a
1
Front seat backrest
2
Screws
3
Heated seats connector
4
Connector for front seat backrest
incline motor
N32/1
Left front seat adjustment control
module with memory
N32/2
Right front seat adjustment control
module with memory
Remove/install
1
Remove front seat
AR91.10-P-1000GH
2
Remove paneling on front seat frame
AR91.10-P-1200GH
Copyright DaimlerChrysler AG 09.05.2006 CD-Ausgabe G/10/04 . This WIS print-out will not be recorde
d by Modification services.
Page 1
Page 3793 of 4133

3.1
Disconnect heated seats connector (3) and
connector for front seat backrest incline motor
(4) from left front seat adjustment control
module with memory (N32/1) or right front
seat adjustment control module with memory
(N32/2)
Only for memory switch for left electrically
adjustable front seat, code 241 or memory
switch for right electrically adjustable front
seat, code 242a.
Installation:
Ensure that the electrical
lines are routed properly!
4
Unscrew screws (2) from backrest fittings
*BA91.10-P-1003-01B
Torx bit set
*000589011000
5
Remove front seat backrest (1)
6
Install in the reverse order
Front seats
Number
Designation
Model
Series 163
BA91.10-P-1003-01B
Bolt, front seat backrest to seat frame
Nm
30 (
F
3)
Torx bit set
000 589 01 10 00
Copyright DaimlerChrysler AG 09.05.2006 CD-Ausgabe G/10/04 . This WIS print-out will not be recorde
d by Modification services.
Page 2
Page 3796 of 4133
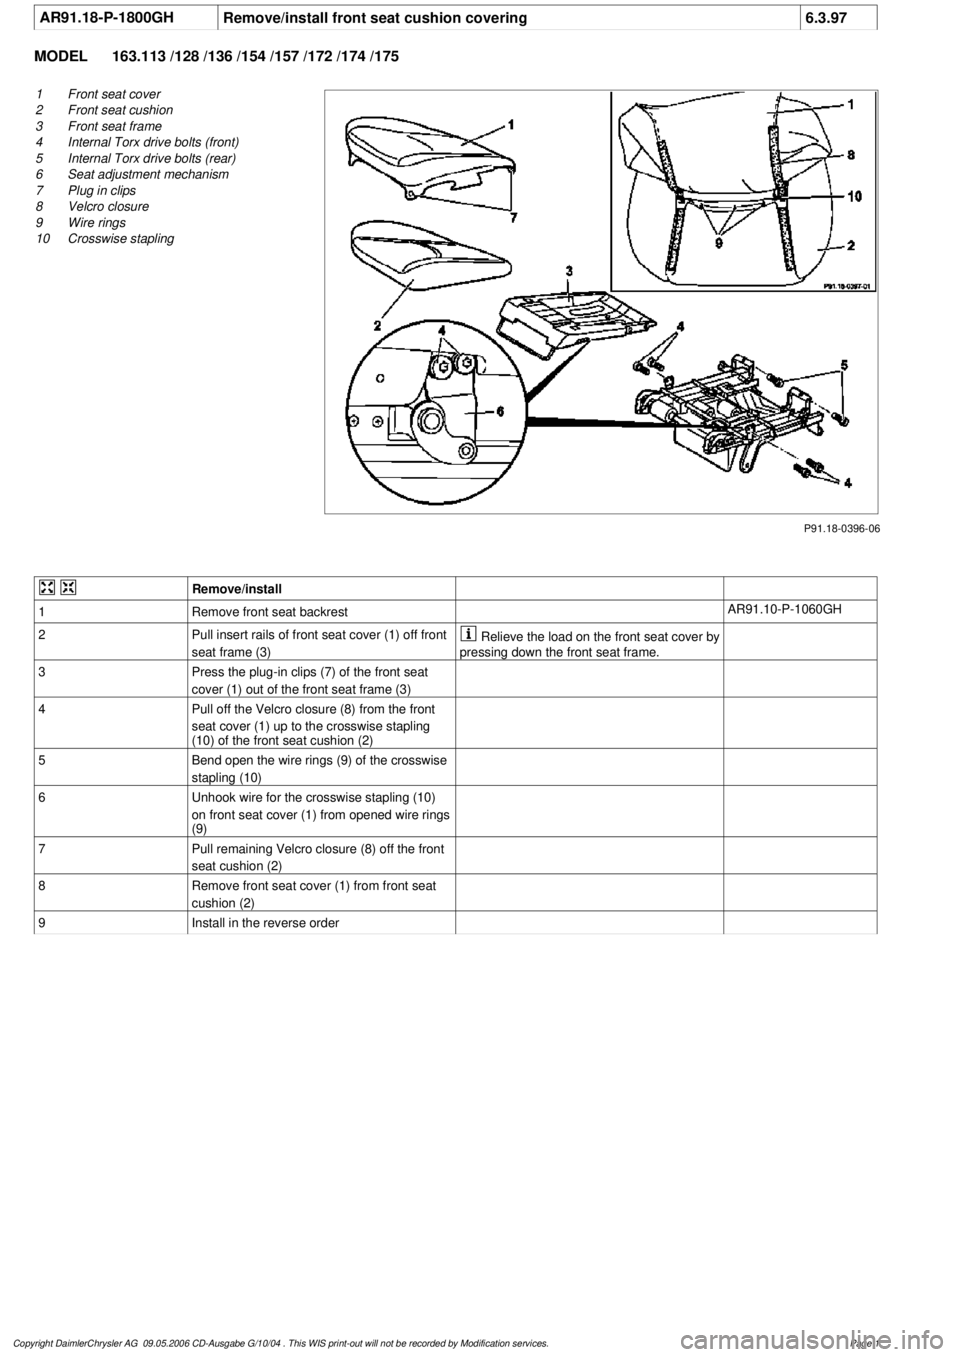
AR91.18-P-1800GH
Remove/install front seat cushion covering
6.3.97
MODEL
163.113 /128 /136 /154 /157 /172 /174 /175
P91.18-0396-06
1
Front seat cover
2
Front seat cushion
3
Front seat frame
4
Internal Torx drive bolts (front)
5
Internal Torx drive bolts (rear)
6
Seat adjustment mechanism
7
Plug in clips
8
Velcro closure
9
Wire rings
10
Crosswise stapling
Remove/install
1
Remove front seat backrest
AR91.10-P-1060GH
2
Pull insert rails of front seat cover (1) off front
seat frame (3)
Relieve the load on the front seat cover by
pressing down the front seat frame.
3
Press the plug-in clips (7) of the front seat
cover (1) out of the front seat frame (3)
4
Pull off the Velcro closure (8) from the front
seat cover (1) up to the crosswise stapling
(10) of the front seat cushion (2)
5
Bend open the wire rings (9) of the crosswise
stapling (10)
6
Unhook wire for the crosswise stapling (10)
on front seat cover (1) from opened wire rings
(9)
7
Pull remaining Velcro closure (8) off the front
seat cushion (2)
8
Remove front seat cover (1) from front seat
cushion (2)
9
Install in the reverse order
Copyright DaimlerChrysler AG 09.05.2006 CD-Ausgabe G/10/04 . This WIS print-out will not be recorde
d by Modification services.
Page 1
Page 3797 of 4133
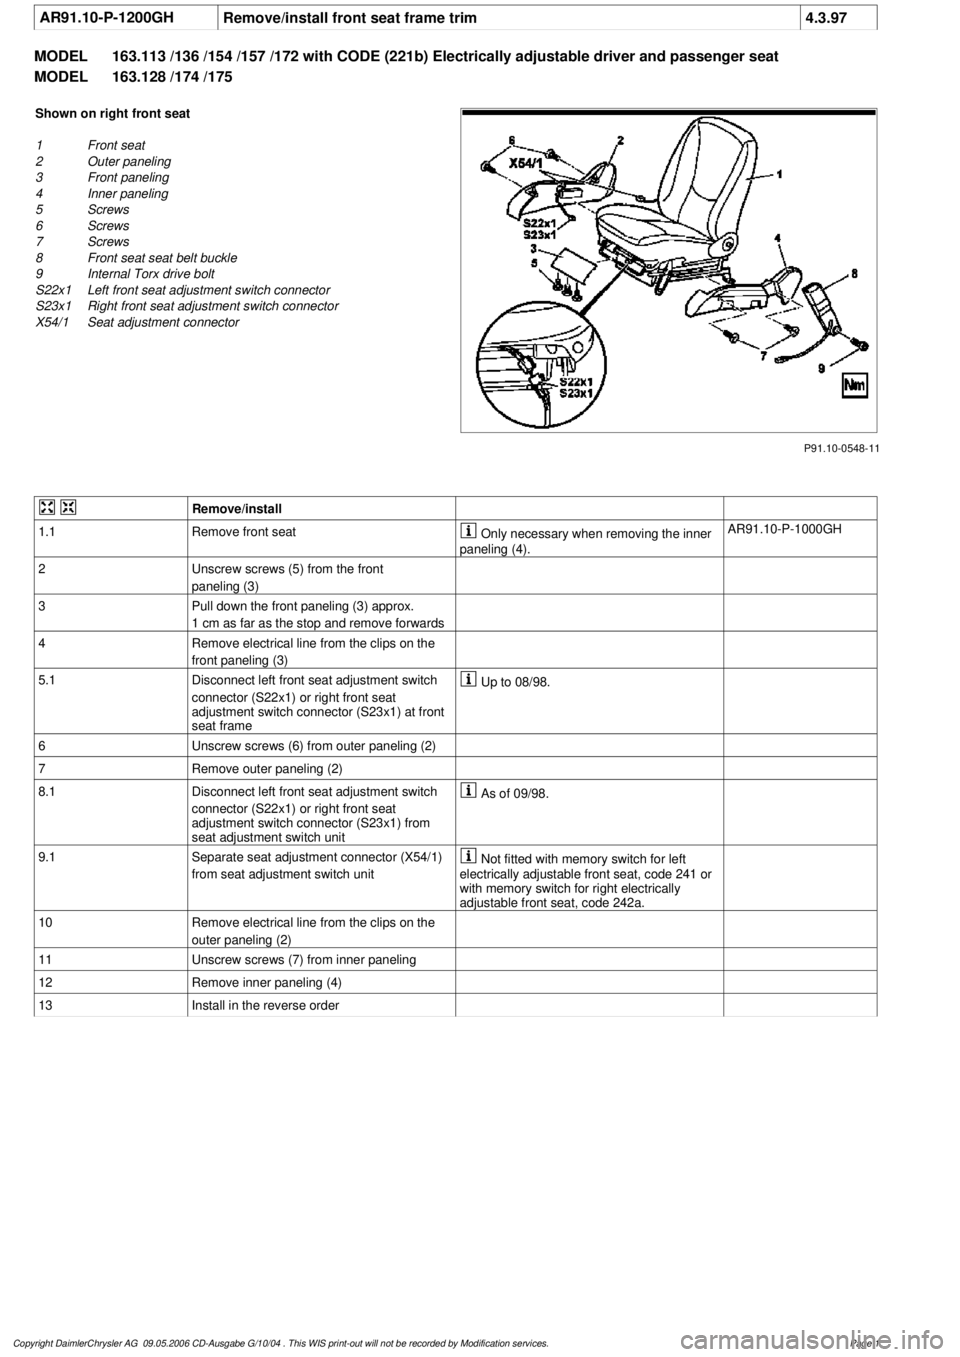
AR91.10-P-1200GH
Remove/install front seat frame trim
4.3.97
MODEL
163.113 /136 /154 /157 /172 with CODE (221b) Electrically adjustable driver and passenger seat
MODEL
163.128 /174 /175
P91.10-0548-11
Shown on right front seat
1
Front seat
2
Outer paneling
3
Front paneling
4
Inner paneling
5
Screws
6
Screws
7
Screws
8
Front seat seat belt buckle
9
Internal Torx drive bolt
S22x1
Left front seat adjustment switch connector
S23x1
Right front seat adjustment switch connector
X54/1
Seat adjustment connector
Remove/install
1.1
Remove front seat
Only necessary when removing the inner
paneling (4).
AR91.10-P-1000GH
2
Unscrew screws (5) from the front
paneling (3)
3
Pull down the front paneling (3) approx.
1 cm as far as the stop and remove forwards
4
Remove electrical line from the clips on the
front paneling (3)
5.1
Disconnect left front seat adjustment switch
connector (S22x1) or right front seat
adjustment switch connector (S23x1) at front
seat frame
Up to 08/98.
6
Unscrew screws (6) from outer paneling (2)
7
Remove outer paneling (2)
8.1
Disconnect left front seat adjustment switch
connector (S22x1) or right front seat
adjustment switch connector (S23x1) from
seat adjustment switch unit
As of 09/98.
9.1
Separate seat adjustment connector (X54/1)
from seat adjustment switch unit
Not fitted with memory switch for left
electrically adjustable front seat, code 241 or
with memory switch for right electrically
adjustable front seat, code 242a.
10
Remove electrical line from the clips on the
outer paneling (2)
11
Unscrew screws (7) from inner paneling
12
Remove inner paneling (4)
13
Install in the reverse order
Copyright DaimlerChrysler AG 09.05.2006 CD-Ausgabe G/10/04 . This WIS print-out will not be recorde
d by Modification services.
Page 1