1997 MERCEDES-BENZ ML500 oil
[x] Cancel search: oilPage 3817 of 4133
AR91.40-P-0630GH
Remove/install seat belt with emergency tensioning retractor
26.3.97
MODEL
163.113 /128 /136 /154 /157 /172 /174 /175
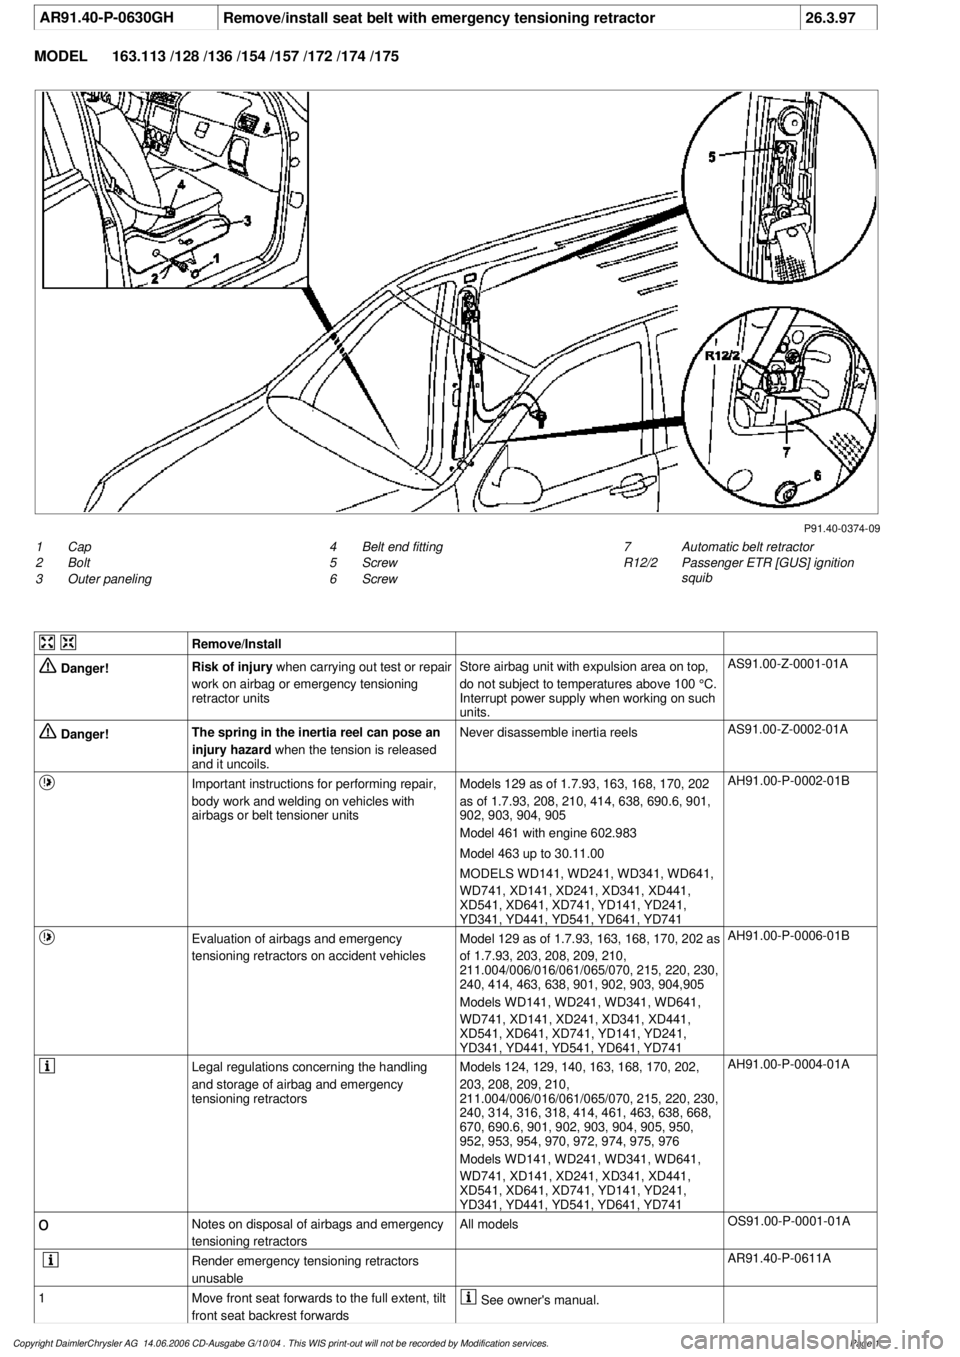
P91.40-0374-09
1
Cap
2
Bolt
3
Outer paneling
7
Automatic belt retractor
R12/2
Passenger ETR [GUS] ignition
squib
4
Belt end fitting
5
Screw
6
Screw
Remove/Install
Danger!
Risk of injury
when carrying out test or repair
work on airbag or emergency tensioning
retractor units
Store airbag unit with expulsion area on top,
do not subject to temperatures above 100 °C.
Interrupt power supply when working on such
units.
AS91.00-Z-0001-01A
Danger!
The spring in the inertia reel can pose an
injury hazard
when the tension is released
and it uncoils.
Never disassemble inertia reels
AS91.00-Z-0002-01A
Important instructions for performing repair,
body work and welding on vehicles with
airbags or belt tensioner units
Models 129 as of 1.7.93, 163, 168, 170, 202
as of 1.7.93, 208, 210, 414, 638, 690.6, 901,
902, 903, 904, 905
Model 461 with engine 602.983
Model 463 up to 30.11.00
MODELS WD141, WD241, WD341, WD641,
WD741, XD141, XD241, XD341, XD441,
XD541, XD641, XD741, YD141, YD241,
YD341, YD441, YD541, YD641, YD741
AH91.00-P-0002-01B
Evaluation of airbags and emergency
tensioning retractors on accident vehicles
Model 129 as of 1.7.93, 163, 168, 170, 202 as
of 1.7.93, 203, 208, 209, 210,
211.004/006/016/061/065/070, 215, 220, 230,
240, 414, 463, 638, 901, 902, 903, 904,905
Models WD141, WD241, WD341, WD641,
WD741, XD141, XD241, XD341, XD441,
XD541, XD641, XD741, YD141, YD241,
YD341, YD441, YD541, YD641, YD741
AH91.00-P-0006-01B
Legal regulations concerning the handling
and storage of airbag and emergency
tensioning retractors
Models 124, 129, 140, 163, 168, 170, 202,
203, 208, 209, 210,
211.004/006/016/061/065/070, 215, 220, 230,
240, 314, 316, 318, 414, 461, 463, 638, 668,
670, 690.6, 901, 902, 903, 904, 905, 950,
952, 953, 954, 970, 972, 974, 975, 976
Models WD141, WD241, WD341, WD641,
WD741, XD141, XD241, XD341, XD441,
XD541, XD641, XD741, YD141, YD241,
YD341, YD441, YD541, YD641, YD741
AH91.00-P-0004-01A
o
Notes on disposal of airbags and emergency
tensioning retractors
All models
OS91.00-P-0001-01A
Render emergency tensioning retractors
unusable
AR91.40-P-0611A
1
Move front seat forwards to the full extent, tilt
front seat backrest forwards
See owner's manual.
Copyright DaimlerChrysler AG 14.06.2006 CD-Ausgabe G/10/04 . This WIS print-out will not be recorde
d by Modification services.
Page 1
Page 3818 of 4133
2
Withdraw ignition key
3
Unclip cap (1) from outer paneling (3)
4
Unscrew bolt (2) from belt end fitting (4)
*BA91.40-P-1001-01D
Torx bit set
*000589011000
5
Pull belt end fitting (4) out of front seat
6
Remove paneling on B-pillar
AR68.30-P-4700GH
7
Unscrew bolt (5) of belt height adjuster from
B-pillar
*BA91.40-P-1004-01D
8
Disconnect connector from passenger ETR
[GUS] ignition squib (R12/2)
9
Unscrew bolt (6) from automatic belt retractor
(7)
*BA91.40-P-1008-01D
Torx bit set
*000589011000
10
Detach automatic belt retractor (7)
The automatic belt retractor must not be
disassembled.
Never use oil or grease to eliminate noises.
Automatic belt retractors that have been
opened are no longer under warranty!
11
Check seat belt for signs of damage
e
Check seat belts for damage
AP91.40-P-9150GH
12
Install in the reverse order
Installation:
Pay attention to different
version (left/ right) of emergency tensioning
retractors and satisfactory seating in the
locking device.
13
Read fault memory and erase
14Carry out diagnosis
see Diagnosis Manual.
Seat belts/emergency tensioning retractors
Number
Designation
Model 163 up to
08/99
Model 163 as of
09/99
BA91.40-P-1001-01D
Screw on belt end fitting
Nm
3535
BA91.40-P-1004-01D
Bolt to belt height adjuster
Nm
2525
BA91.40-P-1008-01DScrew on front automatic belt reel
Nm
30 (+10/-0.15)30 (+10/-0.15)
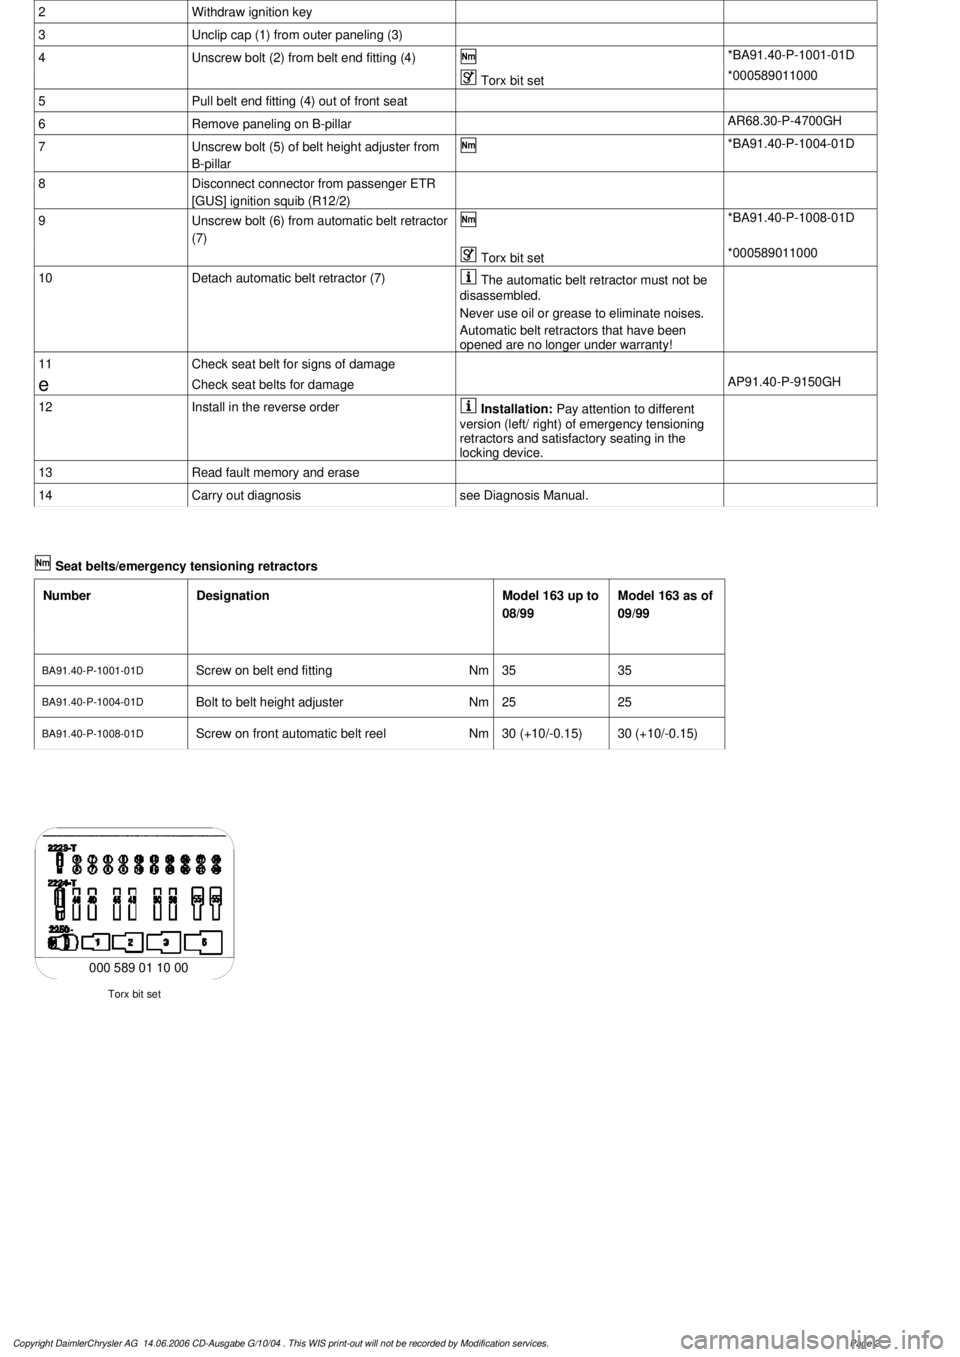
Torx bit set
000 589 01 10 00
Copyright DaimlerChrysler AG 14.06.2006 CD-Ausgabe G/10/04 . This WIS print-out will not be recorde
d by Modification services.
Page 2
Page 3819 of 4133
AR91.40-P-0681GI
Remove/install rear seat belts
16.4.99
MODEL
163.136 /154 /172 as of 1.9.99,
163.113 /128 /157 /174 /175
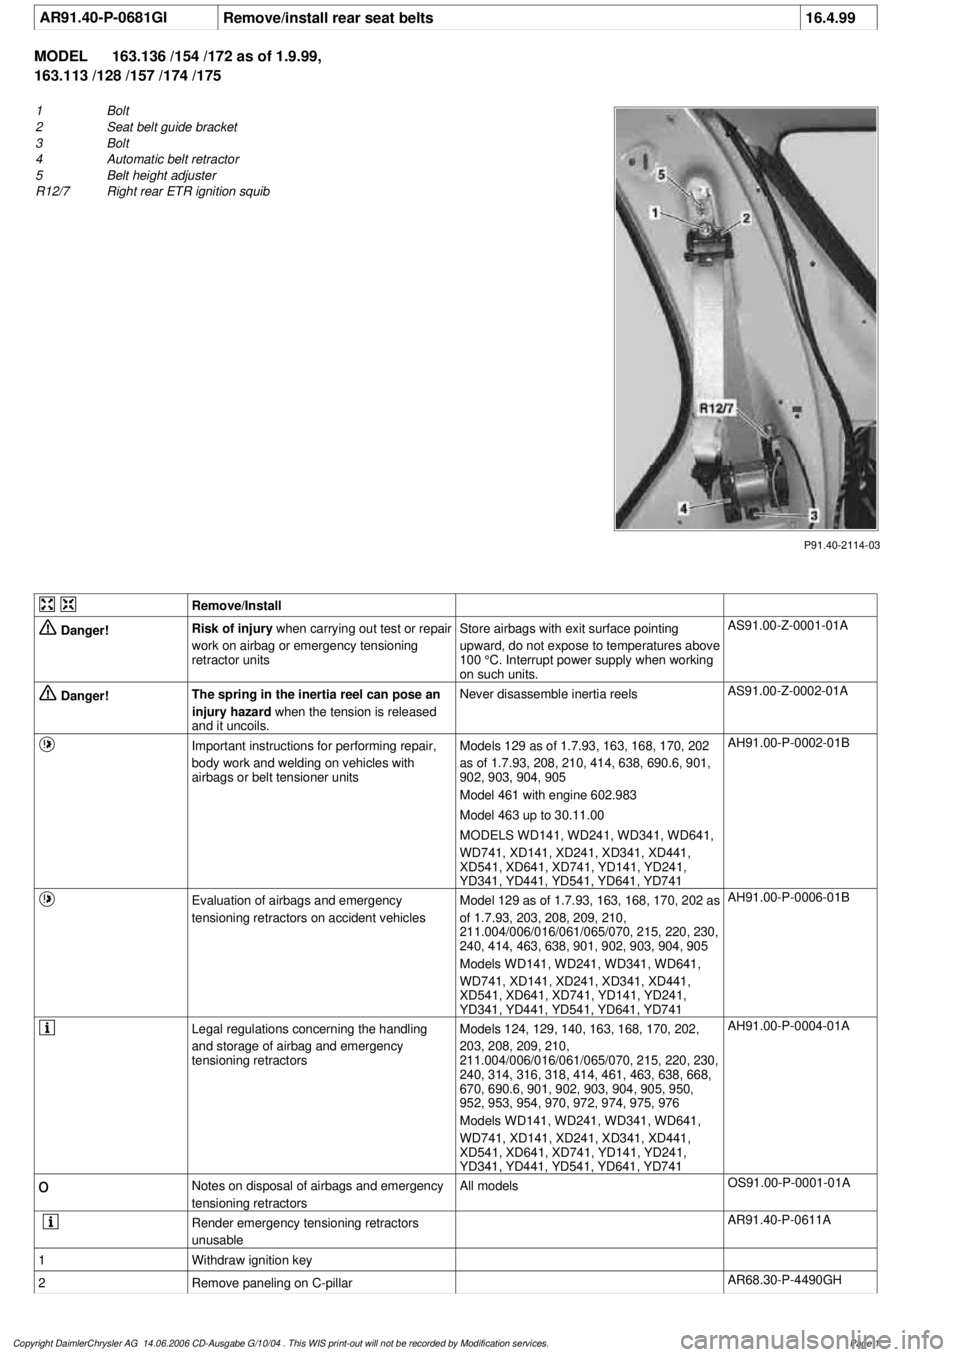
1
Bolt
2
Seat belt guide bracket
3
Bolt
4
Automatic belt retractor
5
Belt height adjuster
R12/7
Right rear ETR ignition squib
P91.40-2114-03
Remove/Install
Danger!
Risk of injury
when carrying out test or repair
work on airbag or emergency tensioning
retractor units
Store airbags with exit surface pointing
upward, do not expose to temperatures above
100 °C. Interrupt power supply when working
on such units.
AS91.00-Z-0001-01A
Danger!
The spring in the inertia reel can pose an
injury hazard
when the tension is released
and it uncoils.
Never disassemble inertia reels
AS91.00-Z-0002-01A
Important instructions for performing repair,
body work and welding on vehicles with
airbags or belt tensioner units
Models 129 as of 1.7.93, 163, 168, 170, 202
as of 1.7.93, 208, 210, 414, 638, 690.6, 901,
902, 903, 904, 905
Model 461 with engine 602.983
Model 463 up to 30.11.00
MODELS WD141, WD241, WD341, WD641,
WD741, XD141, XD241, XD341, XD441,
XD541, XD641, XD741, YD141, YD241,
YD341, YD441, YD541, YD641, YD741
AH91.00-P-0002-01B
Evaluation of airbags and emergency
tensioning retractors on accident vehicles
Model 129 as of 1.7.93, 163, 168, 170, 202 as
of 1.7.93, 203, 208, 209, 210,
211.004/006/016/061/065/070, 215, 220, 230,
240, 414, 463, 638, 901, 902, 903, 904, 905
Models WD141, WD241, WD341, WD641,
WD741, XD141, XD241, XD341, XD441,
XD541, XD641, XD741, YD141, YD241,
YD341, YD441, YD541, YD641, YD741
AH91.00-P-0006-01B
Legal regulations concerning the handling
and storage of airbag and emergency
tensioning retractors
Models 124, 129, 140, 163, 168, 170, 202,
203, 208, 209, 210,
211.004/006/016/061/065/070, 215, 220, 230,
240, 314, 316, 318, 414, 461, 463, 638, 668,
670, 690.6, 901, 902, 903, 904, 905, 950,
952, 953, 954, 970, 972, 974, 975, 976
Models WD141, WD241, WD341, WD641,
WD741, XD141, XD241, XD341, XD441,
XD541, XD641, XD741, YD141, YD241,
YD341, YD441, YD541, YD641, YD741
AH91.00-P-0004-01A
o
Notes on disposal of airbags and emergency
tensioning retractors
All models
OS91.00-P-0001-01A
Render emergency tensioning retractors
unusable
AR91.40-P-0611A
1
Withdraw ignition key
2
Remove paneling on C-pillar
AR68.30-P-4490GH
Copyright DaimlerChrysler AG 14.06.2006 CD-Ausgabe G/10/04 . This WIS print-out will not be recorde
d by Modification services.
Page 1
Page 3820 of 4133
![MERCEDES-BENZ ML500 1997 Complete Repair Manual 3
Unscrew bolt (1) from seat belt guide bracket
(2)
If necessary, remove belt height adjuster
(5).
*BA91.40-P-1002-01D
4
Disconnect connector from right rear ETR
[GUS] ignition squib (R12/7 MERCEDES-BENZ ML500 1997 Complete Repair Manual 3
Unscrew bolt (1) from seat belt guide bracket
(2)
If necessary, remove belt height adjuster
(5).
*BA91.40-P-1002-01D
4
Disconnect connector from right rear ETR
[GUS] ignition squib (R12/7](/manual-img/4/57308/w960_57308-3819.png)
3
Unscrew bolt (1) from seat belt guide bracket
(2)
If necessary, remove belt height adjuster
(5).
*BA91.40-P-1002-01D
4
Disconnect connector from right rear ETR
[GUS] ignition squib (R12/7)
5
Unscrew bolt (3) from automatic belt retractor
(4)
*BA91.40-P-1003-01D
6
Detach automatic belt retractor (4)
The automatic belt retractor must not be
disassembled.
Never use oil or grease to eliminate noises.
7
Check seat belts for damage
e
Check seat belts for damage
AP91.40-P-9150GH
8
Install in the reverse order
Installation:
Pay attention to different
version (left/ right) of emergency tensioning
retractors and satisfactory seating in the
locking device.
9
Read fault memory and erase
10Carry out diagnosis
see Diagnosis Manual.
Seat belts/emergency tensioning retractors
Number
Designation
Model 163 up to
08/99
Model 163 as of
09/99
BA91.40-P-1002-01D
Screw in rear upper belt guide fitting
Nm
3030
BA91.40-P-1003-01D
Bolt to rear inertia reel
Nm
3030
Copyright DaimlerChrysler AG 14.06.2006 CD-Ausgabe G/10/04 . This WIS print-out will not be recorde
d by Modification services.
Page 2
Page 3825 of 4133
AR91.40-P-0683GI
Remove, replace and install rear center seat belt
4.5.99
MODELS
163.136 /154 /172 as of 1.9.99,
163.113 /128 /157 /174 /175
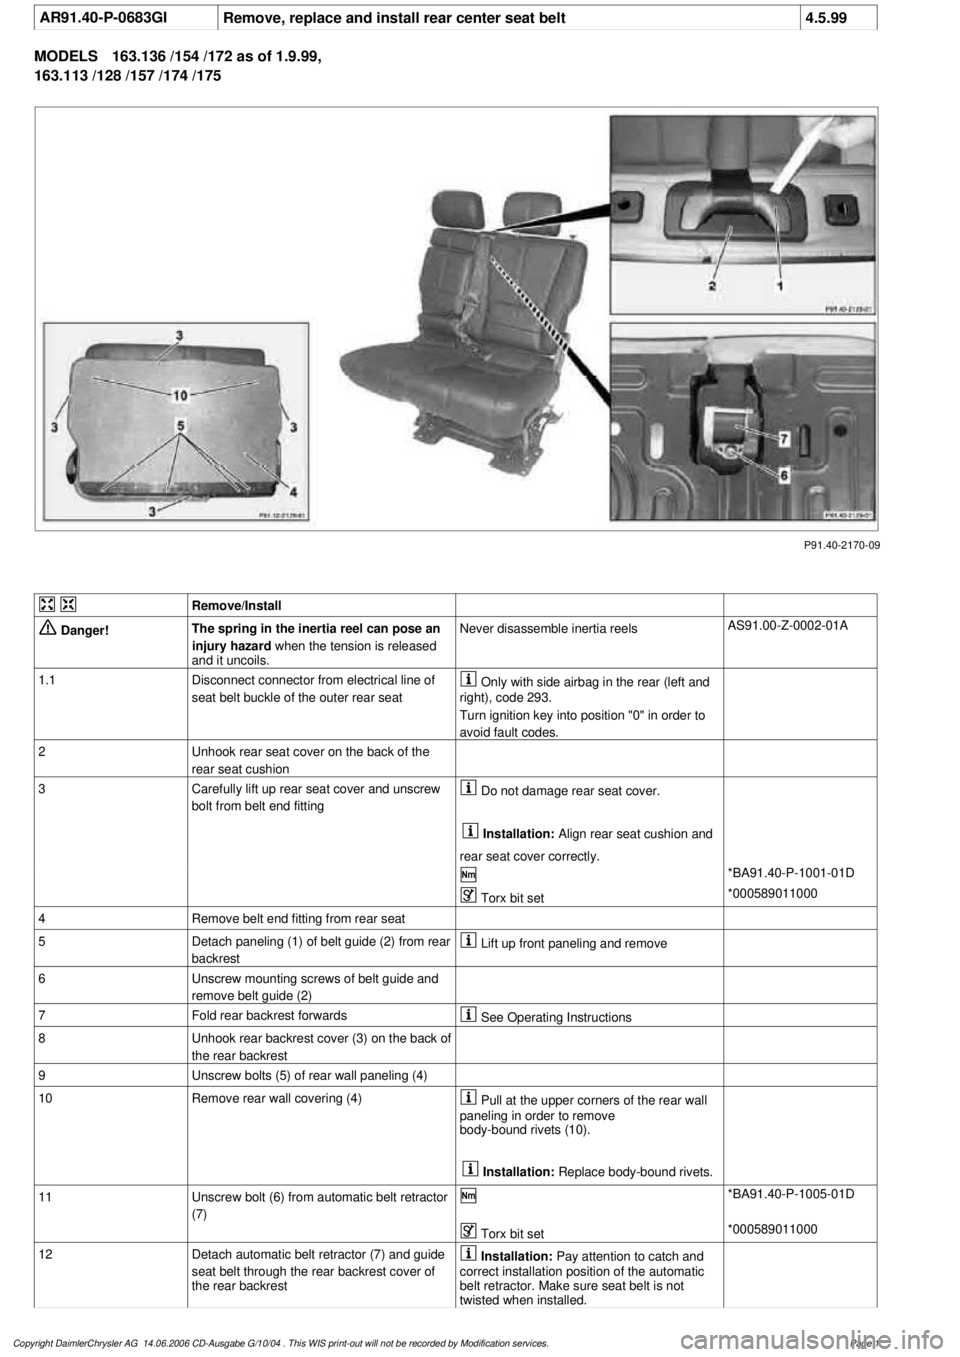
P91.40-2170-09
Remove/Install
Danger!
The spring in the inertia reel can pose an
injury hazard
when the tension is released
and it uncoils.
Never disassemble inertia reels
AS91.00-Z-0002-01A
1.1
Disconnect connector from electrical line of
seat belt buckle of the outer rear seat
Only with side airbag in the rear (left and
right), code 293.
Turn ignition key into position "0" in order to
avoid fault codes.
2
Unhook rear seat cover on the back of the
rear seat cushion
3
Carefully lift up rear seat cover and unscrew
bolt from belt end fitting
Do not damage rear seat cover.
Installation:
Align rear seat cushion and
rear seat cover correctly.
*BA91.40-P-1001-01D
Torx bit set
*000589011000
4
Remove belt end fitting from rear seat
5
Detach paneling (1) of belt guide (2) from rear
backrest
Lift up front paneling and remove
6
Unscrew mounting screws of belt guide and
remove belt guide (2)
7
Fold rear backrest forwards
See Operating Instructions
8
Unhook rear backrest cover (3) on the back of
the rear backrest
9
Unscrew bolts (5) of rear wall paneling (4)
10
Remove rear wall covering (4)
Pull at the upper corners of the rear wall
paneling in order to remove
body-bound rivets (10).
Installation:
Replace body-bound rivets.
11
Unscrew bolt (6) from automatic belt retractor
(7)
*BA91.40-P-1005-01D
Torx bit set
*000589011000
12
Detach automatic belt retractor (7) and guide
seat belt through the rear backrest cover of
the rear backrest
Installation:
Pay attention to catch and
correct installation position of the automatic
belt retractor. Make sure seat belt is not
twisted when installed.
Copyright DaimlerChrysler AG 14.06.2006 CD-Ausgabe G/10/04 . This WIS print-out will not be recorde
d by Modification services.
Page 1
Page 3835 of 4133

SI18.00-P-0010A
Service Information: oil sludge
26.3.01
ENGINE
111 in MODELS 124, 163, 170, 202, 203, 208, 210
ENGINE
112 in MODELS 129, 163, 170, 202, 203, 208, 210, 220
ENGINE
112, 113 in MODEL 463
ENGINE
113 in MODELS 129, 163, 202, 208, 210, 215, 220
ENGINE
137 in MODEL 215, 220
ENGINE
166 in MODEL 168
Oil sludging in gasoline engines with ASSYST maintenance
system
Recently we have determined that time and time again oil
sludging occurs in gasoline engines with an ASSYST maintenance
system.
Oil sludging can lead to the following complaints:
D
engine oil consumption
D
engine smoke (white/blue)
D
influencing of oil level indicator
D
clogged oil filter, engine oil thickened like jelly
D
Check engine lamp illuminated
D
oil sludge visible during assembly job, e.g. in oil filter, in cylinder
head covers, condensation sludging
(engine 166) etc.
-----------------------------------------------------------------------------------------
The following list of causes may lead individually or as a combination
to engine oil sludging:
D
Crankcase ventilation inoperable, function orifices, bores,
passages in cylinder head cover, cylinder head, crankcase etc.
are mechanically sealed. A nonfunctioning crankcase
ventilation boosts loads on the engine oil through organic
nitrates. The risk of oil sludging increases.
The mechanical condition of the engine is always to be
checked, i.e. all engine oil drain orifices on the cylinder head
and crankcase and all crankcase ventilation ducts must be free
of obstacles. Crankcase breather lines may not be kinked.
Check the ventilation bores in the cylinder head covers.
-----------------------------------------------------------------------------------------
D
The engine oil used does not comply with the specifications in
Sheet 229.1 or 229.3 of the Specifications for Service Products.
The additive process, e.g. dirt-carrying capability, neutralization
capability and oxidation resistance as well as the quality of the
base stock influence sludging time.
Use of engine oils with best possible resistance to formation of
sludge, i.e. use only tested and approved engine oils (from
Sheet 229.1 or 229.3). The best protection is afforded by the
engine oils on Sheet 229.3, which fulfill more stringent
specifications with regard to preventing sludge and deposits
(see Sheet 221.0, page 11). These oils have a distinctly better
anti-sludge characteristic than other engine oils.
D
Sludging after adding a fuel or engine oil special additive.
Do not use fuel or engine oil special additives. More information
hereto is available on Sheet 219.0 of the Specifications for
Service products. Reference to customer not to use special
additives.
D
Engine oil change not performed according to ASSYST
specifications. At driven distances
exceeding > approx. 3000 km, engine oil sludging may occur.
-----------------------------------------------------------------------------------------
Comply with engine oil and filter change as under ASSYST
specifications. Observe remaining distance.
D
Fuel grade lies outside standard (regionally contingent). If
contaminated, deficient fuel is used, then engine oil sludging
may occur even where approved engine oil is used.
Operation with fuel, e.g. as under DIN EN 228. Clarify refueling
behavior of customer. If engine operation regional, is
temporarily possible with deficient oil only, then the startup
distance has to be individually reduced, i.e. the oil change
temporarily performed at an interval of, e.g. 10,000 km.
D
Radiator antifreeze penetration into engine oil, e.g. through an
internal engine leak (cylinder head gasket, casting porosity).
The engine oil sludges within a short period. The crankcase
ventilation clogs up and stops functioning. Condensation
sludging clogs up the oil separator cells
(engine 166).
Rectify coolant leakage. Clean all sludged engine parts, in
particular the crankcase ventilation parts. If the occurrence
repeats, and casting porosity is suspected, e.g. replace
crankcase.
-----------------------------------------------------------------------------------------
Copyright DaimlerChrysler AG 20.05.2006 CD-Ausgabe G/10/04 . This WIS print-out will not be recorde
d by Modification services.
Page 1
Page 3836 of 4133

Measures for slightly sludged engine:
Oil and filter change. Purge engine, i.e. normal engine operation
in neutral, or while driving, using oil from Sheet 229.3, 228.3, or
228.5. Drain off scavenging oil after purging process (approx. 1
hour). Repeat purging process if necessary. Refill using engine oil
from Sheet 229.3, or 229.1. The first oil change after clearing the
sludge should be performed after approx. 10,000 km or beforehand;
when doing so use engine oil from Sheet 229.3.
Measures for severely sludged engine:
Engines with severe oil sludging and caking onto engine parts
and into bores have to be dismantled and mechanically cleaned.
Tough sludge residue must not enter the clean side of the oil circuit,
as otherwise, e.g. the piston oil spray and the hydraulic
compensation elements may have their functionality impaired. Refill
using engine oil from Sheet 229.3, or 229.1.
The first oil change after sludging should be performed after approx.
10,000 km; when doing so use engine oil from
Sheet 229.3.
Warranty/goodwill regulations
If in combination with engine oil sludging a warranty/goodwill claim is
submitted, then a regular documentation of maintenance must be
presented. The ASSYST printout is to be filed carefully for further
reference.
Oil sludging in combination with an exceeded oil change interval, or
because of special additives in the fuel/engine oil are costs to be
borne by the customer.
Copyright DaimlerChrysler AG 20.05.2006 CD-Ausgabe G/10/04 . This WIS print-out will not be recorde
d by Modification services.
Page 2
Page 3877 of 4133
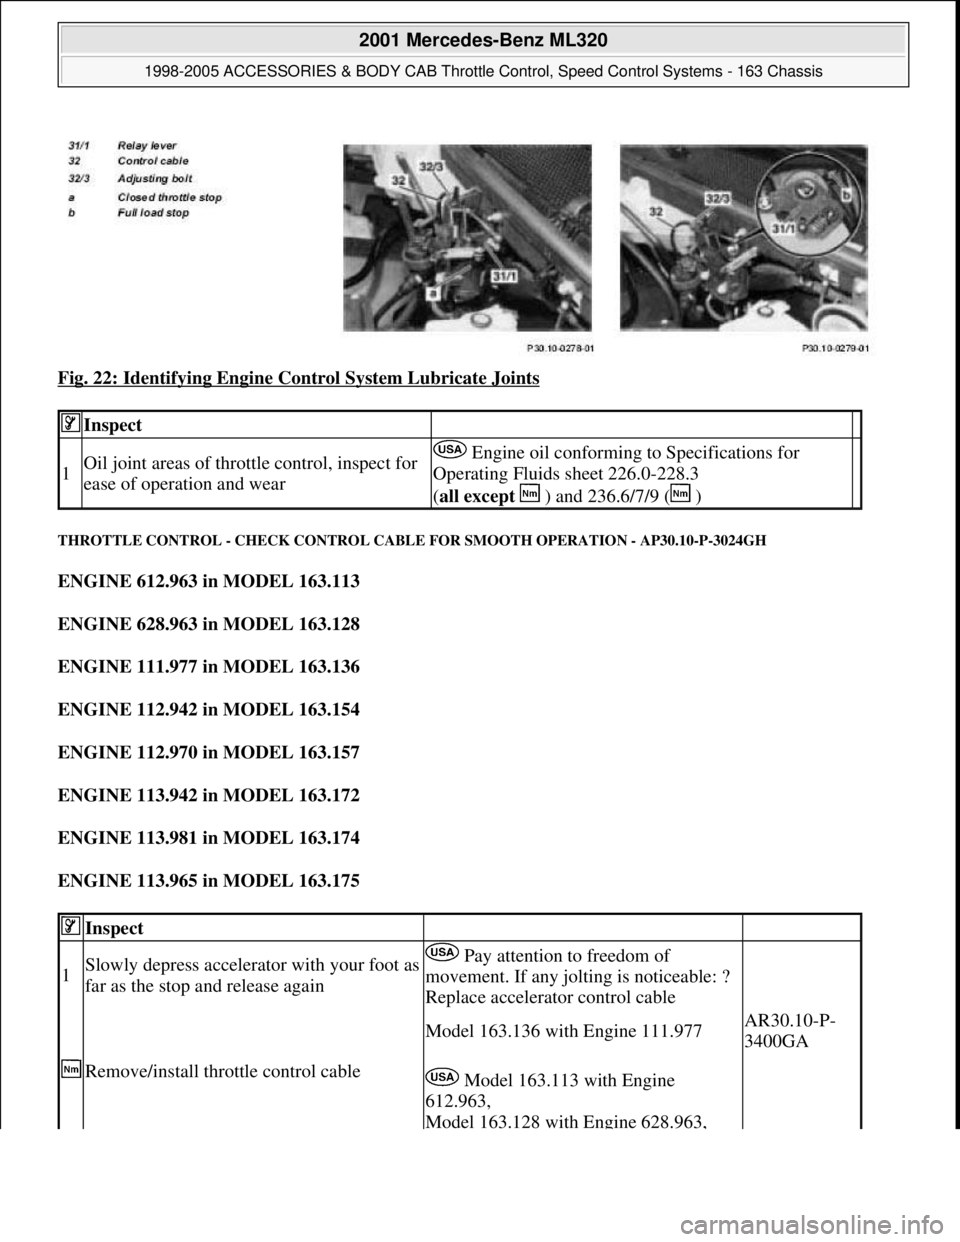
Fig. 22: Identifying Engine Control System Lubricate Joints
THROTTLE CONTROL - CHECK CONTROL CABLE FOR SMOOTH OPERATION - AP30.10-P-3024GH
ENGINE 612.963 in MODEL 163.113
ENGINE 628.963 in MODEL 163.128
ENGINE 111.977 in MODEL 163.136
ENGINE 112.942 in MODEL 163.154
ENGINE 112.970 in MODEL 163.157
ENGINE 113.942 in MODEL 163.172
ENGINE 113.981 in MODEL 163.174
ENGINE 113.965 in MODEL 163.175
Inspect
1Oil joint areas of throttle control, inspect for
ease of operation and wear Engine oil conforming to Specifications for
Operating Fluids sheet 226.0-228.3
(all except ) and 236.6/7/9 ( )
Inspect
1Slowly depress accelerator with your foot as
far as the stop and release again Pay attention to freedom of
movement. If any jolting is noticeable: ?
Replace accelerator control cable
Remove/install throttle control cable
Model 163.136 with Engine 111.977AR30.10-P-
3400GA
Model 163.113 with Engine
612.963,
Model 163.128 with Engine 628.963,
2001 Mercedes-Benz ML320
1998-2005 ACCESSORIES & BODY CAB Throttle Control, Speed Control Systems - 163 Chassis
me
Saturday, October 02, 2010 3:36:28 PMPage 37 © 2006 Mitchell Repair Information Company, LLC.