1997 MERCEDES-BENZ ML500 taillamp
[x] Cancel search: taillampPage 54 of 4133

4 Contents
Practical hintsFirst aid kit .....................................228
Fuses ................................................228
Electrical outlet ..............................230
Stowing things in the vehicle ......230
Hood ................................................. 231
Checking engine oil level .............233
Automatic transmission
fluid level ...................................234
Engine oil consumption ................234
Coolant level ...................................234
Adding coolant ...........................235
Windshield washer/headlamp
cleaning system .........................236
Windshield and
headlamp washer fluid
mixing ratio ................................237Vehicle jack, wheel bolt
wrench and screwdriver ......... 237
Air pump ......................................... 239
Wheels ............................................ 240
Tire replacement ....................... 240
Rotating wheels ......................... 241
Spare wheel .................................... 242
Changing wheels ........................... 245
Tire inflation pressure ................. 250
Battery ............................................. 251
Jump starting ................................. 253
Towing the vehicle ........................ 255
Transmission selector lever,
manually unlocking .................. 259
Stranded vehicle ............................ 259Exterior lamps ................................260
Headlamp assembly ................... 261
Taillamp assemblies ..................265
Adjusting headlamp aim ...............268
Remote control
battery replacement .................270
Synchronizing
remote control ............................ 271
Emergency operation of
sliding/pop-up roof ...................272
Emergency operation of
Skyview Top ...............................273
Manual release for
fuel filler flap ............................. 274
Replacing wiper blades .................275
Roof rack ......................................... 276
Page 55 of 4133

5 Contents
Vehicle careCleaning and care
of the vehicle .............................278
Power washer ..............................279
Tar stains .....................................279
Paintwork, painted body
components .................................279
Engine cleaning ..........................280
Vehicle washing .........................280
Ornamental moldings ................280
Headlamps, taillamps,
turn signal lenses ......................280
Window cleaning ........................ 281
Wiper blades ............................... 281
Light alloy wheels ...................... 281
Instrument cluster ..................... 281
Steering wheel and
gear selector lever ...................... 281Cup holder .................................. 282
Seat belts ..................................... 282
Headliner .................................... 282
Upholstery .................................. 282
Hard plastic trim items ............. 282
Plastic and rubber parts ........... 282
Technical dataSpare parts service ....................... 284
Warranty coverage ........................ 284
Identification labels ...................... 285
Layout of poly-V-belt drive ........... 286
Technical data ................................ 287
Fuels, coolants, lubricants
etc. – capacities ........................ 292
Engine oils ...................................... 294
Engine oil additives ...................... 294
Air conditioner refrigerant .......... 294Brake fluid ......................................294
Premium unleaded gasoline ........295
Fuel requirements .........................295
Gasoline additives .........................296
Coolants ...........................................296
Consumer information ..................298
IndexIndex ................................................300
Page 140 of 4133
90 Exterior lamp switch
Te ch n ica l
data Instruments
and controlsOperationDrivingInstrument
cluster displayPractical hints Car care Index
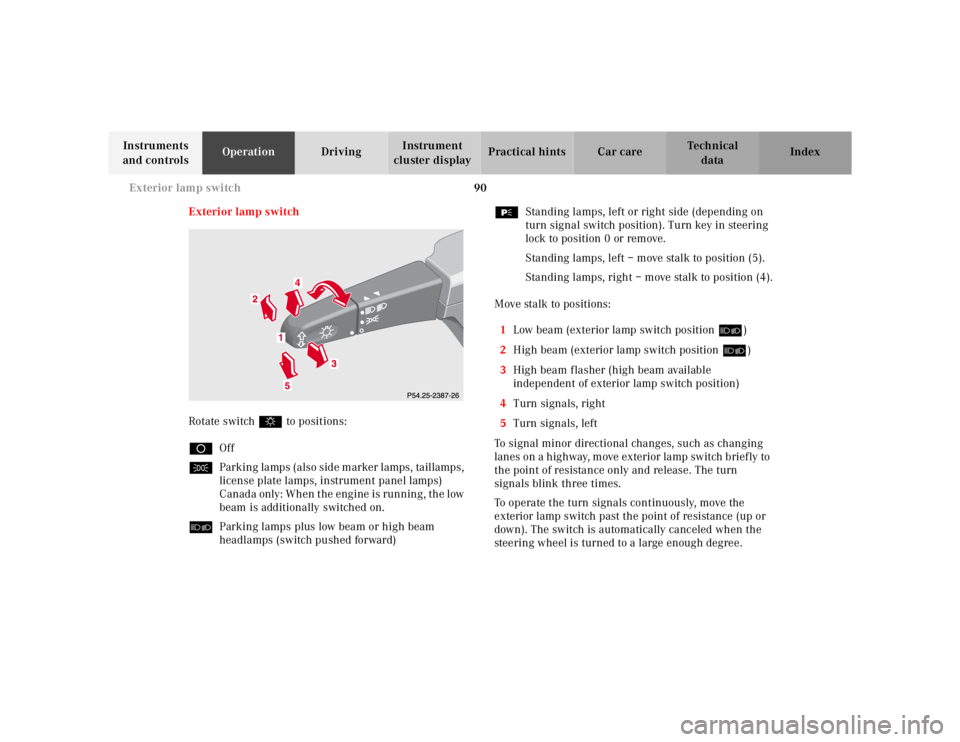
Exterior lamp switch
Rotate switch $ to positions:
DOff
CParking lamps (also side marker lamps, taillamps,
license plate lamps, instrument panel lamps)
Canada only: When the engine is running, the low
beam is additionally switched on.
õParking lamps plus low beam or high beam
headlamps (switch pushed forward)ƒStanding lamps, left or right side (depending on
turn signal switch position). Turn key in steering
lock to position 0 or remove.
Standing lamps, left – move stalk to position (5).
Standing lamps, right – move stalk to position (4).
Move stalk to positions:
1Low beam (exterior lamp switch position õ)
2High beam (exterior lamp switch position õ)
3High beam flasher (high beam available
independent of exterior lamp switch position)
4Turn signals, right
5Turn signals, left
To signal minor directional changes, such as changing
lanes on a h ig hway, m ove exterior la mp sw itch b rief ly to
the point of resistance only and release. The turn
signals blink three times.
To operate the turn signals continuously, move the
exterior lamp switch past the point of resistance (up or
down). The switch is automatically canceled when the
steering wheel is turned to a large enough degree.
Page 141 of 4133
91 Exterior lamp switch
Te ch n ica l
data Instruments
and controlsOperationDrivingInstrument
cluster displayPractical hints Car care Index Turn signal failure
If one of the turn signals fails, the turn signal indicator
system f lashes and sounds at a faster than normal rate.
Standing lamps
When the vehicle is parked on the street the standing
lamps (right or left side parking lamps) can be turned
on, making the vehicle more visible to passing vehicles.
The standing lamps cannot be operated with the key in
steering lock position 1 or 2.
Note:
With the key removed and a front door open, a warning
sounds if the vehicle’s exterior lamps (except standing
lamps) are not switched off.Daytime running lamps (Canada only)
When the engine is running and the selector lever is in
a driving position, the low beam headlamps (includes
parking lamps, side marker lamps, taillamps and
license plate lamps) are automatically switched on.
When shifting from a driving position to position “N”
or “P”, the low beam switches off (2 seconds delay).
For nighttime driving the exterior lamp switch should
be turned to position õ to permit activation of the
high beam headlamps.
Page 262 of 4133
212 What you should know at the gas station
Te ch n ica l
data Instruments
and controlsOperationDrivingInstrument
cluster displayPractical hints Car care Index
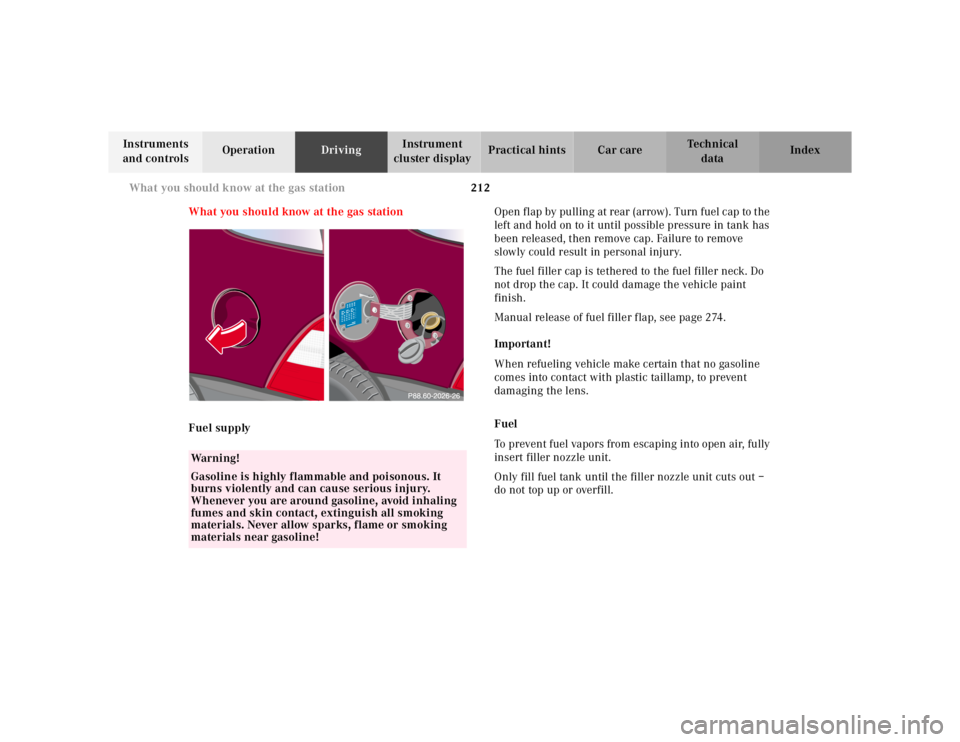
What you should know at the gas station
Fuel supplyOpen f l ap by pu ll ing at rear (arrow). Turn f uel c ap to t he
left and hold on to it until possible pressure in tank has
been released, then remove cap. Failure to remove
slowly could result in personal injury.
The fuel filler cap is tethered to the fuel filler neck. Do
not drop the cap. It could damage the vehicle paint
finish.
Manual release of fuel filler flap, see page 274.
Important!
When refueling vehicle make certain that no gasoline
comes into contact with plastic taillamp, to prevent
damaging the lens.
Fuel
To prevent fuel vapors from escaping into open air, fully
insert filler nozzle unit.
Only fill fuel tank until the filler nozzle unit cuts out –
do not top up or overfill.
Wa r n i n g !
Gasoline is highly flammable and poisonous. It
burns violently and can cause serious injury.
Whenever you are around gasoline, avoid inhaling
fumes and skin contact, extinguish all smoking
materials. Never allow sparks, flame or smoking
materials near gasoline!
Page 277 of 4133
227 Contents - Practical hints
Te ch n ica l
data Instruments
and controlsOperation DrivingInstrument
cluster displayPractical hintsCar care Index
Practical hintsFirst aid kit .....................................228
Fuses ................................................228
Electrical outlet ..............................230
Stowing things in the vehicle ......230
Hood ................................................. 231
Checking engine oil level .............233
Automatic transmission
fluid level ...................................234
Engine oil consumption ................234
Coolant level ...................................234
Adding coolant ...........................235
Windshield washer/headlamp
cleaning system .........................236
Windshield and
headlamp washer fluid
mixing ratio ................................237Vehicle jack, wheel bolt
wrench and screwdriver ......... 237
Air pump ......................................... 239
Wheels ............................................ 240
Tire replacement ....................... 240
Rotating wheels ......................... 241
Spare wheel .................................... 242
Changing wheels ........................... 245
Tire inflation pressure ................. 250
Battery ............................................. 251
Jump starting ................................. 253
Towing the vehicle ........................ 255
Transmission selector lever,
manually unlocking .................. 259
Stranded vehicle ............................ 259Exterior lamps ................................260
Headlamp assembly ................... 261
Taillamp assemblies ..................265
Adjusting headlamp aim ...............268
Remote control
battery replacement .................270
Synchronizing
remote control ............................ 271
Emergency operation of
sliding/pop-up roof ...................272
Emergency operation of
Skyview Top ...............................273
Manual release for
fuel filler flap ............................. 274
Replacing wiper blades .................275
Roof rack ......................................... 276
Page 315 of 4133
![MERCEDES-BENZ ML500 1997 Complete Repair Manual 265 Exterior lamps
Te ch n ica l
data Instruments
and controlsOperation DrivingInstrument
cluster displayPractical hintsCar care Index Taillamp assemblies
1Stop lamp (1073 [32 cp bulb])
2Backup lamp MERCEDES-BENZ ML500 1997 Complete Repair Manual 265 Exterior lamps
Te ch n ica l
data Instruments
and controlsOperation DrivingInstrument
cluster displayPractical hintsCar care Index Taillamp assemblies
1Stop lamp (1073 [32 cp bulb])
2Backup lamp](/manual-img/4/57308/w960_57308-314.png)
265 Exterior lamps
Te ch n ica l
data Instruments
and controlsOperation DrivingInstrument
cluster displayPractical hintsCar care Index Taillamp assemblies
1Stop lamp (1073 [32 cp bulb])
2Backup lamp (1073 [32 cp bulb])
3Turn signal lamp (P Y 21 W bulb)
4Tail, parking, standing and side marker lamp,
driver’s side rear fog lamp (P 21 / 4 W bulb)Open liftgate.
Remove nuts (1).
Remove taillamp.
P82.10-2342-26
P82.10-2343-26
Page 316 of 4133
266 Exterior lamps
Te ch n ica l
data Instruments
and controlsOperation DrivingInstrument
cluster displayPractical hintsCar care Index
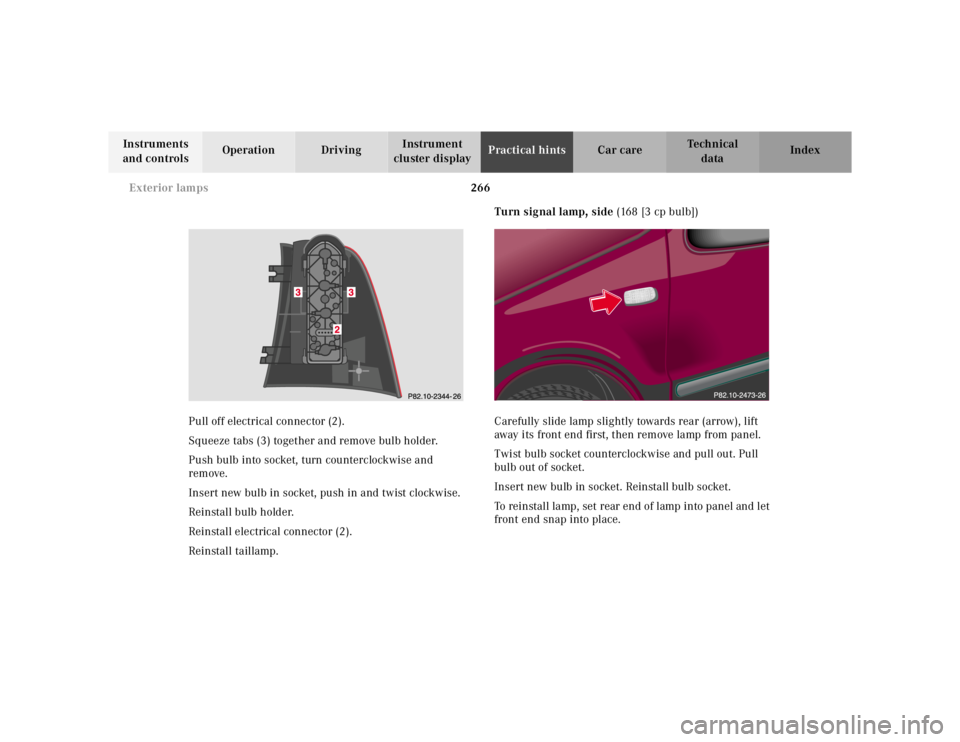
Pull off electrical connector (2).
Squeeze tabs (3) together and remove bulb holder.
Push bulb into socket, turn counterclockwise and
remove.
Insert new bulb in socket, push in and twist clockwise.
Reinstall bulb holder.
Reinstall electrical connector (2).
Reinstall taillamp.Turn signal lamp, side (168 [3 cp bulb])
Carefully slide lamp slightly towards rear (arrow), lift
away its front end first, then remove lamp from panel.
Twist bulb socket counterclockwise and pull out. Pull
bulb out of socket.
Insert new bulb in socket. Reinstall bulb socket.
To reinstall lamp, set rear end of lamp into panel and let
front end snap into place.