Page 1014 of 4133
210 OperationDriving instructions�
The vehicle and trailer combination is
heavier, and therefore is limited in ac-
celeration and climbing ability, and re-
quires longer stopping distances.
I t i s m o r e p r o n e t o r e a c t i n g t o s i d e w i n d
gusts, and requires more sensitive
steering input.
�
If possible, do not brake abruptly, but
rather engage the brake slightly at first
to permit the trailer to activate its
brake. Then increase the braking force.
�
If the transmission hunts between
gears on inclines, manually shift to a
lower gear (select 4, 3, 2 or 1).
A lower gear and reduction of speed re-
duces the chance of engine overload-
ing and / or overheating.
�
On very steep inclines, not manageable
with gear selector lever in position1,
switch transfer case to LOW RANGE
mode (
�page 125).
�
When going down a long hill, shift into
a lower gear and use the engine’s brak-
ing effect.
Avoid riding the brakes, thus overheat-
ing the vehicle and trailer brakes.
�
If the engine coolant rises to an ex-
tremely high temperature (coolant tem-
perature needle approaching the red
zone) when the air conditioning is on,
turn off the air conditioning system.
Engine coolant heat can be additionally
vented by opening the windows,
switching the climate control fan speed
to high and setting the temperature
control to the maximum hot position.
�
Extreme care must be exercised since
your vehicle with a trailer will require
additional passing distance ahead than
when driving without a trailer.
Because your vehicle and trailer is
longer than your vehicle alone, you will
also need to go much farther ahead of
the passed vehicle before you can re-
turn to your lane.
!If the trailer should begin to sway, re-
duce the vehicle’s speed and use the
brake controller by hand to straighten
out the vehicle and trailer.
In no case should you attempt to
straighten out the tow vehicle and trail-
er by increasing the speed or overstee-
ring and stepping on the brakes.
Page 1018 of 4133
214 OperationAt the gas station
�At the gas stationRefueling
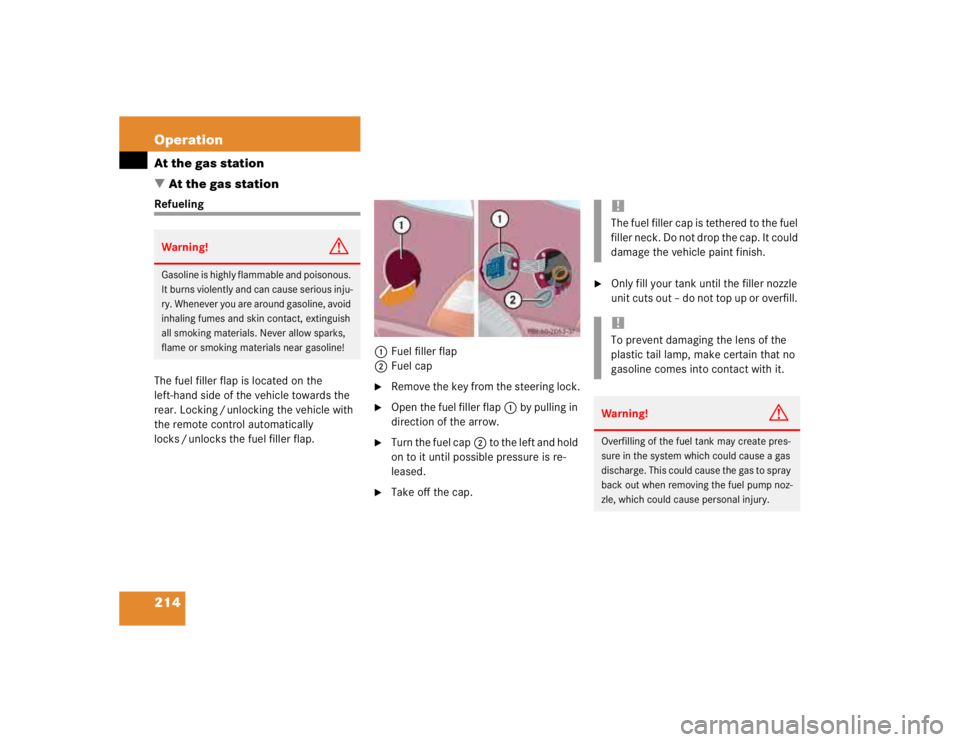
The fuel filler flap is located on the
left-hand side of the vehicle towards the
rear. Locking / unlocking the vehicle with
the remote control automatically
locks / unlocks the fuel filler flap.1Fuel filler flap
2Fuel cap
�
Remove the key from the steering lock.
�
Open the fuel filler flap1 by pulling in
direction of the arrow.
�
Turn the fuel cap2 to the left and hold
on to it until possible pressure is re-
leased.
�
Take off the cap.
�
Only fill your tank until the filler nozzle
unit cuts out – do not top up or overfill.
Warning!
G
Gasoline is highly flammable and poisonous.
It burns violently and can cause serious inju-
ry. Whenever you are around gasoline, avoid
inhaling fumes and skin contact, extinguish
all smoking materials. Never allow sparks,
flame or smoking materials near gasoline!
!The fuel filler cap is tethered to the fuel
filler neck. Do not drop the cap. It could
damage the vehicle paint finish.!To prevent damaging the lens of the
plastic tail lamp, make certain that no
gasoline comes into contact with it.Warning!
G
Overfilling of the fuel tank may create pres-
sure in the system which could cause a gas
discharge. This could cause the gas to spray
back out when removing the fuel pump noz-
zle, which could cause personal injury.
Page 1040 of 4133
236 OperationVehicle careEngine cleaning
Prior to cleaning the engine compartment
make sure to protect electrical compo-
nents and connectors from the intrusion of
water and cleaning agents.
Corrosion protection, such as MB Anticor-
rosion Wax, should be applied to the en-
gine compartment after every engine
cleaning. Before applying, all control link-
age bushings and joints should be lubricat-
ed. The poly-V-belt and all pulleys should
be protected from any wax.
Vehicle washing
Do not use hot water or wash your vehicle
in direct sunlight. Use only a mild car wash
detergent, such as Mercedes-Benz
approved Car Shampoo.Thoroughly spray the vehicle with a dif-
fused jet of water. Direct only a very weak
spray towards the ventilation intake. Use
plenty of water and rinse the sponge and
chamois frequently.
Rinse with clear water and thoroughly dry
with a chamois. Do not allow cleaning
agents to dry on the finish.
Due to the width of the vehicle, fold in out-
side mirrors prior to running the vehicle
through an automatic car wash to prevent
damage to the mirrors.
In the winter, thoroughly remove all traces
of road salt as soon as possible.
When washing the underbody, do not for-
get to clean the inner sides of the wheels.Ornamental moldings
For regular cleaning and care of very dirty
chrome-plated parts, use a chrome clean-
er.
Headlamps, tail lamps, side markers,
turn signal lenses
Use a mild car wash detergent, such as
Mercedes-Benz approved Car Shampoo,
with plenty of water.
To prevent scratches, never apply strong
force and use only a soft, non-scratchy
cloth when cleaning the lenses. Do not at-
tempt to wipe dirty lenses with a dry cloth
or sponge.
Page 1045 of 4133
241 Practical hints
What to do if …
Where will I find ...?
Unlocking / locking in an emergency
Opening / closing in an emergency
Replacing bulbs
Replacing wiper blades
Flat tire
Battery
Jump starting
Towing the vehicle
Fuses
Page 1068 of 4133
264 Practical hintsUnlocking / locking in an emergencyManually unlocking the transmission gear selector lever
In the case of power failure the transmis-
sion gear selector lever can be manually
unlocked, e.g. to tow the vehicle.
1Pin
�
Insert a pin1, e.g. ball point pen, into
the covered opening below the
position D of the shift pattern.
�
Perform the following two steps simul-
taneously:�
Push the pin down.
�
Move gear selector lever from
positionP.
�
Remove pin1.
The cover returns to its closed position
after moving the gear selector lever to
positionD.iThe gear selector lever is locked again
when moving it to positionP.
Page 1086 of 4133
282 Practical hintsJump startingThe battery is located on the right side of
the engine compartment.�
Make sure the two vehicles do not
touch.
�
Turn off all electrical consumers.
�
Apply parking brake.
�
Shift gear selector lever to positionP.
�
Open the hood.
�
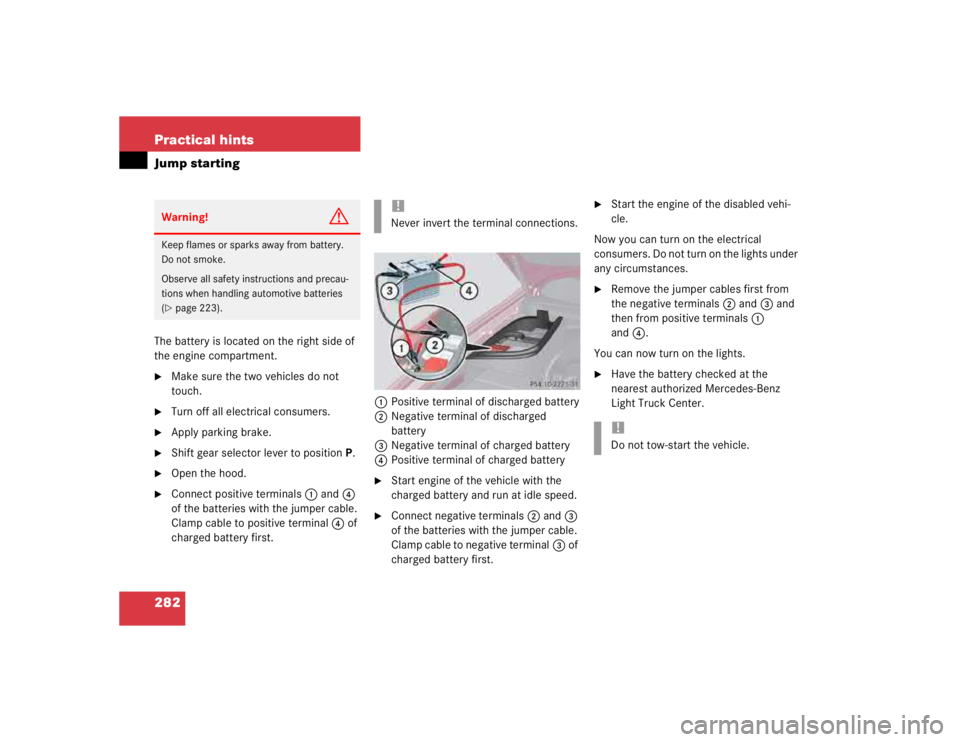
Connect positive terminals1 and4
of the batteries with the jumper cable.
Clamp cable to positive terminal4 of
charged battery first.1Positive terminal of discharged battery
2Negative terminal of discharged
battery
3Negative terminal of charged battery
4Positive terminal of charged battery
�
Start engine of the vehicle with the
charged battery and run at idle speed.
�
Connect negative terminals2 and3
of the batteries with the jumper cable.
Clamp cable to negative terminal3 of
charged battery first.
�
Start the engine of the disabled vehi-
cle.
Now you can turn on the electrical
consumers. Do not turn on the lights under
any circumstances.
�
Remove the jumper cables first from
the negative terminals2 and3 and
then from positive terminals1
and4.
You can now turn on the lights.
�
Have the battery checked at the
nearest authorized Mercedes-Benz
Light Truck Center.
Warning!
G
Keep flames or sparks away from battery.
Do not smoke.
Observe all safety instructions and precau-
tions when handling automotive batteries
(�page 223).
!Never invert the terminal connections.
!Do not tow-start the vehicle.
Page 1087 of 4133
283 Practical hints
Towing the vehicle
�Towing the vehicle
Mercedes-Benz recommends that the vehi-
cle be transported with all wheels off the
ground using flatbed or appropriate wheel
lift / dolly equipment. This method is pref-
erable to other types of towing.When circumstances do not permit the
recommended towing methods, the vehi-
cle may be towed with all wheels on the
ground only so far as necessary to have the
vehicle moved to a safe location where the
recommended towing methods can be em-
ployed.
!Use flatbed or wheel lift / dolly equip-
ment, with key in steering lock turned
to position0.
Do not tow with sling-type equipment.
Towing with sling-type equipment over
bumpy roads will damage radiator and
supports.
To prevent damage during transport,
do not tie down vehicle by its chassis or
suspension parts. Use the towing eyes.
Switch off the ESP (
�page 81),
tow-away alarm (
�page 85) and the
automatic central locking (
�page 93).
!When towing the vehicle with all wheels
on the ground, the gear selector lever
must be in positionN and the key must
be in steering lock position2.
When towing the vehicle with all wheels
on the ground, the vehicle may be
towed only for distances up to 30 miles
(50 km) and at a speed not to exceed
30 mph (50 km / h).
If the vehicle is towed with the front
axle raised (observe instructions re-
garding flexible drive shaft), the engine
must be shut off (key in steering lock
position1). Otherwise, the 4-ETS may
become engaged which may cause loss
of towing control.
!To be certain to avoid additional dam-
age to the vehicle powertrain, however
you should observe the following:�
With damage to the front axle�
raise front axle
�
remove flexible drive shaft be-
tween rear axle and transfer
case
�
With damage to the rear axle�
raise rear axle
�
tow vehicle with wheel lift or
dolly placed under front wheels
�
With damage to the transfer case�
remove flexible drive shaft to
the drive axles
Always install new self-locking nuts
when reinstalling flexible drive shaft.
Page 1088 of 4133
284 Practical hintsTowing the vehicleWarning!
G
If circumstances require towing the vehicle
with all wheels on the ground, always tow
with a tow bar if:�
the engine will not run
�
there is a malfunction in the power sup-
ply or in the vehicle’s electrical system
Prior to towing the vehicle with all wheels on
the ground, make certain that the key is in
steering lock position2.
If the key is left in steering lock position0
for an extended period of time, it can no
longer be turned in the switch. In this case,
the steering is locked. To unlock, remove
key from steering lock and reinsert.
Warning!
G
With the engine not running, there is no
power assistance for the brake and steering
systems. In this case, it is important to keep
in mind that a considerably higher degree of
effort is necessary to brake and steer the ve-
hicle. Adapt your driving accordingly.iTo signal turns while being towed with
hazard warning flasher in use, turn key
in steering lock to position2 and acti-
vate combination switch for left or right
turn signal in usual manner – only the
selected turn signal will operate.
Upon canceling the turn signal, the haz-
ard warning flasher will operate again.iThe vehicle cannot be started via
tow-start.
!When towing the vehicle with all wheels
on the ground, note the following:
With the automatic central locking acti-
vated and the key in steering lock
position2, the vehicle doors lock if the
left front wheel is turning at vehicle
speeds of approx. 9 mph (15 km / h) or
more.
To prevent the vehicle doors from lock-
ing, deactivate the automatic central
locking (
�page 93).
Towing of the vehicle should only be
done using the towing eye. Never at-
tach tow cable, tow rope or tow rod to
vehicle chassis, frame or suspension
parts.