Page 1050 of 4133
246 Practical hintsWhat to do if …Problem
Possible cause
Suggested solution
¿
The yellow BAS / ESP malfunc-
tion indicator lamp comes on
while driving.
The ESP is no longer synchronized following
a voltage supply interruption (e.g. battery dis-
connected or discharged).
Synchronize the ESP:�
With vehicle stationary and the engine
running, turn the steering wheel
completely to the left and then to the
right.
If the BAS / ESP malfunction indicator
lamp does not go out:
�
Continue driving with added caution.
�
Visit an authorized Mercedes-Benz
Light Truck Center as soon as possi-
ble.
Failure to follow these instructions
increases the risk of an accident.
!When synchronizing the ESP, make
sure you can turn the steering wheel in
both directions as far as it will go with-
out the wheels hitting any objects, e.g.
a road curb.
Page 1057 of 4133

253 Practical hints
What to do if …
Problem
Possible cause
Suggested solution
:
The yellow warning lamp flashes
after starting the engine or while
driving.
The engine oil level has sunk to the minimum
level. If the engine oil level continues to sink,
the warning lamp will light up.
�
Add approved oil at the next gas
station (
�page 302).
�
If oil loss is visible on the engine, have
the malfunction corrected as soon as
possible at a Mercedes-Benz Light
Truck Center.
_
The red indicator lamp does not
go out after starting the engine.
The adjustable telescoping steering column
is not properly locked.
�
Lock the adjustable steering column
(�page 39).
‡
The green front fog lamp indica-
tor lamp lights up when ignition
is turned on.
The front fog lamps are switched on.
�
Fog lamps (
�page 111).
<
The red seat belt warning lamp
illuminates for a brief period
after starting the engine.
The warning lamp reminds you to fasten seat
belts.
�
Fasten your seat belt (
�page 64).
W
The yellow low washer system
fluid level lamp comes on after
starting the engine or while driv-
ing.
There is approximately 1.3 US qt. (1.25 l) of
washer fluid remaining in the reservoir.
�
Add washer fluid (
�page 224).
The washer fluid may have frozen.
�
Move the vehicle to a warmer environ-
ment so that the washer fluid will
thaw.
�
Correct the concentration level after
the washer fluid in the reservoir
thaws.
Page 1065 of 4133
261 Practical hints
Unlocking / locking in an emergency
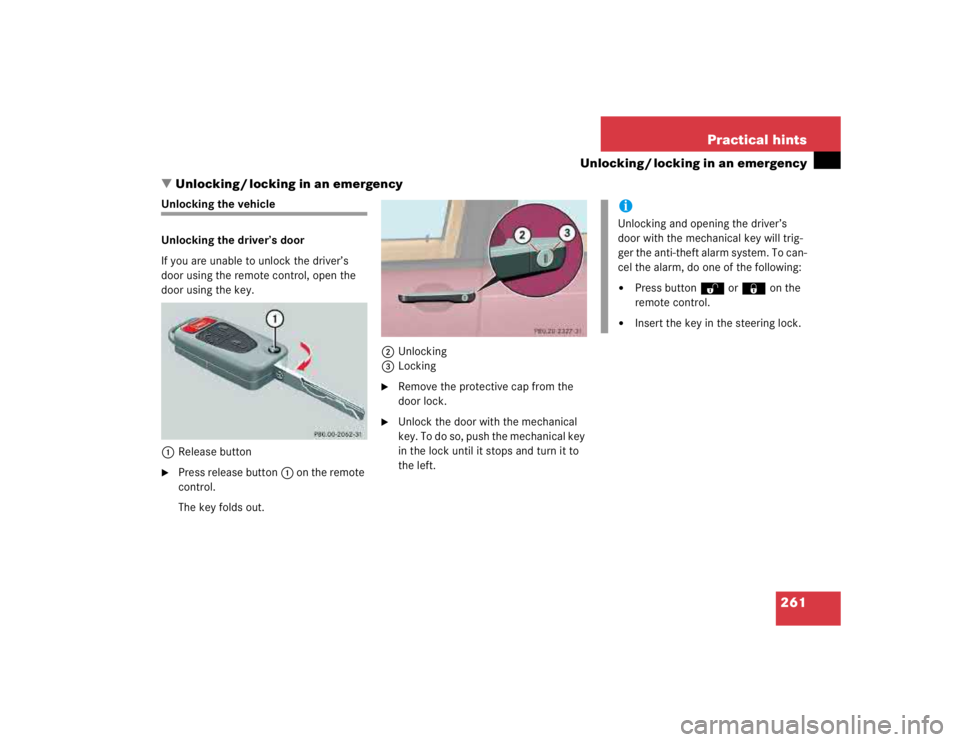
�Unlocking / locking in an emergency
Unlocking the vehicle
Unlocking the driver’s door
If you are unable to unlock the driver’s
door using the remote control, open the
door using the key.
1Release button�
Press release button1 on the remote
control.
The key folds out.2Unlocking
3Locking
�
Remove the protective cap from the
door lock.
�
Unlock the door with the mechanical
key. To do so, push the mechanical key
in the lock until it stops and turn it to
the left.
iUnlocking and opening the driver’s
door with the mechanical key will trig-
ger the anti-theft alarm system. To can-
cel the alarm, do one of the following:�
Press buttonŒ or‹ on the
remote control.
�
Insert the key in the steering lock.
Page 1067 of 4133

263 Practical hints
Unlocking / locking in an emergency
�
Pull off battery cover2 in direction of
arrow.
�
Remove the batteries.
�
Using a lint-free cloth, insert new bat-
teries under the contact spring with the
plus (+) side facing up.
�
Press battery cover2 onto housing
until locked in place.
�
Push each button to assure proper op-
eration of the remote control.
If remote control does not function cor-
rectly after replacing the batteries, the
system may have to be resynchronized.Synchronizing remote control
�
Turn key in steering lock to position2
(�page 33), then to position0 and re-
move.
�
Within ten seconds, push and hold
button‹ while pushing
buttonΠfive times.
�
Release the button, and press‹,
Œ orŠ once.
The remote control is resynchronized.
�
Recheck all of the remote control func-
tions.
Fuel filler flap
1Cover
2Lock rod�
Open the tailgate.
�
Open cover1 in cargo area behind
the left trim panel.
�
Turn lock rod2 clockwise (arrow) to
the end stop.
The fuel filler flap can now be opened.
iI f i t i s n o t p o s s i b l e t o r e s y n c h r o n i z e t h e
remote control, have the system
checked at your authorized
Mercedes-Benz Light Truck Center.
Page 1078 of 4133

274 Practical hintsFlat tire
�Flat tireMounting the spare wheel Preparing the vehicle
�
Park the vehicle as far as possible from
moving traffic on a hard surface.
�
Turn on the hazard warning flashers.
�
Engage the steering wheel lock in the
straight ahead position and set the
parking brake.
�
Move the gear selector lever toP.
�
Have any passenger exit the vehicle at
a safe distance from the roadway.
�
Take the spare wheel out of its carrier
(�page 259).Lifting the vehicle
�
Prevent the vehicle from rolling away
by blocking wheels with wheel chocks
(not included) or other sizable objects.
When changing wheel on a level surface:
�
Place one chock in front of and one be-
hind the wheel that is diagonally oppo-
site to the wheel being changed.
When changing wheel on a hill:
�
Place chocks on the downhill side
blocking both wheels of the other axle.
�
Take the two-piece wheel wrench and
the jack out of the rear compartment
area (
�page 257). Assemble wheel
wrench.
Warning!
G
The dimensions of the spare wheel are dif-
ferent from those of the road wheels. As a
result, the vehicle handling characteristics
change when driving with a mounted spare
wheel. Adapt your driving style accordingly.
The spare wheel is for temporary use only.
When driving with spare wheel mounted, en-
sure proper tire pressure and do not exceed
vehicle speed of 50 mph (80 km / h).
Drive to the nearest Mercedes-Benz Light
Truck Center as soon as possible to have the
spare wheel replaced with a regular road
wheel.
Never operate the vehicle with more than
one spare wheel mounted.
Page 1082 of 4133

278 Practical hintsBattery
�BatteryThe battery is located on the passenger
side of the engine compartment.
1Negative terminal
2Positive terminal
Warning!
G
Failure to follow these instructions can re-
sult in severe injury or death.
Observe all safety instructions and precau-
tions when handling automotive batteries
(�page 223).
Never lean over batteries while connecting,
you might get injured.
Battery fluid contains sulfuric acid. Do not
allow this fluid to come in contact with eyes,
skin or clothing. In case it does, immediately
flush affected area with water and seek
medical help if necessary.
A battery will also produce hydrogen gas,
which is flammable and explosive. Keep
flames or sparks away from battery, avoid
improper connection of jumper cables,
smoking etc.
!Never loosen or detach battery termi-
nal clamps while the engine is running
or the key is in the steering lock. Other-
wise the alternator and other electronic
components could be severely dam-
aged.
Have the battery checked regularly by
an authorized Mercedes-Benz Light
Truck Center.
Refer to Service Booklet for mainte-
nance intervals or contact your autho-
rized Mercedes-Benz Light Truck
Center for further information.Warning!
G
Do not place metal objects on the battery as
this could result in a short circuit.
Use leak-proof battery only to avoid the risk
of acid burns in the event of an accident.
Page 1083 of 4133

279 Practical hints
Battery
Disconnecting the battery�
Depress parking brake firmly or move
gear selector lever to positionP.
�
Turn off all electrical consumers.
�
Remove key from the steering lock.
�
Open the hood (
�page 217).
�
Disconnect the battery negative lead.
�
Remove the cover from the positive ter-
minal.
�
Disconnect the battery positive lead.
Removing the batteries�
Remove the screw securing the bat-
tery.
�
Remove the battery support and brack-
et. Take out the battery.
Charging and reinstalling batteries�
Charge battery in accordance with the
instructions of the battery charger
manufacturer.
�
Reinstall the charged battery. Follow
the previously described steps in re-
verse order.
Reconnecting the batteries�
Turn off all electrical consumers.
�
Connect the positive lead and fasten its
cover.
�
Connect the negative lead.
Warning!
G
With a disconnected battery�
you will no longer be able to turn the key
in the steering lock
�
the gear selector lever will remain
locked in positionP
Warning!
G
Never charge a battery while still installed in
the vehicle. Gases may escape during charg-
ing and cause explosions that may result in
paint damage, corrosion or personal injury.
!Never invert the terminal connections!!The battery, its filler caps and the vent
tube must always be securely installed
when the vehicle is in operation.
Page 1087 of 4133

283 Practical hints
Towing the vehicle
�Towing the vehicle
Mercedes-Benz recommends that the vehi-
cle be transported with all wheels off the
ground using flatbed or appropriate wheel
lift / dolly equipment. This method is pref-
erable to other types of towing.When circumstances do not permit the
recommended towing methods, the vehi-
cle may be towed with all wheels on the
ground only so far as necessary to have the
vehicle moved to a safe location where the
recommended towing methods can be em-
ployed.
!Use flatbed or wheel lift / dolly equip-
ment, with key in steering lock turned
to position0.
Do not tow with sling-type equipment.
Towing with sling-type equipment over
bumpy roads will damage radiator and
supports.
To prevent damage during transport,
do not tie down vehicle by its chassis or
suspension parts. Use the towing eyes.
Switch off the ESP (
�page 81),
tow-away alarm (
�page 85) and the
automatic central locking (
�page 93).
!When towing the vehicle with all wheels
on the ground, the gear selector lever
must be in positionN and the key must
be in steering lock position2.
When towing the vehicle with all wheels
on the ground, the vehicle may be
towed only for distances up to 30 miles
(50 km) and at a speed not to exceed
30 mph (50 km / h).
If the vehicle is towed with the front
axle raised (observe instructions re-
garding flexible drive shaft), the engine
must be shut off (key in steering lock
position1). Otherwise, the 4-ETS may
become engaged which may cause loss
of towing control.
!To be certain to avoid additional dam-
age to the vehicle powertrain, however
you should observe the following:�
With damage to the front axle�
raise front axle
�
remove flexible drive shaft be-
tween rear axle and transfer
case
�
With damage to the rear axle�
raise rear axle
�
tow vehicle with wheel lift or
dolly placed under front wheels
�
With damage to the transfer case�
remove flexible drive shaft to
the drive axles
Always install new self-locking nuts
when reinstalling flexible drive shaft.