Page 913 of 4133

109 Controls in detail
Lighting
Daytime running lamp mode
Canada only:�
Turn combination switch to
positionM orU.
When the engine is running, the low beam
headlamps are automatically switched on.
In low ambient light conditions, the parking
lamps will also switch on.
When you shift from a driving position to
positionN orP, the low beam switches off
(three minutes delay).
For nighttime driving you should turn the
combination switch to positionõ to
permit activation of the high beam head-
lamps.Night security illumination
When you turn off the engine and the last
door has been closed, the following lamps
will remain lit:
�
Parking lamps
�
Tail lamps
�
License plate lamps
�
Front fog lamps
The combination switch must be set to
positionU (
�page 107).Deactivating night security illumination
temporarily
�
Before leaving the vehicle, turn the key
in the steering lock to position0
(�page 33) then turn it to position2
and back to0.
The night security illumination is deac-
tivated. It will reactivate as soon as you
start the engine.
Setting illumination time
1Switch for fog lamps
iThe high beam flasher is always avail-
able.
iYou can reactivate this function within
ten minutes by opening a door or the
liftgate.
If you do not open a door or the liftgate
after turning off the engine, the lamps
will automatically switch off after
60 seconds.
Page 916 of 4133
112 Controls in detailLightingHazard warning flasher
The hazard warning flasher can be activa-
ted with the ignition switched on or off. It
is activated automatically when an airbag
is deployed.
The switch is located on top of the steering
column.Hazard warning flasher switch
Switching on hazard warning flasher�
Press the hazard warning flasher
switch.
All the turn signals will flash.
Switching off hazard warning flasher
�
Press hazard warning flasher switch
again.
Interior lighting
The controls are located in the overhead
control panel.
1Left front interior lamp lens
2Right front interior lamp lens
3Automatic function off
4Automatic function on
5Rear interior lighting
iIf the hazard warning flasher was acti-
vated automatically, press the hazard
warning flasher switch twice to deacti-
vate.
Page 917 of 4133
 are switched on in dark-")
113 Controls in detail
Lighting
Automatic control
Activating automatic control�
Bring the rocker switch to center
position4.
Interior lamps (except cargo compart-
ment lamp) are switched on in dark-
ness, when you�
unlock the vehicle
�
open a door
�
remove the key from the steering
lock
In addition, the entry / exit lamps in the
door trays will come on when you open
a door.
When all doors are closed and no key is
inserted in the steering lock, the interi-
or lamps are switched off after a brief
delay.Deactivating automatic control
�
Press lower part3 of rocker switch.
The interior lighting and the entry / exit
lamps remain switched off in darkness,
even when you�
unlock the vehicle
�
open a door
�
remove the key from the steering
lockManual control
Switching on front interior lamps
�
Press on lamp lens1 or2.
The respective lamp switches on.
Switching off front interior lamps
�
Press on lamp lens1 or2 again.
The respective lamp switches off.
Operating rear interior lighting with
rocker switch
�
Press on upper part5 of rocker
switch.
The rear interior lighting goes on.
iIf the door remains open, the interior
lamps (except cargo compartment
lamp) switch off automatically after ap-
proximately 30 minutes.
iIf a lamp is switched on manually, it will
not go out automatically. This could
cause the battery to become dis-
charged.
��
Page 920 of 4133
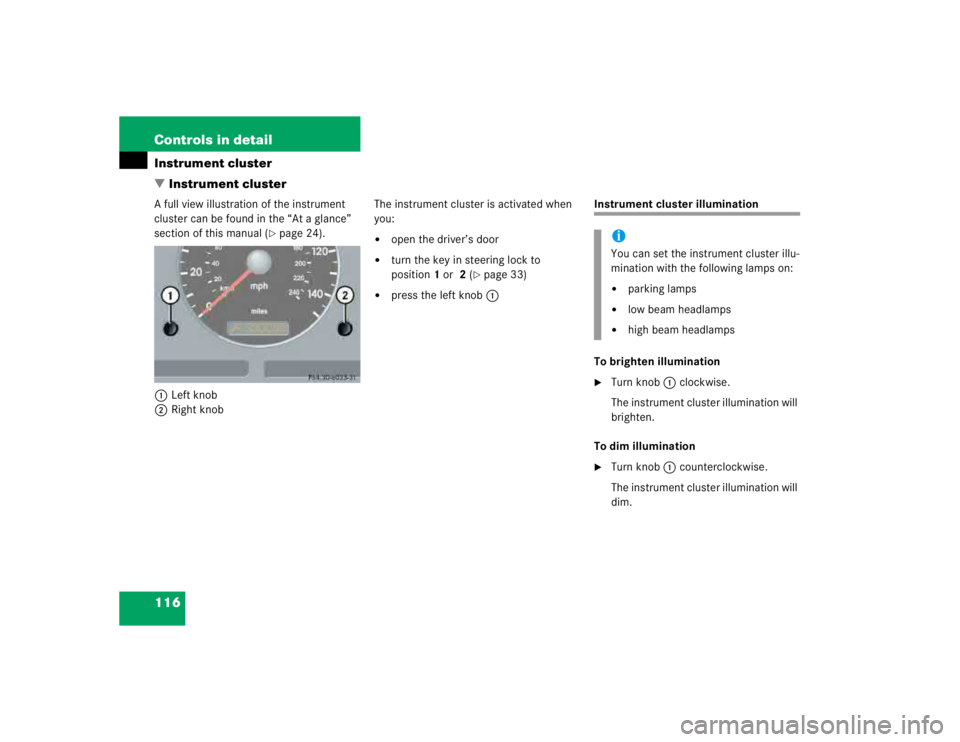
116 Controls in detailInstrument cluster
�Instrument clusterA full view illustration of the instrument
cluster can be found in the “At a glance”
section of this manual (
�page 24).
1Left knob
2Right knobThe instrument cluster is activated when
you:
�
open the driver’s door
�
turn the key in steering lock to
position1 or 2 (
�page 33)
�
press the left knob1
Instrument cluster illumination
To brighten illumination�
Turn knob1 clockwise.
The instrument cluster illumination will
brighten.
To dim illumination
�
Turn knob1 counterclockwise.
The instrument cluster illumination will
dim.iYou can set the instrument cluster illu-
mination with the following lamps on:�
parking lamps
�
low beam headlamps
�
high beam headlamps
Page 926 of 4133

122 Controls in detailAutomatic transmissionGear selector lever position
Effect
ì
Park position
Gear selector lever position
when the vehicle is parked. Place
gear selector lever in positionP
only when vehicle is stopped.
The park position is not intended
to serve as a brake when the
vehicle is parked. Rather, the
driver should always set the
parking brake in addition to
placing the gear selector lever in
positionP to secure the vehicle.
EffectThe key can only be removed
from the steering lock with the
gear selector lever in positionP.
With the key removed, the gear
selector lever is locked in
positionP.
If the vehicle’s electrical system
is malfunctioning, the gear
selector lever could remain
locked in positionP
(�page 264).
í
Reverse gear
Place gear selector lever in
positionR only when vehicle is
stopped.
Effect
ë
Neutral
No power is transmitted from the
engine to the drive axle. When
the brakes are released, the
vehicle can be moved freely
(pushed or towed).
To avoid damage to the trans-
mission, never engageN while
driving.
If the ESP is deactivated or
malfunctioning:
Move gear selector lever toN
only if the vehicle is in danger of
skidding, e.g. on icy roads.
ê
Drive
The transmission shifts
automatically. All five forward
gears are available.
Page 927 of 4133

123 Controls in detail
Automatic transmission
Accelerator position
Your driving style influences the
transmission’s shifting behavior:
Less throttle Earlier upshifting
More throttle Later upshifting
Kickdown
Use kickdown when you want maximum
acceleration.�
Press the accelerator past the point of
resistance.
The transmission shifts into a lower
gear.
�
Ease on the accelerator when you have
reached the desired speed.
The transmission shifts up again.
!Coasting the vehicle, or driving for any
other reason with gear selector lever
inN can result in transmission damage
that is not covered by the
Mercedes-Benz Limited Warranty.Warning!
G
Getting out of your vehicle with the gear
selector lever not fully engaged in positionP
is dangerous. Also, positionP alone is not
intended to or capable of preventing your
vehicle from moving, possibly hitting people
or objects.
Always set the parking brake in addition to
shifting to positionP (
�page 53).
When parked on an incline, turn the front
wheels towards the road curb.
Warning!
G
Do not park this vehicle in areas where com-
bustible materials such as grass, hay or
leaves can come into contact with the hot
exhaust system, as these materials could be
ignited and cause a vehicle fire.Warning!
G
When leaving the vehicle, always remove the
key from the steering lock, take it with you
and lock the vehicle. Do not leave children
unattended in the vehicle, or with access to
an unlocked vehicle. Children could move
the gear selector lever from positionP,
which could result in an accident and / or
serious personal injury.
Page 929 of 4133

125 Controls in detail
Transmission control – LOW RANGE mode
�Transmission control – LOW RANGE mode
In the following situations you should
switch to LOW RANGE mode:�
during off-road driving
�
when crossing water
�
when towing up or down on steep
gradients
Switching on LOW RANGE modeLOW RANGE mode switch�
Stop the vehicle.
�
Move the gear selector lever to
positionN.
�
Press on the upper part of the switch.
During the changeover the indicator
lamp (
�page 25) flashes three times.
Once the changeover is complete, the
indicator lamp comes on continuously.
Switching off LOW RANGE mode�
Stop the vehicle.
�
Move the gear selector lever to
positionN.
�
Press on the upper part of the switch.
During the changeover the indicator
lamp (
�page 25) flashes three times.
Once the changeover is complete, the
indicator lamp goes out.
For information on driving safety systems
during LOW RANGE mode see the “Safety
and Security” section (
�page 76).
!Only switch the LOW RANGE mode on
or off, when the vehicle is�
at a complete standstill
�
the engine speed is less than
1500 rpm
Failure to do so may result in transmis-
sion or engine damage which is not
covered by the Mercedes-Benz Limited
Warranty.
!You should only operate the vehicle on
a single axle dynamometer for briefly
testing the brakes.
The key must be in steering lock
position1 (
�page 33).
Page 933 of 4133
.
The mirrors fold in.Folding out
�
Briefly press button2.
The mirrors fold out.
Windshield wipers
Information on t")
129 Controls in detail
Good visibility
Folding in�
Briefly press button1 (
�page 127).
The mirrors fold in.Folding out
�
Briefly press button2.
The mirrors fold out.
Windshield wipers
Information on the windshield wipers is
found in the “Getting started” section
(�page 49).
!Before you drive the vehicle through an
automatic car wash, fold the exterior
mirrors in, otherwise they may get
damaged.iIf you are driving at more than approxi-
mately 9 mph (15 km / h), you will not
able to fold the exterior mirrors in.
!If an exterior rear view mirror housing
is forcibly pushed forward (hit from the
rear), reposition it manually by applying
firm pressure until it snaps back into
place.
If an exterior rear view mirror is forcibly
pushed rearward (hit from the front)
press button1 to fold mirrors in, then
press button2 to fold mirrors out. Do
not force mirrors by hand as this may
damage the adjustment mechanism.
The mirror housing is now properly po-
sitioned and you can adjust the mirror
normally.
!If leaves, snow, etc. block the wind-
shield wipers, the wiper motor turns
off.�
For safety reasons, withdraw key
from steering lock. Remove block-
age.
�
Turn the windshield wipers on
again.
If windshield wipers fail to function at
all in switch position1,
�
set the wiper switch to the next
highest wiper speed.
�
have the windshield wipers
checked at the nearest authorized
Mercedes-Benz Light Truck Center.