Page 78 of 241
Heating and Cooling
To Cool with A/C
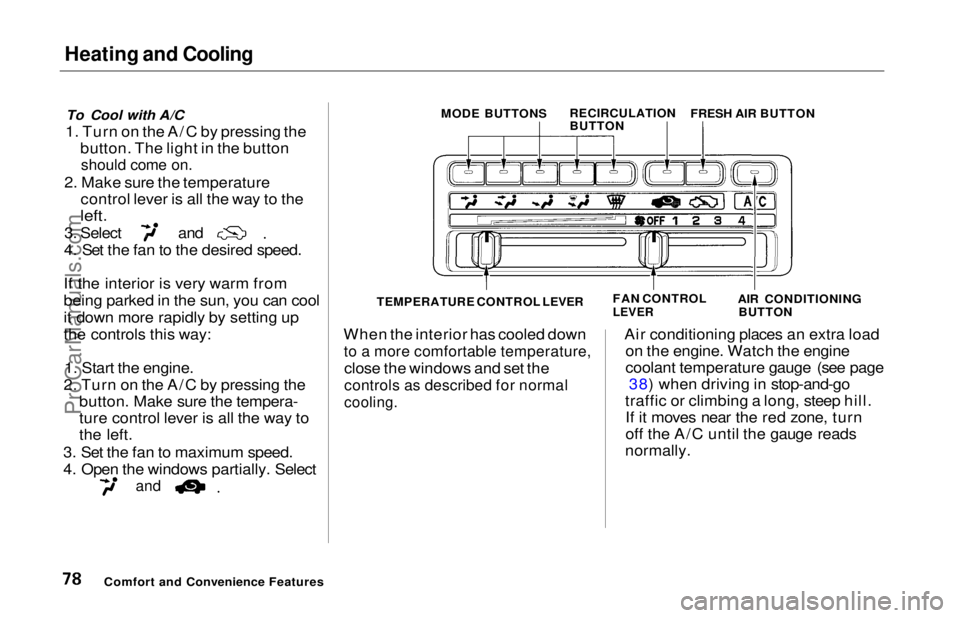
1. Turn on the A/C by pressing the button. The light in the button
should come on.
2. Make sure the temperature control lever is all the way to the
left.
3. Select and
4. Set the fan to the desired speed.
If the interior is very warm from
being parked in the sun, you can cool
it down more rapidly by setting up
the controls this way: 1. Start the engine.
2. Turn on the A/C by pressing the button. Make sure the tempera-
ture control lever is all the way to
the left.
3. Set the fan to maximum speed.
4. Open the windows partially. Select
and
When the interior has cooled down
to a more comfortable temperature,
close the windows and set the
controls as described for normal
cooling.
Air conditioning places an extra load
on the engine. Watch the engine
coolant temperature gauge (see page 38) when driving in stop-and-go
traffic or climbing a long, steep hill. If it moves near the red zone, turn
off the A/C until the gauge reads
normally.
Comfort and Convenience Features MODE BUTTONS
RECIRCULATION
BUTTONFRESH AIR BUTTON
AIR CONDITIONINGBUTTON
FAN CONTROL
LEVER
TEMPERATURE CONTROL LEVERProCarManuals.comMain Menu Table of Contents s t
Page 86 of 241
Audio System
Adjusting the Sound
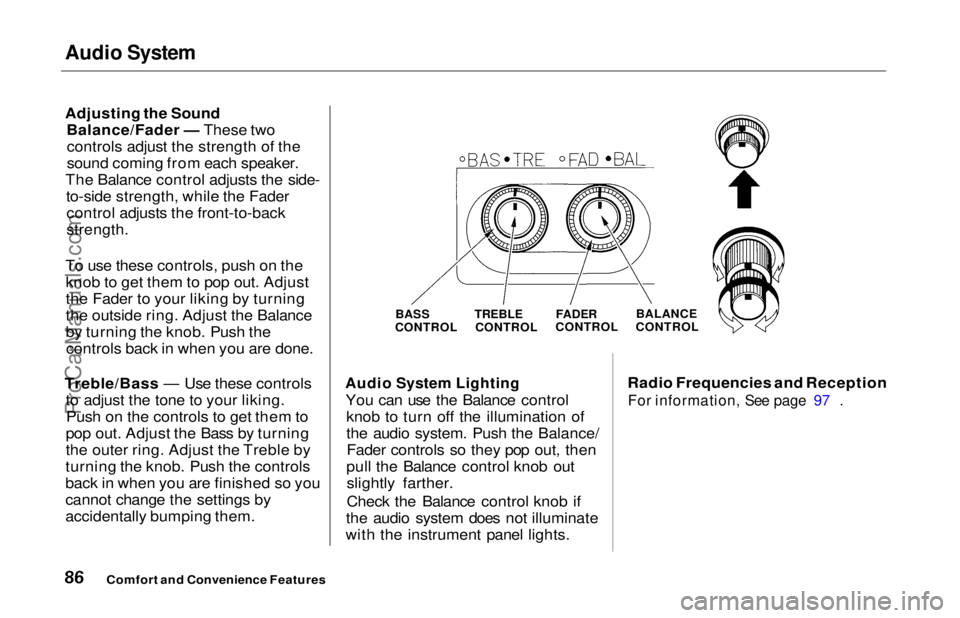
Balance/Fader — These twocontrols adjust the strength of the
sound coming from each speaker.
The Balance control adjusts the side- to-side strength, while the Fadercontrol adjusts the front-to-back
strength.
To use these controls, push on the knob to get them to pop out. Adjust
the Fader to your liking by turning
the outside ring. Adjust the Balance
by turning the knob. Push thecontrols back in when you are done.
Treble/Bass — Use these controls to adjust the tone to your liking.Push on the controls to get them to
pop out. Adjust the Bass by turning
the outer ring. Adjust the Treble by
turning the knob. Push the controls
back in when you are finished so you
cannot change the settings by
accidentally bumping them.
Audio System Lighting
You can use the Balance control knob to turn off the illumination of
the audio system. Push the Balance/Fader controls so they pop out, then
pull the Balance control knob out slightly farther.
Check the Balance control knob if
the audio system does not illuminate
with the instrument panel lights. Radio Frequencies and Reception
For information, See page 97 .
Comfort and Convenience Features
BASS
CONTROL TREBLE
CONTROL
FADER
CONTROL
BALANCE
CONTROLProCarManuals.comMain Menu Table of Contents s t
Page 87 of 241
Audio System
Operating the Cassette Player
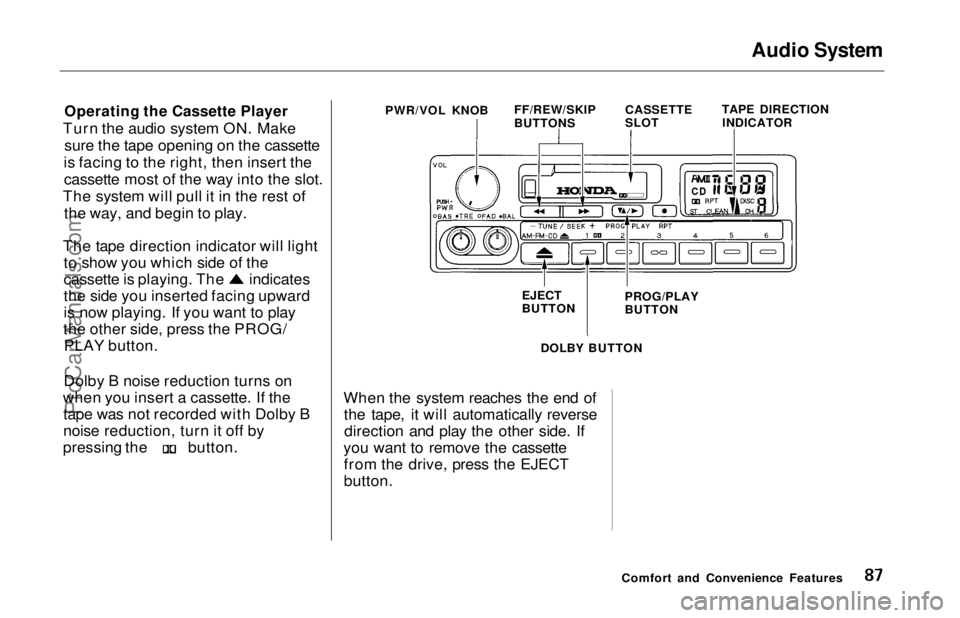
Turn the audio system ON. Make sure the tape opening on the cassette
is facing to the right, then insert the cassette most of the way into the slot.
The system will pull it in the rest of the way, and begin to play.
The tape direction indicator will light to show you which side of the cassette is playing. The indicates
the side you inserted facing upward
is now playing. If you want to play
the other side, press the PROG/ PLAY button.
Dolby B noise reduction turns on
when you insert a cassette. If the tape was not recorded with Dolby B
noise reduction, turn it off by pressing the button.
When the system reaches the end of
the tape, it will automatically reversedirection and play the other side. If
you want to remove the cassette from the drive, press the EJECT
button.
Comfort and Convenience Features
PWR/VOL KNOB
FF/REW/SKIP
BUTTONSCASSETTE
SLOTTAPE DIRECTION
INDICATOR
EJECT
BUTTON PROG/PLAY
BUTTON
DOLBY BUTTONProCarManuals.comMain Menu Table of Contents s t
Page 94 of 241
Audio System
To store a frequency:
1. Select the desired band, AM or FM. FM1 and FM2 let you store
two frequencies with each Preset
button.
2. Use the TUNE or SEEK function to tune the radio to a desired
station.
3. Pick the Preset button you want for that station. Press the buttonand hold it until you hear a beep.
4. Repeat steps 1 to 3 to store a total of six stations on AM and twelve
on FM.
Once a station's frequency is stored,
simply press and release the proper
Preset button to tune to it.
The preset frequencies will be lost if
your vehicle's battery goes dead, is
disconnected or the radio fuse is
removed.
Comfort and Convenience Features AM BUTTON
TUNE/SEEK SWITCH
FM1/FM2
BUTTON
PRESET
BUTTONS
AUTO SELECT LIGHT
A. SEL BUTTONProCarManuals.comMain Menu Table of Contents s t
Page 95 of 241
Audio SystemAUTO SELECT — If you are
traveling far from home and can no
longer receive the stations you
preset, you can use the Auto Select
feature to find stations in the local
area.
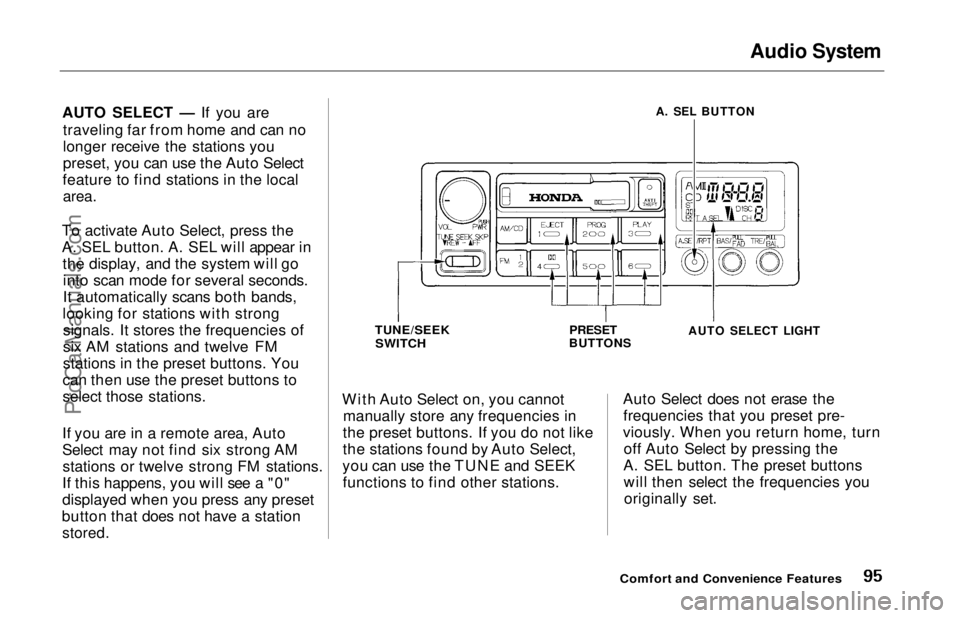
To activate Auto Select, press the
A. SEL button. A. SEL will appear in the display, and the system will gointo scan mode for several seconds.
It automatically scans both bands,
looking for stations with strong signals. It stores the frequencies of
six AM stations and twelve FM
stations in the preset buttons. You
can then use the preset buttons to
select those stations.
If you are in a remote area, Auto
Select may not find six strong AM stations or twelve strong FM stations.
If this happens, you will see a "0"
displayed when you press any preset
button that does not have a station
stored.
With Auto Select on, you cannot
manually store any frequencies in
the preset buttons. If you do not like
the stations found by Auto Select,
you can use the TUNE and SEEK functions to find other stations. Auto Select does not erase the
frequencies that you preset pre-
viously. When you return home, turn off Auto Select by pressing the
A. SEL button. The preset buttons will then select the frequencies youoriginally set.
Comfort and Convenience Features
A. SEL BUTTON
TUNE/SEEK
SWITCH
PRESET
BUTTONS
AUTO SELECT LIGHT
ProCarManuals.comMain Menu Table of Contents s t
Page 96 of 241
Audio System
Adjusting the Sound
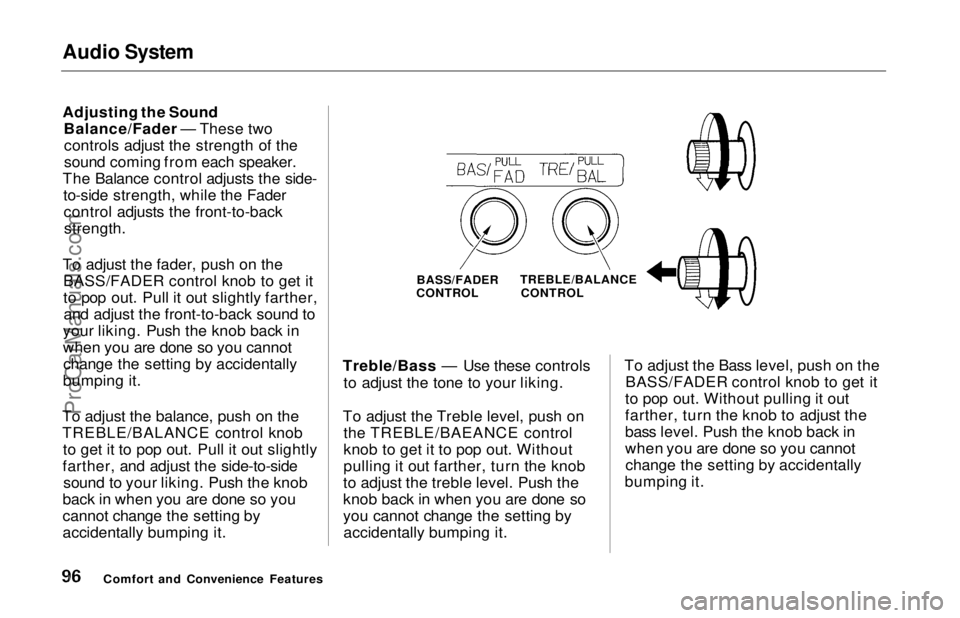
Balance/Fader — These twocontrols adjust the strength of the
sound coming from each speaker.
The Balance control adjusts the side- to-side strength, while the Fadercontrol adjusts the front-to-back
strength.
To adjust the fader, push on the BASS/FADER control knob to get it
to pop out. Pull it out slightly farther,and adjust the front-to-back sound to
your liking. Push the knob back in
when you are done so you cannot change the setting by accidentally
bumping it.
To adjust the balance, push on the
TREBLE/BALANCE control knob to get it to pop out. Pull it out slightly
farther, and adjust the side-to-side sound to your liking. Push the knob
back in when you are done so you
cannot change the setting by
accidentally bumping it. Treble/Bass — Use these controls
to adjust the tone to your liking.
To adjust the Treble level, push on the TREBLE/BAEANCE control
knob to get it to pop out. Without
pulling it out farther, turn the knob
to adjust the treble level. Push the
knob back in when you are done so
you cannot change the setting by accidentally bumping it. To adjust the Bass level, push on the
BASS/FADER control knob to get it
to pop out. Without pulling it out
farther, turn the knob to adjust the
bass level. Push the knob back in
when you are done so you cannot change the setting by accidentally
bumping it.
Comfort and Convenience Features BASS/FADER
CONTROL TREBLE/BALANCE
CONTROLProCarManuals.comMain Menu Table of Contents s t
Page 99 of 241
Audio System
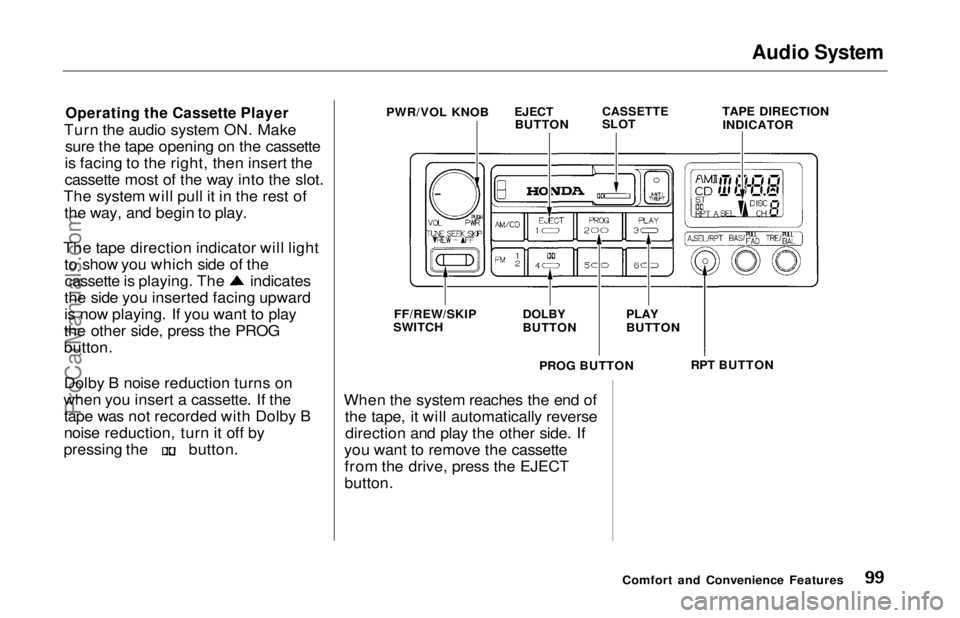
Operating the Cassette Player
Turn the audio system ON. Make sure the tape opening on the cassette
is facing to the right, then insert the
cassette most of the way into the slot.
The system will pull it in the rest of the way, and begin to play.
The tape direction indicator will light to show you which side of the cassette is playing. The indicates
the side you inserted facing upward
is now playing. If you want to play
the other side, press the PROG
button.
Dolby B noise reduction turns on
when you insert a cassette. If the tape was not recorded with Dolby B
noise reduction, turn it off by pressing the button.
When the system reaches the end of
the tape, it will automatically reversedirection and play the other side. If
you want to remove the cassette from the drive, press the EJECT
button.
Comfort and Convenience Features
PWR/VOL KNOB
EJECT
BUTTON
CASSETTE
SLOT
TAPE DIRECTION
INDICATOR
FF/REW/SKIP
SWITCH
DOLBY
BUTTON
PLAY
BUTTON
PROG BUTTON RPT BUTTONProCarManuals.comMain Menu Table of Contents s t
Page 101 of 241
Audio System
Caring for the Cassette Player
The cassette player picks up dirt and oxides from the tape. This
contamination builds up over time
and causes the sound quality to degrade. To prevent this, you should
clean the player after every 30 hours
of use.
If you do not clean the cassette
player regularly, it may eventually
become impossible to remove the contamination with a normal
cleaning kit.
Use 100-minute or shorter cassettes. Cassettes longer than that use
thinner tape that may break or jam
the drive.
Look at the cassette before you
insert it. If the tape is loose, tighten
it by turning a hub with a pencil or
your finger.
If the label is peeling off, remove it
from the cassette or it could cause
the cassette to jam in the player.
Never try to insert a warped or
damaged cassette in the player.
The player automatically ejects
cassettes that do not play properly. If
it ejects a cassette before it begins to
play, it is probably defective and should not be inserted again. You
may have a cassette suddenly stop
playing, reverse directions once or
twice and then eject. This is normally an indication the tape is wound
unevenly. It should play after the
tape is manually rewound.
When they are not in use, store cassettes in their cases to protect
them from dust and moisture. Never
place cassettes where they will be exposed to direct sunlight, high heat,
or high humidity. If a cassette is
exposed to extreme heat or cold, let
it reach a moderate temperature
before inserting it in the player.
Never try to insert foreign objects
into the cassette player.
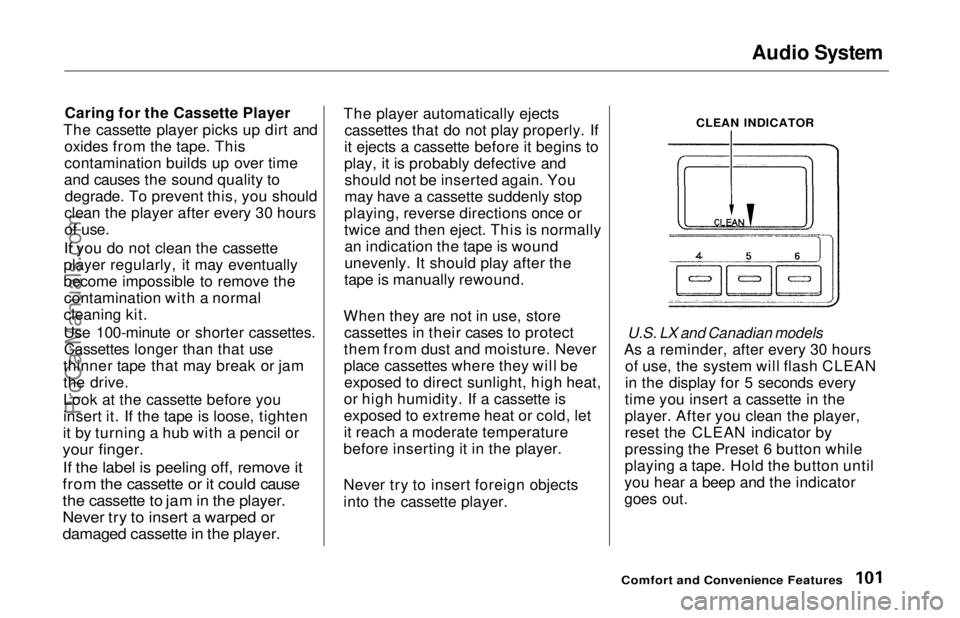
U.S. LX and Canadian models
As a reminder, after every 30 hours of use, the system will flash CLEAN
in the display for 5 seconds every
time you insert a cassette in the
player. After you clean the player,
reset the CLEAN indicator by
pressing the Preset 6 button while
playing a tape. Hold the button until
you hear a beep and the indicator
goes out.
Comfort and Convenience Features
CLEAN INDICATORProCarManuals.comMain Menu Table of Contents s t