1997 ACURA NSX brake fluid
[x] Cancel search: brake fluidPage 152 of 1503
Kickback
1. The motor operates when the ABS is functioning, and the fluid in the reservoir is forced out to the master cylinder,
causing kickback at the brake pedal.
Pump Motor
1. The pump motor operates when the ABS is functioning.
2. The ABS control unit checks the pump motor operation during initial diagnosis when the vehicle is started. You may
hear the motor operate at this time, but it is normal.
Brake Fluid Replacement/Air Bleeding
1. Brake fluid replacement and air bleeding procedures are the same as vehicles without ABS. To ease bleeding, start
with the front wheels.
Troubleshooting
1. The troubleshooting flowcharts procedures assume that the cause of the problem is still present and the ABS indicator
is still on. Following the flowchart when the ABS indicator does not come on can result in incorrect diagnosis.
2. Question the customer about the conditions when the problem occurred, and try to reproduce the same conditions
for troubleshooting.
Find out when the ABS indicator came on, such as during initial diagnosis, during ABS control, after ABS control,
when vehicle speed was at a certain speed, etc.
3. When the ABS indicator does not come on during the test-drive, but troubleshooting is performed based on the DTC,
check for loose connectors, poor contact at the terminals, etc. before you start troubleshooting.
4. After troubleshooting, erase the DTC and test-drive the vehicle. Be sure the ABS indicator does not come on.
5. The connector illustrations show the female terminals with a single outline and the male terminals with a double outline.
ABS Function Test
To simulate ABS operation and activate the solenoid valves and pump, use the Honda PGM Tester.
Connect the PGM Tester to the 16P Data Link Connector (DLC). When the System Select menu is displayed, select the ABS
Test Mode menu and follow the tester's prompts.ProCarManuals.com
Page 371 of 1503

4-2
For the details of lubrication points and types of lubricants to be appl\
ied, refer to the illustrated index and various work
procedures (such as Assembly/Reassembly, Replacement, Overhaul, Install\
ation, etc.) contained in each section.
*1: Always use Honda Manual Transmission Fluid (MTF). Using motor oil can \
cause stiffer shifting because it does not contain theproper additives.
*2: Always use Honda ATF-Z1 (ATF). Using a non-Honda ATF can affect shift \
quality.
*3: Always use Honda Heavy Duty DOT3 Brake Fluid. Using a non-Honda brake fl\
uid can cause corrosion and decrease the life of the system.
Lubrication Points
No.LUBRICATION POINTSLUBRICANT
1Honda Motor Oil: P/N 08798-9015.
Look for the API Certification seal shown below. Make sure
it says “For Gasoline Engines.”
2TransmissionHonda MTF*1(P/N 08798-9016)
3Brake system (including anti-lock brake system)Honda Heavy Duty DOT3 Brake Fluid*3(P/N 08798-9008)4Clutch line
5Change lever pivots (M/T)Super High Temp Urea Grease (P/N 08798-9002)6Release fork (M/T)
8
9
10
11
12
13
14
15
16
17
18
19
20
21Steering boots
Steering ball joints
Select lever (A/T)
Pedal linkage
Intermediate shaft
Brake master power pushrod
Fuel fill door
Clutch master cylinder pushrod
Tilt lever
Parking brake cable end
Door hinges upper and lower
Door opening detents
Hood hinges and lock
Rear hatch latch
Multipurpose grease
24
22
23
Caliper piston boot, caliper pins, and boots
Shift cable end and select cable end (A/T)
Throttle cable ends
Honda Caliper Grease (P/N 08C30-B0234M)
Silicone grease
25Air conditioning compressorCompressor oil:
DENSO: ND-OIL8 (P/N 38897-PR7-A01AH or 38899-PR7-A01)
For Refrigerant: HFC-134a (R-134a)
Manual
Honda ATF-Z1 (ATF)*2(P/N 08200-9001)Automatic
7Steering gearboxSteering grease (P/N 08733-B070E)
Engine
API CERTIFICATION SEAL
Recommended engine oil
Engine oil viscosity for
ambient temperature ranges
*05-NSX (61SW004)SEC04(01-10) 9/22/04 1:49 PM Page 4-2
ProCarManuals.com
Page 373 of 1503
4-4
7,500 miles
15,000 miles
22,500 miles
30,000 miles
37,500 miles
45,000 miles
–
52,500 miles
60,000 miles
67,500 miles
75,000 miles
82,500 miles
90,000 miles
–
97,500 miles
105,000 miles
105,000 miles
112,500 miles
120,000 miles
–
120,000 miles
127,500 miles
135,500 miles
142,500 miles
150,000 miles
–
12,000 km
24,000 km
36,000 km
48,000 km
60,000 km
72,000 km
–
84,000 km
96,000 km
108,000 km
120,000 km
132,000 km
144,000 km
–
156,000 km
168,000 km
168,000 km
180,000 km
192,000 km
–
192,000 km
204,000 km
216,000 km
228,000 km
240,000 km
–
–
1 year
–
2 years
–
3 years
3 years
–
4 years
–
5 years
–
6 years
6 years
–
–
7 years
–
8 years
9 years
10 years
–
11 years
–
12 years
12 years
Do item in A.
Do items in A and B.
Do item in A.
Do items in A, B, and C.
Do item in A.
Do items in A and B.
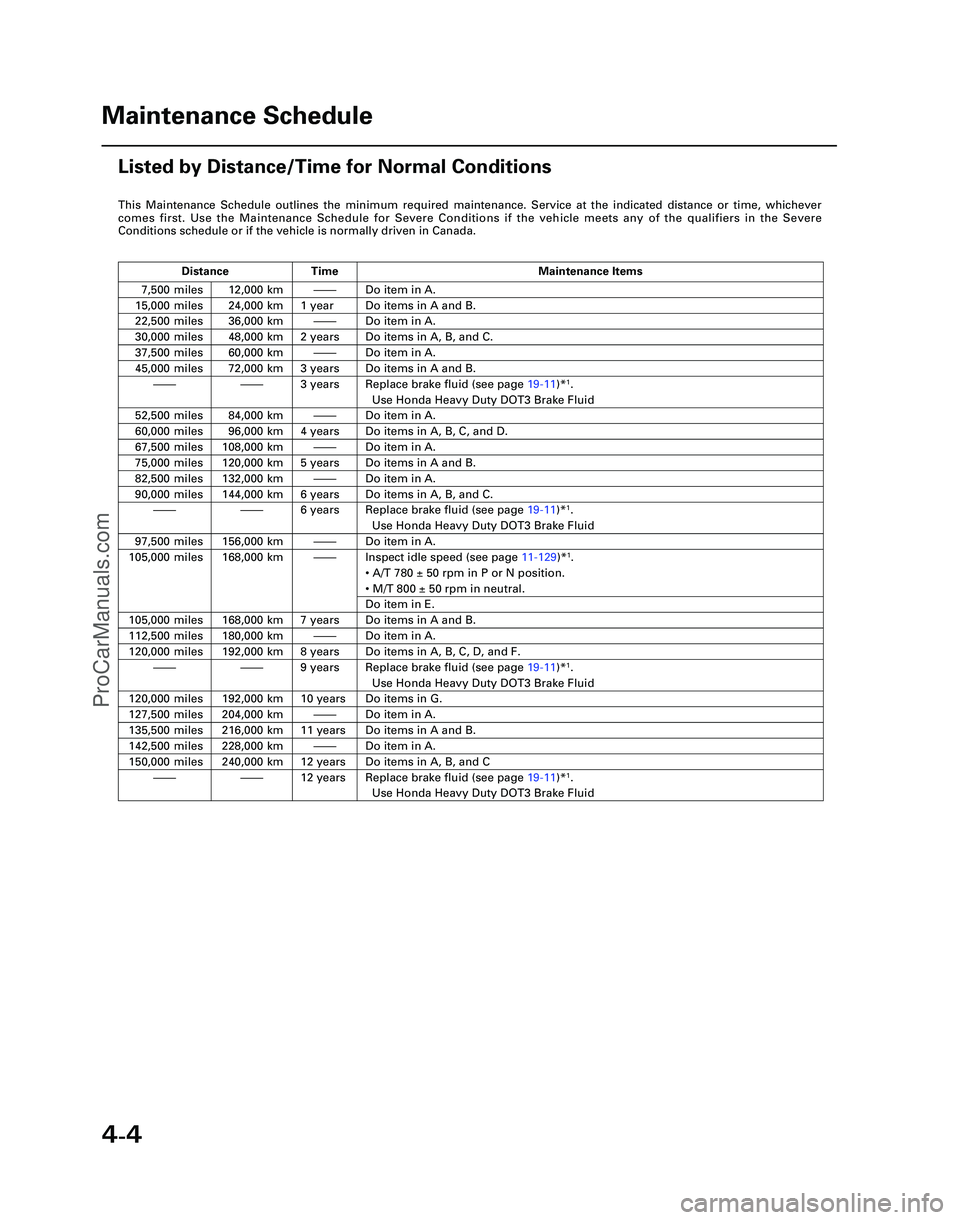
Replace brake fluid (see page 19-11)*1.
Use Honda Heavy Duty DOT3 Brake Fluid
Do item in A.
Do items in A, B, C, and D.
Do item in A.
Do items in A and B.
Do item in A.
Do items in A, B, and C.
Replace brake fluid (see page 19-11)*1.
Use Honda Heavy Duty DOT3 Brake Fluid
Do item in A.
Inspect idle speed (see page 11-129)*1.
• A/T 780 ± 50 rpm in P or N position.
• M/T 800 ± 50 rpm in neutral.
Do item in E.
Do items in A and B.
Do item in A.
Do items in A, B, C, D, and F.
Replace brake fluid (see page 19-11)*1.
Use Honda Heavy Duty DOT3 Brake Fluid
Do items in G.
Do item in A.
Do items in A and B.
Do item in A.
Do items in A, B, and C
Replace brake fluid (see page 19-11)*1.
Use Honda Heavy Duty DOT3 Brake Fluid
Distance Time Maintenance Items
This Maintenance Schedule outlines the minimum required maintenance. Ser\
vice at the indicated distance or time, whichever
comes first. Use the Maintenance Schedule for Severe Conditions if the v\
ehicle meets any of the qualifiers in the Severe
Conditions schedule or if the vehicle is normally driven in Canada.
Maintenance Schedule
Listed by Distance/Time for Normal Conditions
*05-NSX (61SW004)SEC04(01-10) 9/22/04 1:49 PM Page 4-4
ProCarManuals.com
Page 374 of 1503

4-5
Y
Do the items in parts A, B, C, D, E, F, and G as required for the mileag\
e/time interval listed.
NOTE: According to state and federal regulations, failure to do the maintenanc\
e items marked with an asterisk (*) will not
void the customer ’s emissions warranties. However, Acura recommends that all maintenance s\
ervices be done at
the recommended interval to ensure long-term reliability.
*1: Refer to the 1997 NSX Service Manual, P/N 61SL006.
*2: Refer to the 1998 NSX Service Manual Supplement, P/N 61SL007.
*3: Refer to the 2001 NSX Service Manual Supplement, P/N 61SW000.
A
B Replace engine oil (see page
8-2)*
2, every 7,500 miles (12,000 km) or 1 year.
Engine oil capacity: without oil filter: 4.3 L (4.5 US qt).
Check tire inflation and condition at least once a month, every 7,500 mi\
les (12,000 km).
Replace engine oil filter (see page 8-5)*1, every 15,000 miles (24,000 km) or 1 year.
Engine oil capacity: with oil filter: 5.0 L (5.3 US qt).
Check front and rear brake wear (see page 19-4)*1, every 15,000 miles (24,000 km) or 1 year.
• Check pads and discs for wear (thickness), damage, and cracks.
• Check calipers for damage, leaks, and tightness of mounting bolts.
Check parking brake adjustment (see page 19-5)*1, every 15,000 miles (24,000 km) or 1 year.
Check the number of clicks (10 to 14) when the parking brake lever is pulled with 196 N (20 kgf,\
44 lbf) of force.
Inspect tie-rod ends, steering gearbox, and gearbox boots (see page 17-57)*1, every 15,000 miles (24,000 km) or 1 year.
• Check rack grease and steering linkage.
• Check boots for damage and leaking grease.
• Check fluid lines for damage and leaks.1
• Check bolts for tightness.
• Check condition of ball joint boots for deterioration and damage.
Inspect driveshaft boots (see page 16-3)*1, every 15,000 miles (24,000 km) or 1 year.
Check boots for cracks and boot bands for tightness.
Inspect brake hoses and lines including ABS (see page 19-27)*1, every 15,000 miles (24,000 km) or 1 year.
Check the master cylinder, proportioning control valve and ABS modulator\
for damage and leakage.
Inspect all fluid levels and condition of fluids, every 15,000 miles (2\
4,000 km) or 1 year.
• Manual transmission fluid (MTF) (see page 13-3)*
1.
• Automatic transmission fluid (ATF-Z1) (see page 14-105)*1.
• Engine coolant (see page 10-2)*1.
• Brake fluid (see page 19-84)*1.
• Windshield washer fluid.
Cooling system hoses and connections (see page 10-2)*1, every 15,000 miles (24,000 km) or 1 year.
• Check all hoses for damage, leaks and deterioration.
• Check for proper fan operation.
Inspect exhaust system (see page 9-6)*, *1, every 15,000 miles (24,000 km) or 1 year.
Check catalytic converter heat shield, exhaust pipe, and muffler for dam\
age, leaks, and tightness ( see page 9-14 ).
Inspect fuel lines and connections (see page 11-130)*, *1, every 15,000 miles (24,000 km) or 1 year.
Check for loose connections, cracks, and deterioration; retighten loose \
connections and replace damaged parts.
Part Maintenance Items
*05-NSX (61SW004)SEC04(01-10) 9/22/04 1:49 PM Page 4-5
Inspect suspension components (see page 18-14)* , every 15,000 miles (24,000 km) or 1 year.
ProCarManuals.com
Page 982 of 1503
Inspection and Adjustment
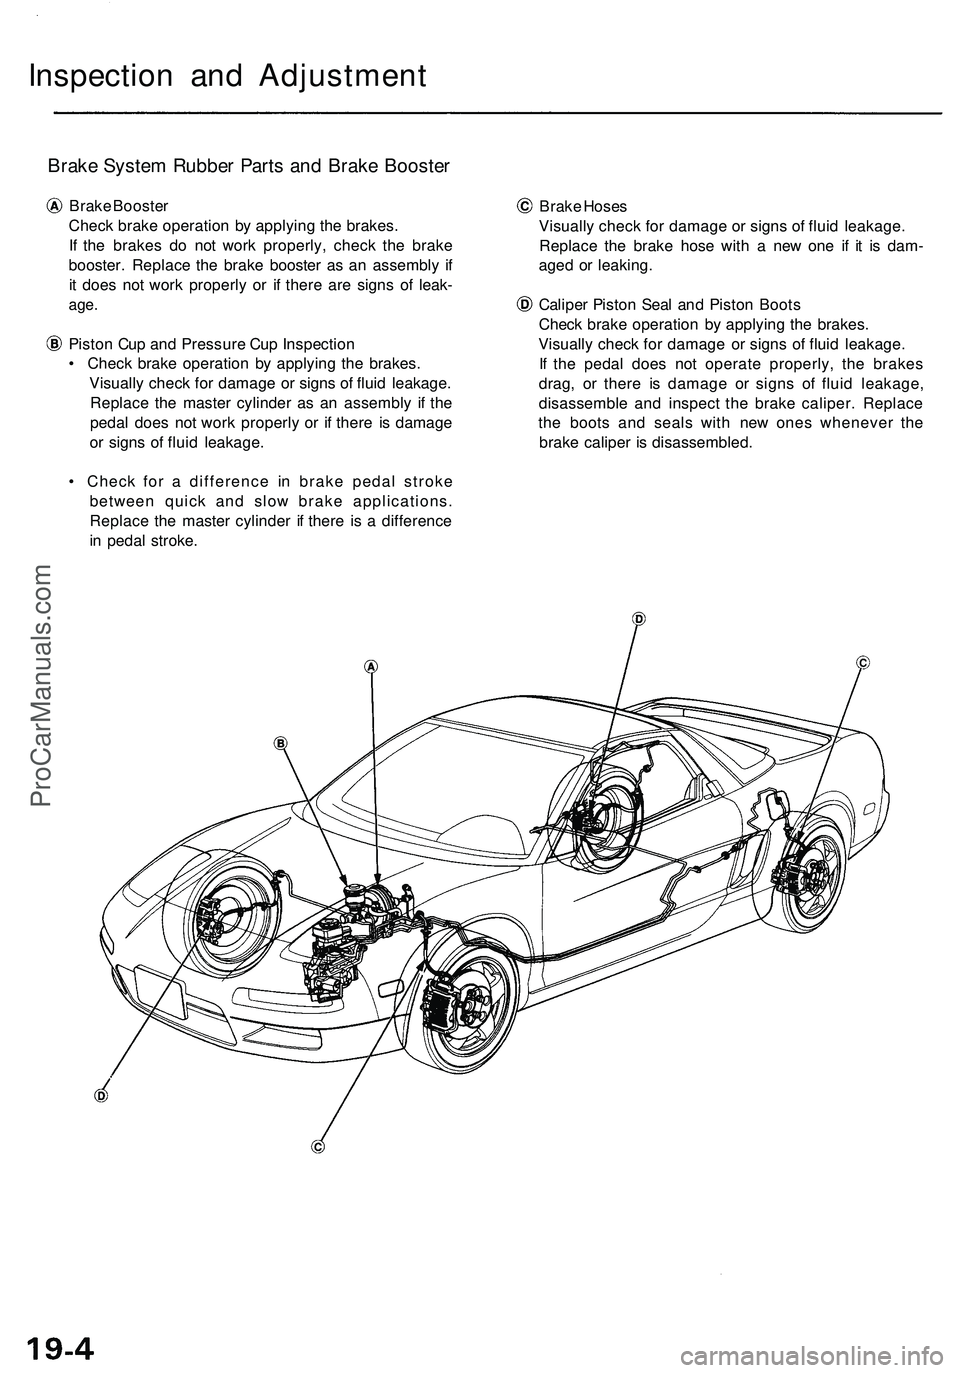
Brake System Rubber Parts and Brake Booster
Brake Booster
Check brake operation by applying the brakes.
If the brakes do not work properly, check the brake
booster. Replace the brake booster as an assembly if
it does not work properly or if there are signs of leak-
age.
Piston Cup and Pressure Cup Inspection
• Check brake operation by applying the brakes.
Visually check for damage or signs of fluid leakage.
Replace the master cylinder as an assembly if the
pedal does not work properly or if there is damage
or signs of fluid leakage.
• Check for a difference in brake pedal stroke
between quick and slow brake applications.
Replace the master cylinder if there is a difference
in pedal stroke.
Brake Hoses
Visually check for damage or signs of fluid leakage.
Replace the brake hose with a new one if it is dam-
aged or leaking.
Caliper Piston Seal and Piston Boots
Check brake operation by applying the brakes.
Visually check for damage or signs of fluid leakage.
If the pedal does not operate properly, the brakes
drag, or there is damage or signs of fluid leakage,
disassemble and inspect the brake caliper. Replace
the boots and seals with new ones whenever the
brake caliper is disassembled.ProCarManuals.com
Page 984 of 1503
Front Brakes
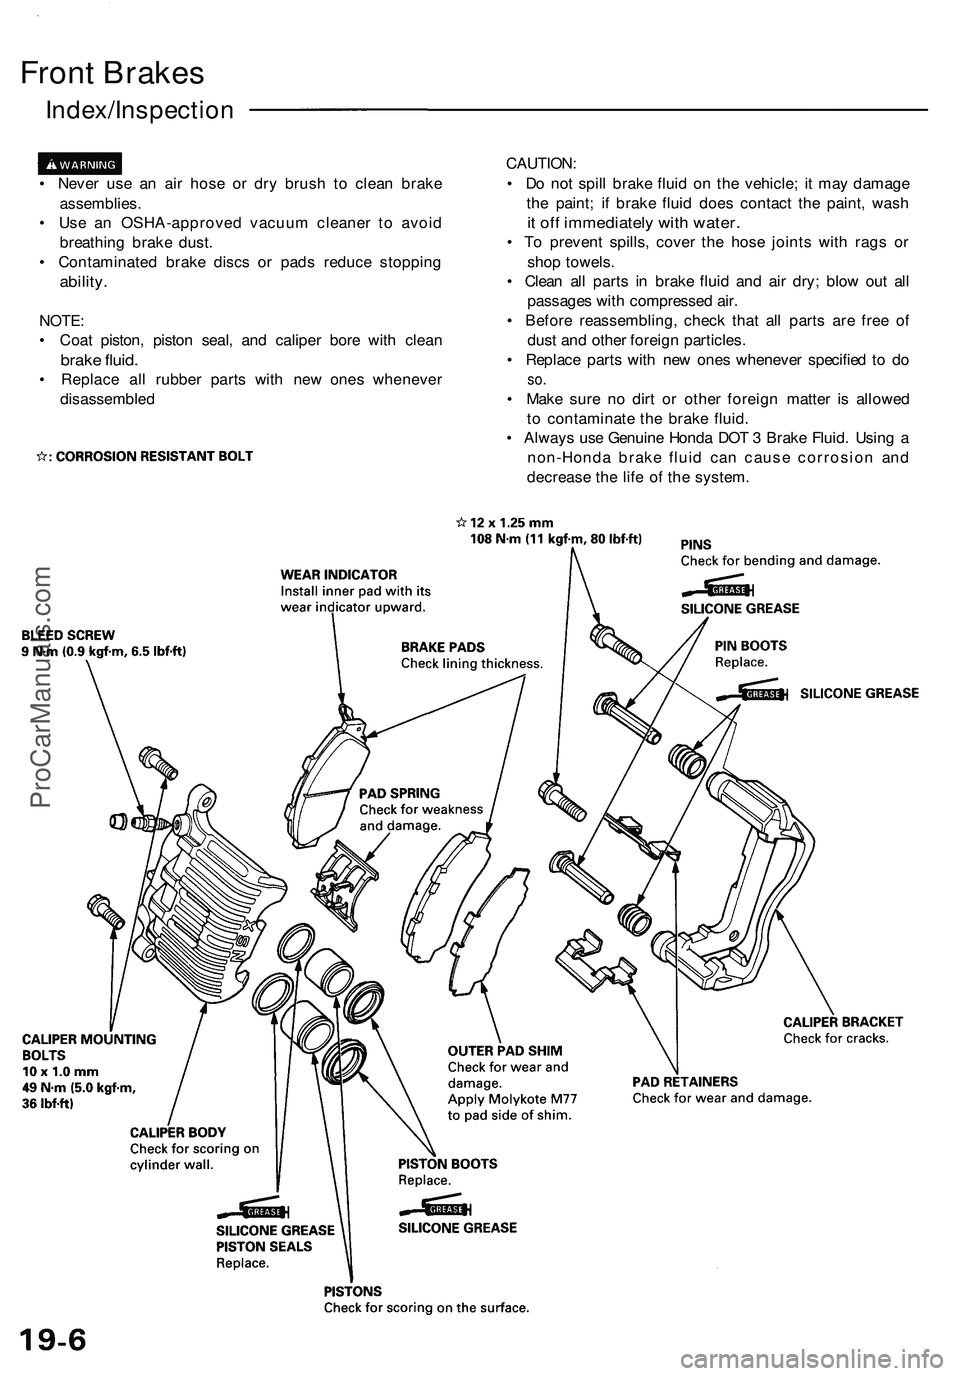
Index/Inspection
• Never use an air hose or dry brush to clean brake
assemblies.
• Use an OSHA-approved vacuum cleaner to avoid
breathing brake dust.
• Contaminated brake discs or pads reduce stopping
ability.
NOTE:
• Coat piston, piston seal, and caliper bore with clean
brake fluid.
• Replace all rubber parts with new ones whenever
disassembled
CAUTION:
• Do not spill brake fluid on the vehicle; it may damage
the paint; if brake fluid does contact the paint, wash
it off immediately with water.
• To prevent spills, cover the hose joints with rags or
shop towels.
• Clean all parts in brake fluid and air dry; blow out all
passages with compressed air.
• Before reassembling, check that all parts are free of
dust and other foreign particles.
• Replace parts with new ones whenever specified to do
so.
• Make sure no dirt or other foreign matter is allowed
to contaminate the brake fluid.
• Always use Genuine Honda DOT 3 Brake Fluid. Using a
non-Honda brake fluid can cause corrosion and
decrease the life of the system.ProCarManuals.com
Page 987 of 1503
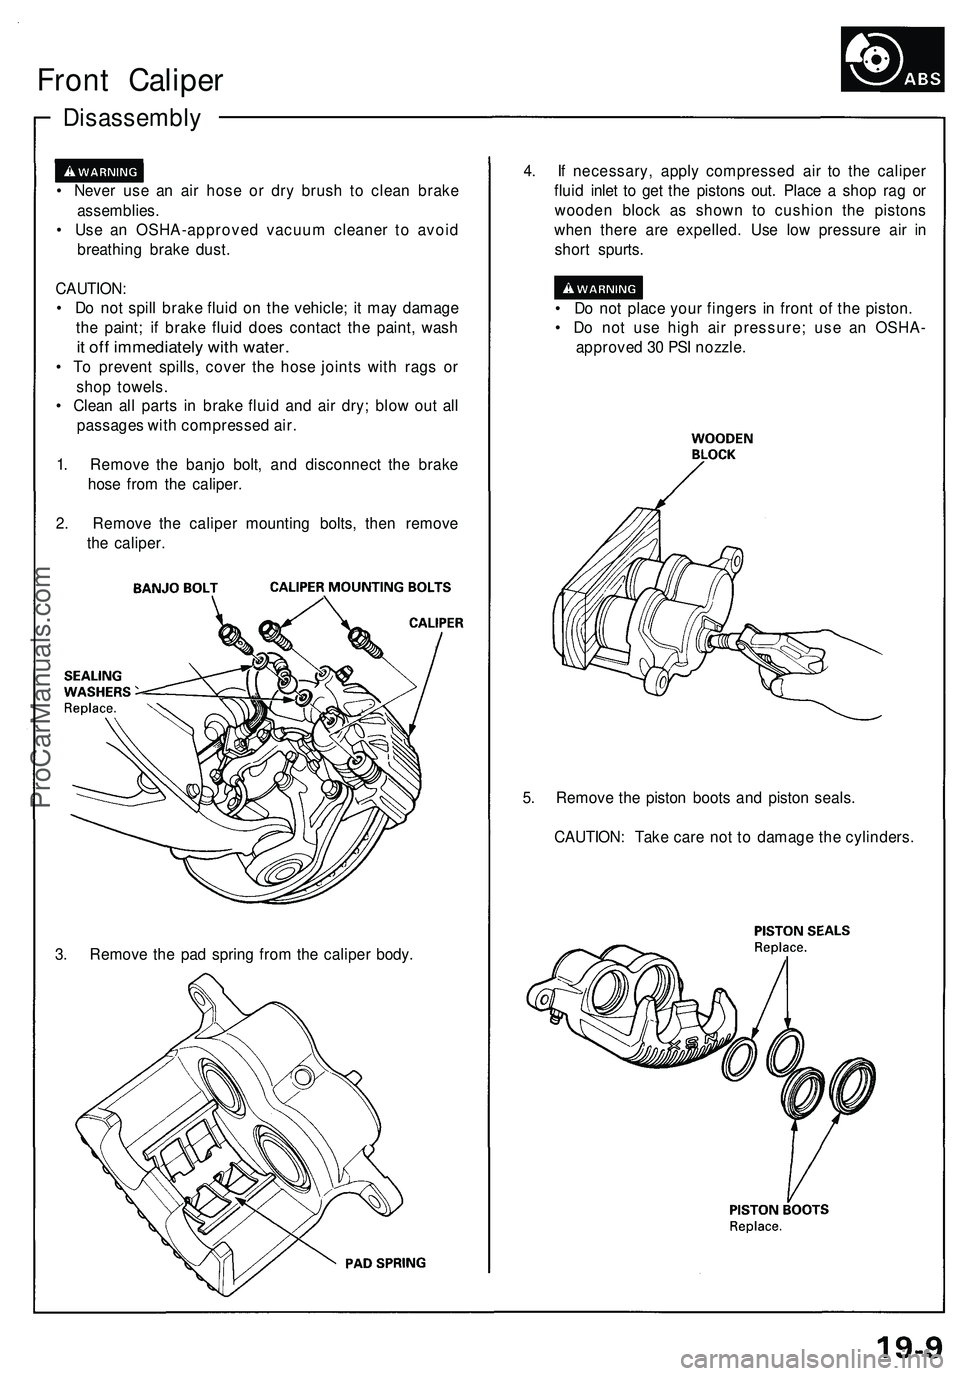
Disassembly
Front Caliper
• Never use an air hose or dry brush to clean brake
assemblies.
• Use an OSHA-approved vacuum cleaner to avoid
breathing brake dust.
CAUTION:
• Do not spill brake fluid on the vehicle; it may damage
the paint; if brake fluid does contact the paint, wash
it off immediately with water.
• To prevent spills, cover the hose joints with rags or
shop towels.
• Clean all parts in brake fluid and air dry; blow out all
passages with compressed air.
1. Remove the banjo bolt, and disconnect the brake
hose from the caliper.
2. Remove the caliper mounting bolts, then remove
the caliper.
4. If necessary, apply compressed air to the caliper
fluid inlet to get the pistons out. Place a shop rag or
wooden block as shown to cushion the pistons
when there are expelled. Use low pressure air in
short spurts.
• Do not place your fingers in front of the piston.
• Do not use high air pressure; use an OSHA-
approved 30 PSI nozzle.
3. Remove the pad spring from the caliper body.
5. Remove the piston boots and piston seals.
CAUTION: Take care not to damage the cylinders.ProCarManuals.com
Page 988 of 1503
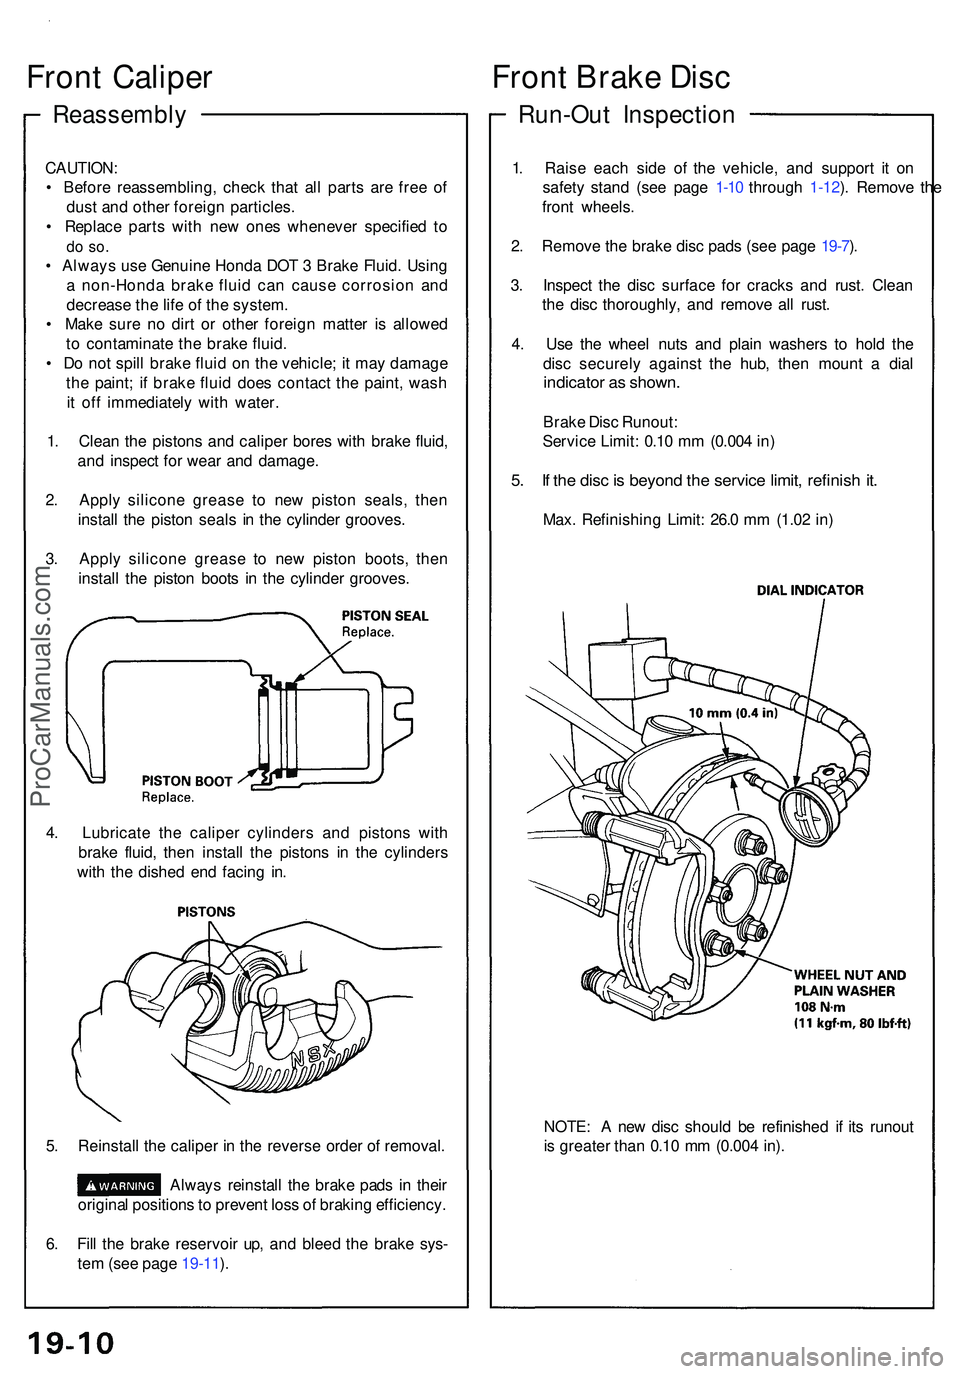
Reassembly
Front Calipe r
CAUTION :
• Befor e reassembling , chec k tha t al l part s ar e fre e o f
dus t an d othe r foreig n particles .
• Replac e part s wit h ne w one s wheneve r specifie d t o
do so .
• Alway s us e Genuin e Hond a DO T 3 Brak e Fluid . Usin g
a non-Hond a brak e flui d ca n caus e corrosio n an d
decreas e th e lif e o f th e system .
• Mak e sur e n o dir t o r othe r foreig n matte r i s allowe d
t o contaminat e th e brak e fluid .
• D o no t spil l brak e flui d o n th e vehicle ; i t ma y damag e
th e paint ; i f brak e flui d doe s contac t th e paint , was h
i t of f immediatel y wit h water .
1 . Clea n th e piston s an d calipe r bore s wit h brak e fluid ,
an d inspec t fo r wea r an d damage .
2 . Appl y silicon e greas e t o ne w pisto n seals , the n
instal l th e pisto n seal s i n th e cylinde r grooves .
3 . Appl y silicon e greas e t o ne w pisto n boots , the n
instal l th e pisto n boot s i n th e cylinde r grooves .
Run-Out Inspectio n
Front Brak e Dis c
1. Rais e eac h sid e of the vehicle , an d suppor t i t o n
safet y stan d (se e pag e 1-10 throug h 1-12 ). Remov e th e
fron t wheels .
2 . Remov e th e brak e dis c pad s (se e pag e 19-7 ).
3 . Inspec t th e dis c surfac e fo r crack s an d rust . Clean
th e dis c thoroughly , an d remov e al l rust .
4 . Us e th e whee l nut s an d plai n washer s t o hol d th e
dis c securel y agains t th e hub , the n moun t a dia l
indicato r a s shown .
Brake Dis c Runout :
Servic e Limit : 0.1 0 m m (0.00 4 in )
5. I f th e dis c is beyon d th e servic e limit , refinis h it .
Max . Refinishin g Limit : 26. 0 m m (1.0 2 in )
4 . Lubricat e th e calipe r cylinder s an d piston s wit h
brak e fluid , the n instal l th e piston s i n th e cylinder s
wit h th e dishe d en d facin g in .
5 . Reinstal l th e calipe r i n th e revers e orde r o f removal .
Always reinstal l th e brak e pad s in thei r
origina l position s to preven t los s o f brakin g efficiency .
6 . Fil l th e brak e reservoi r up , an d blee d th e brak e sys -
te m (se e pag e 19-11 ). NOTE
: A ne w dis c shoul d b e refinishe d i f it s runou t
i s greate r tha n 0.1 0 m m (0.00 4 in) .
ProCarManuals.com