Page 1457 of 2062
Downloaded from www.Manualslib.com manuals search engine PR01M−04
F14977
PR−10
− PROPELLER SHAFTPROPELLER SHAFT ASSEMBLY (4WD)
1428 Author�: Date�:
1996 TOYOTA T100 (RM449U)
PROPELLER SHAFT ASSEMBLY (4WD)
COMPONENTS
Page 1458 of 2062

Downloaded from www.Manualslib.com manuals search engine PR01N−01
R04437
Matchmarks
R04440
Matchmarks
R04441
Matchmarks
R15508Matchmarks
− PROPELLER SHAFTPROPELLER SHAFT ASSEMBLY (4WD)
PR−11
1996 TOYOTA T100 (RM449U)
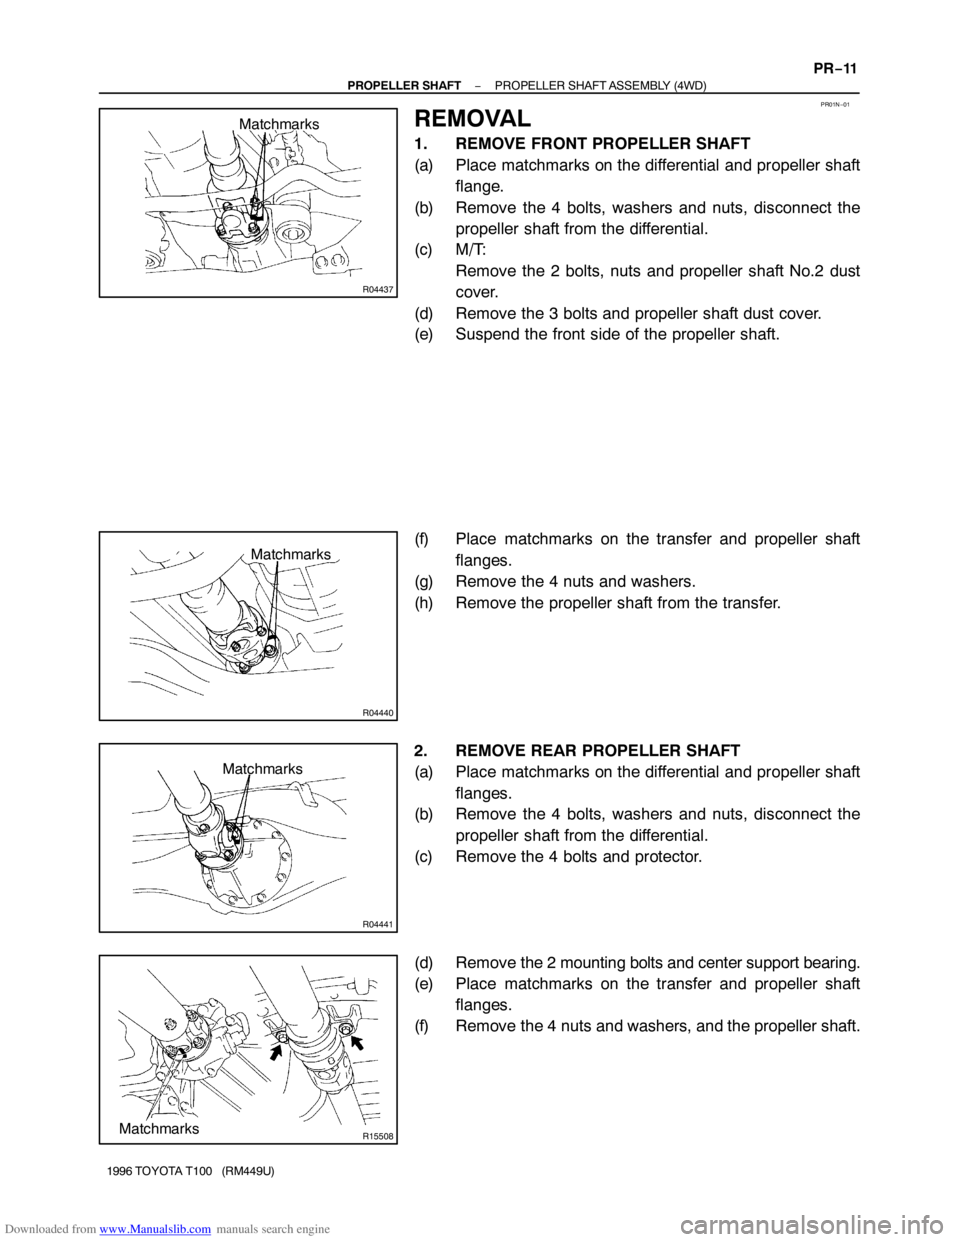
REMOVAL
1. REMOVE FRONT PROPELLER SHAFT
(a) Place matchmarks on the differential and propeller shaft
flange.
(b) Remove the 4 bolts, washers and nuts, disconnect the
propeller shaft from the differential.
(c) M/T:
Remove the 2 bolts, nuts and propeller shaft No.2 dust
cover.
(d) Remove the 3 bolts and propeller shaft dust cover.
(e) Suspend the front side of the propeller shaft.
(f) Place matchmarks on the transfer and propeller shaft
flanges.
(g) Remove the 4 nuts and washers.
(h) Remove the propeller shaft from the transfer.
2. REMOVE REAR PROPELLER SHAFT
(a) Place matchmarks on the differential and propeller shaft
flanges.
(b) Remove the 4 bolts, washers and nuts, disconnect the
propeller shaft from the differential.
(c) Remove the 4 bolts and protector.
(d) Remove the 2 mounting bolts and center support bearing.
(e) Place matchmarks on the transfer and propeller shaft
flanges.
(f) Remove the 4 nuts and washers, and the propeller shaft.
Page 1459 of 2062
Downloaded from www.Manualslib.com manuals search engine PR01O−02
R04444
Matchmarks
R04445
Matchmarks
Z04243
Matchmarks
SST
Q06613
SST PR−12
− PROPELLER SHAFTPROPELLER SHAFT ASSEMBLY (4WD)
1996 TOYOTA T100 (RM449U)
DISASSEMBLY
1. Front:
REMOVE SLEEVE YOKE FROM FRONT PROPELLER
SHAFT
(a) Place matchmarks on the sleeve yoke and propeller
shaft.
(b) Pull out the sleeve yoke from the propeller shaft.
2. Rear:
SEPARATE PROPELLER SHAFT AND INTERMEDI-
ATE SHAFT
(a) Place the matchmarks on the flanges.
(b) Remove the 4 nuts, bolts and washers.
3. REMOVE CENTER SUPPORT BEARING FROM IN-
TERMEDIATE SHAFT
(a) Using a hammer and chisel, loosen the staked part of the
nut.
(b) Using SST to hold the flange, remove the nut.
SST 09330−00021
(c) Place matchmarks on the flange and shaft.
(d) Using SST, remove the flange from the intermediate
shaft.
SST 09950−30010
(e) Remove the center support bearing from the intermediate
shaft.
Page 1460 of 2062

Downloaded from www.Manualslib.com manuals search engine PR01P−01
R04446
R04447
R04478
R04479
Double Cardan
Joint
− PROPELLER SHAFTPROPELLER SHAFT ASSEMBLY (4WD)
PR−13
1996 TOYOTA T100 (RM449U)
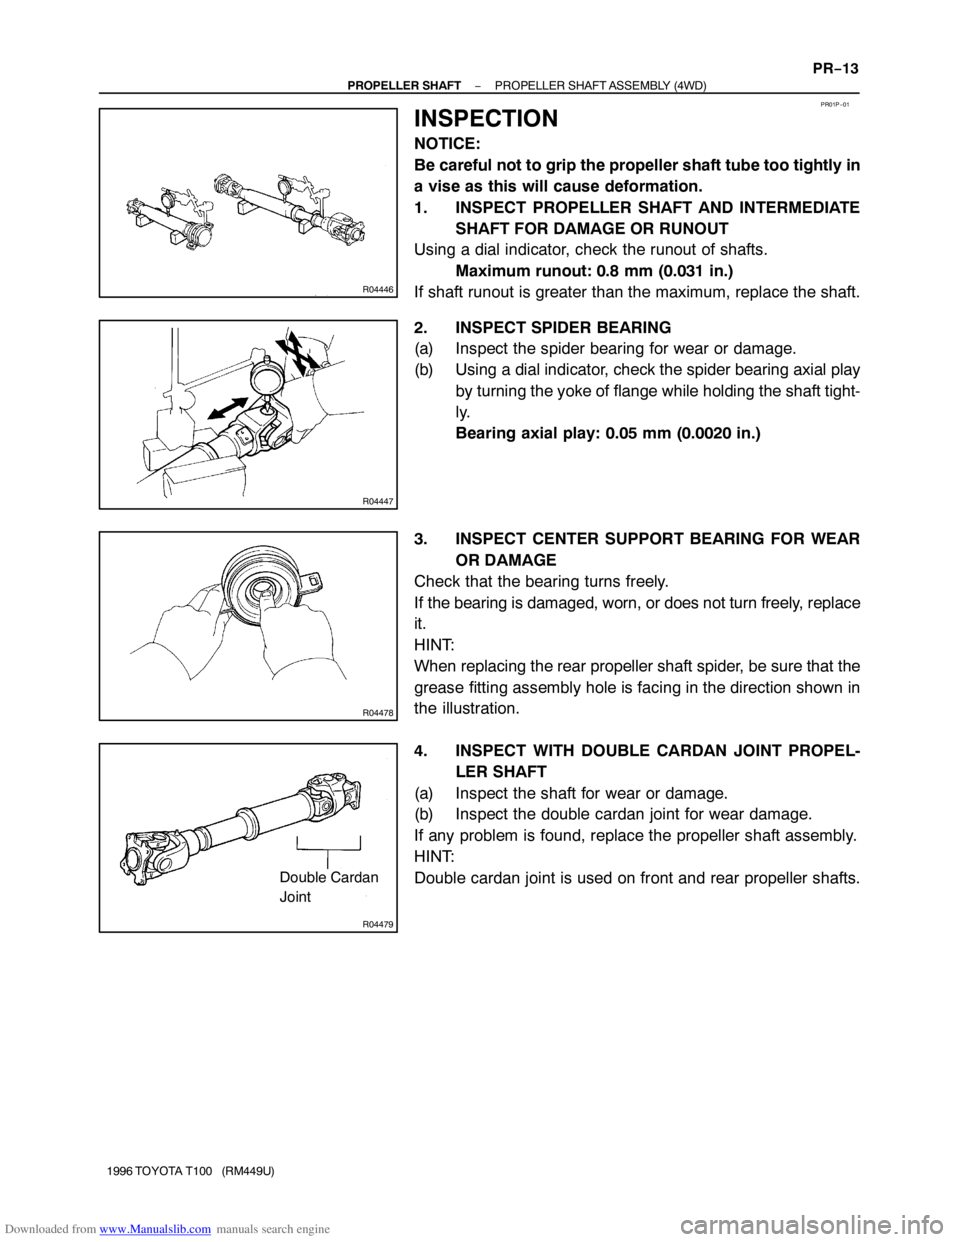
INSPECTION
NOTICE:
Be careful not to grip the propeller shaft tube too tightly in
a vise as this will cause deformation.
1. INSPECT PROPELLER SHAFT AND INTERMEDIATE
SHAFT FOR DAMAGE OR RUNOUT
Using a dial indicator, check the runout of shafts.
Maximum runout: 0.8 mm (0.031 in.)
If shaft runout is greater than the maximum, replace the shaft.
2. INSPECT SPIDER BEARING
(a) Inspect the spider bearing for wear or damage.
(b) Using a dial indicator, check the spider bearing axial play
by turning the yoke of flange while holding the shaft tight-
ly.
Bearing axial play: 0.05 mm (0.0020 in.)
3. INSPECT CENTER SUPPORT BEARING FOR WEAR
OR DAMAGE
Check that the bearing turns freely.
If the bearing is damaged, worn, or does not turn freely, replace
it.
HINT:
When replacing the rear propeller shaft spider, be sure that the
grease fitting assembly hole is facing in the direction shown in
the illustration.
4. INSPECT WITH DOUBLE CARDAN JOINT PROPEL-
LER SHAFT
(a) Inspect the shaft for wear or damage.
(b) Inspect the double cardan joint for wear damage.
If any problem is found, replace the propeller shaft assembly.
HINT:
Double cardan joint is used on front and rear propeller shafts.
Page 1461 of 2062
Downloaded from www.Manualslib.com manuals search engine Z03924
Front Propeller Shaft
Rear Propeller Shaft
PR01Q−01
PR0036
Front PR−14
− PROPELLER SHAFTPROPELLER SHAFT ASSEMBLY (4WD)
1996 TOYOTA T100 (RM449U)
REASSEMBLY
HINT:
When removing or installing any part, make sure that each joint
is facing to the correct direction, as shown in the illustration be-
low.
1. Frsont:
INSERT SLEEVE YOKE INTO FRONT PROPELLER
SHAFT
(a) Apply MP grease to the propeller shaft spline and sleeve
yoke sliding surface.
(b) Align the matchmarks on the sleeve yoke and propeller
shaft.
(c) Insert the sleeve yoke into the propeller shaft.
2. Rear:
INSTALL CENTER SUPPORT BEARING ON INTER-
MEDIATE SHAFT
HINT:
Install the center support bearing in the direction, as shown.
Page 1462 of 2062

Downloaded from www.Manualslib.com manuals search engine PR0011
Matchmarks
PR0034
SST
− PROPELLER SHAFTPROPELLER SHAFT ASSEMBLY (4WD)
PR−15
1996 TOYOTA T100 (RM449U)
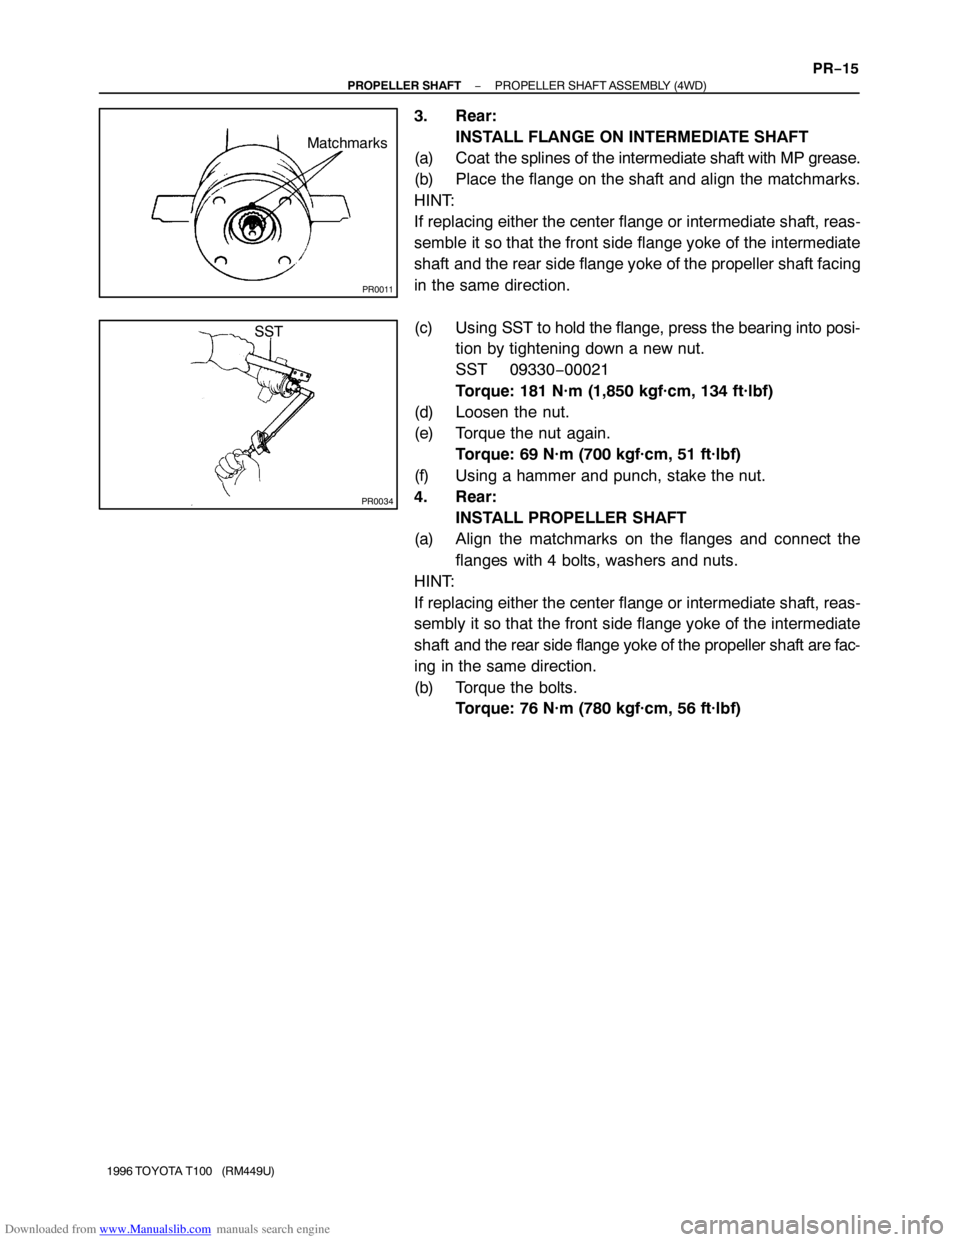
3. Rear:
INSTALL FLANGE ON INTERMEDIATE SHAFT
(a) Coat the splines of the intermediate shaft with MP grease.
(b) Place the flange on the shaft and align the matchmarks.
HINT:
If replacing either the center flange or intermediate shaft, reas-
semble it so that the front side flange yoke of the intermediate
shaft and the rear side flange yoke of the propeller shaft facing
in the same direction.
(c) Using SST to hold the flange, press the bearing into posi-
tion by tightening down a new nut.
SST 09330−00021
Torque: 181 N·m (1,850 kgf·cm, 134 ft·lbf)
(d) Loosen the nut.
(e) Torque the nut again.
Torque: 69 N·m (700 kgf·cm, 51 ft·lbf)
(f) Using a hammer and punch, stake the nut.
4. Rear:
INSTALL PROPELLER SHAFT
(a) Align the matchmarks on the flanges and connect the
flanges with 4 bolts, washers and nuts.
HINT:
If replacing either the center flange or intermediate shaft, reas-
sembly it so that the front side flange yoke of the intermediate
shaft and the rear side flange yoke of the propeller shaft are fac-
ing in the same direction.
(b) Torque the bolts.
Torque: 76 N·m (780 kgf·cm, 56 ft·lbf)
Page 1463 of 2062

Downloaded from www.Manualslib.com manuals search engine PR080−01
R04437
Matchmarks
R04440
Matchmarks
Z04758
A
A B
R15508Matchmarks PR−16
− PROPELLER SHAFTPROPELLER SHAFT ASSEMBLY (4WD)
1996 TOYOTA T100 (RM449U)
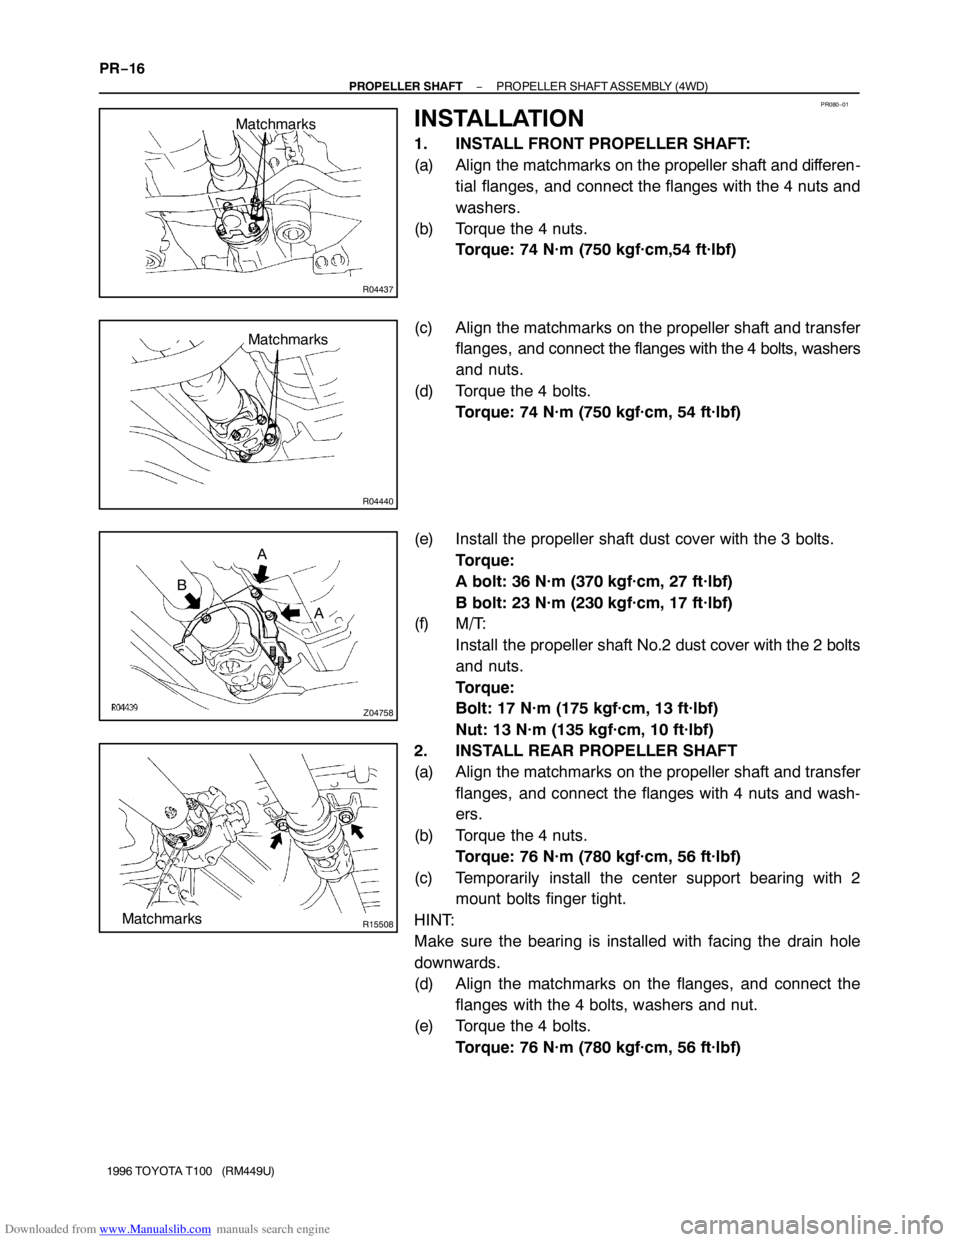
INSTALLATION
1. INSTALL FRONT PROPELLER SHAFT:
(a) Align the matchmarks on the propeller shaft and differen-
tial flanges, and connect the flanges with the 4 nuts and
washers.
(b) Torque the 4 nuts.
Torque: 74 N·m (750 kgf·cm,54 ft·lbf)
(c) Align the matchmarks on the propeller shaft and transfer
flanges, and connect the flanges with the 4 bolts, washers
and nuts.
(d) Torque the 4 bolts.
Torque: 74 N·m (750 kgf·cm, 54 ft·lbf)
(e) Install the propeller shaft dust cover with the 3 bolts.
Torque:
A bolt: 36 N·m (370 kgf·cm, 27 ft·lbf)
B bolt: 23 N·m (230 kgf·cm, 17 ft·lbf)
(f) M/T:
Install the propeller shaft No.2 dust cover with the 2 bolts
and nuts.
Torque:
Bolt: 17 N·m (175 kgf·cm, 13 ft·lbf)
Nut: 13 N·m (135 kgf·cm, 10 ft·lbf)
2. INSTALL REAR PROPELLER SHAFT
(a) Align the matchmarks on the propeller shaft and transfer
flanges, and connect the flanges with 4 nuts and wash-
ers.
(b) Torque the 4 nuts.
Torque: 76 N·m (780 kgf·cm, 56 ft·lbf)
(c) Temporarily install the center support bearing with 2
mount bolts finger tight.
HINT:
Make sure the bearing is installed with facing the drain hole
downwards.
(d) Align the matchmarks on the flanges, and connect the
flanges with the 4 bolts, washers and nut.
(e) Torque the 4 bolts.
Torque: 76 N·m (780 kgf·cm, 56 ft·lbf)
Page 1464 of 2062
Downloaded from www.Manualslib.com manuals search engine R04482
Bracket Center
Line
90
Shaft Axial
Direction
− PROPELLER SHAFTPROPELLER SHAFT ASSEMBLY (4WD)
PR−17
1996 TOYOTA T100 (RM449U)
3. ADJUST CENTER SUPPORT BEARING
HINT:
�With the vehicle unladen, adjust the center support bear-
ing to keep the intervals, as shown.
�At the same condition, check the center line in the axial
direction. Adjust the bearing if necessary.
�Check that the center line of the center bearing is set to
the center line of the bracket when the vehicle is unladen.
Adjust the bracket if necessary.
(a) Torque the 2 bolts.
Torque: 36 N·m (370 kgf·cm, 27 ft·lbf)
(b) Install propeller shaft protector with 4 bolts.
Torque: 29 N·m (300 kgf·cm, 22 ft·lbf)