Page 107 of 1354

BO483−01
BO0020
N11412
N11473
N17924
BO−10
− BODYFRONT DOOR
1996 RAV4 (RM447U)
DISASSEMBLY
HINT:
Tape the screwdriver tip before using to pry parts.
1. w/o Power Window:
REMOVE REGULATOR HANDLE
Pull off the snap ring with a shop rag and remove the regulator
handle and plate.
2. REMOVE INSIDE HANDLE BEZEL
(a) Remove the screw.
(b) Using a screwdriver, pry out the bezel.
3. REMOVE OUTSIDE REAR VIEW MIRROR COVER
4. REMOVE DOOR PULL HANDLE
5. w/ Power window:
REMOVE POWER WINDOW SWITCH
6. REMOVE DOOR TRIM
(a) Remove the 3 screws.
(b) Insert a screwdriver between the door and door trim to pry
out the door trim.
(c) Pull the trim upwards to remove it.
7. REMOVE DOOR INSIDE HANDLE
(a) Disconnect the link and door lock cable.
(b) Remove the 2 screws and inside handle.
8. REMOVE SERVICE HOLE COVER
HINT:
At the time of reassembly, bring out the links through the service
hole cover.
9. REMOVE OUTSIDE REAR VIEW MIRROR
10. REMOVE DOOR GLASS RUN
11. REMOVE DOOR BELT MOULDING
12. REMOVE DOOR SPEAKER
Page 136 of 1354
BO10N−01
H03769
Windshield� Dam
� Stopper
Sun Visor
Holder
Inner Rear
View Mirror Cover
Sun Visor
Inner Rear
View Mirror
Personal Light
Personal Light Cover
Front Pillar Garnish
Hood to Cowl Top Seal
Wiper Arm
Cowl Top Vent ilat or
Louver Arm Cover
N·m (kgf·cm, ft·lbf) : Specified torque
� Non−reusable part � Windshield Moulding
20 (200, 15)
20 (200, 15)
Arm Cover
Wiper Arm
Holder
Front Pillar Garnish
− BODYWINDSHIELD
BO−39
1996 RAV4 (RM447U)
WINDSHIELD
COMPONENTS
Page 137 of 1354

BO10O−12
N11424
BO5232
BO1689
BO−40
− BODYWINDSHIELD
1996 RAV4 (RM447U)
REMOVAL
1. REMOVE INNER REAR VIEW MIRROR
2. REMOVE PERSONAL LIGHT
3. REMOVE SUN VISORS AND HOLDERS
4. REMOVE FRONT PILLAR GARNISHES
5. REMOVE WIPER ARMS
6. REMOVE COWL TOP VENTILATOR LOUVER
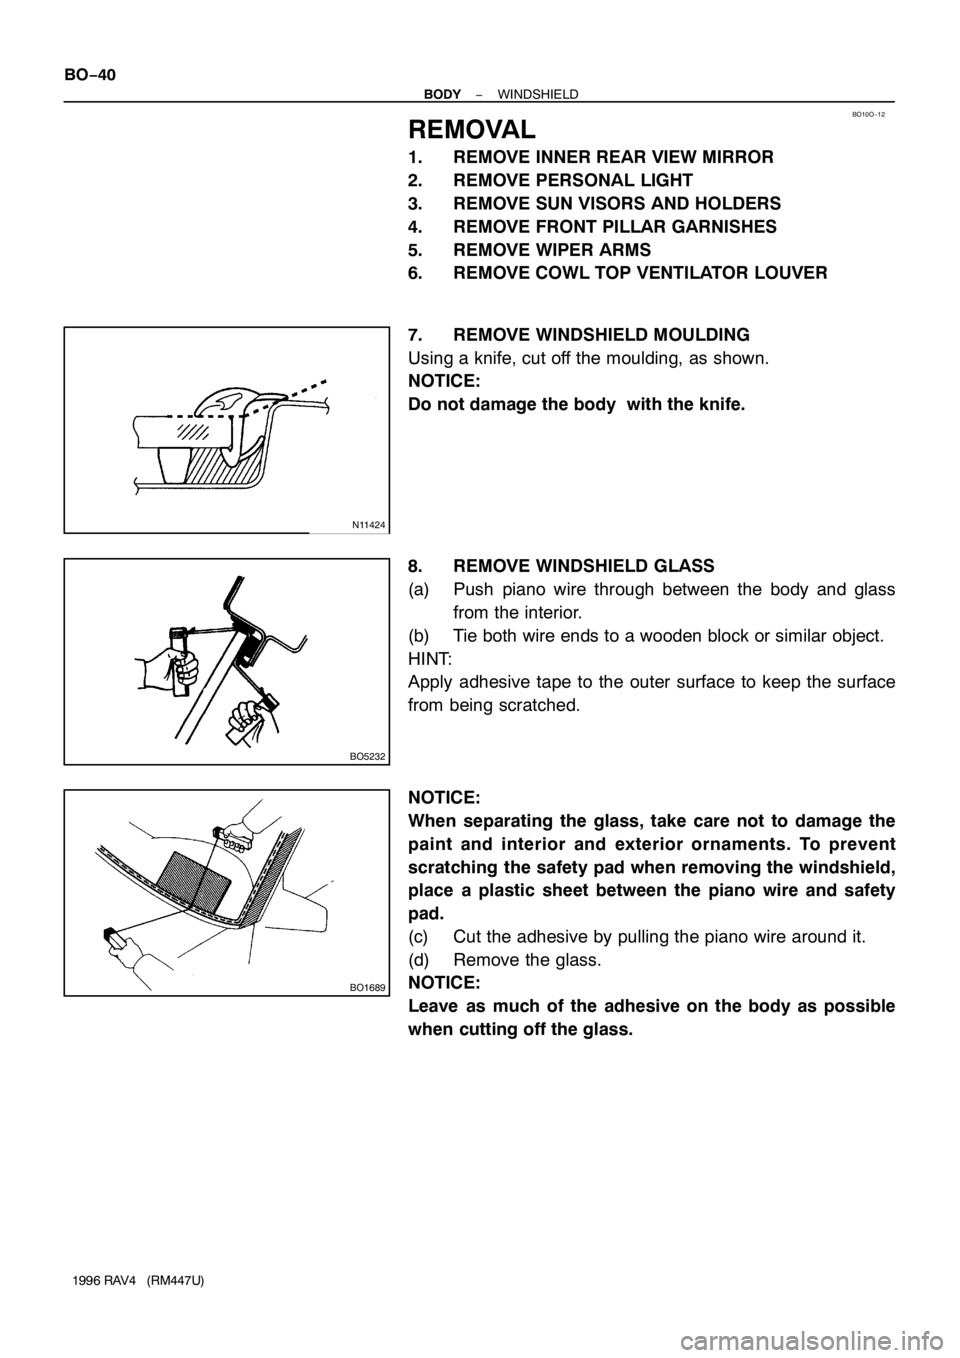
7. REMOVE WINDSHIELD MOULDING
Using a knife, cut off the moulding, as shown.
NOTICE:
Do not damage the body with the knife.
8. REMOVE WINDSHIELD GLASS
(a) Push piano wire through between the body and glass
from the interior.
(b) Tie both wire ends to a wooden block or similar object.
HINT:
Apply adhesive tape to the outer surface to keep the surface
from being scratched.
NOTICE:
When separating the glass, take care not to damage the
paint and interior and exterior ornaments. To prevent
scratching the safety pad when removing the windshield,
place a plastic sheet between the piano wire and safety
pad.
(c) Cut the adhesive by pulling the piano wire around it.
(d) Remove the glass.
NOTICE:
Leave as much of the adhesive on the body as possible
when cutting off the glass.
Page 141 of 1354
BO−44
− BODYWINDSHIELD
1996 RAV4 (RM447U)
17. INSTALL PERSONAL LIGHT
18. INSTALL INNER REAR VIEW MIRROR
Page 157 of 1354
N11417
N11415
BO−60
− BODYREMOVABLE ROOF
1996 RAV4 (RM447U)
10. REMOVE WIND DEFLECTOR PANEL
Remove the 2 deflector panel clips, while prying them with a
screwdriver.
11. REMOVE LOCK BASE
Remove the 2 screws and lock garnish.
12. REMOVE LOCK GARNISH
Remove the 2 nuts, lock base and spacer.
13. REMOVE OPENING TRIM
14. REMOVE INNER WEATHERSTRIP
15. REMOVE HINGE CASE
Remove the 2 nuts and hinge case.
16. REMOVE ROOM LIGHT
17. REMOVE PERSONAL LIGHT
18. REMOVE INNER REAR VIEW MIRROR
19. REMOVE SUN VISORS
20. REMOVE ROOF HEADLINING
Page 214 of 1354

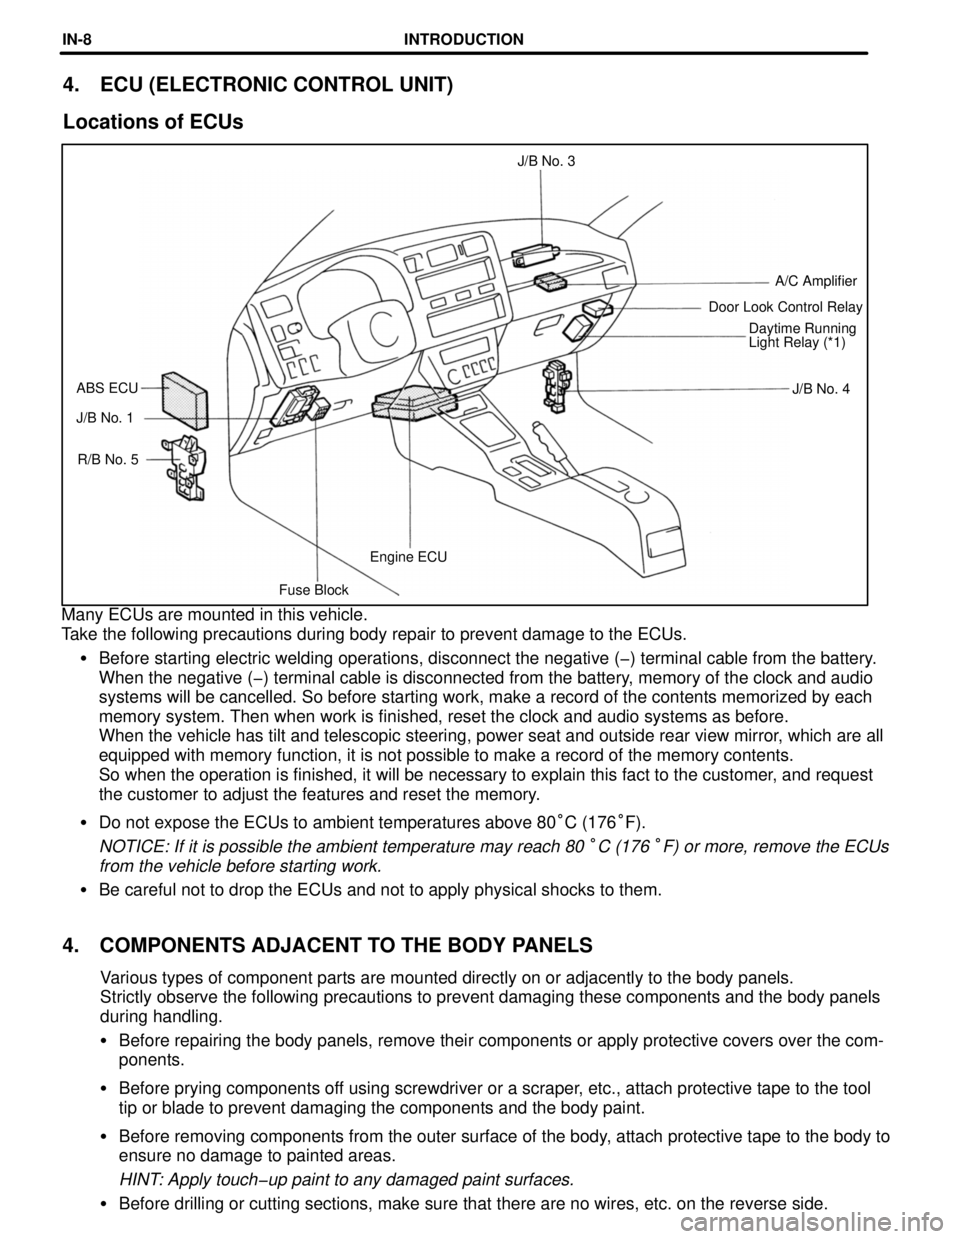
Fuse BlockEngine ECU R/B No. 5 J/B No. 1J/B No. 4 ABS ECUDaytime Running
Light Relay (*1) Door Look Control RelayA/C Amplifier J/B No. 3
4. ECU (ELECTRONIC CONTROL UNIT)
Locations of ECUs
Many ECUs are mounted in this vehicle.
Take the following precautions during body repair to prevent damage to the ECUs.
�Before starting electric welding operations, disconnect the negative (-) terminal cable from the battery.
When the negative (-) terminal cable is disconnected from the battery, memory of the clock and audio
systems will be cancelled. So before starting work, make a record of the contents memorized by each
memory system. Then when work is finished, reset the clock and audio systems as before.
When the vehicle has tilt and telescopic steering, power seat and outside rear view mirror, which are all
equipped with memory function, it is not possible to make a record of the memory contents.
So when the operation is finished, it will be necessary to explain this fact to the customer, and request
the customer to adjust the features and reset the memory.
�Do not expose the ECUs to ambient temperatures above 80°C (176°F).
NOTICE: If it is possible the ambient temperature may reach 80 °C (176 °F) or more, remove the ECUs
from the vehicle before starting work.
�Be careful not to drop the ECUs and not to apply physical shocks to them.
4. COMPONENTS ADJACENT TO THE BODY PANELS
Various types of component parts are mounted directly on or adjacently to the body panels.
Strictly observe the following precautions to prevent damaging these components and the body panels
during handling.
�Before repairing the body panels, remove their components or apply protective covers over the comœ
ponents.
�Before prying components off using screwdriver or a scraper, etc., attach protective tape to the tool
tip or blade to prevent damaging the components and the body paint.
�Before removing components from the outer surface of the body, attach protective tape to the body to
ensure no damage to painted areas.
HINT: Apply touch-up paint to any damaged paint surfaces.
�Before drilling or cutting sections, make sure that there are no wires, etc. on the reverse side.
INTRODUCTIONINœ8
Page 274 of 1354
LOCATION OF PLASTIC BODY PARTS
Quarter Vent Duct (PP)
Rear Door Outside Handle (PC)
Front Door Outside Handle (PC)
Outer Rear View Mirror (AAS)
Instrument Panel Safety Pad (PP)
Cowl TopVentilator Louver (PP)
Radiator Grill (ABS)
Quarter Outside Moulding
(TSOP)
Rear Door Outside Moulding (TSOP) Front Bumper Cover (TSOP)
Front Turn Signal Light (PMMA/PP)
Front Door Outside Moulding (TSOP)
Front Fender Moulding (TSOP)
HINT:
wResin material differs with model.
/ Made up of 2 or more kinds of materials.
PLASTIC BODY PARTSPPœ4