Page 369 of 1354
− DIAGNOSTICSENGINE
DI−49
1996 RAV4 (RM447U)
2 Check for oxygen sensor data.
PREPARATION:
(a) Connect the OBDII scan tool or TOYOTA hand−held tester to the DLC3.
(b) Warm up engine to normal operating temperature.
CHECK:
Read the oxygen sensor output voltage and short−term fuel trim.
RESULT:
PatternOxygen sensor output voltageShort−term fuel trim
1Lean condition (Changes at 0.55 V or less)Changes at about +20 %
2Rich condition (Changes at 0.35 V or more)Changes at about −20 %
3Except 1 and 2
3 Check for oxygen sensor
(See page DI−42).
1, 2
3 Check fuel pressure (See page SF−5).
NG Check and repair fuel pump, pressure regulator,
fuel pipe line and filter (See page SF−1).
OK
4 Check injector injection (See page SF−21).
NG Replace injector.
OK
5 Check manifold absolute pressure sensor and engine coolant temp. sensor
(See page DI−21, DI−29).
NG Repair or replace.
OK
Page 374 of 1354
DI−54
− DIAGNOSTICSENGINE
1996 RAV4 (RM447U)
3 Check injector resistance of misfiring cylinder (See page SF−21).
NG Replace injector.
OK
Check for open and short in harness and con-
nector between injector and ECM (See page
IN−30).
4 Check fuel pressure (See page SF−5).
NG Check and repair fuel pomp, pressure regulator,
fuel pipe line and filter (See page SF−1).
OK
5 Check injector injection (See page SF−21).
NG Replace injector.
OK
6 Check EGR system (See page SF−45).
NG Repair EGR system.
OK
7 Check manifold absolute pressure sensor and engine coolant temp. sensor (See
page DI−21, DI−29).
Page 658 of 1354

EC05I−03
EC3069Check Valve (Vacuum Valve)Gasket
S01428
S01451
Port E
Port D
Port A
Compressed
Air
Port B
S01452
Port C Port D Port A
Compressed
Air
Port B
− EMISSION CONTROLEVAPORATIVE EMISSION (EVAP) CONTROL SYSTEM
EC−5
1996 RAV4 (RM447U)
EVAPORATIVE EMISSION (EVAP)
CONTROL SYSTEM
INSPECTION
1. VISUALLY INSPECT LINES AND CONNECTIONS
Look for loose connections, sharp bends or damage.
2. VISUALLY INSPECT FUEL TANK
Look for deformation, cracks or fuel leakage.
3. VISUALLY INSPECT FUEL TANK CAP
Check if the cap and/or gasket are deformed or damaged.
If necessary, repair or replace the cap.
4. DISCONNECT EVAP HOSES FROM CHARCOAL CAN-
ISTER
5. VISUALLY INSPECT CHARCOAL CANISTER
Look for cracks or damage.
6. CHECK FOR CLOGGED FILTER, AND STUCK CHECK
VALVE AND DIAPHRAGM
(a) Install a plug to port E.
(b) While holding port B closed, blow air (1.76 kPa, 18
gf/cm
2, 0.26 psi) into port A and check that air flows from
port D.
(c) While holding port B and port D closed, blow air (1.76 kPa,
18 gf/cm
2, 0.26 psi) into port A and check that air does not
flow from port C.
Page 668 of 1354

EM−2
− ENGINE MECHANICALCO/HC
1996 RAV4 (RM447U)
6. TROUBLESHOOTING
If the CO/HC concentration does not comply with regulations,
troubleshoot in the order given below.
(a) Check the oxygen sensor operation (See page DI−42).
(b) See the table below for possible causes, then inspect and
correct the applicable causes if necessary.
HCCOProblemsCauses
HighNormalRough idle4. Faulty ignitions:
�Incorrect timing
�Fouled, shorted or improperly gapped plugs
�Open or or crossed high−tension cords
�Cracked distributor cap
5. Incorrect valve clearance
6. Leaky EGR valve
7. Leaky intake and exhaust valves
8. Leaky cylinder
HighLowRough idle
(Fluctuating HC reading)1. Vacuum leaks:
�PCV hose
�EGR valve
�Intake manifold
�Throttle body
�IAC valve
�Brake booster line
2. Lean mixture causing misfire
HighHighRough idle
(Black smoke from exhaust)1. Restricted air filter
2. Faulty SFI system:
�Faulty pressure regulator
�Clogged fuel return line
�Defective ECT sensor
�Defective IAT sensor
�Faulty ECM
�Faulty injector
�Faulty throttle position sensor
�MAP sensor
Page 701 of 1354

S01560
(3)(1)
(2)
S01806
S01644
S01791
− ENGINE MECHANICALCYLINDER HEAD
EM−35
1996 RAV4 (RM447U)
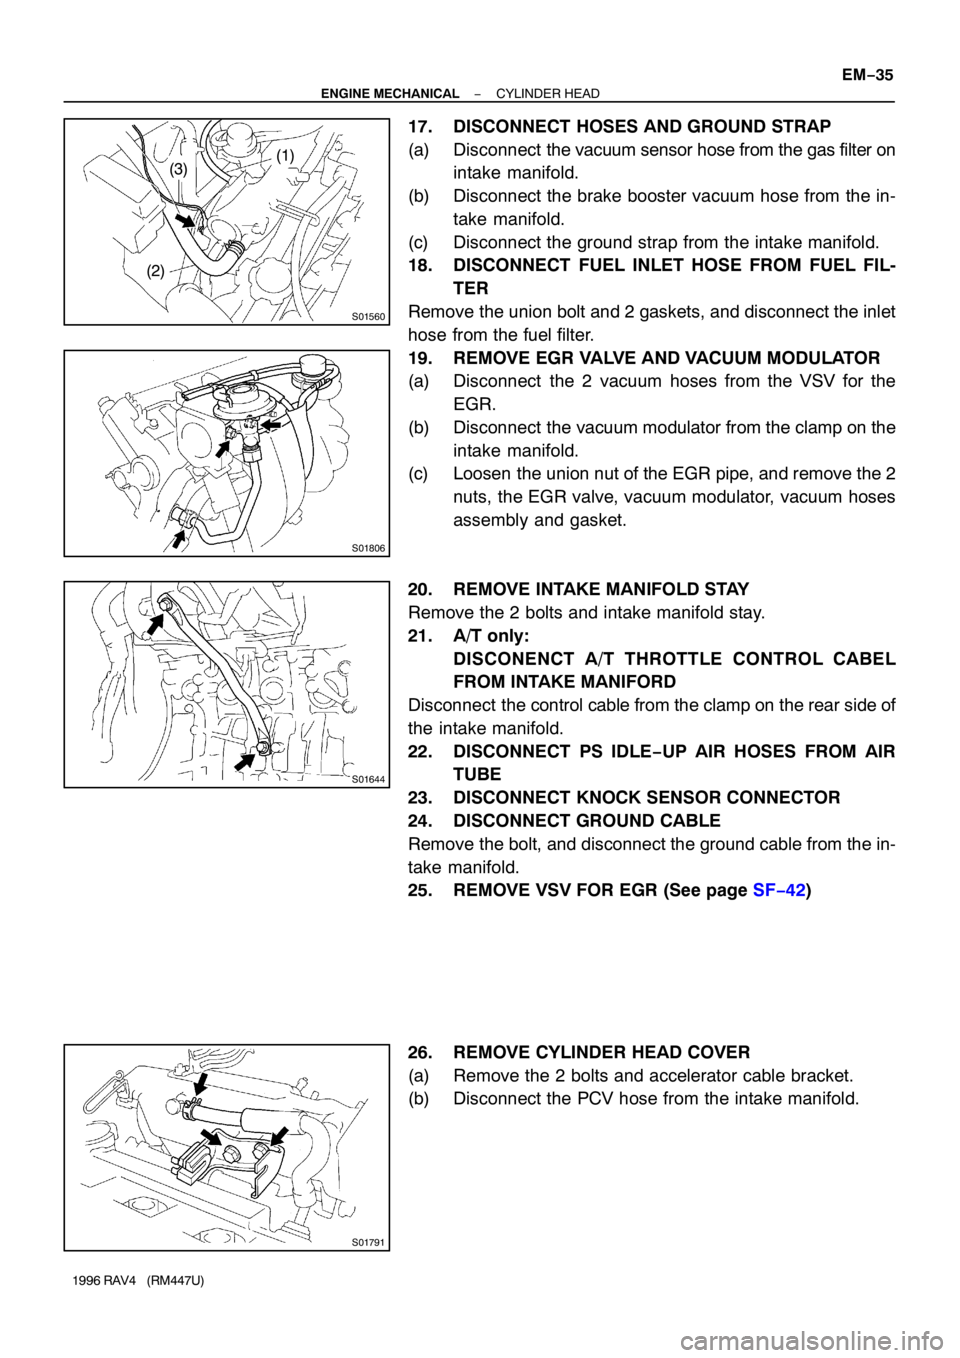
17. DISCONNECT HOSES AND GROUND STRAP
(a) Disconnect the vacuum sensor hose from the gas filter on
intake manifold.
(b) Disconnect the brake booster vacuum hose from the in-
take manifold.
(c) Disconnect the ground strap from the intake manifold.
18. DISCONNECT FUEL INLET HOSE FROM FUEL FIL-
TER
Remove the union bolt and 2 gaskets, and disconnect the inlet
hose from the fuel filter.
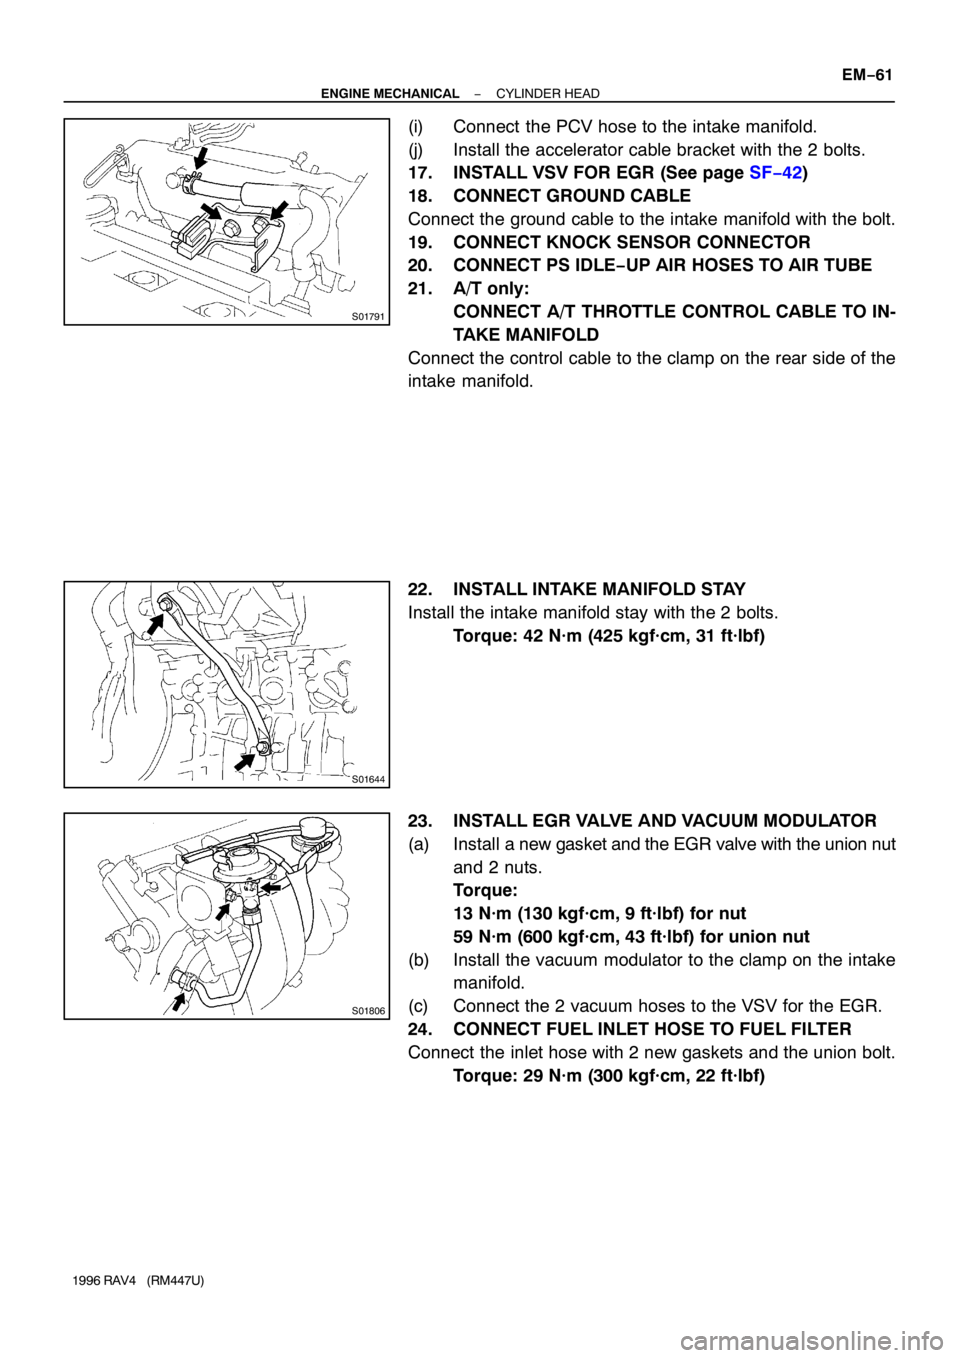
19. REMOVE EGR VALVE AND VACUUM MODULATOR
(a) Disconnect the 2 vacuum hoses from the VSV for the
EGR.
(b) Disconnect the vacuum modulator from the clamp on the
intake manifold.
(c) Loosen the union nut of the EGR pipe, and remove the 2
nuts, the EGR valve, vacuum modulator, vacuum hoses
assembly and gasket.
20. REMOVE INTAKE MANIFOLD STAY
Remove the 2 bolts and intake manifold stay.
21. A/T only:
DISCONENCT A/T THROTTLE CONTROL CABEL
FROM INTAKE MANIFORD
Disconnect the control cable from the clamp on the rear side of
the intake manifold.
22. DISCONNECT PS IDLE−UP AIR HOSES FROM AIR
TUBE
23. DISCONNECT KNOCK SENSOR CONNECTOR
24. DISCONNECT GROUND CABLE
Remove the bolt, and disconnect the ground cable from the in-
take manifold.
25. REMOVE VSV FOR EGR (See page SF−42)
26. REMOVE CYLINDER HEAD COVER
(a) Remove the 2 bolts and accelerator cable bracket.
(b) Disconnect the PCV hose from the intake manifold.
Page 727 of 1354

S01791
S01644
S01806
− ENGINE MECHANICALCYLINDER HEAD
EM−61
1996 RAV4 (RM447U)
(i) Connect the PCV hose to the intake manifold.
(j) Install the accelerator cable bracket with the 2 bolts.
17. INSTALL VSV FOR EGR (See page SF−42)
18. CONNECT GROUND CABLE
Connect the ground cable to the intake manifold with the bolt.
19. CONNECT KNOCK SENSOR CONNECTOR
20. CONNECT PS IDLE−UP AIR HOSES TO AIR TUBE
21. A/T only:
CONNECT A/T THROTTLE CONTROL CABLE TO IN-
TAKE MANIFOLD
Connect the control cable to the clamp on the rear side of the
intake manifold.
22. INSTALL INTAKE MANIFOLD STAY
Install the intake manifold stay with the 2 bolts.
Torque: 42 N·m (425 kgf·cm, 31 ft·lbf)
23. INSTALL EGR VALVE AND VACUUM MODULATOR
(a) Install a new gasket and the EGR valve with the union nut
and 2 nuts.
Torque:
13 N·m (130 kgf·cm, 9 ft·lbf) for nut
59 N·m (600 kgf·cm, 43 ft·lbf) for union nut
(b) Install the vacuum modulator to the clamp on the intake
manifold.
(c) Connect the 2 vacuum hoses to the VSV for the EGR.
24. CONNECT FUEL INLET HOSE TO FUEL FILTER
Connect the inlet hose with 2 new gaskets and the union bolt.
Torque: 29 N·m (300 kgf·cm, 22 ft·lbf)
Page 731 of 1354
EM0EV−02
A04063
N·m (kgf·cm, ft·lbf) : Specified torque
� Non−reusable part
29 (300, 22)
Hold Down ClampHold Down Clamp
BatteryEngine Hood
Battery Tray
Lower Radiator
HosePS Pump
w/ BracketCharcoal Canister
Battery Tray
IAT Sensor ConnectorAir Cleaner Cap
� Gasket
� Gasket
Fuel Inlet Hose
Fuel Filter
Water Inlet
Upper Radiator
Hose
Heater Hose
PS Pump Drive Belt
Generator Drive
Belt
Accelerator Cable
Generator
Generator Drive Belt
Adjusting Bar
Air Filter
EVAP VSV Connector
Air Cleaner Case
Radiator
Reservoir
Relay Block No. 2
Upper Cover
Relay Block No. 2
Wire Harness
A/C Compressor
Type B Type A
Type B Type A
− ENGINE MECHANICALENGINE UNIT
EM−65
1996 RAV4 (RM447U)
ENGINE UNIT
COMPONENTS
Page 744 of 1354

S01797
M/T
A/T
S01785
A/T Only
S01351
M/T Only
Back−up Light
Connector EM−78
− ENGINE MECHANICALENGINE UNIT
1996 RAV4 (RM447U)
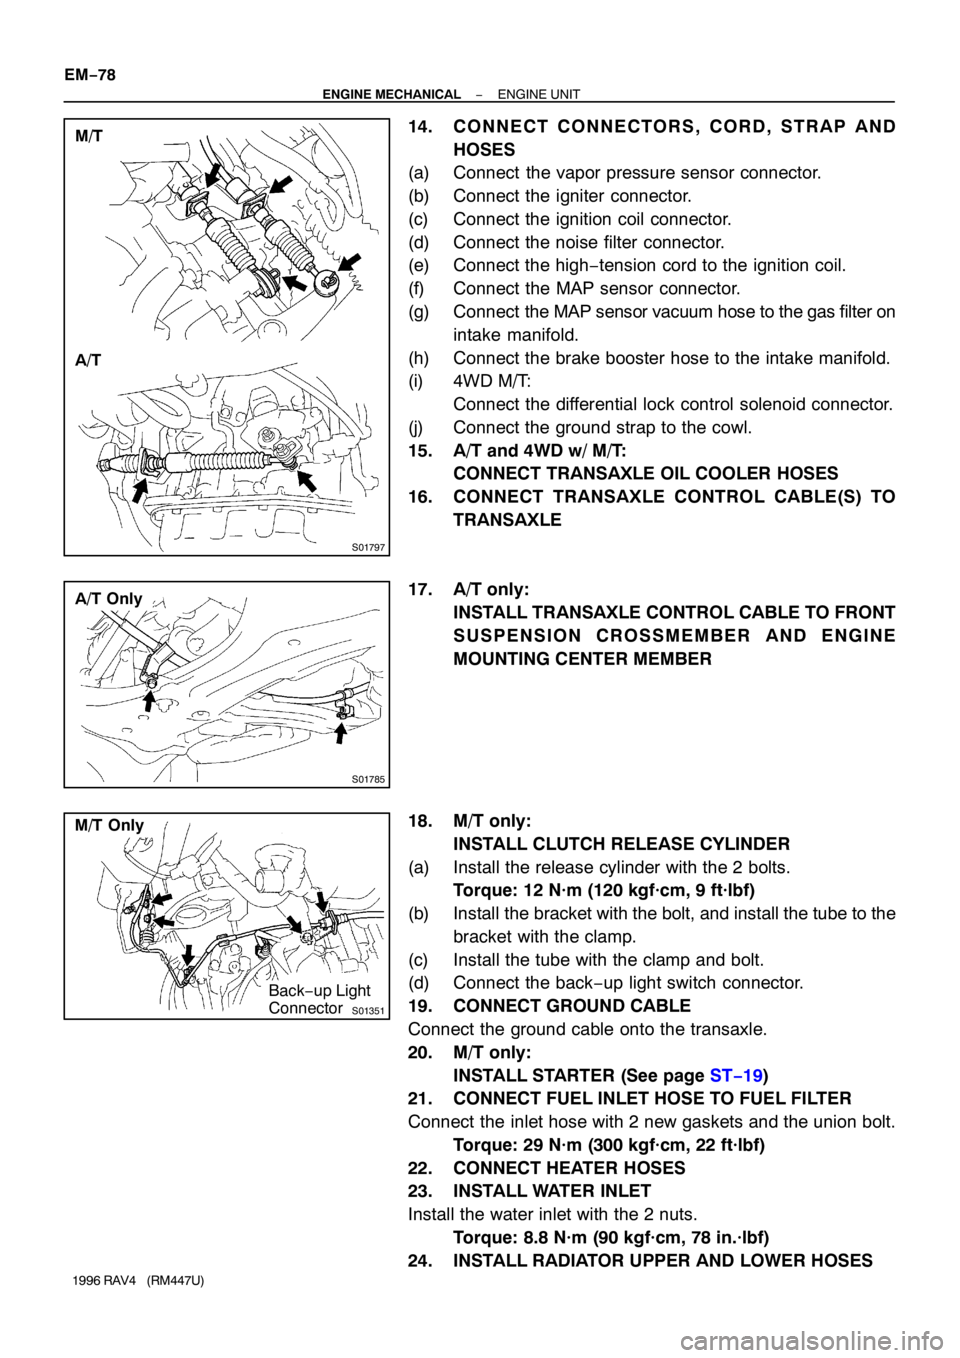
14. CONNECT CONNECTORS, CORD, STRAP AND
HOSES
(a) Connect the vapor pressure sensor connector.
(b) Connect the igniter connector.
(c) Connect the ignition coil connector.
(d) Connect the noise filter connector.
(e) Connect the high−tension cord to the ignition coil.
(f) Connect the MAP sensor connector.
(g) Connect the MAP sensor vacuum hose to the gas filter on
intake manifold.
(h) Connect the brake booster hose to the intake manifold.
(i) 4WD M/T:
Connect the differential lock control solenoid connector.
(j) Connect the ground strap to the cowl.
15. A/T and 4WD w/ M/T:
CONNECT TRANSAXLE OIL COOLER HOSES
16. CONNECT TRANSAXLE CONTROL CABLE(S) TO
TRANSAXLE
17. A/T only:
INSTALL TRANSAXLE CONTROL CABLE TO FRONT
SUSPENSION CROSSMEMBER AND ENGINE
MOUNTING CENTER MEMBER
18. M/T only:
INSTALL CLUTCH RELEASE CYLINDER
(a) Install the release cylinder with the 2 bolts.
Torque: 12 N·m (120 kgf·cm, 9 ft·lbf)
(b) Install the bracket with the bolt, and install the tube to the
bracket with the clamp.
(c) Install the tube with the clamp and bolt.
(d) Connect the back−up light switch connector.
19. CONNECT GROUND CABLE
Connect the ground cable onto the transaxle.
20. M/T only:
INSTALL STARTER (See page ST−19)
21. CONNECT FUEL INLET HOSE TO FUEL FILTER
Connect the inlet hose with 2 new gaskets and the union bolt.
Torque: 29 N·m (300 kgf·cm, 22 ft·lbf)
22. CONNECT HEATER HOSES
23. INSTALL WATER INLET
Install the water inlet with the 2 nuts.
Torque: 8.8 N·m (90 kgf·cm, 78 in.·lbf)
24. INSTALL RADIATOR UPPER AND LOWER HOSES