Page 687 of 1354

S01621
S01623
S01622
S07327Length = 660 mm (25.98 in.)
− ENGINE MECHANICALTIMING BELT
EM−21
1996 RAV4 (RM447U)
5. TEMPORARILY INSTALL TIMING BELT
NOTICE:
The engine should be cold.
(a) Using the crankshaft pulley bolt, turn the crankshaft and
position the key groove of the crankshaft timing pulley up-
ward.
(b) Remove any oil or water on the crankshaft pulley, oil
pump pulley, water pump pulley, No. 1 idler pulley and No.
2 idler pulley, and keep them clean.
(c) Install the timing belt on the crankshaft timing pulley, oil
pump pulley, No. 1 idler pulley, water pump pulley and No.
2 idler pulley.
HINT:
When re−using timing belt:
Align the points marked during removal, and install the belt with
the arrow pointing in the direction of engine revolution.
6. INSTALL TIMING BELT GUIDE
Install the guide, facing the cup side outward.
7. INSTALL NO. 1 TIMING BELT COVER
(a) Check that the timing belt cover gaskets has no cracks or
peeling, etc.
If the gasket has cracks or peeling, etc., replace it using these
steps:
�Using a screwdriver and gasket scraper, remove all
the old gasket material.
�Thoroughly clean all components to remove all the
loose material.
�Remove the backing paper from a new gasket and
install the gasket evenly to the part of the timing belt
cover shaded black in the illustration.
�After installing the gasket, press down on it so that
the adhesive firmly sticks to the timing belt cover.
(b) Install the timing belt cover with the 4 bolts.
(c) Install the engine wire to the timing belt cover.
Page 699 of 1354

EM1B8−02
S01285
S01557
− ENGINE MECHANICALCYLINDER HEAD
EM−33
1996 RAV4 (RM447U)
REMOVAL
1. REMOVE RH ENGINE UNDER COVER
2. DRAIN ENGINE COOLANT
3. A/T only:
DISCONNECT THROTTLE CABLE FROM THROTTLE
BODY
4. DISCONNECT ACCELERATOR CABLE FROM
THROTTLE BODY
5. REMOVE AIR CLEANER CAP AND CASE
6. REMOVE GENERATOR (See page CH−7)
7. REMOVE DISTRIBUTOR
8. REMOVE FRONT EXHAUST PIPE
(a) Using a 14 mm deep socket wrench, remove the 3 nuts
holding the front exhaust pipe to the front TWC.
(b) Remove the 2 bolts holding the front exhaust pipe to the
TWC w/ pipe.
(c) Remove the front exhaust pipe and 2 gaskets.
9. REMOVE EXHAUST MANIFOLD AND HEAT INSULA-
TOR ASSEMBLY
(a) Disconnect the oxygen sensor (bank 1 sensor 1) connec-
tor.
(b) Disconnect the oxygen sensor (bank 1 sensor 2) connec-
tor.
(c) Remove the 6 bolts and manifold upper heat insulator.
(d) Remove the 2 bolts holding the RH exhaust manifold stay
to the cylinder block.
(e) Remove the 6 nuts, the exhaust manifold and heat insula-
tor assembly.
Page 734 of 1354
EM1BA−02
S01374
Cover
Connector EM−68
− ENGINE MECHANICALENGINE UNIT
1996 RAV4 (RM447U)
REMOVAL
1. REMOVE BATTERY
2. REMOVE ENGINE HOOD
3. REMOVE ENGINE UNDER COVERS
4. DRAIN ENGINE COOLANT
5. DRAIN ENGINE OIL
6. DRAIN TRANSAXLE OIL
7. REMOVE AIR CLEANER CAP AND CASE
8. DISCONNECT ACCELERATOR CABLE FROM
THROTTLE BODY, CABLE BRACKET AND CLAMPS
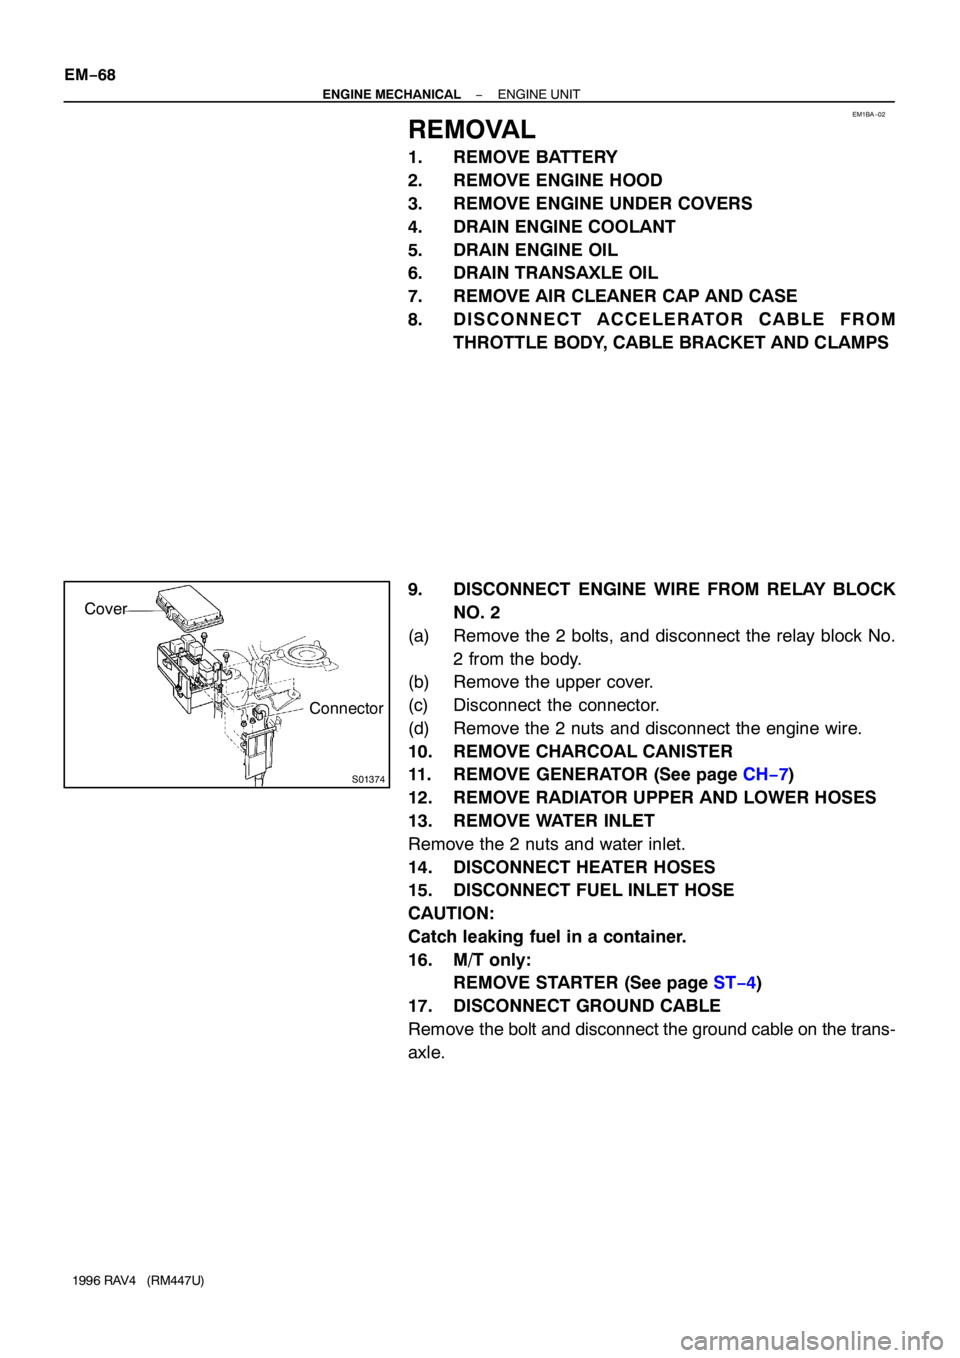
9. DISCONNECT ENGINE WIRE FROM RELAY BLOCK
NO. 2
(a) Remove the 2 bolts, and disconnect the relay block No.
2 from the body.
(b) Remove the upper cover.
(c) Disconnect the connector.
(d) Remove the 2 nuts and disconnect the engine wire.
10. REMOVE CHARCOAL CANISTER
11. REMOVE GENERATOR (See page CH−7)
12. REMOVE RADIATOR UPPER AND LOWER HOSES
13. REMOVE WATER INLET
Remove the 2 nuts and water inlet.
14. DISCONNECT HEATER HOSES
15. DISCONNECT FUEL INLET HOSE
CAUTION:
Catch leaking fuel in a container.
16. M/T only:
REMOVE STARTER (See page ST−4)
17. DISCONNECT GROUND CABLE
Remove the bolt and disconnect the ground cable on the trans-
axle.
Page 977 of 1354

LU061−02
S01264
SST
LU0555
S01266
LU−2
− LUBRICATIONOIL AND FILTER
1996 RAV4 (RM447U)
REPLACEMENT
CAUTION:
�Prolonged and repeated contact with mineral oil will
result in the removal of natural fats from the skin,
leading to dryness, irritation and dermatitis. In addi-
tion, used engine oil contains potentially harmful
contaminants which may cause skin cancer.
�Care should be taken, therefore, when changing en-
gine oil to minimize the frequency and length of time
your skin is exposed to used engine oil. Protective
clothing and gloves that cannot be penetrated by oil
should be worn. The skin should be thoroughly
washed with soap and water, or use water−less hand
cleaner, to remove any used engine oil. Do not use
gasoline, thinners, or solvents.
�In order to preserve the environment, used oil and
used oil filters must be disposed of only at desig-
nated disposal sites.
1. DRAIN ENGINE OIL
(a) Remove the oil filler cap.
(b) Remove the oil drain plug, and drain the oil into a contain-
er.
2. REPLACE OIL FILTER
(a) Using SST, remove the oil filter.
SST 09228−06501
(b) Check and clean the oil filter installation surface.
(c) Lubricate the filter rubber gasket with clean engine oil.
(d) Lightly tighten the oil filter by hand until the rubber gasket
contacts the seat of the filter mounting.
Page 982 of 1354
LU0O4−01
S01775S01237B13839
M/T
A/T
S01375
P04282
SST
SST
− LUBRICATIONOIL PUMP
LU−7
1996 RAV4 (RM447U)
REMOVAL
HINT:
When repairing the oil pump, the oil pan and strainer should be
removed and cleaned.
1. REMOVE HOOD
2. REMOVE RH ENGINE UNDER COVER
3. DRAIN ENGINE OIL
4. REMOVE FRONT EXHAUST PIPE (See page EM−33)
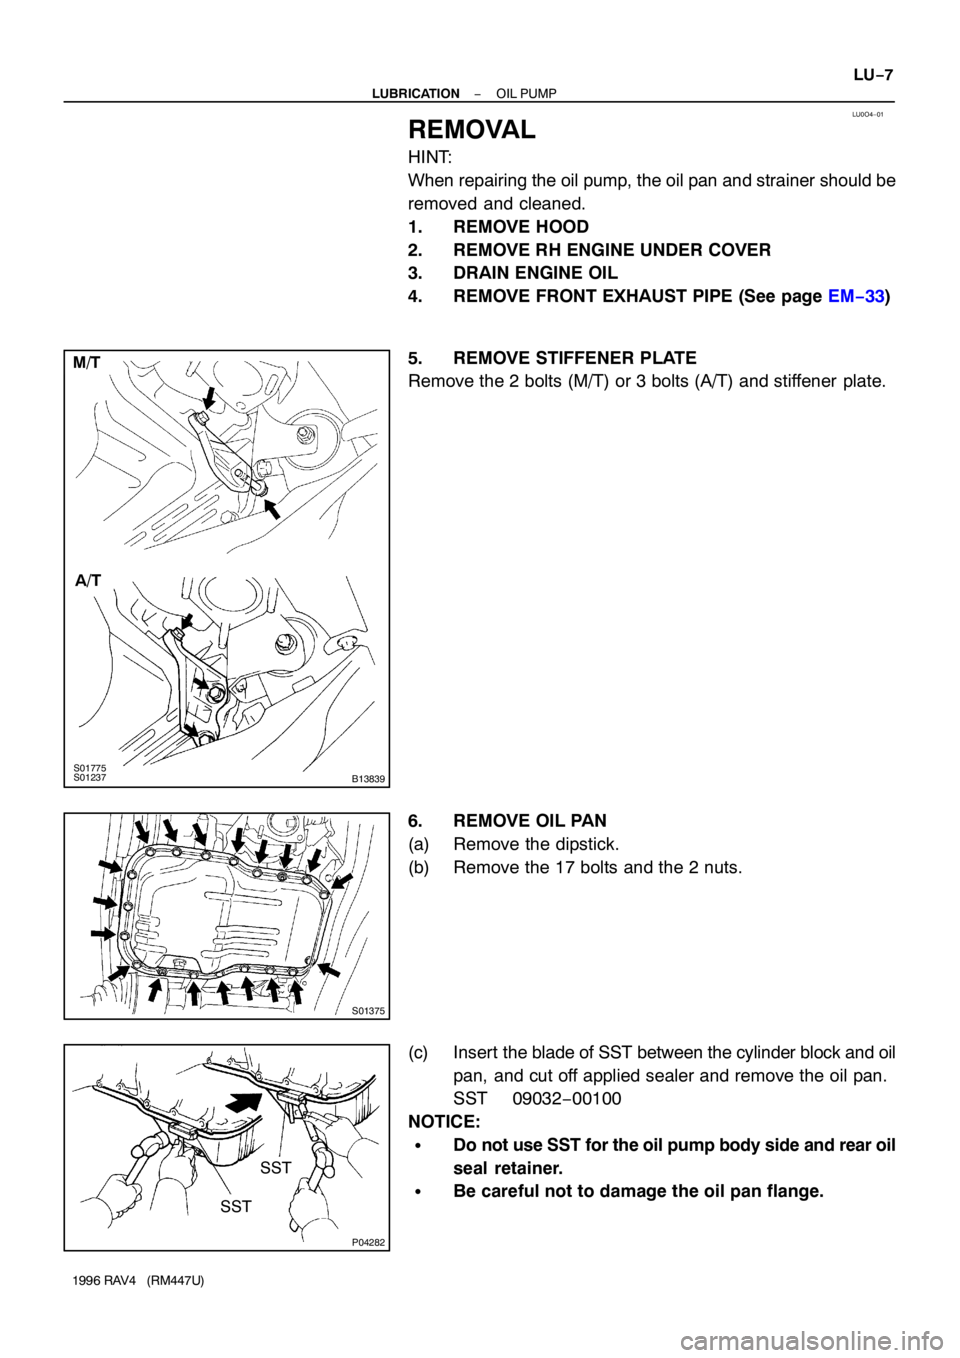
5. REMOVE STIFFENER PLATE
Remove the 2 bolts (M/T) or 3 bolts (A/T) and stiffener plate.
6. REMOVE OIL PAN
(a) Remove the dipstick.
(b) Remove the 17 bolts and the 2 nuts.
(c) Insert the blade of SST between the cylinder block and oil
pan, and cut off applied sealer and remove the oil pan.
SST 09032−00100
NOTICE:
�Do not use SST for the oil pump body side and rear oil
seal retainer.
�Be careful not to damage the oil pan flange.
Page 993 of 1354
LU06A−03
S01365
S01359
SST
S01366
LU−18
− LUBRICATIONOIL COOLER
1996 RAV4 (RM447U)
REMOVAL
1. REMOVE RH ENGINE UNDER COVER
2. DRAIN ENGINE COOLANT
3. REMOVE FRONT EXHAUST PIPE (See page EM−33)
4. REMOVE GENERATOR (See page CH−7)
5. REMOVE OIL DIPSTICK
6. REMOVE EXHAUST MANIFOLD AND FRONT TWC
ASSEMBLY (See page EM−33)
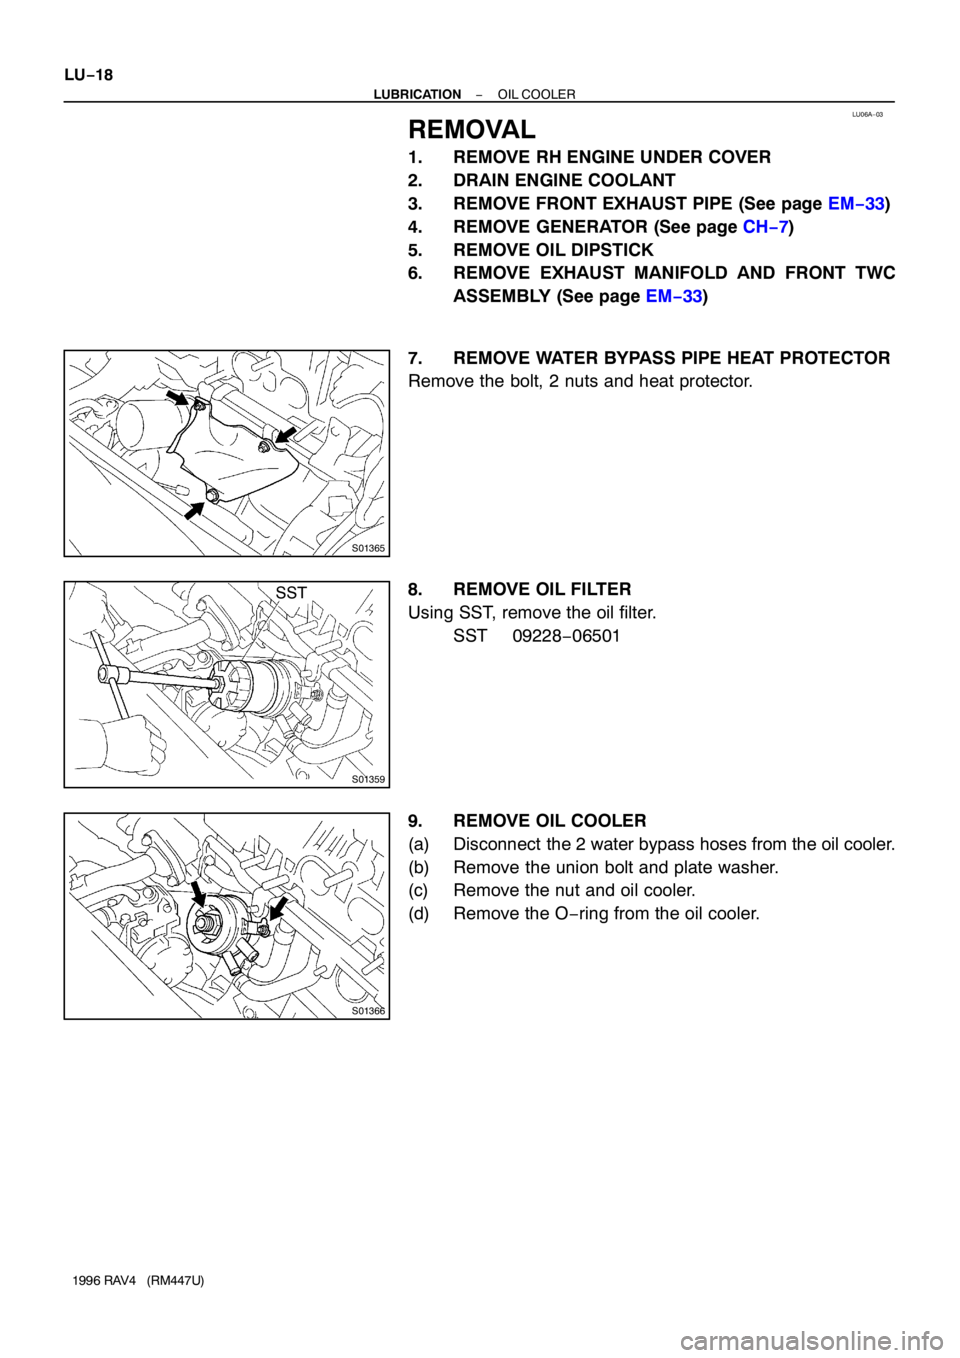
7. REMOVE WATER BYPASS PIPE HEAT PROTECTOR
Remove the bolt, 2 nuts and heat protector.
8. REMOVE OIL FILTER
Using SST, remove the oil filter.
SST 09228−06501
9. REMOVE OIL COOLER
(a) Disconnect the 2 water bypass hoses from the oil cooler.
(b) Remove the union bolt and plate washer.
(c) Remove the nut and oil cooler.
(d) Remove the O−ring from the oil cooler.
Page 998 of 1354

MX05O−02
Q08747
Q08748
A
B
Q08749
Q08750
A B
A
− MANUAL TRANSAXLEMANUAL TRANSAXLE UNIT (2WD)
MX−3
1996 RAV4 (RM447U)
REMOVAL
1. REMOVE AIR CLEANER CASE ASSEMBLY WITH AIR
HOSE
2. REMOVE ENGINE COOLANT RESERVOIR TANK
3. REMOVE ENGINE WIRE CLAMP SET NUT
4. REMOVE STARTER
(a) Disconnect the connector and wire from the starter.
(b) Remove the 2 bolts and starter.
Torque: 39 N·m (400 kgf·cm, 29 ft·lbf)
5. DISCONNECT CLUTCH RELEASE CYLINDER AND
LINE
(a) Remove the 2 set bolts of the clutch line bracket.
Torque:
Bolt A: 12 N·m (120 kgf·cm, 9 ft·lbf)
Bolt B: 4.9 N·m (50 kgf·cm, 43 in.·lbf)
(b) Remove the 2 bolts, release cylinder and line.
Torque: 12 N·m (120 kgf·cm, 9 ft·lbf)
6. DISCONNECT GROUND CABLE
Remove the set bolt of the ground cable from the transaxle.
7. DISCONNECT VEHICLE SPEED SENSOR AND
BACK−UP LIGHT SWITCH CONNECTORS
8. DISCONNECT CONTROL CABLE
(a) Remove the 2 clips and washers.
(b) Remove the 2 clips from the cables.
9. REMOVE 4 TRANSAXLE UPPER SIDE MOUNTING
BOLTS
Torque:
Bolt A: 64 N·m (650 kgf·cm, 47 ft·lbf)
Bolt B: 35 N·m (360 kgf·cm, 26 ft·lbf)
Page 1004 of 1354

MX05S−01
Q09031
B
A
C
FED A
A
C
Q08759
No.1
No.2 No.0
No.0
− MANUAL TRANSAXLEMANUAL TRANSAXLE UNIT (4WD)
MX−9
1996 RAV4 (RM447U)
REMOVAL
1. REMOVE TRANSAXLE WITH ENGINE
(See page EM−80)
2. REMOVE TRANSAXLE CASE PROTECTOR
Remove the 2 bolts and transaxle case protector.
Torque: 25 N·m (250 kgf·cm, 18 ft·lbf)
3. REMOVE STARTER
(a) Disconnect the connector and wire from the starter.
(b) Remove the 2 bolts and starter.
Torque: 39 N·m (400 kgf·cm, 29 ft·lbf)
4. DISCONNECT DIFFERENTIAL LOCK INDICATOR
SWITCH, BACK−UP LIGHT SWITCH AND VEHICLE
SPEED SENSOR CONNECTORS
5. REMOVE TRANSFER VACUUM ACTUATOR BRACK-
ET
Remove the 4 bolts and bracket.
Torque: 37 N·m (380 kgf·cm, 27 ft·lbf)
6. REMOVE TRANSFER VACUUM ACTUATOR AS-
SEMBLY
(a) Disconnect the 4 solenoid hoses from the transfer vacu-
um actuator assembly.
NOTICE:
At the time of installation, please refer to the following item.
Check that the hose No.0, No.1 and No.2 are securely
installed to the solenoid.
(b) Remove the 2 bolts and transfer vacuum actuator assem-
bly.
Torque: 37 N·m (380 kgf·cm, 27 ft·lbf)
7. REMOVE RIGHT TRANSFER STIFFENER PLATE
Remove the 5 bolts and right transfer stiffener plate.
Torque: 37 N·m (380 kgf·cm, 27 ft·lbf)
8. REMOVE CENTER TRANSFER STIFFENER PLATE
Remove the 3 bolts and center transfer stiffener plate.
Torque: 37 N·m (380 kgf·cm, 27 ft·lbf)
9. REMOVE STIFFENER PLATE
Remove the 2 bolts and stiffener plate.
Torque: 37 N·m (380 kgf·cm, 27 ft·lbf)
10. REMOVE TRANSAXLE FROM ENGINE
(a) Remove the 9 transaxle mounting bolts from the engine.
Torque:
Bolt A: 64 N·m (650 kgf·cm, 47 ft·lbf)
Bolt B: 35 N·m (360 kgf·cm, 26 ft·lbf)
Bolt C: 29 N·m (300 kgf·cm, 22 ft·lbf)
Bolt D: 46 N·m (470 kgf·cm, 34 ft·lbf)
Bolt E: 25 N·m (250 kgf·cm, 18 ft·lbf)
Bolt F: 9.0 N·m (95 kgf·cm, 78 in.·lbf)