Page 741 of 1354

S01559
Ground
Strap
Connector
R10966
S01283
B
SST
A
S01363
− ENGINE MECHANICALENGINE UNIT
EM−75
1996 RAV4 (RM447U)
(f) Tighten the bolt and 2 nuts holding the RH engine mount-
ing bracket to the mounting insulator.
Torque:
37 N·m (380 kgf·cm, 27 ft·lbf) for bolt
52 N·m (530 kgf·cm, 38 ft·lbf) for nut:
(g) Connect the ground strap connector.
(h) Remove the engine sling device from the engine.
(i) Remove the engine hanger No. 1.
5. INSTALL PS PUMP
(a) Install the PS pump with the 3 bolts.
Torque: 43 N·m (440 kgf·cm, 32 ft·lbf)
(b) Install the belt.
(c) Tighten the bolt A.
Torque: 39 N·m (400 kgf·cm, 29 ft·lbf)
(d) Using SST and a deep socket wrench, tighten the bolt B.
SST 09249−63010
Torque:
43 N·m (440 kgf·cm, 32 ft·lbf)
30 N·m (300 kgf·cm, 22 ft·lbf) for SST
HINT:
Use a torque wrench with a fulcrum length of 340 mm (13.39
in.).
(e) Connect the 2 air hoses.
6. INSTALL ENGINE MOUNTING CENTER MEMBER
(a) Attach the center member to the body.
(b) Temporarily install the 2 bolts holding the center member
to the body.
(c) Temporarily install the 2 bolts holding the center member
to the front engine mounting insulator.
Page 742 of 1354
S01362
S01364
S01434
Z17304BB A EM−76
− ENGINE MECHANICALENGINE UNIT
1996 RAV4 (RM447U)
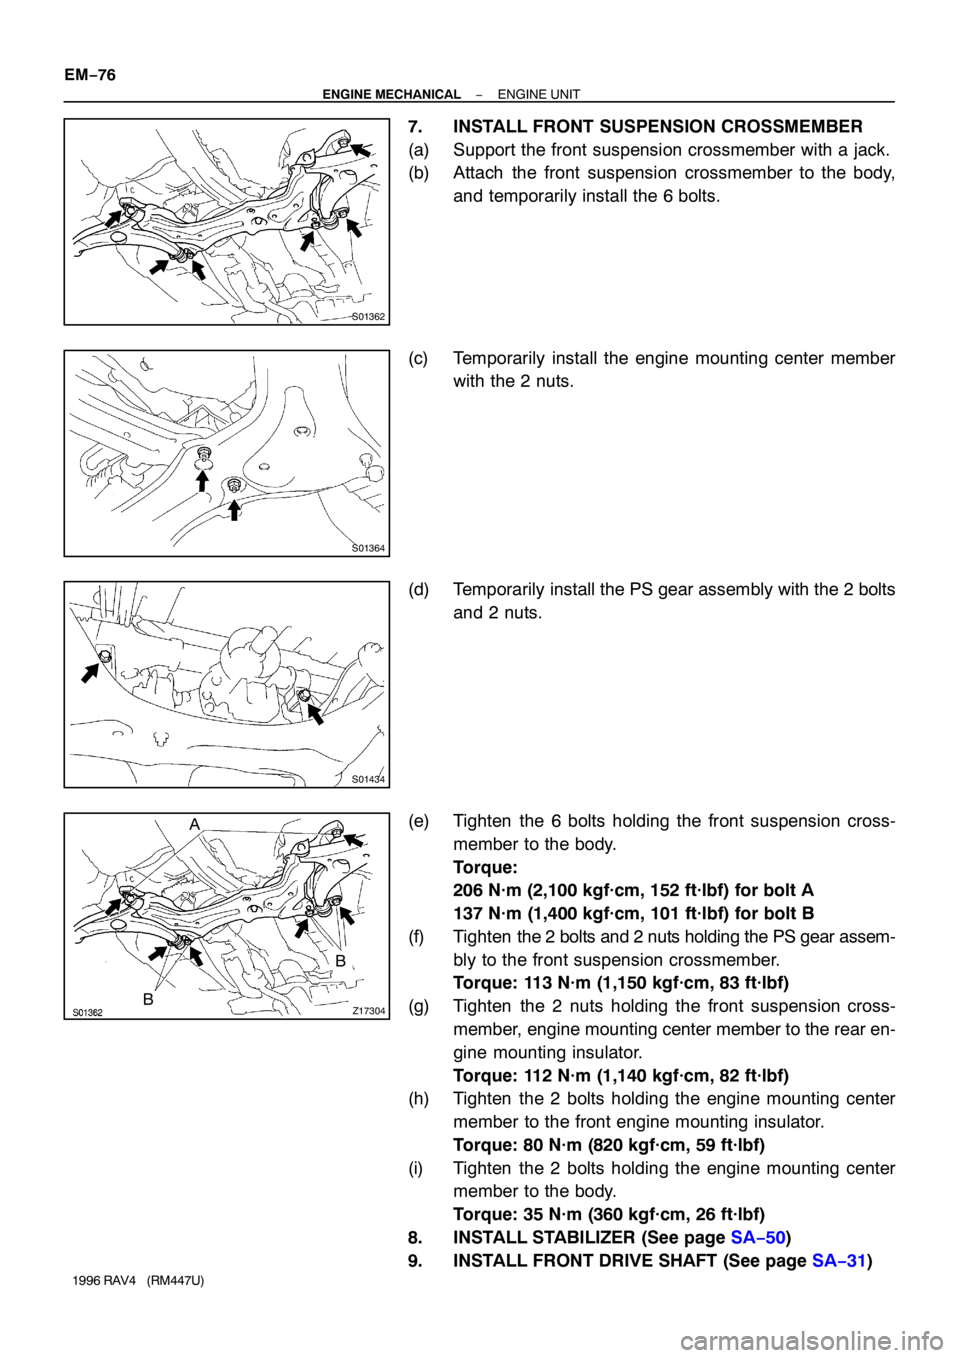
7. INSTALL FRONT SUSPENSION CROSSMEMBER
(a) Support the front suspension crossmember with a jack.
(b) Attach the front suspension crossmember to the body,
and temporarily install the 6 bolts.
(c) Temporarily install the engine mounting center member
with the 2 nuts.
(d) Temporarily install the PS gear assembly with the 2 bolts
and 2 nuts.
(e) Tighten the 6 bolts holding the front suspension cross-
member to the body.
Torque:
206 N·m (2,100 kgf·cm, 152 ft·lbf) for bolt A
137 N·m (1,400 kgf·cm, 101 ft·lbf) for bolt B
(f) Tighten the 2 bolts and 2 nuts holding the PS gear assem-
bly to the front suspension crossmember.
Torque: 113 N·m (1,150 kgf·cm, 83 ft·lbf)
(g) Tighten the 2 nuts holding the front suspension cross-
member, engine mounting center member to the rear en-
gine mounting insulator.
Torque: 112 N·m (1,140 kgf·cm, 82 ft·lbf)
(h) Tighten the 2 bolts holding the engine mounting center
member to the front engine mounting insulator.
Torque: 80 N·m (820 kgf·cm, 59 ft·lbf)
(i) Tighten the 2 bolts holding the engine mounting center
member to the body.
Torque: 35 N·m (360 kgf·cm, 26 ft·lbf)
8. INSTALL STABILIZER (See page SA−50)
9. INSTALL FRONT DRIVE SHAFT (See page SA−31)
Page 743 of 1354
S01347
S01285
S01432
− ENGINE MECHANICALENGINE UNIT
EM−77
1996 RAV4 (RM447U)
10. 4WD only:
INSTALL PROPELLER SHAFT (See page PR−9)
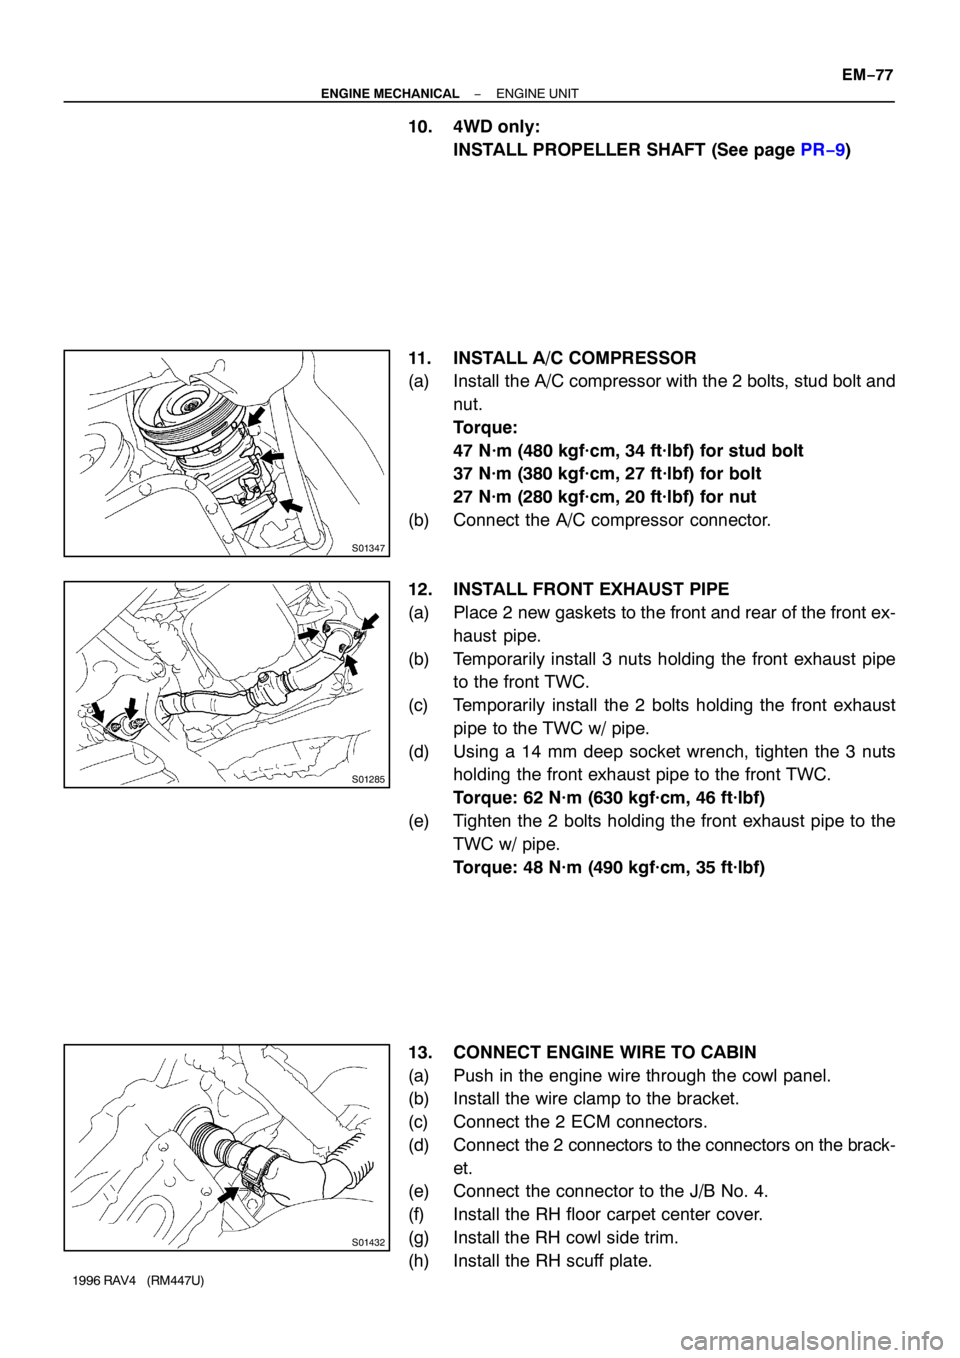
11. INSTALL A/C COMPRESSOR
(a) Install the A/C compressor with the 2 bolts, stud bolt and
nut.
Torque:
47 N·m (480 kgf·cm, 34 ft·lbf) for stud bolt
37 N·m (380 kgf·cm, 27 ft·lbf) for bolt
27 N·m (280 kgf·cm, 20 ft·lbf) for nut
(b) Connect the A/C compressor connector.
12. INSTALL FRONT EXHAUST PIPE
(a) Place 2 new gaskets to the front and rear of the front ex-
haust pipe.
(b) Temporarily install 3 nuts holding the front exhaust pipe
to the front TWC.
(c) Temporarily install the 2 bolts holding the front exhaust
pipe to the TWC w/ pipe.
(d) Using a 14 mm deep socket wrench, tighten the 3 nuts
holding the front exhaust pipe to the front TWC.
Torque: 62 N·m (630 kgf·cm, 46 ft·lbf)
(e) Tighten the 2 bolts holding the front exhaust pipe to the
TWC w/ pipe.
Torque: 48 N·m (490 kgf·cm, 35 ft·lbf)
13. CONNECT ENGINE WIRE TO CABIN
(a) Push in the engine wire through the cowl panel.
(b) Install the wire clamp to the bracket.
(c) Connect the 2 ECM connectors.
(d) Connect the 2 connectors to the connectors on the brack-
et.
(e) Connect the connector to the J/B No. 4.
(f) Install the RH floor carpet center cover.
(g) Install the RH cowl side trim.
(h) Install the RH scuff plate.
Page 744 of 1354
S01797
M/T
A/T
S01785
A/T Only
S01351
M/T Only
Back−up Light
Connector EM−78
− ENGINE MECHANICALENGINE UNIT
1996 RAV4 (RM447U)
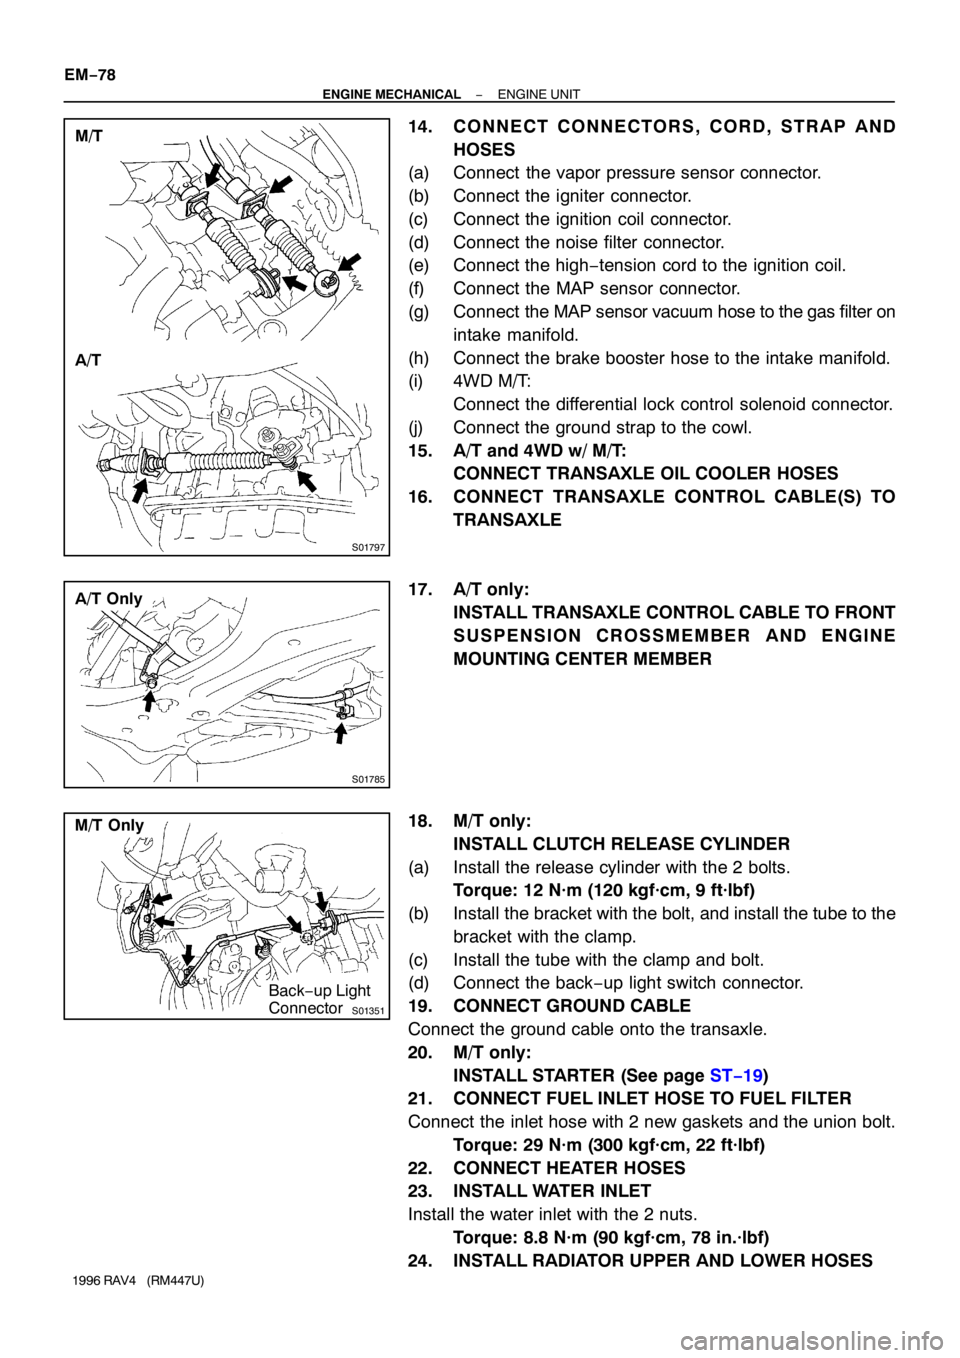
14. CONNECT CONNECTORS, CORD, STRAP AND
HOSES
(a) Connect the vapor pressure sensor connector.
(b) Connect the igniter connector.
(c) Connect the ignition coil connector.
(d) Connect the noise filter connector.
(e) Connect the high−tension cord to the ignition coil.
(f) Connect the MAP sensor connector.
(g) Connect the MAP sensor vacuum hose to the gas filter on
intake manifold.
(h) Connect the brake booster hose to the intake manifold.
(i) 4WD M/T:
Connect the differential lock control solenoid connector.
(j) Connect the ground strap to the cowl.
15. A/T and 4WD w/ M/T:
CONNECT TRANSAXLE OIL COOLER HOSES
16. CONNECT TRANSAXLE CONTROL CABLE(S) TO
TRANSAXLE
17. A/T only:
INSTALL TRANSAXLE CONTROL CABLE TO FRONT
SUSPENSION CROSSMEMBER AND ENGINE
MOUNTING CENTER MEMBER
18. M/T only:
INSTALL CLUTCH RELEASE CYLINDER
(a) Install the release cylinder with the 2 bolts.
Torque: 12 N·m (120 kgf·cm, 9 ft·lbf)
(b) Install the bracket with the bolt, and install the tube to the
bracket with the clamp.
(c) Install the tube with the clamp and bolt.
(d) Connect the back−up light switch connector.
19. CONNECT GROUND CABLE
Connect the ground cable onto the transaxle.
20. M/T only:
INSTALL STARTER (See page ST−19)
21. CONNECT FUEL INLET HOSE TO FUEL FILTER
Connect the inlet hose with 2 new gaskets and the union bolt.
Torque: 29 N·m (300 kgf·cm, 22 ft·lbf)
22. CONNECT HEATER HOSES
23. INSTALL WATER INLET
Install the water inlet with the 2 nuts.
Torque: 8.8 N·m (90 kgf·cm, 78 in.·lbf)
24. INSTALL RADIATOR UPPER AND LOWER HOSES
Page 767 of 1354
P13450
P13448
Z17147
Front Mark
(Cavity)
FrontPush
P13451
Front Mark
(Protrusion)
P13441
− ENGINE MECHANICALCYLINDER BLOCK
EM−101
1996 RAV4 (RM447U)
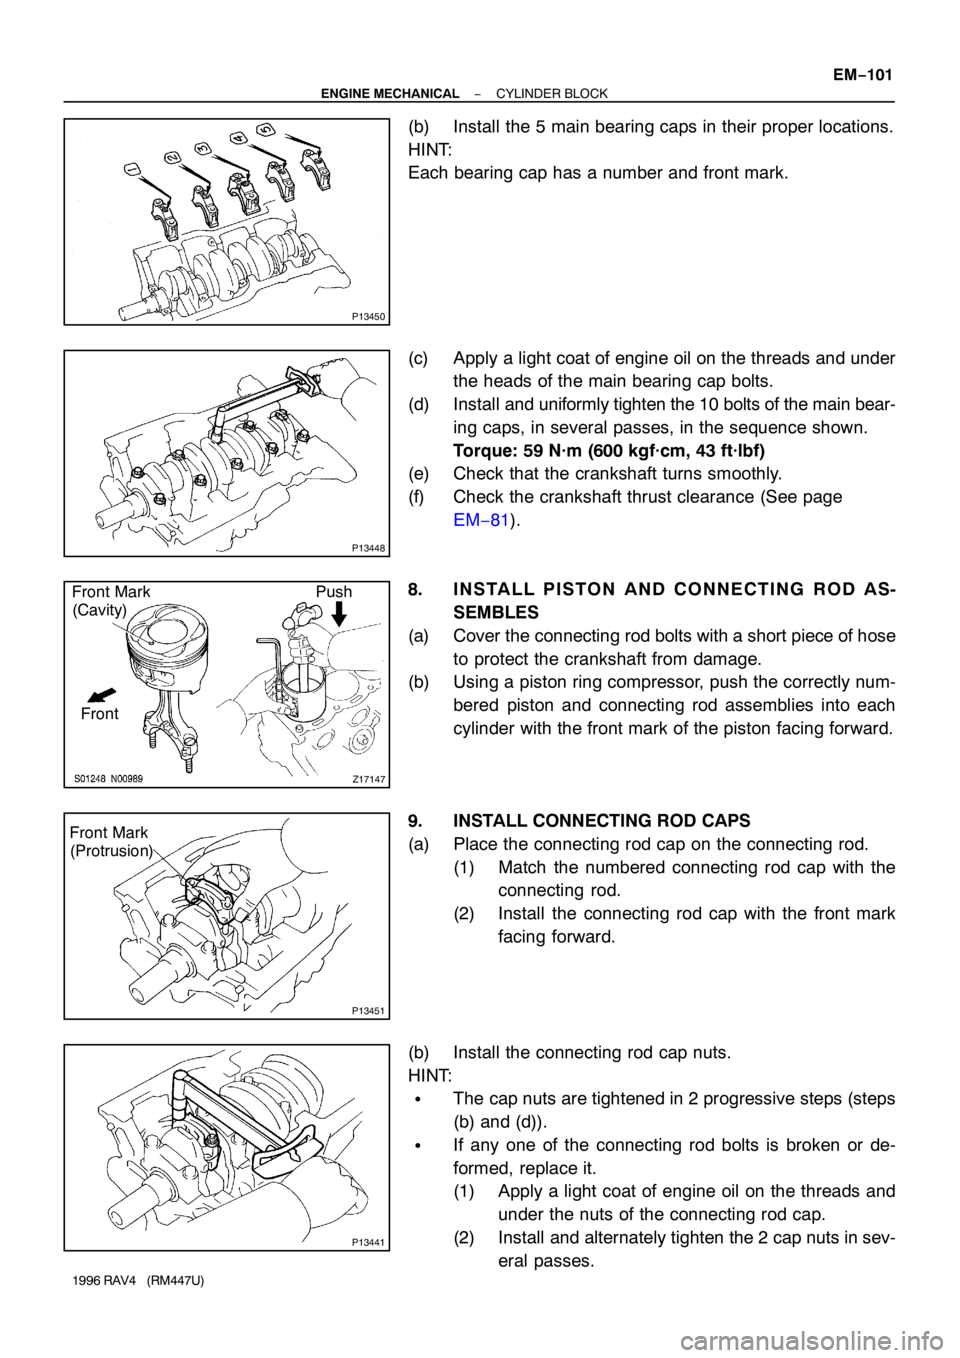
(b) Install the 5 main bearing caps in their proper locations.
HINT:
Each bearing cap has a number and front mark.
(c) Apply a light coat of engine oil on the threads and under
the heads of the main bearing cap bolts.
(d) Install and uniformly tighten the 10 bolts of the main bear-
ing caps, in several passes, in the sequence shown.
Torque: 59 N·m (600 kgf·cm, 43 ft·lbf)
(e) Check that the crankshaft turns smoothly.
(f) Check the crankshaft thrust clearance (See page
EM−81).
8. INSTALL PISTON AND CONNECTING ROD AS-
SEMBLES
(a) Cover the connecting rod bolts with a short piece of hose
to protect the crankshaft from damage.
(b) Using a piston ring compressor, push the correctly num-
bered piston and connecting rod assemblies into each
cylinder with the front mark of the piston facing forward.
9. INSTALL CONNECTING ROD CAPS
(a) Place the connecting rod cap on the connecting rod.
(1) Match the numbered connecting rod cap with the
connecting rod.
(2) Install the connecting rod cap with the front mark
facing forward.
(b) Install the connecting rod cap nuts.
HINT:
�The cap nuts are tightened in 2 progressive steps (steps
(b) and (d)).
�If any one of the connecting rod bolts is broken or de-
formed, replace it.
(1) Apply a light coat of engine oil on the threads and
under the nuts of the connecting rod cap.
(2) Install and alternately tighten the 2 cap nuts in sev-
eral passes.
Page 768 of 1354
P13453
Painted Mark
90°90°
P05527
S01632
SST
P15371
New O−Ring EM−102
− ENGINE MECHANICALCYLINDER BLOCK
1996 RAV4 (RM447U)
Torque: 25 N·m (250 kgf·cm, 18 ft·lbf)
If any one of the cap nuts does not meet the torque specifica-
tion, replace the connecting rod bolt and cap nut as a set.
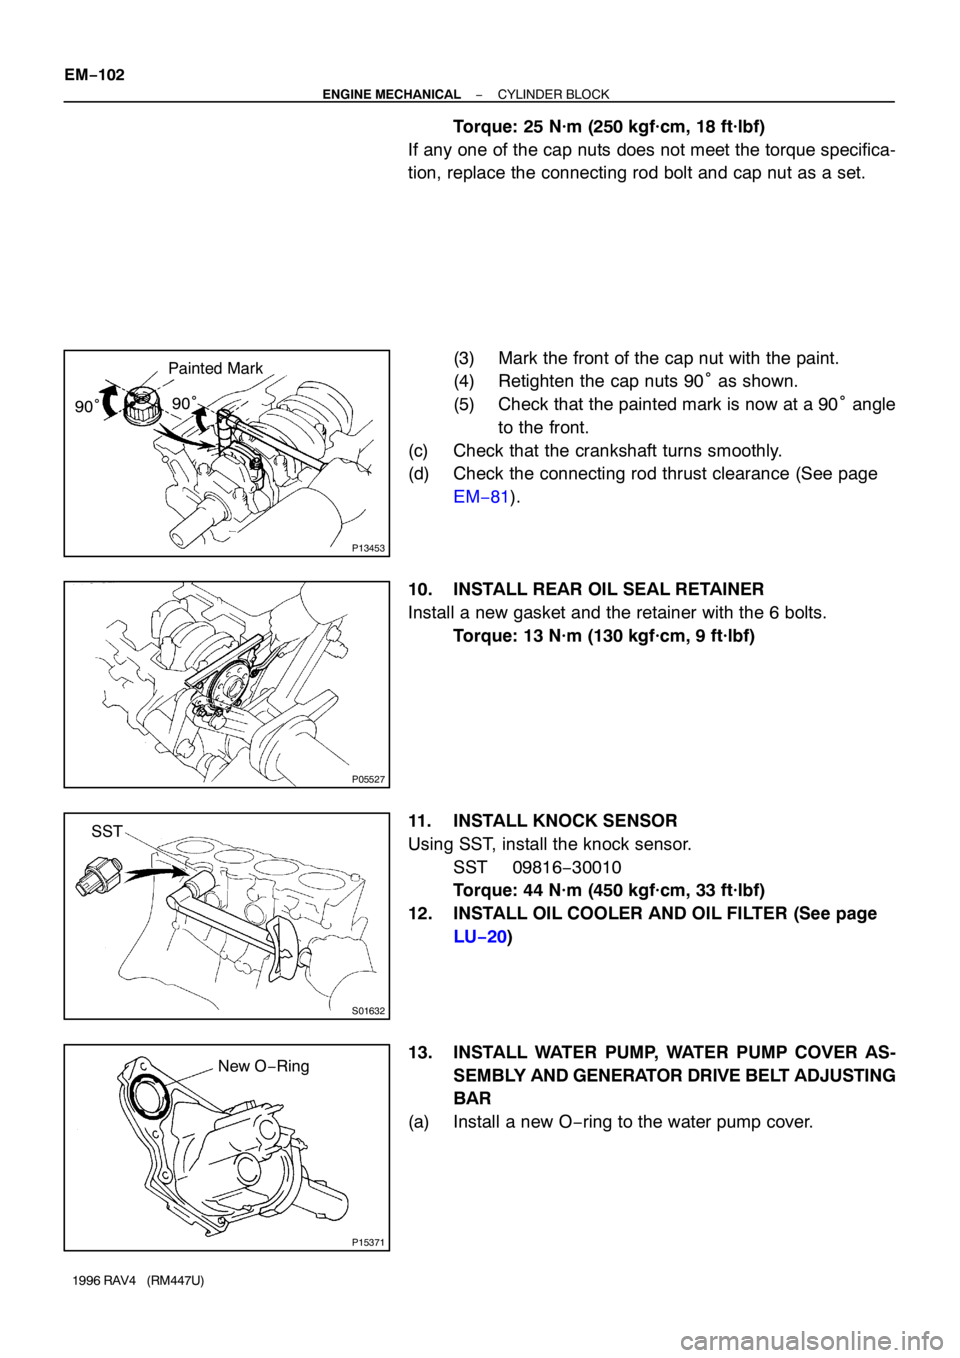
(3) Mark the front of the cap nut with the paint.
(4) Retighten the cap nuts 90° as shown.
(5) Check that the painted mark is now at a 90° angle
to the front.
(c) Check that the crankshaft turns smoothly.
(d) Check the connecting rod thrust clearance (See page
EM−81).
10. INSTALL REAR OIL SEAL RETAINER
Install a new gasket and the retainer with the 6 bolts.
Torque: 13 N·m (130 kgf·cm, 9 ft·lbf)
11. INSTALL KNOCK SENSOR
Using SST, install the knock sensor.
SST 09816−30010
Torque: 44 N·m (450 kgf·cm, 33 ft·lbf)
12. INSTALL OIL COOLER AND OIL FILTER (See page
LU−20)
13. INSTALL WATER PUMP, WATER PUMP COVER AS-
SEMBLY AND GENERATOR DRIVE BELT ADJUSTING
BAR
(a) Install a new O−ring to the water pump cover.
Page 769 of 1354
Z17349
3
1
2
P15304
RH Engine
Mounting
Bracket
PS Pump
Bracket
P13432
EM7333
P15298
3
1
2 M/T
5
8 7
6
4
− ENGINE MECHANICALCYLINDER BLOCK
EM−103
1996 RAV4 (RM447U)
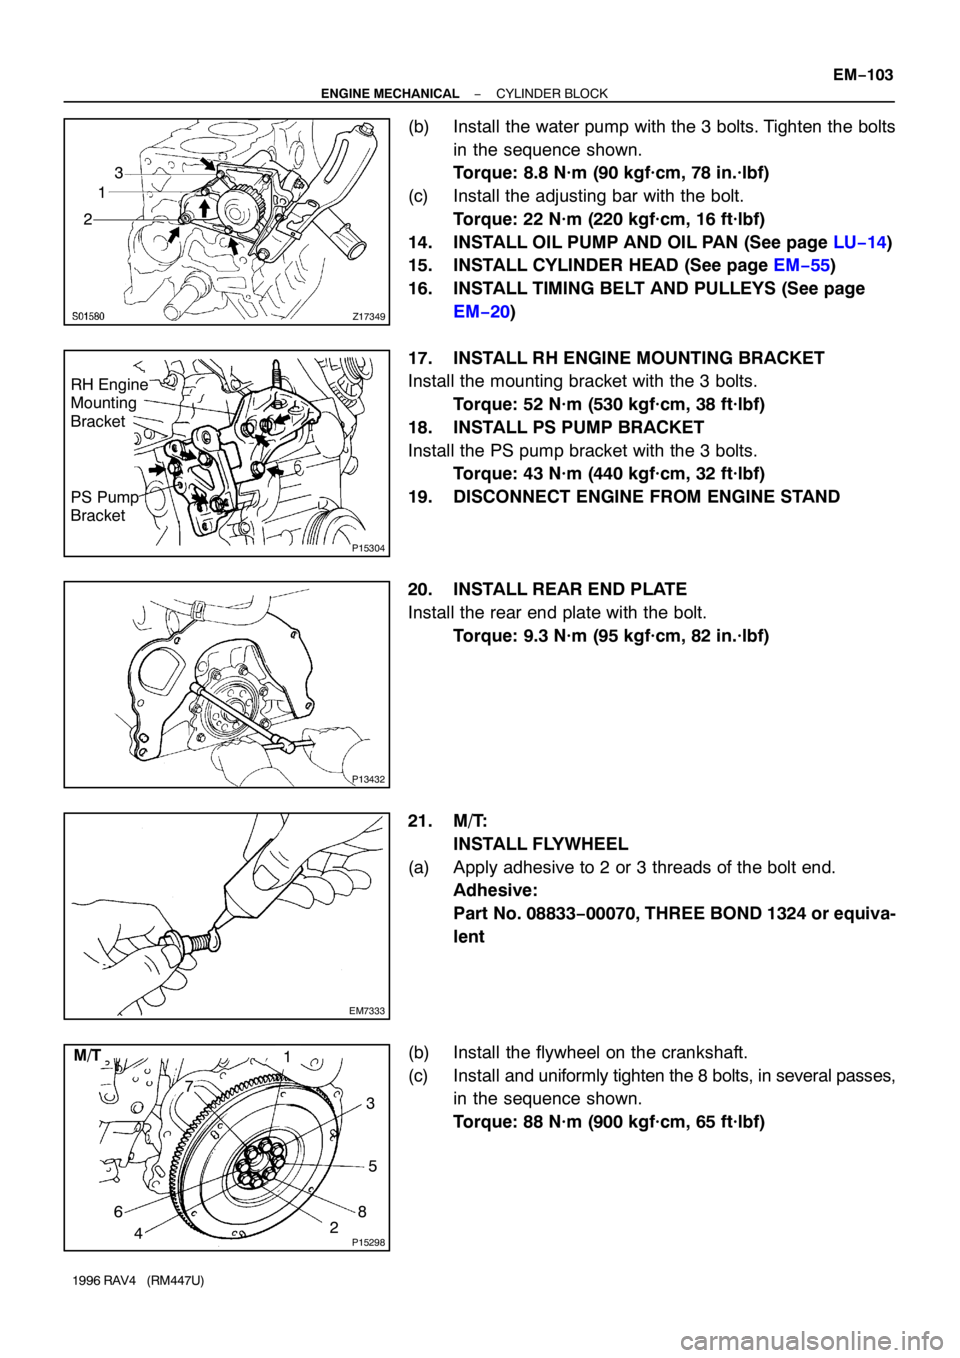
(b) Install the water pump with the 3 bolts. Tighten the bolts
in the sequence shown.
Torque: 8.8 N·m (90 kgf·cm, 78 in.·lbf)
(c) Install the adjusting bar with the bolt.
Torque: 22 N·m (220 kgf·cm, 16 ft·lbf)
14. INSTALL OIL PUMP AND OIL PAN (See page LU−14)
15. INSTALL CYLINDER HEAD (See page EM−55)
16. INSTALL TIMING BELT AND PULLEYS (See page
EM−20)
17. INSTALL RH ENGINE MOUNTING BRACKET
Install the mounting bracket with the 3 bolts.
Torque: 52 N·m (530 kgf·cm, 38 ft·lbf)
18. INSTALL PS PUMP BRACKET
Install the PS pump bracket with the 3 bolts.
Torque: 43 N·m (440 kgf·cm, 32 ft·lbf)
19. DISCONNECT ENGINE FROM ENGINE STAND
20. INSTALL REAR END PLATE
Install the rear end plate with the bolt.
Torque: 9.3 N·m (95 kgf·cm, 82 in.·lbf)
21. M/T:
INSTALL FLYWHEEL
(a) Apply adhesive to 2 or 3 threads of the bolt end.
Adhesive:
Part No. 08833−00070, THREE BOND 1324 or equiva-
lent
(b) Install the flywheel on the crankshaft.
(c) Install and uniformly tighten the 8 bolts, in several passes,
in the sequence shown.
Torque: 88 N·m (900 kgf·cm, 65 ft·lbf)
Page 770 of 1354
P15300
3
1
2 A/T
5
8 7
6
4 EM−104
− ENGINE MECHANICALCYLINDER BLOCK
1996 RAV4 (RM447U)
22. A/T:
INSTALL DRIVE PLATE
Torque: 83 N·m (850 kgf·cm, 61 ft·lbf)