Page 220 of 1354
SUPPORT POSITIONPANTOGRAPH JACK POSITION
CAUTION: Before jacking-up the rear and front, make sure the car is
not carrying any extra weight.
Front Front crossmember. . . . . . . .
Rear Rear axle beam. . . . . . . .
JACK POSITION
Front
VEHICLE LIFT AND SUPPORT LOCATIONS
Safety stand and swing arm type lift . . . . . . . . . . . . . . . . . . . . . . . . . . . . .
INTRODUCTIONINœ14
Page 681 of 1354

EM0EM−03
S01283
B
SST
A
S01358
Oil Pump
S01630
SST
SST
− ENGINE MECHANICALTIMING BELT
EM−15
1996 RAV4 (RM447U)
REMOVAL
1. DISCONNECT PS RESERVOIR AND REMOVE RES-
ERVOIR BRACKET
2. DISCONNECT WIRE HARNESS BRACKET FOR DLC1
3. REMOVE GENERATOR (See page CH−7)
4. REMOVE GENERATOR BRACKET
5. w/ ABS:
REMOVE NO. 3 ABS ACTUATOR BRACKET (See page
BR−40)
6. REMOVE RH FRONT WHEEL
7. REMOVE RH ENGINE UNDER COVER
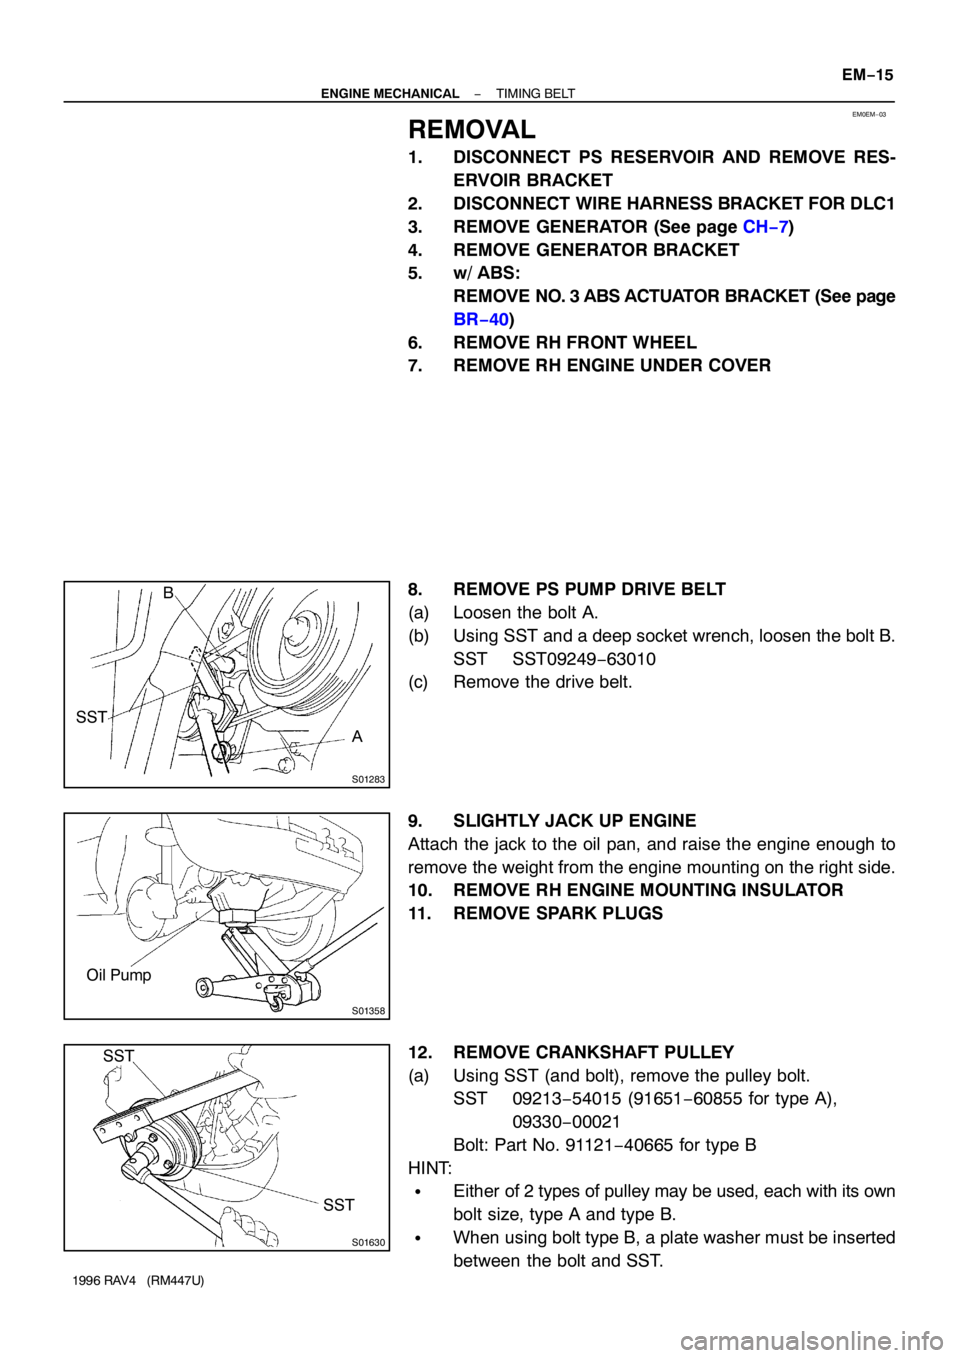
8. REMOVE PS PUMP DRIVE BELT
(a) Loosen the bolt A.
(b) Using SST and a deep socket wrench, loosen the bolt B.
SST SST09249−63010
(c) Remove the drive belt.
9. SLIGHTLY JACK UP ENGINE
Attach the jack to the oil pan, and raise the engine enough to
remove the weight from the engine mounting on the right side.
10. REMOVE RH ENGINE MOUNTING INSULATOR
11. REMOVE SPARK PLUGS
12. REMOVE CRANKSHAFT PULLEY
(a) Using SST (and bolt), remove the pulley bolt.
SST 09213−54015 (91651−60855 for type A),
09330−00021
Bolt: Part No. 91121−40665 for type B
HINT:
�Either of 2 types of pulley may be used, each with its own
bolt size, type A and type B.
�When using bolt type B, a plate washer must be inserted
between the bolt and SST.
Page 986 of 1354
LU065−02
P04232
P04350
P04233
− LUBRICATIONOIL PUMP
LU−11
1996 RAV4 (RM447U)
INSPECTION
1. INSPECT RELIEF VALVE
Coat the valve with engine oil and check that it falls smoothly
into the valve hole by its own weight.
If it doesn’t, replace the relief valve. If necessary, replace the oil
pump assembly.
2. INSPECT DRIVE AND DRIVEN ROTORS
3. INSPECT ROTOR BODY CLEARANCE
Using a feeler gauge, measure the clearance between the driv-
en rotor and body.
Standard body clearance:
0.10 − 0.16 mm (0.0039 − 0.0063 in.)
Maximum body clearance:
0.20 mm (0.0079 in.)
If the body clearance is greater than maximum, replace the ro-
tors as a set. If necessary, replace the oil pump assembly.
4. INSPECT ROTOR TIP CLEARANCE
Using a feeler gauge, measure the clearance between the drive
and driven rotor tips.
Standard tip clearance:
0.04 − 0.16 mm (0.0016 − 0.0063 in.)
Maximum tip clearance:
0.20 mm (0.0079 in.)
If the tip clearance is greater than maximum, replace the rotors
as a set.
Page 1111 of 1354

R05752
SST
R11852
Weight
R04211
Tires
(3 or more)Inner Diam.
Width RS−16
− SUPPLEMENTAL RESTRAINT SYSTEMSTEERING WHEEL PAD AND SPIRAL CABLE
1996 RAV4 (RM447U)
(d) Install the SST.
CAUTION:
Place the disc wheel on level ground.
(1) Connect the SST connector to the steering wheel
pad connector.
SST 09082−00700, 09082−00760
NOTICE:
To avoid damaging the SST connector and wire harness,
do not lock the secondary lock of the twin lock. Also, pro-
vide some slack for the SST wire harness inside the disc
wheel.
(2) Move the SST to at least 10 m (33 ft) away from the
steering wheel pad tied down on the disc wheel.
(e) Cover the steering wheel pad with cardboard box or tires.
�Covering method using cardboard box:
Cover the steering wheel pad with the cardboard
box and weight the cardboard box down in 4 places
with at least 190 N (20 kg, 44 lb).
Size of cardboard box:
Must exceed the following dimensions:
x= 460 mm (18.11 in.)
When dimension y of the cardboard box exceeds the
diameter of the disc wheel with tire to which the steer-
ing wheel pad is tied −
x= 460 mm (18.11 in.) + width of tire
y= 650 mm (25.59 in.)
NOTICE:
If a cardboard box smaller than the specified size is used,
the cardboard box will be broken by the shock of the airbag
deployment.
�Covering method using tires:
Place at least 3 tires without disc wheel on top of the
disc wheel with tire to which the steering wheel pad
is tied.
Tire size: Must exceed the following dimensions−
Width: 185 mm (7.28 in.)
Inner diameter: 360 mm (14.17 in.)
CAUTION:
Do not use tires with disc wheels.
Page 1134 of 1354

SA1YB−02
FA1535
SST
R10849
SA−20
− SUSPENSION AND AXLEFRONT DRIVE SHAFT
1996 RAV4 (RM447U)
REMOVAL
NOTICE:
�The hub bearing could be damaged if it is subjected
to the vehicle weight, such as when moving the ve-
hicle with the drive shaft bearing removed.
Therefore if it is absolutely necessary to place the ve-
hicle weight on the hub bearing, first support it with
the SST.
SST 09608−16042 (09608−02021, 09608−02041)
�w/ ABS:
After disconnecting the drive shaft from the axle hub,
work carefully so as not to damage ABS speed sensor
rotor serrations on the drive shaft.
1. REMOVE FRONT WHEEL
Torque: 103 N·m (1,050 kgf·cm, 76 ft·lbf)
2. REMOVE ENGINE UNDER COVER
3. DRAIN GEAR OIL (M/T) OR ATF (A/T)
4. w/ABS:
REMOVE BOLT AND ABS SPEED SENSOR
Torque: 8 N·m (80 kgf·cm, 69 in.·lbf)
5. REMOVE COTTER PIN, LOCK CAP AND LOCK NUT
(a) Remove the cotter pin and lock cap.
(b) With applying the brakes, remove the nut.
Torque: 216 N·m (2,200 kgf·cm, 159 ft·lbf)
6. D I S C O N N E C T T I E R O D E N D F R O M S T E E R I N G
KNUCKLE (See page SA−10)
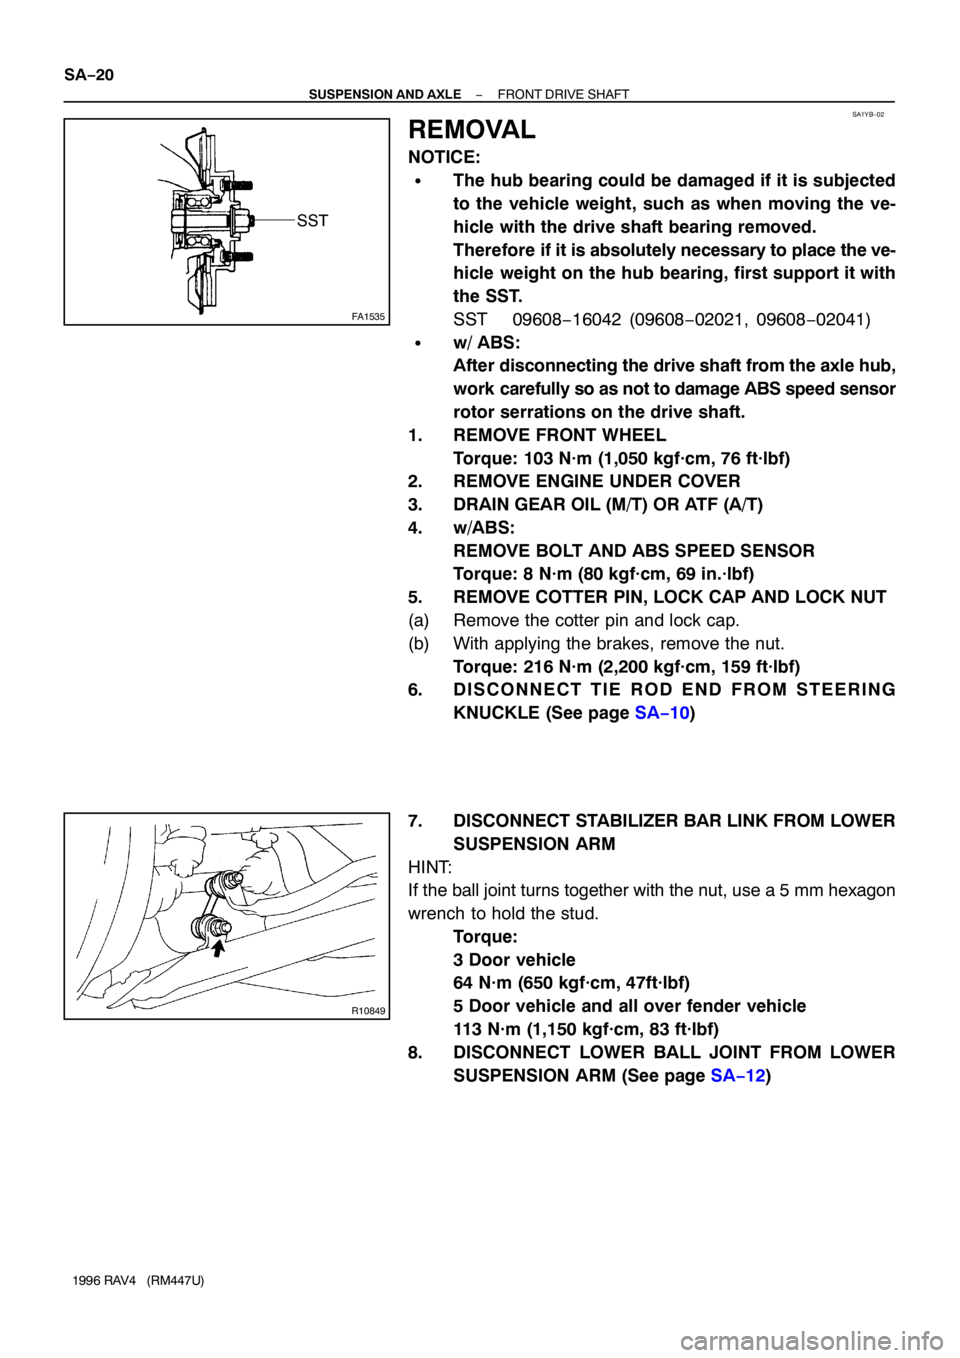
7. DISCONNECT STABILIZER BAR LINK FROM LOWER
SUSPENSION ARM
HINT:
If the ball joint turns together with the nut, use a 5 mm hexagon
wrench to hold the stud.
Torque:
3 Door vehicle
64 N·m (650 kgf·cm, 47ft·lbf)
5 Door vehicle and all over fender vehicle
113 N·m (1,150 kgf·cm, 83 ft·lbf)
8. DISCONNECT LOWER BALL JOINT FROM LOWER
SUSPENSION ARM (See page SA−12)
Page 1176 of 1354

R10041
SST
SA0UC−03
R10773Matchmarks SA−62
− SUSPENSION AND AXLEREAR DRIVE SHAFT
1996 RAV4 (RM447U)
REMOVAL
NOTICE:
�The hub bearing could be damaged if it is subjected
to the vehicle weight, such as when moving the ve-
hicle with the drive shaft bearing removed. Therefore,
if it is absolutely necessary to place the vehicle
weight on the hub bearing, first support it with SST.
SST 09608−16042 (09608−02021, 09608−02041)
�w/ ABS:
After disconnecting the drive shaft from the axle hub,
work carefully so as not to damage the sensor rotor
serrations on the drive shaft.
1. REMOVE REAR WHEEL
Torque: 103 N·m (1,050 kgf·cm, 76 ft·lbf)
2. w/ ABS:
REMOVE BOLT AND ABS SPEED SENSOR
Torque: 7.8 N·m (80 kgf·cm, 69 ft·lbf)
3. REMOVE DRIVE SHAFT LOCK NUT
(a) Remove the cotter pin and lock cap.
(b) With depressing the brakes, remove the nut.
Torque: 206 N·m (2,100 kgf·cm, 152 ft·lbf)
4. REMOVE DRIVE SHAFT
(a) Place matchmarks on the drive shaft and differential side
gear shaft.
(b) Remove the 4 nuts and washers, and disconnect the
drive shaft from the differential side gear shaft.
Torque: 56 N·m (570 kgf·cm, 41 ft·lbf)
(c) Remove the drive shaft from the axle carrier.
Page 1311 of 1354
R10970
W01133
Compressed Air
R10971
A
− STEERINGPOWER STEERING VANE PUMP
SR−37
1996 RAV4 (RM447U)
HINT:
There are 5 vane lengths with the following rotor and cam ring
marks:
Rotor and
cam ring markVane plate
part numberVane plate length mm
(in.)
None44345−1201014.996−14.998
(0.59039−0.59047)
144345−1202014.994−14.996
(0.59032−0.59039)
244345−1203014.992−14.994
(0.59024−0.59032)
344345−1204014.990−14.992
(0.59016−0.59024)
444345−1205014.988−14.990
(0.59008−0.59016)
3. INSPECT FLOW CONTROL VALVE
(a) Coat the flow control valve with power steering fluid and
check that it falls smoothly into the valve hole by its own
weight.
(b) Check the valve for leakage. Close one of the holes and
apply 392−490 kPa (4−5 kgf/cm
2, 57−71 psi) of com-
pressed air into the opposite side, and confirm that air
does not come out from the end hole.
If necessary, replace the valve with one having the same letter
as inscribed on the front housing.
Inscribed mark: A, B, C, D, E or F