Page 1072 of 1399

INSTALLATION
1. PACK BEARINGS WITH MP GREASE
(a) Place MP grease on the palm of your hand")
SA1UD−01
SA2636
Grease
R04134
SST
−
SUSPENSION AND AXLE FRONT AXLE HUB
SA−9
1996 LAND CRUISER (RM451U)
INSTALLATION
1. PACK BEARINGS WITH MP GREASE
(a) Place MP grease on the palm of your hand.
(b) Pack grease into the bearing until the grease oozes out
from the other side.
(c) Do the same around the bearing circumference.
2. COAT INSIDE OF HUB WITH MP GREASE
3. INSTALL INNER BEARING AND OIL SEAL
(a) Place the inner bearing into the hub.
(b) Using SST, install a new oil seal into the hub. SST 09950−60020 (09951 −00910),
09950 −70010 (09951 −07150)
(c) Coat the oil seal lip with MP grease.
4. INSTALL AXLE HUB WITH DISC TO SPINDLE
(a) Place the axle hub with disc to the spindle.
(b) Install the outer bearing.
(c) Install the thrust washer.
5. ADJUST PRELOAD
(a) Using SST, torque the adjusting nut.
SST 09607−60020
Torque: 59 N·m (600 kgf·cm, 43 ft·lbf)
(b) Turn the hub right and left 2 or 3 times.
(c) Using SST, torque the adjusting nut.
SST 09607−60020
Torque: 59 N·m (600 kgf·cm, 43 ft·lbf)
(d) Loosen the nut until it can be turned by hand.
(e) Using SST, torque the adjusting nut again.
SST 09607−60020
Torque: 5.4 N·m (55 kgf·cm, 48 in.·lbf)
NOTICE:
Check that the bearing has no play.
(f) Using a spring tension gauge, measure the preload.
Preload (at starting):
28 − 56 N (2.9 − 5.7 kgf, 6.4 − 12.6 lbf)
6. INSTALL LOCK WASHER AND LOCK NUT
(a) Install a new lock washer and lock nut.
(b) Using SST, torque the lock nut. SST 09607−60020
Torque: 64 N·m (650 kgf·cm, 47 ft·lbf)
(c) Check that axle hub turns smoothly and that the bearing has no play.
(d) Using a spring tension gauge, check the preload. Preload (at starting):
28−56 N (2.9−5.7 kgf, 6.4−12.6 lbf)
If it is not within the specification, adjust it with the adjusting nut
after removing the lock washer and lock nut.
Brought to you by BirfMark
Brought to you by BirfMark
Version 1.11 - 03/16/2010
Page 1101 of 1399

5. INSTALL SIDE BEARINGS
�w/o Differential lock:
Using SST and a press, inst")
SA2160
Boiling Water
SA2178
SA2182
SA−38
−
SUSPENSION AND AXLE FRONT DIFFERENTIAL CARRIER
1996 LAND CRUISER (RM451U)
5. INSTALL SIDE BEARINGS
�w/o Differential lock:
Using SST and a press, install the 2 side bearings on the
differential case.
SST 09950−60010 (09951 −00480)
�w/ Differential lock:
Using SST and a press, install the 2 side bearings on the
differential case.
SST 09223−15020, 09950 −60010 (09951−00480)
6. INSTALL RING GEAR ON DIFFERENTIAL CASE
(a) Clean the contact surfaces of the differential case and ring gear.
(b) Heat the ring gear to about 100° C (212°F) in boiling wa-
ter.
(c) Carefully remove the ring gear from the water.
(d) After the moisture on the ring gear has completely evapo-
rated, quickly install the ring gear to the differential case.
(e) Align the matchmarks on the ring gear and differential
case.
(f) Temporarily install new 5 lock plates and 10 set bolts.
NOTICE:
The ring gear set bolts should not tighten until the ring gear
has cooled sufficiently.
(g) After the ring gear cools down enough, tighten the set bolts uniformly and a little at a time.
Torque: 97 N·m (985 kgf·cm, 71 ft·lbf)
(h) Using a drift punch and hammer, stake the lock plates.
HINT:
Stake one claw flush with the flat surface of the bolt. For the
claw contacting the protruding portion of the bolt, stake only the
half on the tightening side.
Brought to you by BirfMark
Brought to you by BirfMark
Version 1.11 - 03/16/2010
Page 1118 of 1399
SA1UX−01
FA0533
SST
SST
FA0534
SST
SST
−
SUSPENSION AND AXLE FRONT LATERAL CONTROL ROD
SA−55
1996 LAND CRUISER (RM451U)
REPLACEMENT
1. REMOVE BUSHING
Using SST, remove the bushing from the lateral control rod.
SST 09710 −22042 (09710 −02051, 09710 −02071),
09950 −70010 (09951 −07150)
2. INSTALL BUSHING
Using SST, install a new bushing into the lateral control rod. SST 09710−22042 (09710 −02051, 09710−02071)
HINT:
Do not use a lubricant when pressing in the bushing.
Brought to you by BirfMark
Brought to you by BirfMark
Version 1.11 - 03/16/2010
Page 1131 of 1399

REPLACEMENT
1. REMOVE OIL SEAL AND INNER BEARING
(a) Using SST, rem")
SA1VA−01
R13157
Brass Bar
Positions
R13158
SST
R13159
SA−68
−
SUSPENSION AND AXLE REAR AXLE HUB
1996 LAND CRUISER (RM451U)
REPLACEMENT
1. REMOVE OIL SEAL AND INNER BEARING
(a) Using SST, remove the oil seal.
SST 09308−00010
(b) Remove the inner bearing from the hub.
2. REMOVE BEARING OUTER RACE
Using a brass bar and hammer, remove the bearing outer
races.
NOTICE:
Be careful not to damage the ABS speed sensor rotor.
3. INSTALL BEARING OUTER RACE
�Outside race:
Using SST and a press, install new bearing outer races.
SST 09950−60020 (09951 −00710),
09950 −70010 (09951 −07150)
�Inside race:
Using SST and a press, install new bearing outer races.
SST 09950−60020 (09951 −00810),
09950 −70010 (09951 −07150)
4. PACK BEARINGS WITH MP GREASE
(a) Place MP grease on the palm of your hand.
(b) Pack grease into the bearing until the grease ooze out from the other side.
(c) Do the same around the bearing circumference.
5. COAT INSIDE OF HUB WITH MP GREASE
6. INSTALL INNER BEARING AND OIL SEAL
(a) Place inner bearing into the hub.
(b) Using SST, install a new oil seal into the hub. SST 09223−15020, 09950 −70010 (09951−07150)
(c) Apply MP grease to the oil seal lip.
Brought to you by BirfMark
Brought to you by BirfMark
Version 1.11 - 03/16/2010
Page 1134 of 1399
SA1VC−01
−
SUSPENSION AND AXLE REAR WHEEL HUB BOLT
SA−71
928
Author�: Date�:
1996 LAND CRUISER (RM451U)
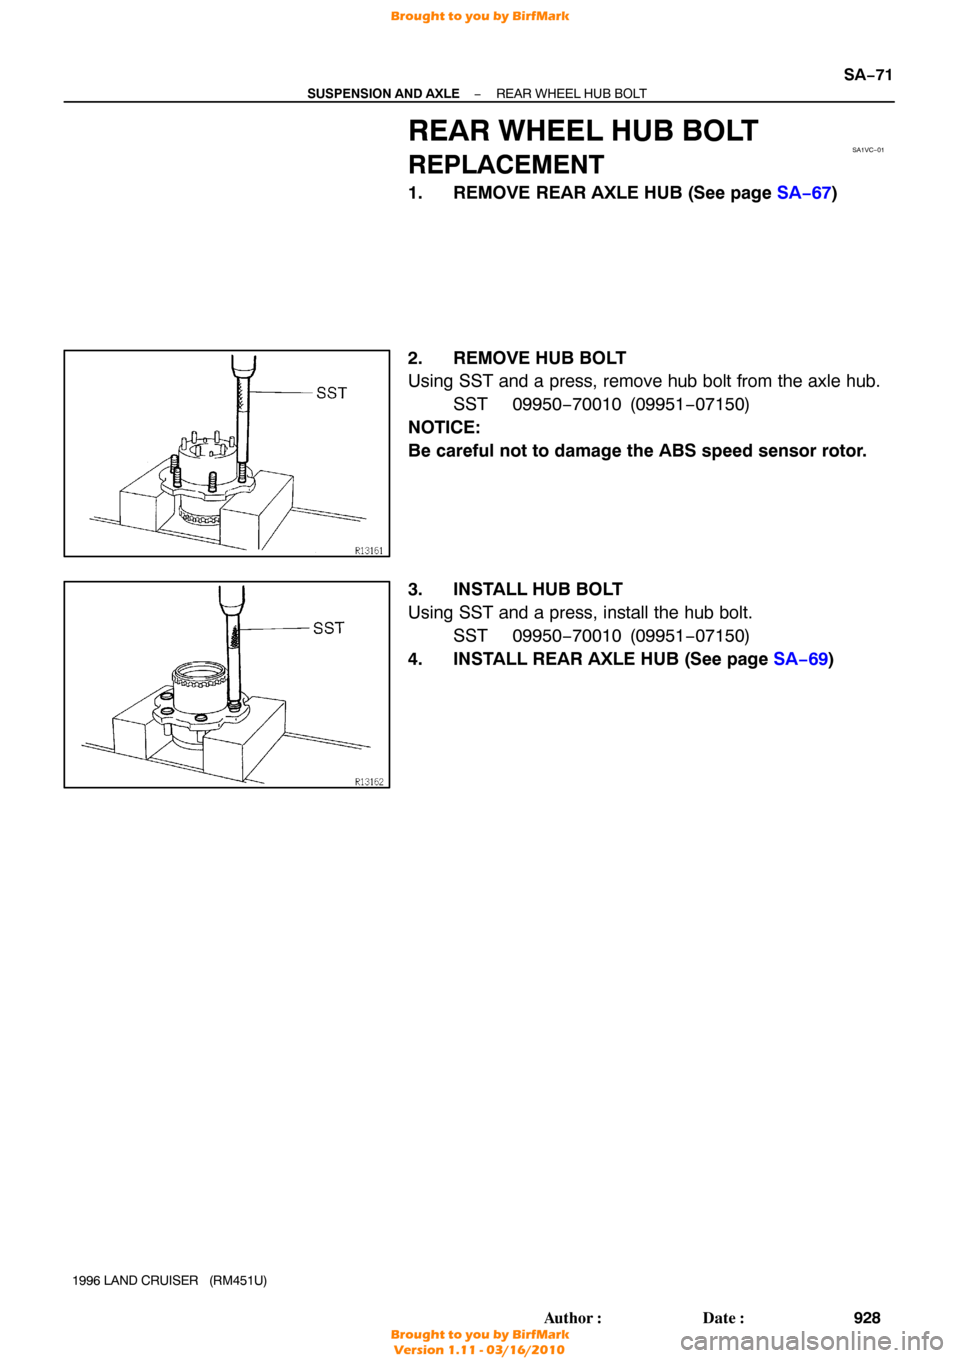
REAR WHEEL HUB BOLT
REPLACEMENT
1. REMOVE REAR AXLE HUB (See page SA−67 )
2. REMOVE HUB BOLT
Using SST and a press, remove hub bolt from the axle hub. SST 09950−70010 (09951 −07150)
NOTICE:
Be careful not to damage the ABS speed sensor rotor.
3. INSTALL HUB BOLT
Using SST and a press, install the hub bolt. SST 09950−70010 (09951 −07150)
4. INSTALL REAR AXLE HUB (See page SA−69 )
Brought to you by BirfMark
Brought to you by BirfMark
Version 1.11 - 03/16/2010
Page 1147 of 1399

19. REMOVE RING GEAR
(a) Place matchmarks on the ring gear and differential case.
(b) Remove the 12 ring")
SA2464
SA−84
−
SUSPENSION AND AXLE REAR DIFFERENTIAL CARRIER
1996 LAND CRUISER (RM451U)
19. REMOVE RING GEAR
(a) Place matchmarks on the ring gear and differential case.
(b) Remove the 12 ring gear set nuts and bolts.
(c) Using a plastic hammer, tap on the ring gear to remove it
from the differential case.
20. CHECK DIFFERENTIAL CASE RUNOUT
(a) Install the differential case in the differential carrier and tighten the adjusting nut just to where there is no play in
the bearing.
(b) Using a dial indicator, measure the differential case run- out.
Maximum case runout: 0.07 mm (0.0028 in.)
(c) Remove the differential case.
21. w/o DIFFERENTIAL LOCK: REMOVE SIDE BEARINGS FROM DIFFERENTIAL
CASE
Using SST, remove the 2 side bearings from the differential
case. SST 09950 −40010 (09951 −04010, 09952 −04010,
09953 −04020, 09955 −04060, 09957 −04010,
09958 −04010), 09950−60010 (09951 −00480)
22. w/ DIFFERENTIAL LOCK:
REMOVE SIDE BEARINGS FROM DIFFERENTIAL
CASE
(a) Using SST, remove the side bearing (ring gear side). SST 09950 −40010 (09951 −04010, 09952 −04010,
09953 −04020, 09955 −04060, 09957 −04010,
09958 −04010), 09950−60010 (09951 −00480)
HINT:
Fix the claws of SST to the notches in the differential case.
(b) Using SST, 4 bolts and a press, remove the side bearing (cover side).
SST 09550−10012 (09557 −10010),
09950 −70010 (09951 −07150)
HINT:
Fix the claws of SST to the notches in the differential case.
Brought to you by BirfMark
Brought to you by BirfMark
Version 1.11 - 03/16/2010
Page 1153 of 1399

(g) After the ring gear cools down enough, tighten the set
bolts")
SA2425
SSTSST
Front
Rear
SA3102
SST
R13414
SST
SA−90
−
SUSPENSION AND AXLE REAR DIFFERENTIAL CARRIER
1996 LAND CRUISER (RM451U)
(g) After the ring gear cools down enough, tighten the set
bolts uniformly and a little at a time.
Torque: 110 N·m (1,125 kgf·cm, 81 ft·lbf)
6. CHECK RING GEAR RUNOUT
(a) Install the differential case onto the carrier and tighten the
adjusting nut just to where there is no play in the bearings.
(b) Using a dial indicator, check the ring gear runout. Maximum runout: 0.10 mm (0.0039 in.)
(c) Remove the differential case.
7. INSTALL DRIVE PINION FRONT AND REAR BEARING
OUTER RACES
(a) Front side: Using SST and a press, install the 2 outer races.
SST 09950−60020 (09951 −00710),
09950 −70010 (09951 −07150)
(b) Rear side: Using SST and a press, install the 2 outer races.
SST 09950−60020 (09951 −00890),
09950 −70010 (09951 −07150)
8. INSTALL DRIVE PINION REAR BEARING
(a) Install the washer on the drive pinion.
HINT:
First fit a washer with the same thickness as the washer which
was removed, then after checking the tooth contact pattern, re-
place the washer with one of a different thickne ss if necessary.
(b) Using SST and a press, install the rear bearing onto the drive pinion.
SST 09506−35010
9. TEMPORARILY ADJUST DRIVE PINION PRELOAD
(a) Install the drive pinion and front bearing.
HINT:
Assemble the spacer and oil seal after adjusting the gear con-
tact pattern.
(b) Install the oil slinger.
(c) Install the companion flange with SST. SST 09550 −30010 (09951 −03010, 09953 −03010,
09954 −03010, 09955 −03030, 09956−03020)
Brought to you by BirfMark
Brought to you by BirfMark
Version 1.11 - 03/16/2010
Page 1156 of 1399

13. w/ DIFFERENTIAL LOCK:
ADJUST SIDE BEARING PRELOAD
(a) After adjustment with the backlash a")
RA0090
R08269
SST
−
SUSPENSION AND AXLE REAR DIFFERENTIAL CARRIER
SA−93
1996 LAND CRUISER (RM451U)
13. w/ DIFFERENTIAL LOCK:
ADJUST SIDE BEARING PRELOAD
(a) After adjustment with the backlash as reference, remove
the ring gear side plate washer.
(b) Using a micrometer, measure the thickness of the re- moved plate washer.
(c) Install a new thicker washer of 0.06 − 0.09 mm (0.0024 −
0.0035 in.) than the washer removed.
HINT:
Select a washer which can be pressed in 2/3 of the way with fin-
ger.
(d) Using SST, tap in the plate washer. SST 09504−22010
(e) Align the matchmarks on the cap and carrier.
(f) Tighten the 4 bearing cap bolts to the specified torque. Torque: 113 N·m (1,150 kgf·cm, 83 ft·lbf)
(g) Using a dial indicator, adjust the ring gear backlash until it is within the specification.
Backlash: 0.15 − 0.20 mm (0.0059 − 0.0079 in.)
If it is not within the specification, follow the procedure listed be-
low.
If backlash is greater than the specification:
Replace the cover side washer with a thicker washer. When do-
ing so replace the ring gear side plate washer with one having
a thickness equalling the amount the cover side plate washer
thickness was decreased.
If backlash is less than specification:
Replace the cover side washer with a thicker washer. When do-
ing so, replace the ring gear side plate washer with one having
a thickness equalling the amount the cover side plate washer
thickness was increased.
Brought to you by BirfMark
Brought to you by BirfMark
Version 1.11 - 03/16/2010

REPLACEMENT
1. REMOVE BUSHING
Using SST, remove the bushing from the lat")