1996 NISSAN QUEST warning
[x] Cancel search: warningPage 95 of 235
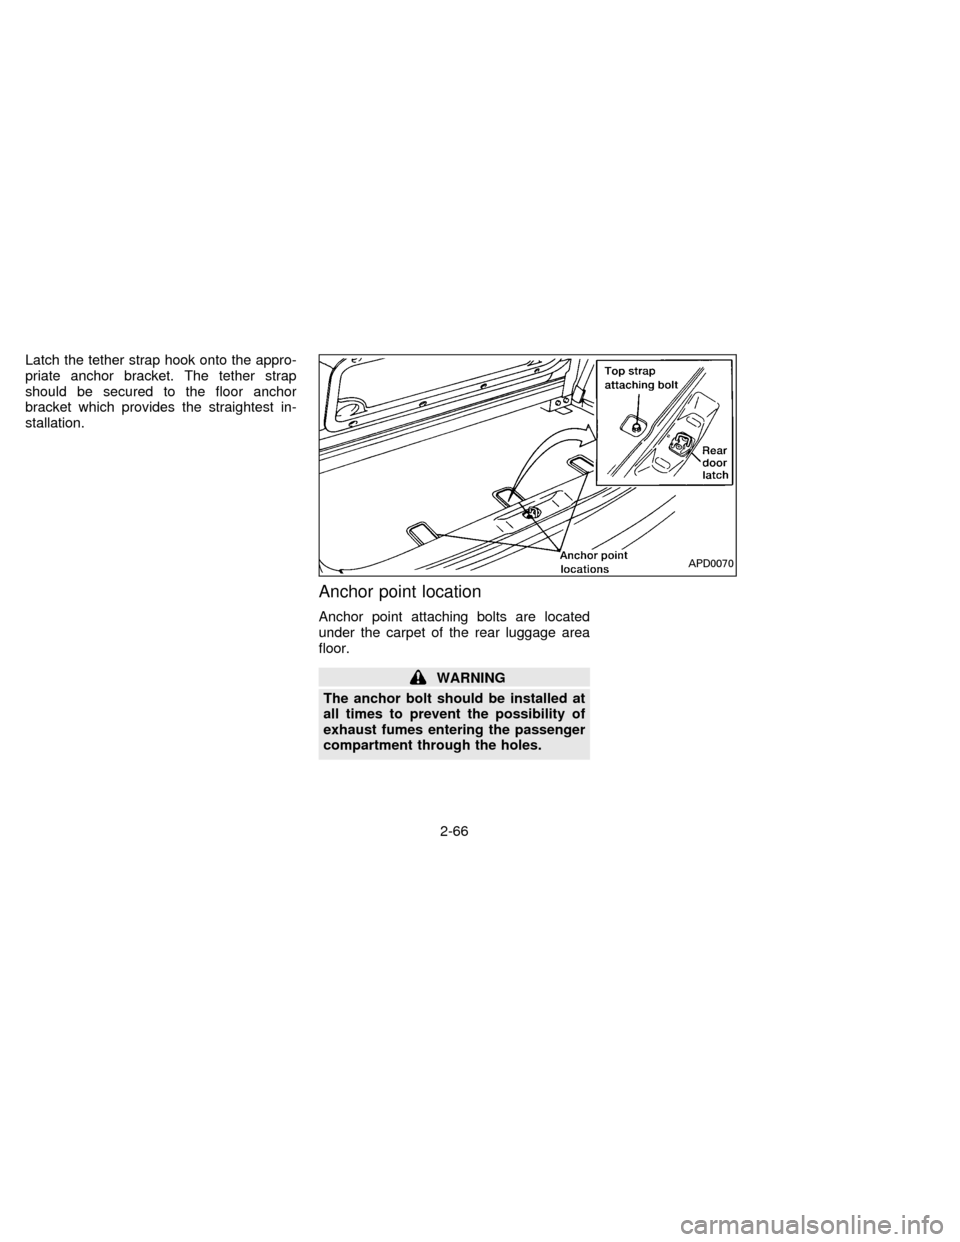
Latch the tether strap hook onto the appro-
priate anchor bracket. The tether strap
should be secured to the floor anchor
bracket which provides the straightest in-
stallation.
Anchor point location
Anchor point attaching bolts are located
under the carpet of the rear luggage area
floor.
WARNING
The anchor bolt should be installed at
all times to prevent the possibility of
exhaust fumes entering the passenger
compartment through the holes.
APD0070
2-66
ZX
Page 96 of 235
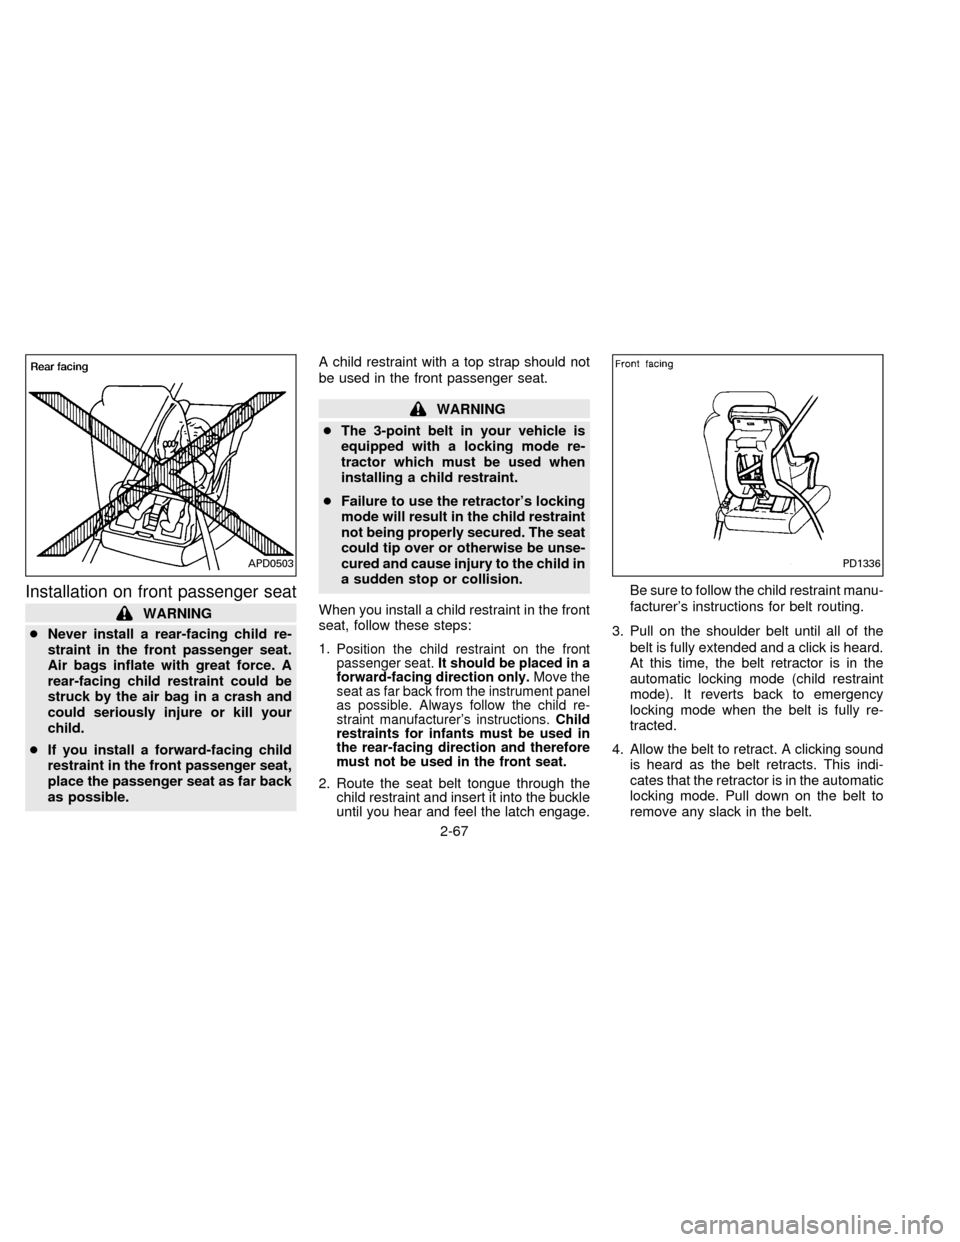
Installation on front passenger seat
WARNING
cNever install a rear-facing child re-
straint in the front passenger seat.
Air bags inflate with great force. A
rear-facing child restraint could be
struck by the air bag in a crash and
could seriously injure or kill your
child.
cIf you install a forward-facing child
restraint in the front passenger seat,
place the passenger seat as far back
as possible.A child restraint with a top strap should not
be used in the front passenger seat.
WARNING
cThe 3-point belt in your vehicle is
equipped with a locking mode re-
tractor which must be used when
installing a child restraint.
cFailure to use the retractor's locking
mode will result in the child restraint
not being properly secured. The seat
could tip over or otherwise be unse-
cured and cause injury to the child in
a sudden stop or collision.
When you install a child restraint in the front
seat, follow these steps:
1.
Position the child restraint on the front
passenger seat.It should be placed in a
forward-facing direction only.Move the
seat as far back from the instrument panel
as possible. Always follow the child re-
straint manufacturer's instructions.Child
restraints for infants must be used in
the rear-facing direction and therefore
must not be used in the front seat.
2. Route the seat belt tongue through the
child restraint and insert it into the buckle
until you hear and feel the latch engage.Be sure to follow the child restraint manu-
facturer's instructions for belt routing.
3. Pull on the shoulder belt until all of the
belt is fully extended and a click is heard.
At this time, the belt retractor is in the
automatic locking mode (child restraint
mode). It reverts back to emergency
locking mode when the belt is fully re-
tracted.
4. Allow the belt to retract. A clicking sound
is heard as the belt retracts. This indi-
cates that the retractor is in the automatic
locking mode. Pull down on the belt to
remove any slack in the belt.
APD0503PD1336
2-67
ZX
Page 97 of 235
5. Before placing the child in the child re-
straint, use force to tilt the child restraint
from side to side, and tug it forward to
make sure it is securely held in place.
6. Check that the retractor is in the auto-
matic locking mode by trying to pull more
belt out of the retractor. If you cannot pull
any more belt webbing out of the retrac-
tor, the belt is in the automatic locking
mode.
7. Check to make sure the child restraint is
properly secured prior to each use. If the
lap belt is not locked, repeat steps 3
through 6.
After the child restraint is removed and the
seat belt is allowed to wind back into the
retractor, the automatic locking mode (child
restraint mode) is canceled; the seat belt
may be used as normal and will only lock
during a sudden stop or impact.INTEGRATED CHILD SAFETY
SEATS (If so equipped)
WARNING
cFailure to follow the instructions for
the use of these integrated child
safety seats can result in your child
striking vehicle's interior during a
sudden stop or crash, causing the
injury or death of your child.
cImproper use of a child restraint can
increase the risk or severity of injury
for both the child and other occu-
pants of the vehicle.
cAll U.S. states and provinces of
Canada require that infants and
small children be restrained in ap-
proved child restraints at all times
while the vehicle is being operated.
The optional second row bench seat con-
tains two integrated child safety seats.
These seats are designed for use only by
children who weigh between 22 and 60
pounds (10-27 kg) and whose height is 45
inches (1145 mm) or less and who are
capable of sitting upright alone.In addition, these integrated child safety
seats must only be used by children who
meet the following requirements:
cAGE:
At least one year old
cSEATED HEIGHT:
Top of child's shoulders must be below
the shoulder harness openings of the
integrated child seat.
Children smaller than these requirements
should be restrained in an appropriate
separate child restraint. Children larger than
these requirements should also be re-
strained in an appropriate separate child
restraint or in the appropriate vehicle seat
belt system. Refer to ``Child Restraints for
Infants and Small Children'' and ``Precau-
tions On Seat Belt Usage'' in this chapter for
important child safety information.
2-68
ZX
Page 98 of 235
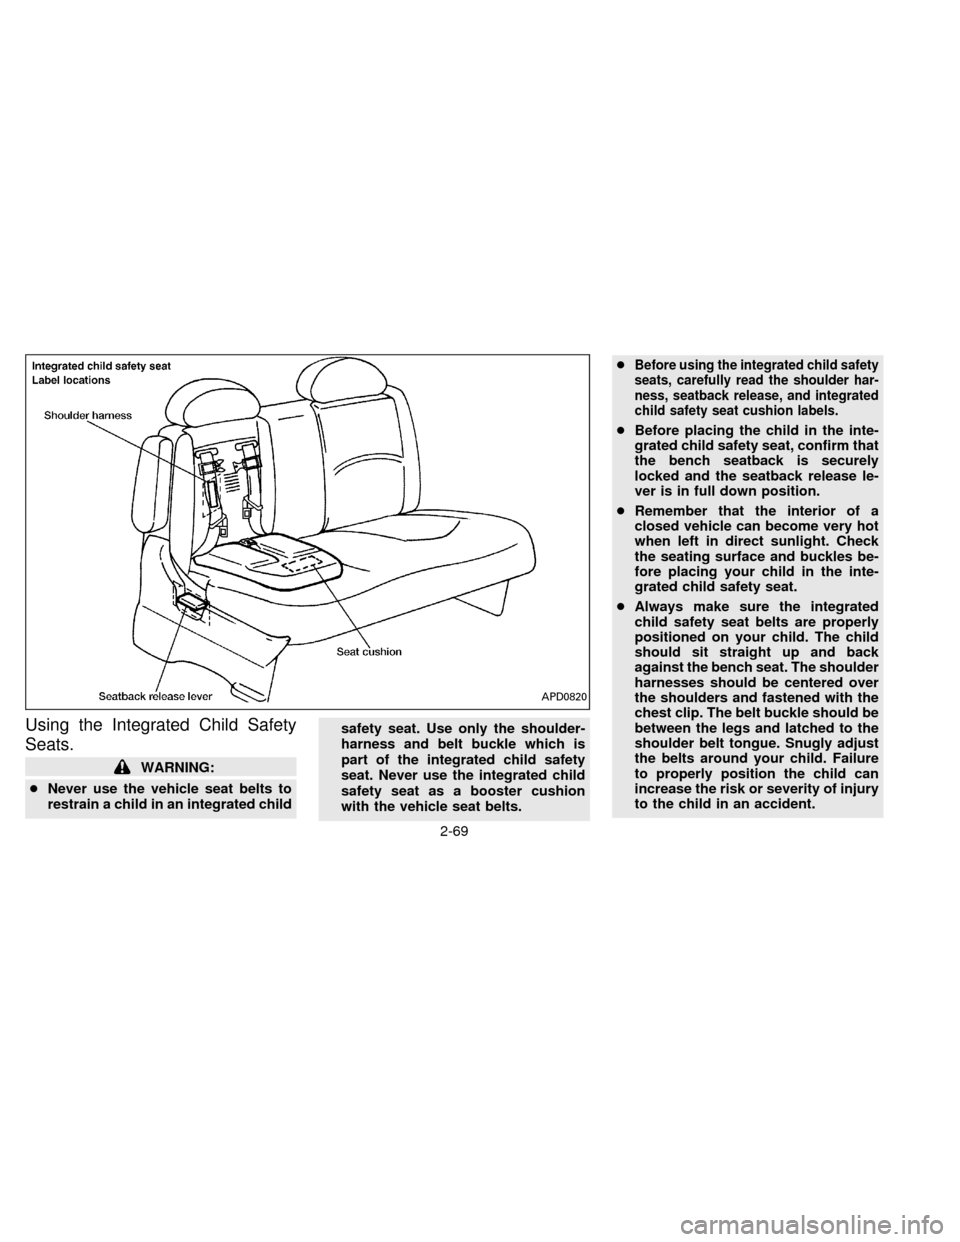
Using the Integrated Child Safety
Seats.
WARNING:
cNever use the vehicle seat belts to
restrain a child in an integrated childsafety seat. Use only the shoulder-
harness and belt buckle which is
part of the integrated child safety
seat. Never use the integrated child
safety seat as a booster cushion
with the vehicle seat belts.c
Before using the integrated child safety
seats, carefully read the shoulder har-
ness, seatback release, and integrated
child safety seat cushion labels.
cBefore placing the child in the inte-
grated child safety seat, confirm that
the bench seatback is securely
locked and the seatback release le-
ver is in full down position.
cRemember that the interior of a
closed vehicle can become very hot
when left in direct sunlight. Check
the seating surface and buckles be-
fore placing your child in the inte-
grated child safety seat.
cAlways make sure the integrated
child safety seat belts are properly
positioned on your child. The child
should sit straight up and back
against the bench seat. The shoulder
harnesses should be centered over
the shoulders and fastened with the
chest clip. The belt buckle should be
between the legs and latched to the
shoulder belt tongue. Snugly adjust
the belts around your child. Failure
to properly position the child can
increase the risk or severity of injury
to the child in an accident.
APD0820
2-69
ZX
Page 103 of 235
brush the webbing, wipe it with a cloth
and allow it to dry in the shade. Do not
allow the shoulder harnesses to retract
until they are completely dry.
cThe integrated child safety seats cloth
removable pads may be cleaned with
mild soap and water. The cloth remov-
able pads are attached to the seats with
fastener strips, and may be easily re-
moved. The pads are machine washable.
Follow the instructions attached to the
cloth removable pads.
CAUTION
Failure to follow the washing instruc-
tions provided on the cloth removable
pads may result in premature wear or
damage.
cPeriodically inspect the belt and metal
components of the integrated child safety
seats, such as the buckles, tongues,
shoulder harness webbings, and latching
indicators. Periodically check the func-
tion of the integrated child safety seat
shoulder harness retractor functions. If
loose parts, deterioration, cuts, frays,
malfunctions or other damage to the beltwebbings or metal parts are found, see
your NISSAN dealer for repairs.
Inspection After An Accident
If your vehicle was involved in an accident,
before using the integrated child safety
seats, all related components should be
inspected by a NISSAN dealer for damage.
Damage to the integrated child safety seats
or related components must be repaired.
Push the lock lever down and adjust the
steering wheel up or down to the desired
position. Pull the lock lever up firmly to lock
the steering wheel in place.
Gently pull down on the wheel to be sure it
is properly locked.
WARNING
Do not adjust the steering wheel while
driving.
APD0812
TILTING STEERING WHEEL
2-74
ZX
Page 109 of 235
indicator light comes on when the air condi-
tioner is on. To stop the air conditioner,
push the button again; the indicator light
goes off.
The air conditioner cooling function op-
erates only when the engine is running.
WARNING
Positioning of the heating or air condi-
tioning controls should not be done
while driving, in order that full attention
may be given to the driving operation.
HEATER OPERATION
Heating
This mode is used to direct most of the hot
air to the floor outlets.
The air recirculation button light shouldnot
be on for normal heating.
1. Push the
button in.
2. Turn the fan control dial to select speed.
3. Move the temperature control dial to the
desired position.
Ventilation
This mode directs air to the side and center
vents.
1. Push the
button in.
2. Turn the fan control dial to select speed.
3. Move the temperature control dial to the
desired position.
NOTE: The recirculate position can be
used.
Defrosting or defogging
This mode is used to defrost/defog the
windows.
1. Push the
button in.
2. Turn the fan control dial to select speed.
3. Move the temperature control dial to the
desired position.
When the
button is pushed, the air
conditioner automatically turns on to de-
fog the windshield. The recirculated air
mode automatically turns off to reduce
window fogging.
When
is selected, the air condi-
tioner indicator light does not illuminateunless illuminated in the previously se-
lected mode. However, the air condi-
tioner operates to dehumidify if the out-
side temperature is more than 40ÉF
(4ÉC), whether or not the A/C button has
been pressed. Manual selection and illu-
mination of the A/C button does not
override the automatic dehumidifying
which occurs when
is selected.
Operating Tips
Clear snow and ice from the wiper
blades and air inlet in front of the wind-
shield. This improves defrosting/-
defogging operation.
Bi-level heating/cooling
The bi-level mode directs air to the side and
center vents and to the floor outlets.
Bi-level is also a cooling mode when high
sun load conditions are present with cool
temperatures.
With the A/C system in operation, this mode
can be used to cool the passenger's or
driver's feet under high temperature condi-
tions.
With the A/C system in operation under high
3-4
ZX
Page 133 of 235
WARNING
Do not leave children, unreliable
adults, or pets alone in your vehicle.
They could accidently injure them-
selves or others through inadvertent
operation of the vehicle. Also, on hot,
sunny days, temperatures in a closed
vehicle could quickly become high
enough to cause severe or possibly
fatal injuries to people or animals.
EXHAUST GAS (Carbon
Monoxide)
WARNING
Do not breathe exhaust gases; they
contain colorless and odorless carbon
monoxide. Carbon monoxide is dan-
gerous. It can cause unconsciousness
or death.
cIf you suspect that exhaust fumes
are entering the vehicle, drive with
all windows fully open, and have the
vehicle inspected immediately.
cDo not run the engine in closed
spaces such as a garage for any
longer than is absolutely necessary.c
Do not park the vehicle with the en-
gine running for any extended length
of time.
cKeep the rear door and flip-up rear
window closed while driving, other-
wise exhaust gases could be drawn
into the passenger compartment. If
you must drive in this manner for
some reason, take the following
steps.
1. Open all the windows.
2. Set the air recirculate switch to
``OFF'' and the fan control dial at 4
(high) to circulate the air.
cIf electrical wiring or other cable
connections must pass to a trailer
through a seal on the body, follow
the manufacturer's recommendation
to prevent carbon monoxide entry
into the vehicle.
cThe exhaust system and body
should be inspected by a qualified
mechanic whenever:
a. The vehicle is raised for service.b. You suspect that exhaust fumes
are entering into the passenger
compartment.
c. You notice a change in the sound
of the exhaust system.
d.
You have had an accident involv-
ing damage to the exhaust system,
underbody, or rear of the vehicle.
THREE WAY CATALYST
The three way catalyst is an emission con-
trol device installed in the exhaust system.
Exhaust gases in the three way catalyst are
burned at high temperatures to help reduce
pollutants.
WARNING
cThe exhaust gas and the exhaust
system are very hot. While the en-
gine is running, keep people or flam-
mable materials away from the ex-
haust pipe.
cDo not stop or park the vehicle over
flammable materials such as dry
grass, waste paper or rags, as they
may burn easily.
PRECAUTIONS WHEN
STARTING AND DRIVING
4-2
ZX
Page 134 of 235
To help prevent damage
cDo not use leaded gasoline.
Deposits from leaded gasoline will se-
riously reduce the three way cata-
lyst's ability to help reduce exhaust
pollutants.
cKeep your engine tuned up. Malfunc-
tions in the ignition, fuel injection, or
electrical systems can cause overrich
fuel flow into the catalyst, causing it to
overheat. Do not keep driving if the
engine misfires, or if noticeable loss
of performance or other unusual op-
erating conditions are detected. Have
the vehicle inspected promptly by an
authorized NISSAN dealer.
cAvoid driving with an extremely low
fuel level. Running out of fuel could
cause the engine to misfire, damaging
the three way catalyst.
cDo not race the engine while warming
it up.
cDo not push or tow your vehicle to
start the engine.Failure to operate this vehicle in a safe and
prudent manner may result in loss of control
or an accident. Be alert and drive defen-
sively at all times. Obey all traffic regula-
tions. Avoid excessive speed, high speed
cornering, or sudden steering maneuvers,
because these driving practices could
cause you to lose control of your vehicle.As
with any vehicle, a loss of control could
result in a collision with other vehicles or
objects, or cause the vehicle to rollover,
particularly if the loss of control causes
the vehicle to slide sideways.Be attentive
at all times, and avoid driving when tired.
Never drive when under the influence of
alcohol or drugs (including prescription or
over-the-counter drugs which may cause
drowsiness). Always wear your seat belt as
outlined in the ``Seat Belts'' section of this
manual, and also instruct your passengers
to do so.
WARNING
Alcohol in the blood stream reduces
coordination, delays reaction time and
impairs judgement. Driving after drink-
ing alcohol increases the likelihood of
being involved in an accident injuring
yourself and others. Additionally, if you
are injured in an accident alcohol can
increase the severity of the injury.
Nissan is committed to safe driving. How-
ever, you must choose not to drive under
the influence of alcohol. Every year thou-
sands of people are injured or killed in
alcohol related accidents. Although the local
laws vary on what is considered to be
legally intoxicated, the fact is that alcohol
affects all people differently and most
people underestimate the effects of alcohol.
Remember, drinking and driving don't mix!
And that's true for drugs, too (over the
counter, prescription, and illegal drugs).
Don't drive if your ability to operate your
vehicle is impaired by alcohol, drugs, or
some other physical condition.
AVOIDING COLLISION AND
ROLLOVERDRINKING ALCOHOL/DRUGS
AND DRIVING
4-3
ZX