Page 59 of 235
UNDERSEAT STORAGE TRAY
Some front passenger seats have an under-
seat storage tray.
TABLETOP SEATS
The second and third row seats convert to
tabletop with built-in cupholders. To use the
tabletop seats, lift up on the seatback re-
lease lever and fold the seatback forward.
WARNING
cNever place hard items such as cof-
fee mugs or drinking glasses on the
tabletop seats when the vehicle is
moving. Any item can become a pro-
jectile inside a vehicle involved in a
collision. To help prevent personal
injury, never leave loose items on
the folded-down tabletop seats when
the vehicle is moving.
cDo not use the tabletop and cup
holder feature while the vehicle is in
motion unless you are properly
seated with your seat belt on.
APD0811
APD0129
2-30
ZX
Page 60 of 235
To use the cup holder, pull the cover away
from the side of the front passenger seat.
Pull the cup holder out of the cover.
To store the cup holder, push it back into the
cover and lift the cover to its original position
against the side of the seat.WARNING
cThe driver should not pull out the
cup holder or remove or insert cups
into the cup holder while driving inorder that full attention may be given
to the driving operation.
cAvoid abrupt starting and braking
when the cup holder is being used to
prevent spilling the drink. If the liq-
uid is hot it can scald you or your
passenger.
APD0087
CUP HOLDER
2-31
ZX
Page 62 of 235

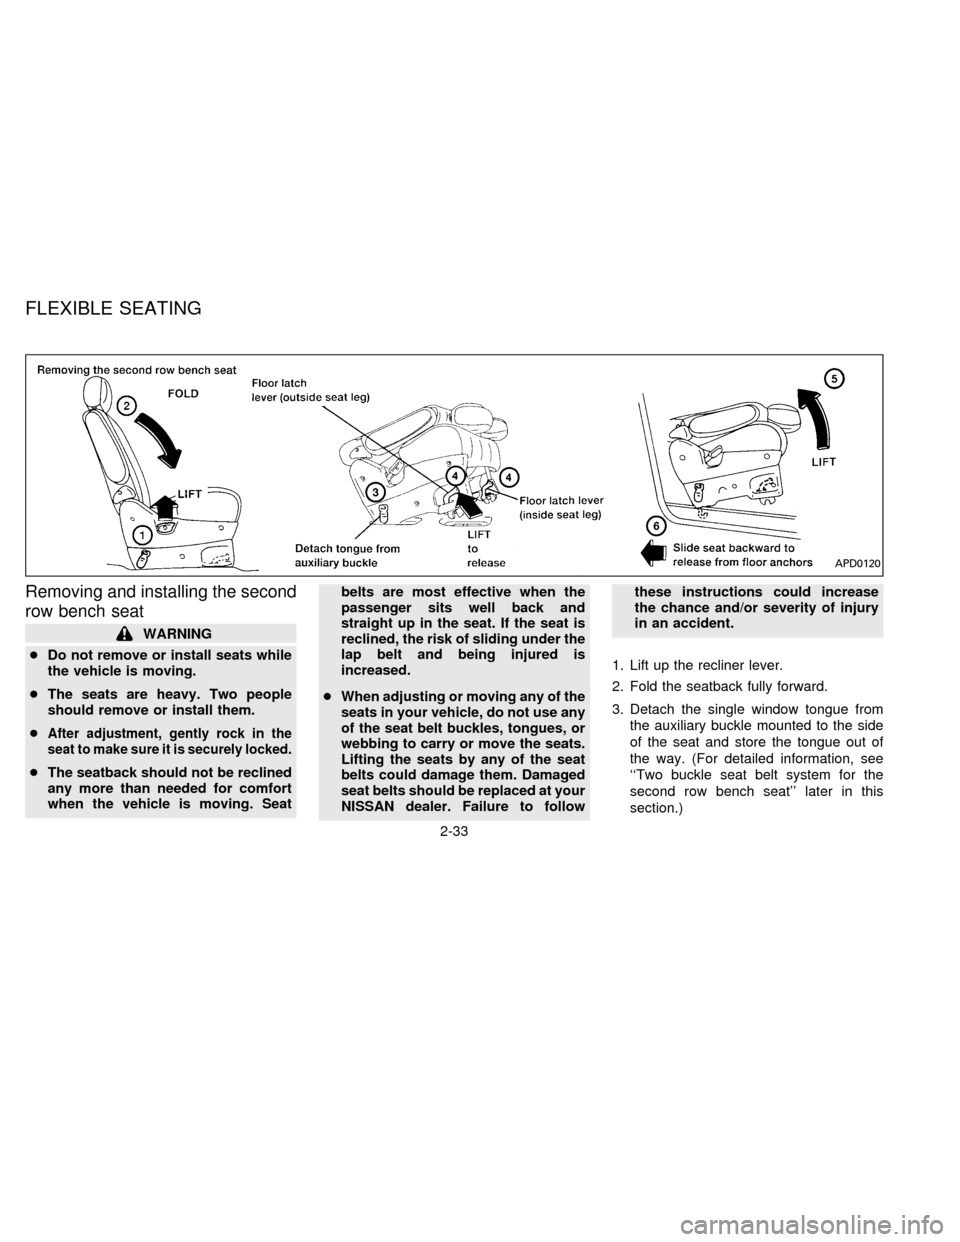
Removing and installing the second
row bench seat
WARNING
cDo not remove or install seats while
the vehicle is moving.
cThe seats are heavy. Two people
should remove or install them.
c
After adjustment, gently rock in the
seat to make sure it is securely locked.
cThe seatback should not be reclined
any more than needed for comfort
when the vehicle is moving. Seatbelts are most effective when the
passenger sits well back and
straight up in the seat. If the seat is
reclined, the risk of sliding under the
lap belt and being injured is
increased.
cWhen adjusting or moving any of the
seats in your vehicle, do not use any
of the seat belt buckles, tongues, or
webbing to carry or move the seats.
Lifting the seats by any of the seat
belts could damage them. Damaged
seat belts should be replaced at your
NISSAN dealer. Failure to followthese instructions could increase
the chance and/or severity of injury
in an accident.
1. Lift up the recliner lever.
2. Fold the seatback fully forward.
3. Detach the single window tongue from
the auxiliary buckle mounted to the side
of the seat and store the tongue out of
the way. (For detailed information, see
``Two buckle seat belt system for the
second row bench seat'' later in this
section.)
APD0120
FLEXIBLE SEATING
2-33
ZX
Page 63 of 235
4. Unlock the seat legs at the two front floor
latch levers.
5. Lift the front of the seat.
6. Slide it rearward off the rear anchor
positions.
WARNING
The seats are heavy. Two people
should remove or install them.
Installing the second row bench
seat
Clean the area around the seat leg floor
anchors before installing seat.
1. With the seatback fully folded, place the
seat behind the floor anchors and catch
the seat leg hooks into each floor anchor.
2. Push down on the front of the seat cush-
ion to secure the two front floor latches.
3. Lift up the recliner lever and raise the
seatback.
4. Rock the seat back and forth to be sureall four seat legs are securely latched.
5. Insert the single window tongue into the
auxiliary buckle mounted to the side of
the seat.
APD0121
2-34
ZX
Page 64 of 235

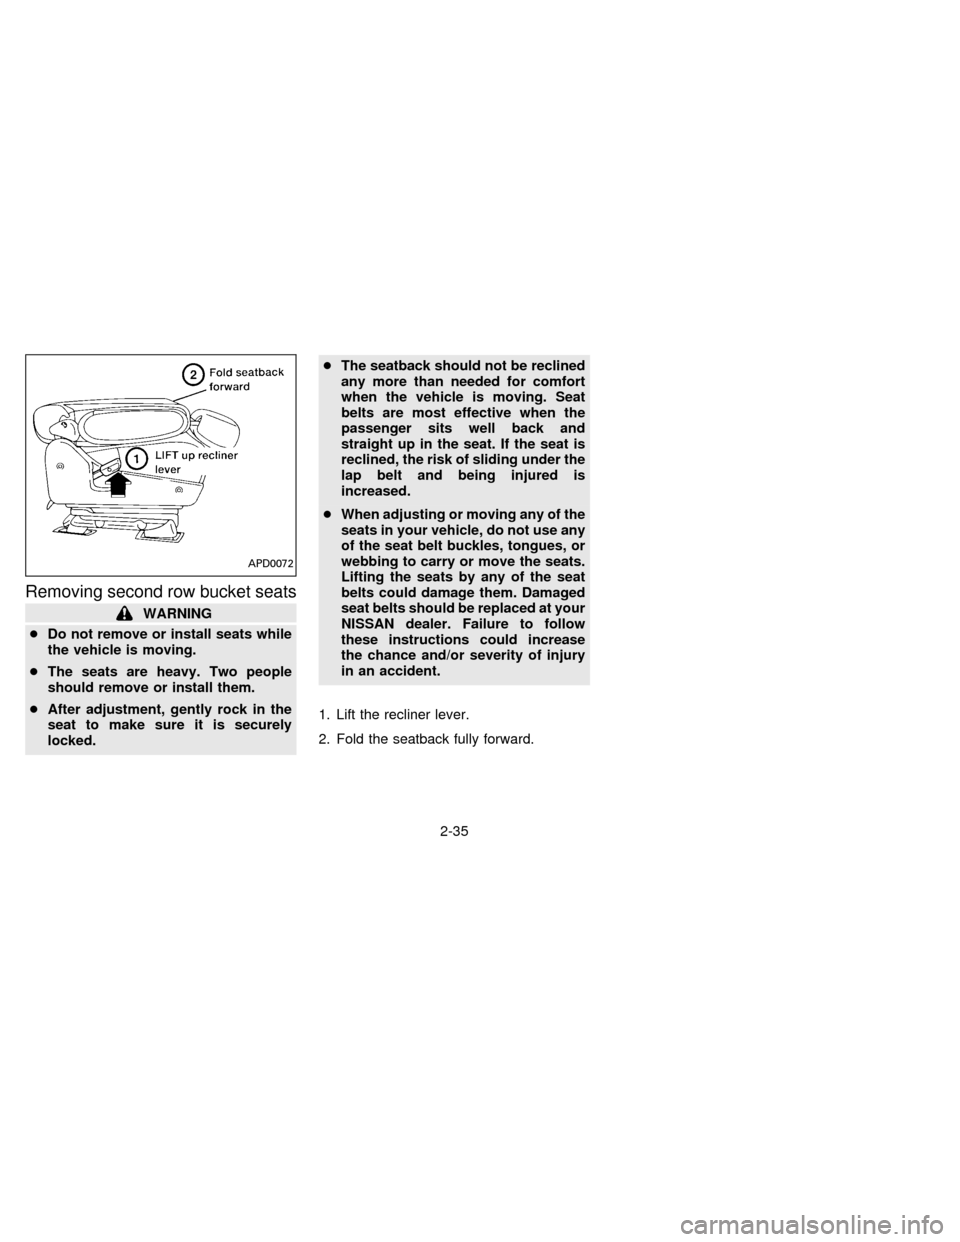
Removing second row bucket seats
WARNING
cDo not remove or install seats while
the vehicle is moving.
cThe seats are heavy. Two people
should remove or install them.
cAfter adjustment, gently rock in the
seat to make sure it is securely
locked.cThe seatback should not be reclined
any more than needed for comfort
when the vehicle is moving. Seat
belts are most effective when the
passenger sits well back and
straight up in the seat. If the seat is
reclined, the risk of sliding under the
lap belt and being injured is
increased.
cWhen adjusting or moving any of the
seats in your vehicle, do not use any
of the seat belt buckles, tongues, or
webbing to carry or move the seats.
Lifting the seats by any of the seat
belts could damage them. Damaged
seat belts should be replaced at your
NISSAN dealer. Failure to follow
these instructions could increase
the chance and/or severity of injury
in an accident.
1. Lift the recliner lever.
2. Fold the seatback fully forward.
APD0072
2-35
ZX
Page 68 of 235
SLIDING THREE-PASSENGER
SEAT
Reclining
To recline the three-passenger seat, lift up
on the lever and lean back until you reach
the desired angle. To bring the seatback
forward, pull the lever up and lean your
body forward.
Some three-passenger seats do not have
the recline feature.
WARNING
cDo not recline the seatback while the
vehicle is moving.
cThe seatback should not be reclined
any more than needed for comfort
when the vehicle is moving. Seat
belts are most effective when the
passenger sits well back and
straight up in the seat. If the seat is
reclined, the risk of sliding under the
lap belt and being injured is
increased.cAfter adjustment, gently rock in the
seat to be sure both sides are se-
curely locked.
APD0026
2-39
ZX
Page 70 of 235

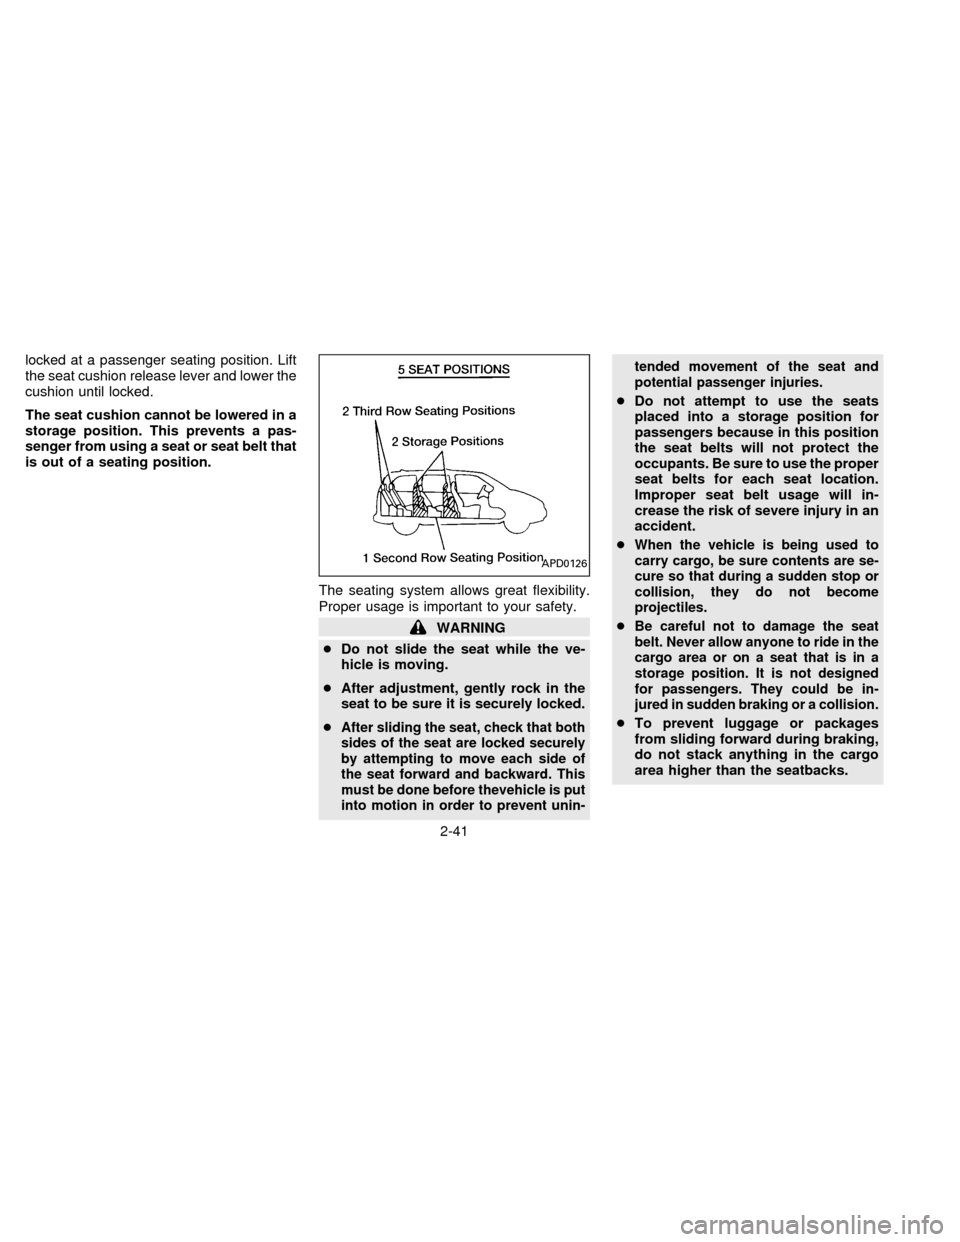
locked at a passenger seating position. Lift
the seat cushion release lever and lower the
cushion until locked.
The seat cushion cannot be lowered in a
storage position. This prevents a pas-
senger from using a seat or seat belt that
is out of a seating position.
The seating system allows great flexibility.
Proper usage is important to your safety.
WARNING
cDo not slide the seat while the ve-
hicle is moving.
cAfter adjustment, gently rock in the
seat to be sure it is securely locked.
c
After sliding the seat, check that both
sides of the seat are locked securely
by attempting to move each side of
the seat forward and backward. This
must be done before thevehicle is put
into motion in order to prevent unin-tended movement of the seat and
potential passenger injuries.
cDo not attempt to use the seats
placed into a storage position for
passengers because in this position
the seat belts will not protect the
occupants. Be sure to use the proper
seat belts for each seat location.
Improper seat belt usage will in-
crease the risk of severe injury in an
accident.
c
When the vehicle is being used to
carry cargo, be sure contents are se-
cure so that during a sudden stop or
collision, they do not become
projectiles.
cBe careful not to damage the seat
belt. Never allow anyone to ride in the
cargo area or on a seat that is in a
storage position. It is not designed
for passengers. They could be in-
jured in sudden braking or a collision.
cTo prevent luggage or packages
from sliding forward during braking,
do not stack anything in the cargo
area higher than the seatbacks.
APD0126
2-41
ZX
Page 71 of 235

cBe sure to replace and reposition
floor mats as discussed in ``Floor
mat positioning'' in this section.
WARNING
The three-passenger sliding bench
seat is not intended to be removed from
the vehicle by consumers. However, if
it must be removed, have a qualified
person remove it. That person should
refer to the instructions in the Service
Manual. When seat is reinstalled, the
attaching bolts must be tightened to
the appropriate torque specifications.
Failure to follow these instructions
could increase the chance and/or se-
verity of injury in an accident.
Cleaning the seat tracks
The seat tracks for the three-passenger
sliding bench seat should be cleaned peri-
odically with a high-powered vacuum
cleaner. If the seat tracks become dirty it
may reduce the ability to slide the seat. A
wet cleansing agent may be used if neces-
sary, but the seat tracks must be thoroughly
dried.Use a cloth wrapped around a screwdriver
(or similar object) to clean the seat tracks.
Do not use your fingers to clean debris from
the tracks.
Do not apply any type of lubricant to the
seat tracks.
WARNING
cNever insert fingers into the seat
track rails. The rails may be sharp
and could cause injury.This Supplemental Restraint System de-
scription contains important information
concerning the special driver and passen-
ger supplemental air bag. The Supplemen-
tal Restraint System Air Bag can help re-
duce impact force to the driver and to the
front passenger in certain frontal collisions.
The air bags are designed tosupplement
the crash protection provided by the seat
belts and arenot a substitutefor the seat
belts. The seat belts should always be cor-
rectly worn and the driver and front passen-
ger seated a suitable distance from the
steering wheel and instrument panel. (See
``Seat belts'' for instructions and precautions
on seat belt usage.)
The supplemental air bags operate only
when the ignition switch is in the ON or
START position.
WARNING
The supplemental air bag ordinarily will
not inflate in the event of a side impact,
rear impact, roll over, or lower severity
frontal collision; so always wear your
seat belts to help reduce the risk or
severity of injury in various kinds of
accidents.
SUPPLEMENTAL RESTRAINT
SYSTEM (AIR BAG SYSTEM)
2-42
ZX