1996 NISSAN QUEST warning
[x] Cancel search: warningPage 135 of 235
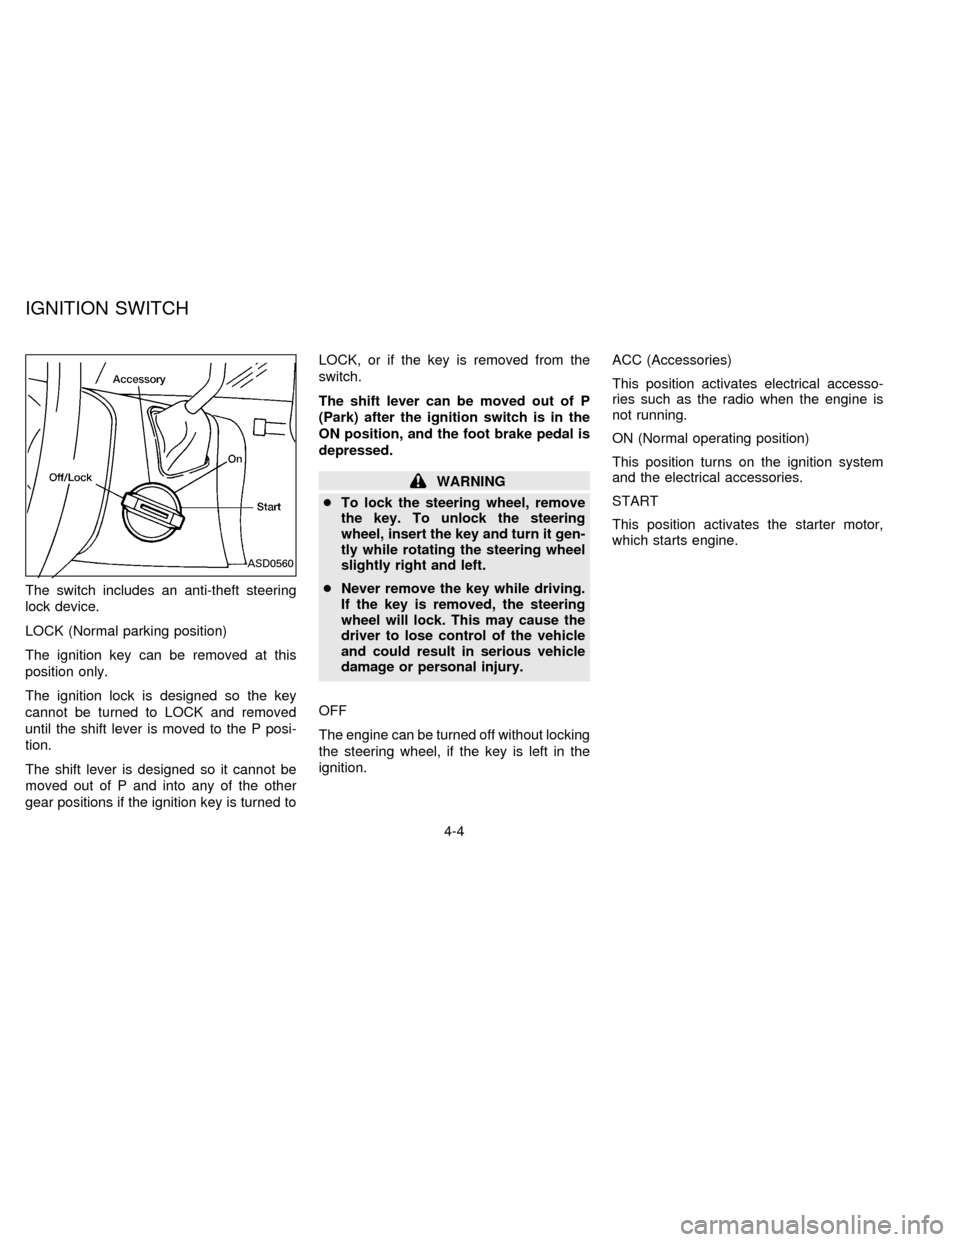
The switch includes an anti-theft steering
lock device.
LOCK (Normal parking position)
The ignition key can be removed at this
position only.
The ignition lock is designed so the key
cannot be turned to LOCK and removed
until the shift lever is moved to the P posi-
tion.
The shift lever is designed so it cannot be
moved out of P and into any of the other
gear positions if the ignition key is turned toLOCK, or if the key is removed from the
switch.
The shift lever can be moved out of P
(Park) after the ignition switch is in the
ON position, and the foot brake pedal is
depressed.
WARNING
cTo lock the steering wheel, remove
the key. To unlock the steering
wheel, insert the key and turn it gen-
tly while rotating the steering wheel
slightly right and left.
cNever remove the key while driving.
If the key is removed, the steering
wheel will lock. This may cause the
driver to lose control of the vehicle
and could result in serious vehicle
damage or personal injury.
OFF
The engine can be turned off without locking
the steering wheel, if the key is left in the
ignition.ACC (Accessories)
This position activates electrical accesso-
ries such as the radio when the engine is
not running.
ON (Normal operating position)
This position turns on the ignition system
and the electrical accessories.
START
This position activates the starter motor,
which starts engine.
ASD0560
IGNITION SWITCH
4-4
ZX
Page 136 of 235

cMake sure the area around the vehicle is
clear.
cMaintenance items listed here should be
checked periodically, for example, each
time you check engine oil.
cCheck that all windows and lights are
clean.
cVisually inspect tires for their appearance
and condition. Also check tires for proper
inflation.
cLock all doors.
cPosition seat and adjust head restraints.
cAdjust inside and outside mirrors.
cFasten seat belts and ask all passengers
to do likewise.
cCheck the operation of warning lights
when key is turned to the ON position.The automatic transmission in your vehicle
is electronically controlled by a microcom-
puter to produce maximum power and
smooth operation.
Shown on the following pages are the rec-
ommended operating procedures for this
transmission. Follow these procedures for
maximum vehicle performance and driving
enjoyment.
Starting the vehicle
cAfter starting the engine, fully depress the
foot brake pedal before shifting the selec-
tor lever to the R, N, D, 2 or 1 position. Be
sure the vehicle is fully stopped before
attempting to shift the selector lever.
This automatic transmission is designed
so the foot brake pedal MUST be de-
pressed before shifting from P to any drive
position while the ignition switch is ON.
The shift lever cannot be moved out of P
and into any of the other gear positions if
the ignition key is turned to ACC, LOCK,
or if the key is removed from the switch.
When the battery charge is low, the shift
lever can be moved if the ignition switch
is in the ACC position.1. Keep the foot brake pedal depressed and
shift into a driving gear.
2. Release the parking brake and foot
brake, then gradually start the vehicle in
motion.
cCold engine idle speed is high, so use
caution when shifting into a forward
or reverse gear before the engine has
warmed up.
cAvoid revving up the engine while the
vehicle is stopped. This could cause
unexpected vehicle movement.
Driving precautions
To help prevent transmission damage:
cDo not depress the accelerator pedal
while shifting from P or N to: R, D, 2 or
1. Always depress the brake pedal
until shifting is completed.
cNever shift to P or R while the vehicle
is moving.
cWhen stopping the vehicle on an up-
hill grade, do not hold the vehicle by
depressing the accelerator pedal. The
foot brakes should be used for this
purpose.
BEFORE STARTING THE
ENGINEDRIVING WITH AN
AUTOMATIC TRANSMISSION
4-5
ZX
Page 139 of 235
1. Apply the parking brake.
2. Move the selector lever to P (Park) or N
(Neutral). (P preferred.)
The shift lever cannot be moved out of
P and into any of the other gear posi-
tions under the following conditions:
cThe ignition key is turned to the
OFF position.
cThe ignition key is turned to the ON
position without depressing the
foot brake pedal.
The starter is designed not to operate
if the selector lever is in one of the
driving positions.
3. Crank the enginewith your foot off the
accelerator pedalby turning the ignition
key to START. Release the key when the
engine starts. If the engine starts, but
fails to run, repeat the above procedure.
Ð If the engine is very hard to start in
extremely cold or hot weather, de-
press the accelerator pedal and hold it
to help start the engine.Ð In the summer, when restarting the
engine within 30 minutes after it has
been stopped, keep the accelerator
pedal slightly depressed while start-
ing.
CAUTION
Do not operate the starter for more than
15 seconds at a time. If the engine does
not start, wait 10 seconds before crank-
ing again, otherwise the starter could
be damaged.
4. Warm-up
Allow the engine to idle for at least 30
seconds after starting. Drive at moderate
speeds for a short distance first, espe-
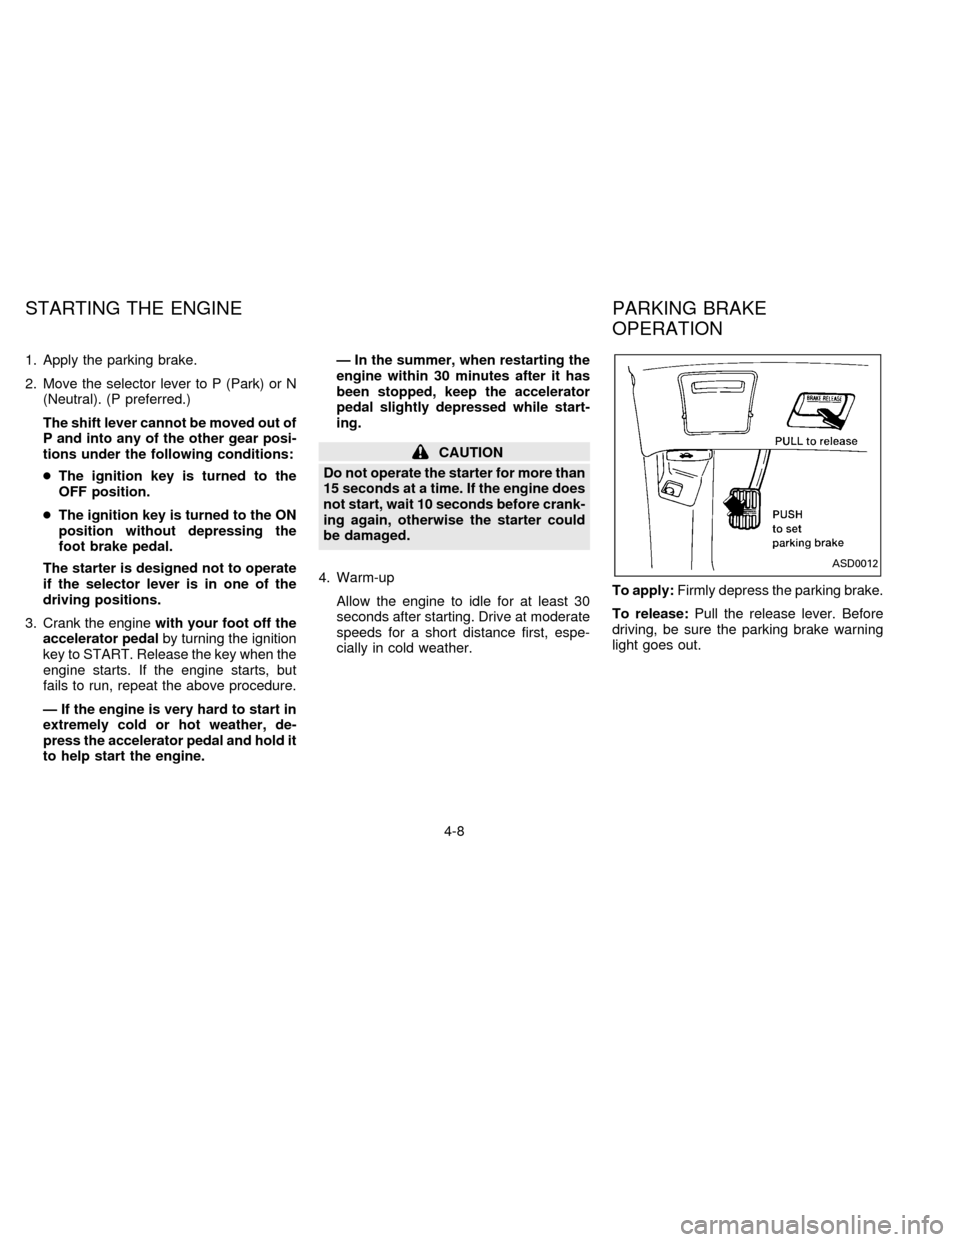
cially in cold weather.To apply:Firmly depress the parking brake.
To release:Pull the release lever. Before
driving, be sure the parking brake warning
light goes out.
ASD0012
STARTING THE ENGINE PARKING BRAKE
OPERATION
4-8
ZX
Page 145 of 235
tuator is working, you may feel a pulsation in
the brake pedal and hear a noise or vibra-
tion from the actuator under the hood. This
is normal and indicates the anti-lock system
is working properly. However, the pulsation
may indicate road conditions are hazardous
and extra care is required while driving.
Self-test feature
The anti-lock brake system consists of elec-
tronic sensors, electric pumps, and hydrau-
lic solenoids controlled by a computer. The
computer has a built-in diagnostic feature
that tests the system each time you start the
engine and move the vehicle at a low speed
in forward or reverse. When the ``self-test''
occurs, you may hear a ``clunk'' noise
and/or feel a ``pulsation'' in the brake pedal.
This is normal and is not an indication of any
malfunction. If the computer senses any
malfunction, it switches the anti-lock brake
system OFF and turns on the ANTI-LOCK
brake warning light in the dashboard. The
brake system then operates normally, but
without anti-lock assistance.
If the light comes on during the self check,
or while driving, take your vehicle to your
NISSAN dealer for repair at your earliest
convenience.
WARNING
The anti-lock brake system is a sophis-
ticated device, but it cannot prevent
accidents resulting from careless or
dangerous driving techniques. It can
help maintain vehicle control during
braking on slippery surfaces, but re-
member that the stopping distance on
slippery surfaces will be longer than on
normal surfaces, even with the anti-
lock system. Stopping distances may
also be longer on rough, gravel or
snow covered roads, or if you are using
tire chains. Always maintain a safe dis-
tance from the vehicle in front of you.
Ultimately, the responsibility for safety
of self and others rests in the hands of
the driver.
Tire type and condition of tires may
also affect braking effectiveness.
cWhen replacing tires, install the
specified size of tires on all 4 wheels.cWhen installing a spare tire, make
sure it is the proper size and type as
specified on the tire placard. For tire
placard location information, refer to
``Tire placard'' in the Owner's
Manual index.
cRefer to ``Wheels and tires'' in the
``Do-it-yourself operations'' section
of this manual.
4-14
ZX
Page 147 of 235

Never install tire chains on T-type and small
size spare tires. Do not use the chains on
dry roads.
Special winter equipment
It is recommended that the following items
be carried in the vehicle during winter:
1. A scraper and stiff-bristled brush to re-
move ice and snow from the windows
and wiper blades.
2. A sturdy, flat board to be placed under
the jack to give it firm support.
3. A shovel to dig the vehicle out of snow-
drifts.
4. Extra window washer fluid to refill the
reservoir tank.
Driving on snow or ice
cWet ice (32ÉF, 0ÉC and freezing rain),
very cold snow or ice can be slick and
very hard to drive on. The vehicle will
have a lot less traction or ``grip'' under
these conditions. Try to avoid driving on
wet ice until the road is salted or sanded.
cWhatever the condition, drive with cau-
tion and accelerate gently. If acceleratedtoo fast, the drive wheels spin and lose
even more traction.
cAllow more stopping distance under
these conditions. Braking should be
started sooner than on dry pavement.
cAllow greater following distances on slip-
pery roads.
cWatch for slippery spots (glare ice).
These may appear on an otherwise clear
road in shaded areas. If a patch of ice is
seen ahead, brake before reaching it. Try
not to brake while actually on the ice, and
avoid any sudden steering maneuvers.
Engine block heater
WARNING
Do not use your heater (if so equipped)
with an ungrounded electrical system
or two-pronged (cheater) adapters. You
can be injured by an electrical shock if
you use an ungrounded connection.
4-16
ZX
Page 149 of 235
If you have a flat tire, follow the instructions
below:
Stopping the vehicle
1. Safely move the vehicle off the road and
away from traffic.
2. Turn on the hazard warning flashers.
3. Park on a level surface and apply the
parking brake. Move the gearshift lever
to the P (Park) position.
4. Turn off the engine.
WARNING
cMake sure the parking brake is se-
curely applied and the automatic
transmission is shifted into P.
cNever change tires when the vehicle
is on a slope, ice or slippery areas.
This is dangerous.
cNever change tires if oncoming traf-
fic is close to your vehicle. Wait for
professional road assistance.cRaise the hood to warn other traffic,
and to signal professional road as-
sistance personnel that you need
assistance.
c
Have all passengers get out of the
vehicle and stand in a safe place, away
from traffic and clear of the vehicle.
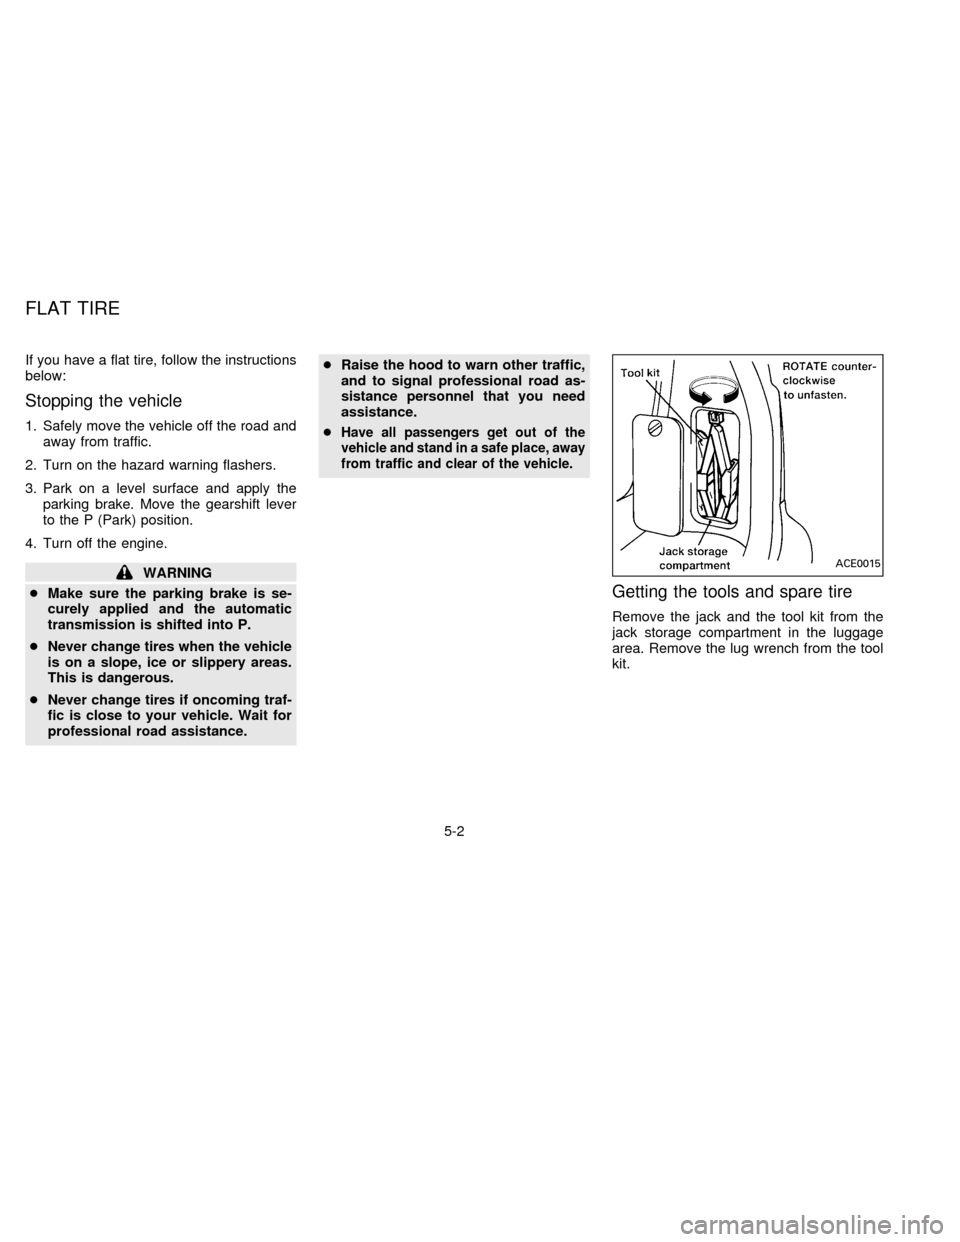
Getting the tools and spare tire
Remove the jack and the tool kit from the
jack storage compartment in the luggage
area. Remove the lug wrench from the tool
kit.
ACE0015
FLAT TIRE
5-2
ZX
Page 151 of 235
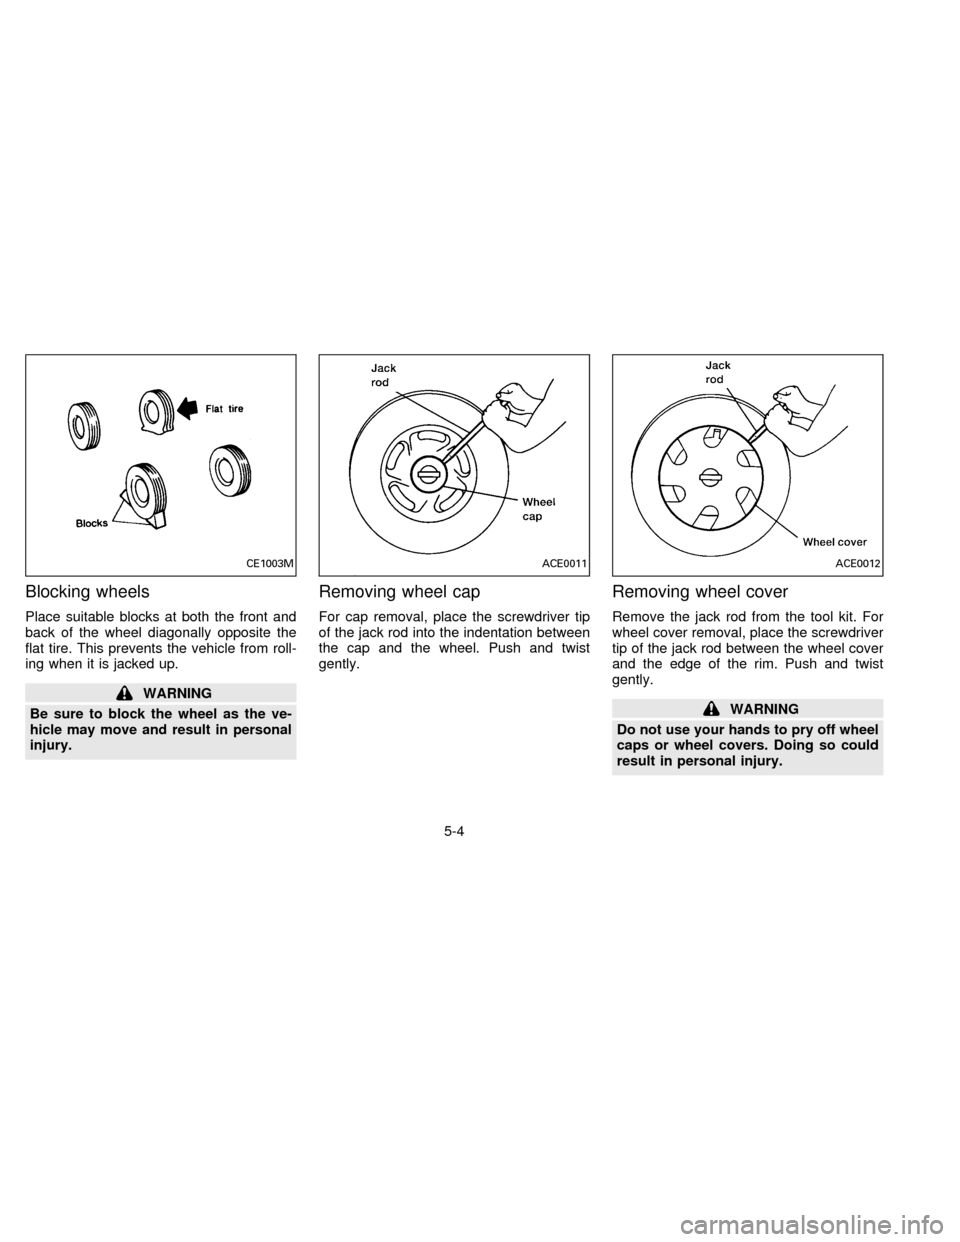
Blocking wheels
Place suitable blocks at both the front and
back of the wheel diagonally opposite the
flat tire. This prevents the vehicle from roll-
ing when it is jacked up.
WARNING
Be sure to block the wheel as the ve-
hicle may move and result in personal
injury.
Removing wheel cap
For cap removal, place the screwdriver tip
of the jack rod into the indentation between
the cap and the wheel. Push and twist
gently.
Removing wheel cover
Remove the jack rod from the tool kit. For
wheel cover removal, place the screwdriver
tip of the jack rod between the wheel cover
and the edge of the rim. Push and twist
gently.
WARNING
Do not use your hands to pry off wheel
caps or wheel covers. Doing so could
result in personal injury.
CE1003MACE0011ACE0012
5-4
ZX
Page 152 of 235
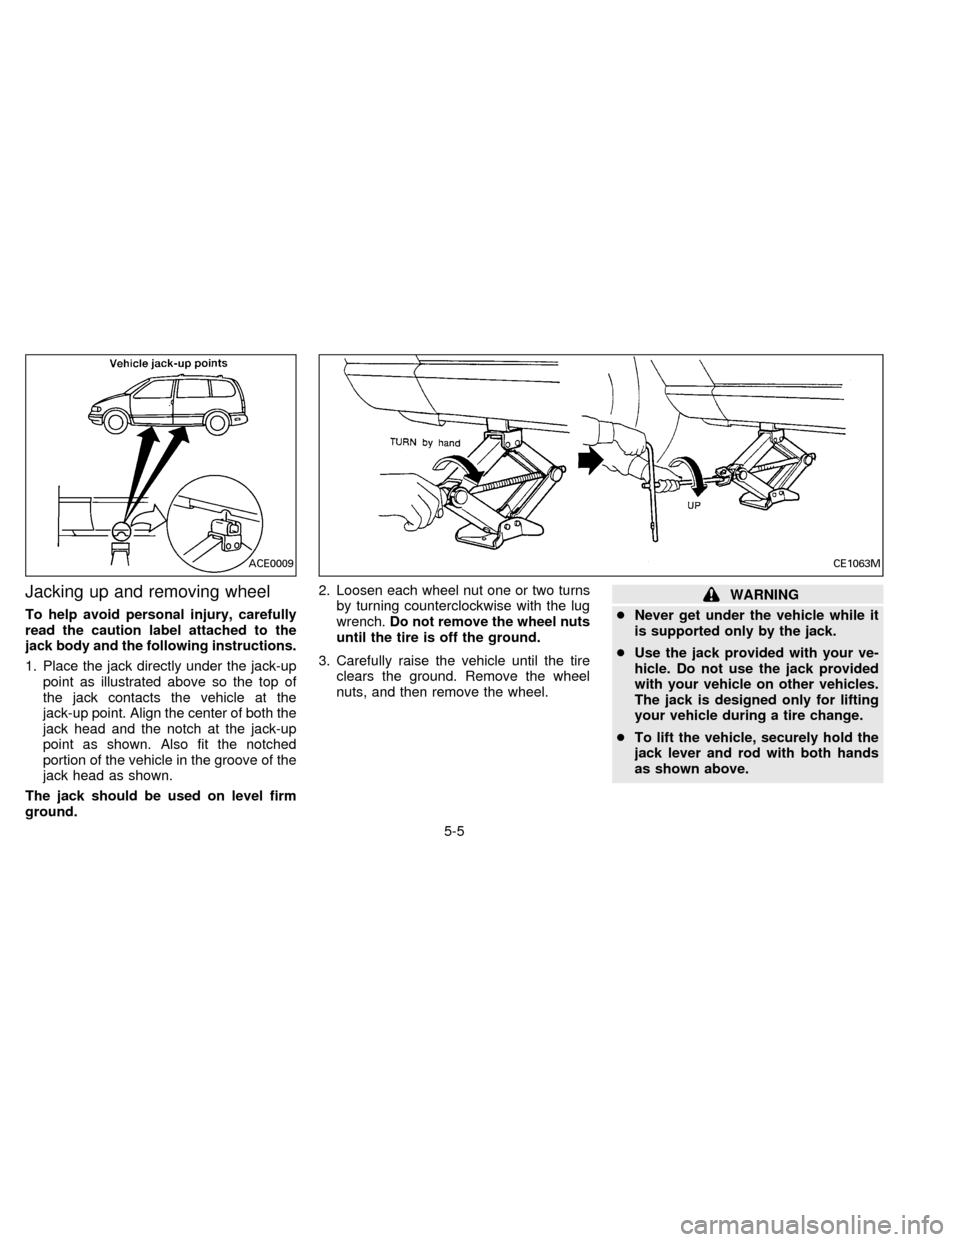
Jacking up and removing wheel
To help avoid personal injury, carefully
read the caution label attached to the
jack body and the following instructions.
1. Place the jack directly under the jack-up
point as illustrated above so the top of
the jack contacts the vehicle at the
jack-up point. Align the center of both the
jack head and the notch at the jack-up
point as shown. Also fit the notched
portion of the vehicle in the groove of the
jack head as shown.
The jack should be used on level firm
ground.2. Loosen each wheel nut one or two turns
by turning counterclockwise with the lug
wrench.Do not remove the wheel nuts
until the tire is off the ground.
3. Carefully raise the vehicle until the tire
clears the ground. Remove the wheel
nuts, and then remove the wheel.
WARNING
cNever get under the vehicle while it
is supported only by the jack.
cUse the jack provided with your ve-
hicle. Do not use the jack provided
with your vehicle on other vehicles.
The jack is designed only for lifting
your vehicle during a tire change.
cTo lift the vehicle, securely hold the
jack lever and rod with both hands
as shown above.
ACE0009CE1063M
5-5
ZX