1996 NISSAN QUEST charging
[x] Cancel search: chargingPage 11 of 235

Checking bulbs
Apply the parking brake, fasten seat belts,
and turn the ignition key to ON without
starting the engine. The following lights
come on and stay on until the engine is
started:
The following lights come on briefly and
then go off:
ABS or
If any light fails to come on, it mayindicate a burned-out bulb or an open
circuit in the electrical system. Have the
system repaired promptly.
Engine oil pressure warning
light
This light warns of low engine oil pressure. If
the light flickers or comes on during normal
driving, pull off the road in a safe area, stop
the engineimmediatelyand call a NISSAN
dealer or other authorized repair shop.Run-
ning the engine with the oil pressure
warning light on could cause serious
damage to the engine.The oil pressure warning light is not
designed to indicate a low oil level. Use
the dipstick to check the oil level.See
``Engine oil'' in the ``Do-it-yourself opera-
tions'' section.Charge warning light
If the light comes on while the engine is
running, it may indicate something wrong
with the charging system. Turn the engine
off and check the generator belt. If the belt is
loose, broken, missing, or if the light re-
mains on, see your NISSAN dealer imme-
diately.
AIC0583
WARNING/INDICATOR
LIGHTS AND CHIMES
1-6
ZX
Page 111 of 235

2. Push thebutton in.
3. Turn the fan control dial to select speed.
4. Push on the air conditioner button. The
indicator light comes on.
5. Move the temperature control dial to the
desired position.
Dehumidified defogging
This mode is used to defog the windows
and dehumidify.
1. Push the
button in.
2. Turn the fan control dial to the desired
speed.
3. Move the temperature control dial to the
desired position.
When the
button is pushed, the air
conditioner automatically turns on to de-
fog the windshield, (however, the light
does not illuminate unless illuminated in
the previously selected mode) and the
recirculated air mode automatically turns
off.
Operating tips
cKeep windows and sun roof closed while
the air conditioner is in operation.cAfter parking in the sun, drive for two or
three minutes with the windows open to
vent hot air from the passenger compart-
ment. Then, close the windows. This
allows the air conditioner to cool the
interior more quickly.
cThe air conditioning system should be
operated for about ten minutes at
least once a month. This helps pre-
vent damage to the system due to lack
of lubrication.
cIf the coolant temperature gauge ex-
ceeds the H (hot) position, turn the air
conditioner off. See ``If your vehicle over-
heats'' in the ``In case of emergency''
section for additional information.
Servicing air conditioning
The air conditioning system in your NISSAN
vehicle is charged with a new refrigerant
designed with the environment in mind.
This new refrigerant does not harm the
earth's ozone layer.
Special charging equipment and lubricant
are required when servicing your NISSAN
air conditioner. Using improper refrigerants
or lubricants causes severe damage to yourair conditioning system. See ``Air condition-
ing system refrigerant and lubricant recom-
mendations'' in the ``Technical and con-
sumer information'' section of this manual.
Your NISSAN dealer is able to service your
environmentally ``friendly'' air conditioning
system.
3-6
ZX
Page 155 of 235

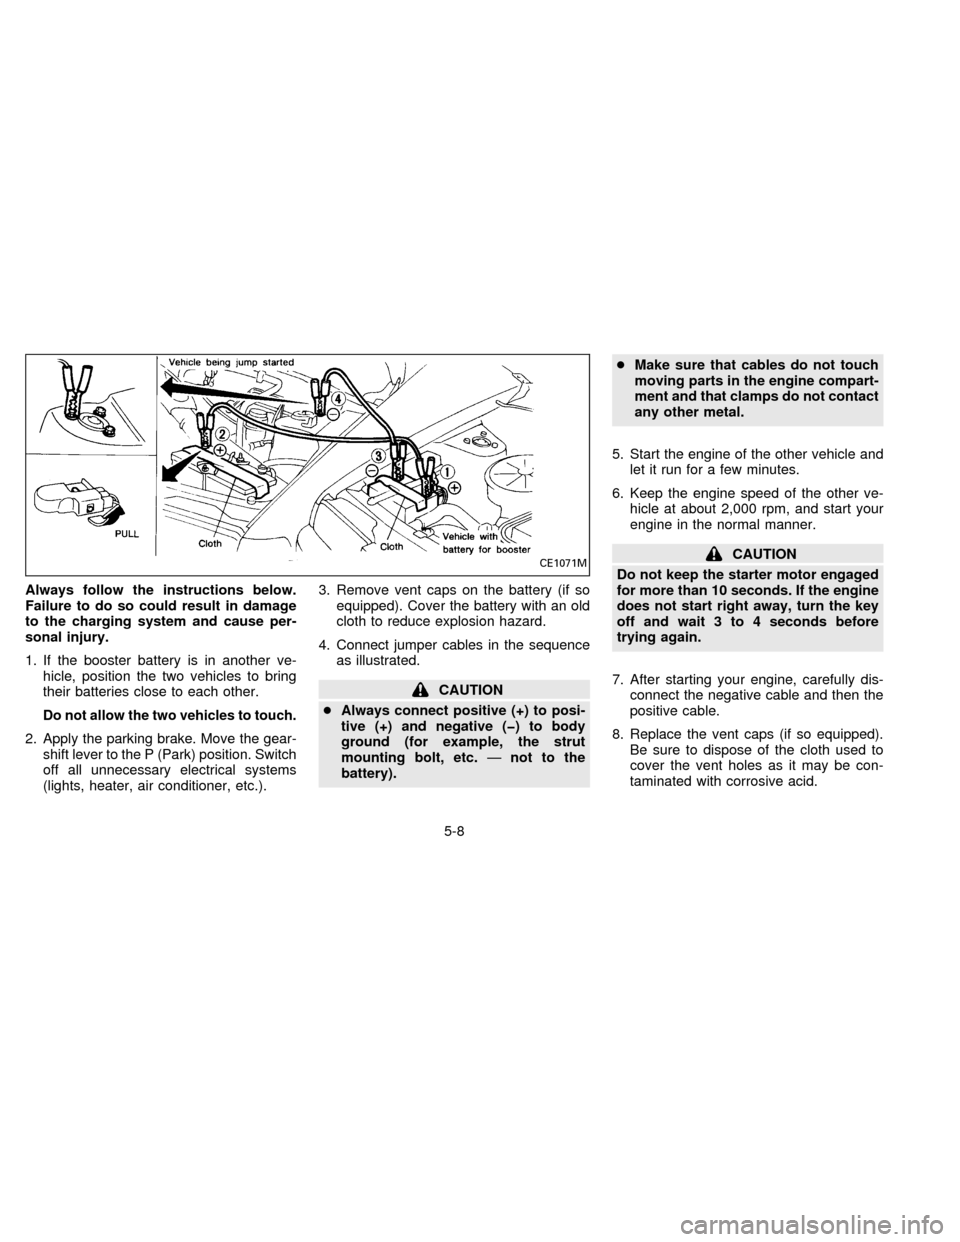
Always follow the instructions below.
Failure to do so could result in damage
to the charging system and cause per-
sonal injury.
1. If the booster battery is in another ve-
hicle, position the two vehicles to bring
their batteries close to each other.
Do not allow the two vehicles to touch.
2. Apply the parking brake. Move the gear-
shift lever to the P (Park) position. Switch
off all unnecessary electrical systems
(lights, heater, air conditioner, etc.).3. Remove vent caps on the battery (if so
equipped). Cover the battery with an old
cloth to reduce explosion hazard.
4. Connect jumper cables in the sequence
as illustrated.
CAUTION
cAlways connect positive (+) to posi-
tive (+) and negative (þ) to body
ground (for example, the strut
mounting bolt, etc.Ðnot to the
battery).cMake sure that cables do not touch
moving parts in the engine compart-
ment and that clamps do not contact
any other metal.
5. Start the engine of the other vehicle and
let it run for a few minutes.
6. Keep the engine speed of the other ve-
hicle at about 2,000 rpm, and start your
engine in the normal manner.
CAUTION
Do not keep the starter motor engaged
for more than 10 seconds. If the engine
does not start right away, turn the key
off and wait 3 to 4 seconds before
trying again.
7. After starting your engine, carefully dis-
connect the negative cable and then the
positive cable.
8. Replace the vent caps (if so equipped).
Be sure to dispose of the cloth used to
cover the vent holes as it may be con-
taminated with corrosive acid.CE1071M
5-8
ZX
Page 176 of 235

3. Check the fluid level with the engine
idling.
4. Remove the dipstick and wipe it clean
with lint-free paper.
5. Reinsert the dipstick into the charging
pipe as far as it goes.
6. Remove the dipstick and note the read-
ing. If the level is at the low side of either
range, add fluid to the charging pipe.
DO NOT OVERFILL.
Use ONLY Nissan Matic `D' (Continen-
tal U.S. and Alaska) or Genuine Nis-
san Automatic Transmission Fluid
(Canada). Dexronž III/Merconž or
equivalent may also be used. Outside
the continental United States and
Alaska contact a Nissan dealership
for more information regarding suit-
able fluids, including recommended
brand(s) of Dexronž III/Merconž or
Dexronž IIE/Merconž Automatic
Transmission Fluid.
NOTE:
If the vehicle has been driven for a long
time at high speeds, or in city traffic in
hot weather, or if it is being used to pulla trailer, the accurate fluid level cannot
be read. You should wait until the fluid
has cooled down (about 30 minutes).
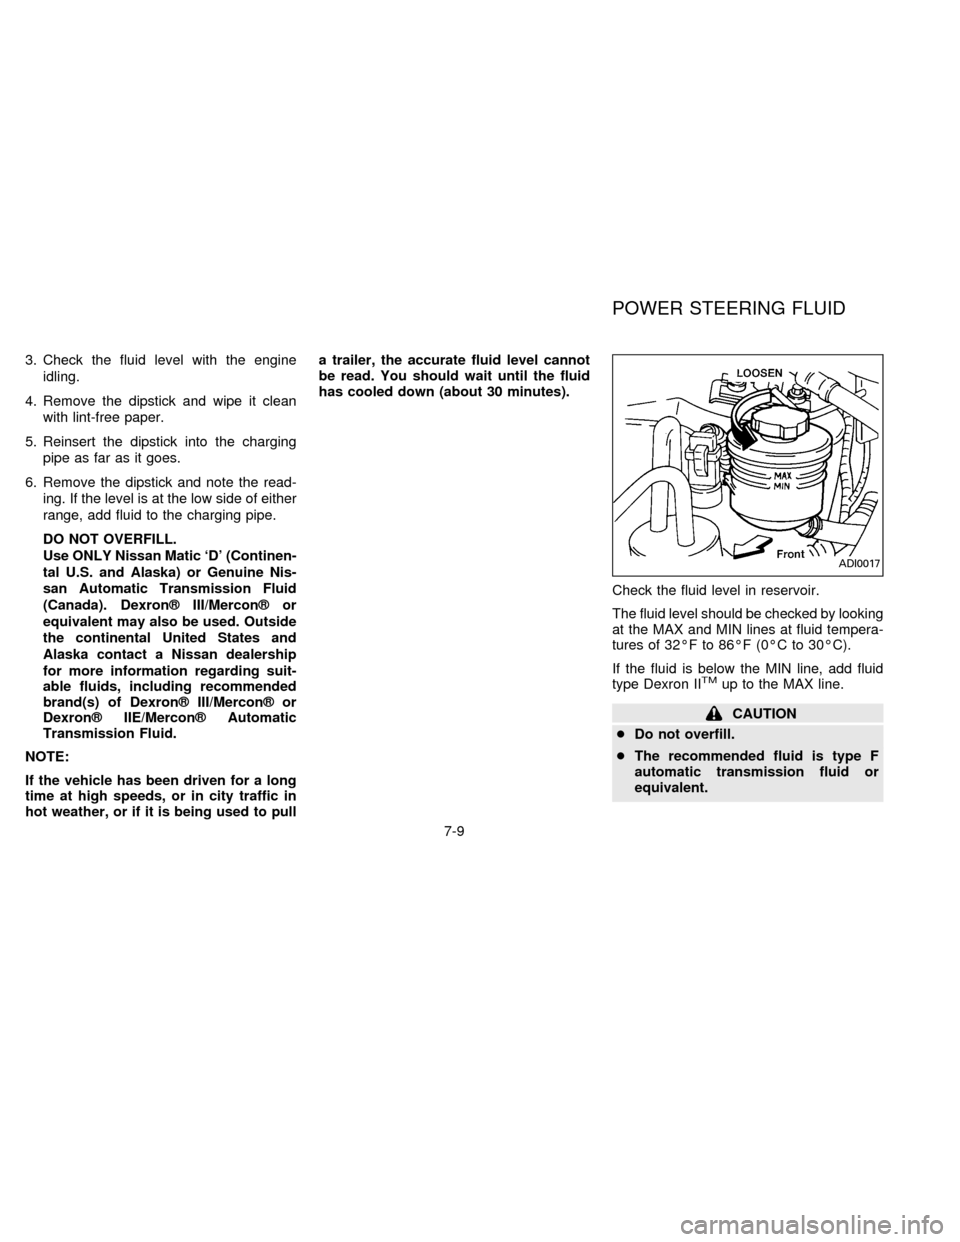
Check the fluid level in reservoir.
The fluid level should be checked by looking
at the MAX and MIN lines at fluid tempera-
tures of 32ÉF to 86ÉF (0ÉC to 30ÉC).
If the fluid is below the MIN line, add fluid
type Dexron II
TMup to the MAX line.
CAUTION
cDo not overfill.
cThe recommended fluid is type F
automatic transmission fluid or
equivalent.
ADI0017
POWER STEERING FLUID
7-9
ZB13-DX
Page 227 of 235

affect vehicle/trailer handling, possibly
causing vehicle sway. When being
passed by larger vehicles, be prepared
for possible changes in crosswinds that
could affect vehicle handling. If swaying
does occur, firmly grip the steering
wheel, steer straight ahead, and immedi-
ately (but gradually) reduce vehicle
speed. This combination helps to stabi-
lize the vehicle. Never increase speed.
cBe careful when passing other vehicles.
Passing while towing a trailer requires
considerably more distance than normal
passing. Remember the length of the
trailer must also pass the other vehicle
before you can safely change lanes.
cTo maintain engine braking efficiency
and electrical charging performance, do
not use overdrive.
cAvoid holding the brake pedal down too
long or too frequently. This could cause
the brakes to overheat, resulting in re-
duced braking efficiency.
When towing a trailer, change fluid in the
transmission more frequently.
See the Maintenance schedule.Department of Transportation (DOT) Qual-
ity Grades: All passenger car tires must
conform to Federal Safety Requirements in
addition to these grades.
Treadwear
Treadwear grade is a comparative rating
based on tire wear rate when tested under
controlled conditions on specified govern-
ment test courses. For example, a tire
graded 150 would wear one and a half
(1-1/2) times as well on the government
course as a tire graded 100. However,
relative tire performance depends on actual
driving conditions, and may vary signifi-
cantly from the norm, due to variations in
driving habits, service practices and differ-
ences in road characteristics and climate.
Traction A, B and C
Traction grades are A (the highest), B and
C. They represent a tire's ability to stop on
wet pavement as measured under con-
trolled conditions, on specified government
test surfaces of asphalt and concrete. A tire
marked with a C may have poor traction
performance.
WARNING
The traction grade assigned to your
vehicle tires is based on straight line
braking traction tests and does not
include cornering (turning) traction.
Temperature A, B and C
Temperature grades are A (the highest), B,
and C. They represent a tire's resistance to
heat build-up, and its ability to dissipate
heat when tested under controlled condi-
tions on a specified indoor laboratory test
wheel. Sustained high temperature can
cause tire material to degenerate, reducing
tire life. Excessive temperatures can lead to
sudden tire failure. Grade C corresponds to
a performance level which all passenger car
tires must meet under the Federal Motor
Vehicle Safety Standard No. 109. Grades A
and B represent higher levels of perfor-
mance on laboratory test wheels than the
minimum required by law.
UNIFORM TIRE QUALITY
GRADING
9-18
ZX