1996 MITSUBISHI PAJERO valve
[x] Cancel search: valvePage 231 of 302

Downloaded from www.Manualslib.com manuals search engine HATATOIMENPITEITA .... FOR EMERGENCIES
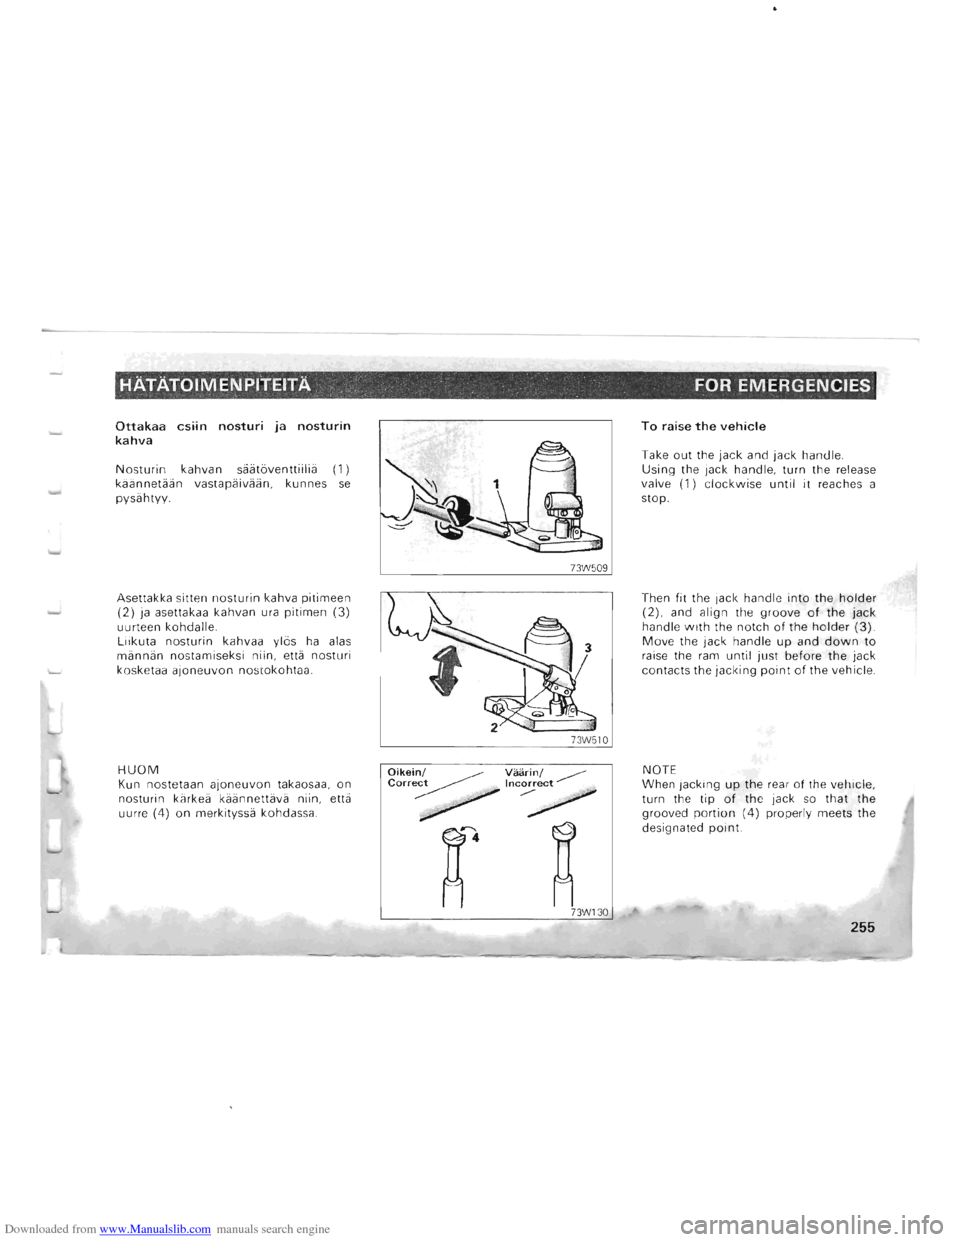
Ottakaa csiin nosturi ja nosturin kahva
Nosturin kahvan siiiitaventtiiliii (1) kiiiinnetiiiin vastapiiiviiiin , kunnes se pysiihtyy.
Asettakka sitten
nosturin kahva pitimeen (2) ja asettakaa kahvan ura pitimen (3)
uurteen kohdalle.
Liikuta nosturin kahvaa ylas ha alas miinniin nostamiseksi niin, etta nosturi
kosk etaa a
joneuvon nostokohtaa .
HUOM Kun nostetaan ajoneuvon takaosaa, on
nosturin kiirkeii kaannettiivii niin, ettii
uurr e (4)
on merkityssii kohdassa.
Oikei~/ Vaarin/ ~ Correct Incorrect
~ .. ~ . .......-~ ~ ~ ~.
~4 ~
73W130
To raise the vehicle
Take out the jack and jack handle .
Using the jack hand le, turn the release
valve (1) clockwise until it reaches a
stop.
Then
fit th e jack handle into the holder (2), and align the groove of the jack handle with the notch of the holder (3). Move the jack handle up and down to raise the ram until just before the jack
contacts the jacki ng point of the vehicle .
NOTE
When jacking
up the rear of the vehicle,
turn the tip of the jack so that the
grooved portion (4) properly meets the
designated
point.
255
Page 232 of 302

Downloaded from www.Manualslib.com manuals search engine HATATOIMENPITEITA " . "', '.... FOR'EMERGENCIES '
Nostakaa manta liikuttamalla nousturin kahvaa ylas ja alas.
Ajoneuvon laskeminen
Kaantakaa vapautusventtiilia vasta·
paivaan nosturin kahvalla hitaasti
mannan laskemiseksi ja ottakaa nosturi
sitten pois.
& VAROITOS Jos vapautusventtijli loysennetaan kaantamalta sita 2 tai useamman kerran vastapaivaan, nosturin oijy vuotaa eika sita voida kayttaa.
HUOM (1) Jaskus kun nostetaan ajoneuvon etuosaa, merkityn kohdan uurrettu osa ei irtoa. Jos nain kay, laskekaa manta alas
heiluttamalla ajoneuvoa.
(2)
Jos nostunia on vaikea irrottaa kasin, asettakaa nostunin kahva pitimeen ja asettakaa nosturin kahvan uurre pitimen
uurteen kanssa sarnalle kohdalle kinnitaenkahvan siihen.
Vetakaa sitten nosturin kahva ja irrottakaa nostun.
256
Moving the jack handle up and down,
raise the position .
To lower the vehicle
Using the jack handle , turn the release
valve anticlockwise slowly to lower the
ram , and then take out the jack .
& CAUTION If the release valve is loosened by turning it 2 or more times in the anticlockwise direction, the jack's oil will leak and the jack cannot be used .
NOTE (1) Occasionally when the front part of the vehicle is jacked
up, the grooved portion of the designated point will not
come off. When this happens, rock the vehicle to lower the ram. (2) When the jack is difficult to remove by hand, insert the jack handle into the holder and catch the jack handle notch onto the holder notch and secure it there. Then pull the jack handle and remove the jack.
Page 233 of 302

Downloaded from www.Manualslib.com manuals search engine HATATOIMEN PITEITA FOR EMERGENCIES
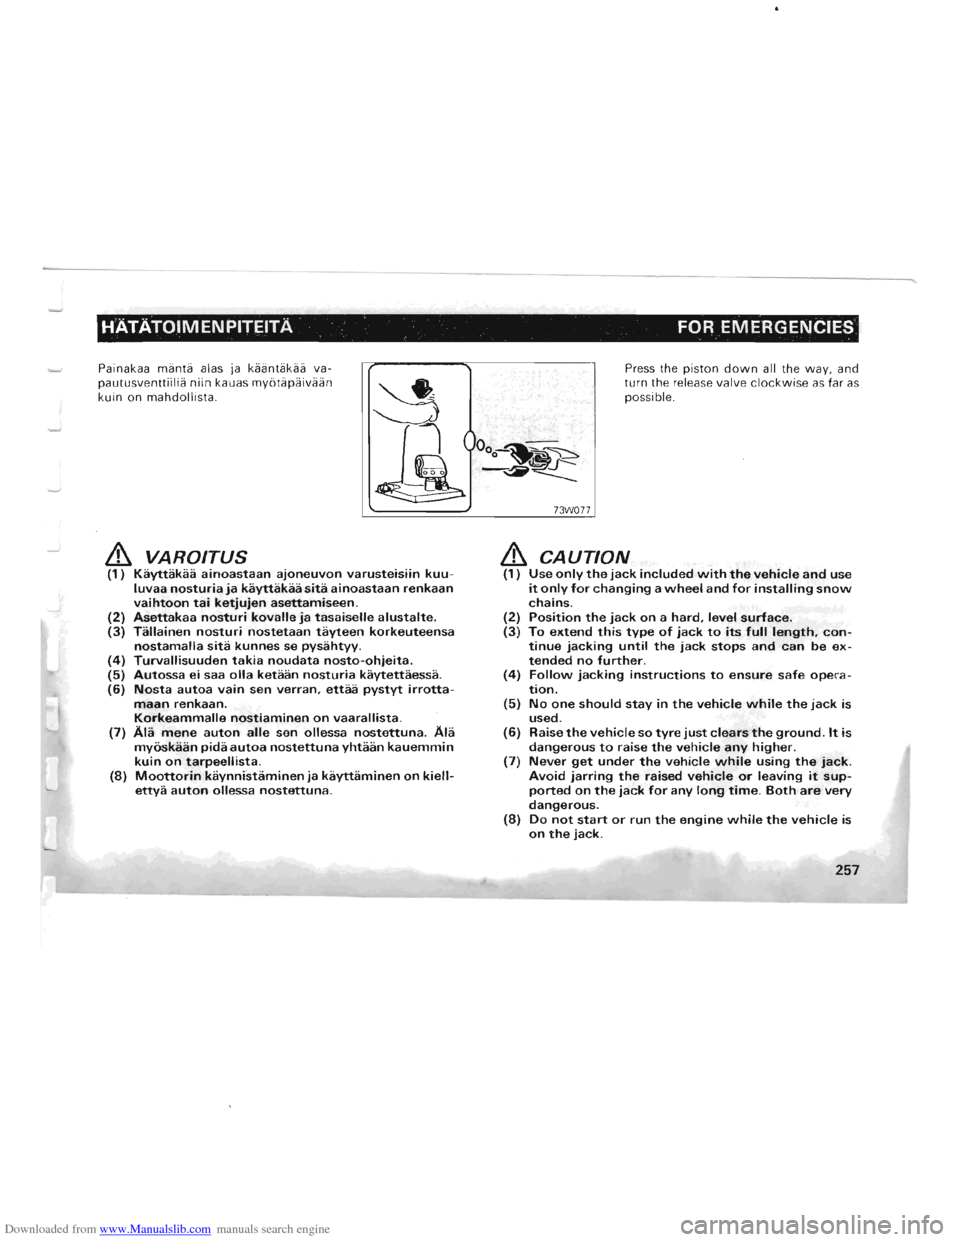
Painakaa manta alas ja kaijntakaa va
pautusventtiilia niin kauas mybtapaivaan
kuin on mahdollista .
& VAROITUS (1) Kayttakaa ainoastaan ajoneuvon varusteisiin kuuluvaa nosturia ja kayttakaa sita ainoastaan renkaan vaihtoon tai ketjujen asettamiseen. (2) Asettakaa nosturi kovalle ja tasaiselle alustalte. (3) Tallainen nosturi nostetaan tayteen korkeuteensa nostamalla sita kunnes se pysahtyy. (4) Turvallisuuden takia noudata nosto-ohjeita. (5) Autossa ei saa olla ketaan nosturia kaytettaessa. (6) Nosta autoa vain sen verran, ettaa pystyt irrotta-maan renkaan. Korkeammalle nostiaminen on vaarallista.
(7) Ala mene auton aile sen ollessa nostettuna. Ala myoskaan pida autoa nostettuna yhtaan kauemmin kuin on tarpeellista. (8) Moottorin kaynnistaminen ja kayttaminen on kiellettya auton ollessa nostettuna.
73W0 77
Press the piston down all the way, and
turn the release valve clockwise as far as
possible.
& CAUTION (1) Use only the jack included with the vehicle and use it only for changing a wheel and for installing snow chains. (2) Position the jack on a hard, level surface. (3) To extend this type of jack to its full length, continue jacking until the jack stops and can be extended no further. (4) Follow jacking instructions to ensure safe operation. (5) No one should stay in the vehicle while the jack is used. (6) Raise the vehicle so tyre just clears the ground. It is dangerous to raise the vehicle any higher. (7) Never get under the vehicle while using the jack. Avoid jarring the raised vehicle or leaving it supported on the jack for any long time. Both are very dangerous. (8) Do not start or run the engine while the vehicle is on the jack.
257
Page 277 of 302

Downloaded from www.Manualslib.com manuals search engine ~UOLTbTOIMENPITEET .' ~. " MAINTENANC'e "
Mikali renkaassa on kulutuksenilmaisimet. tulevat nama vybn suuntaiset merkit esiin kuudessa kohdassa vybn pinnalla sen kuluessa. ilmolttaen ettei rengas enaa tayta minimivaatimuksia. Kun nama merkit tulevat esiin. on renkaat vaihdettava uusiin. Tarkasta muttereiden kirevs. Katso taman kasikirjan kappaletta "Hatatoimenpiteita" halutessasi tietoja renkaiden vaihdosta.
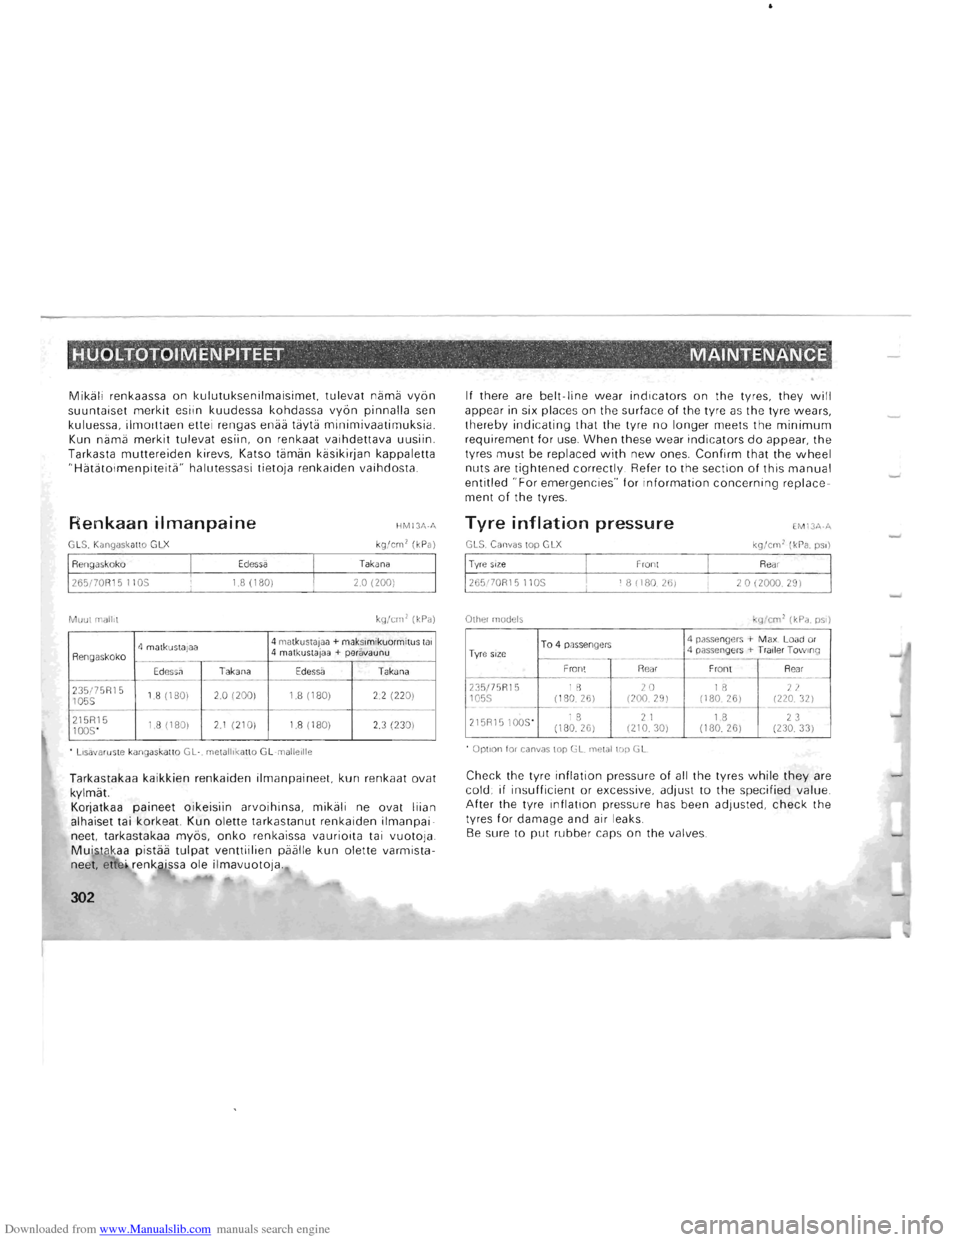
Renkaan ilmanpaine HM13A·A
GLS. Kangaskallo GLX kg/em ' (kPa)
Rengaskoko Edessa Takana
265!70R15 I lOS 1.8 (180) 2.0 (200)
Muul malill kg/em' (kPa)
4 malkustalaa 4 malkustaJaa + makslmikuormitus lai
Rengaskoko 4 malkuslaiaa + peravaunu
Edess;; Takana Edessa Takana
235!75R15
1.8 (180) 2.0 (200) 1.8 (180) 2.2 (220) 105S ----215R15 1.8 (180) 2.1 (210) 1.8 (180) 2.3 (230) 100S'
.
LlsavarUSle kangaskallo GL·. melalilkallo GL·maJlellle
Tarkastakaa kaikkien renkaiden ilmanpaineet. kun renkaat ovat kylmat. Korjatkaa paineet oikeisiin arvoihinsa. mikali ne ovat liian alhaiset tai korkeat. Kun olette tarkastanut renkaiden ilmanpai
nee!, tarkastakaa mybs. onko renkaissa vaurioita tai vuotoja Muistakaa pistaa tulpat venttiilien paalle kun olette varmistaneet. et . renkgj"ssa ole ilmavuotoja.
302
If there are belt-line wear indicators on the tyres. they will appear in six places on the surface of the tyre as the tyre wears. thereby indicating that the tyre no longer meets the minimum requirement for use. When these wear indicators do appear, the tyres must be replaced with new ones. Confirm that the wheel nuts are tightened correctly. Refer to the section of this manual entitled "For emergencies" for information concerning replacement of the tyres.
Tyre inflation pressure EM13A·A
G LS. Canvas lOP G LX kg/em' (kPa. pSI)
Tyre size Froni Rear
265170R15 11 OS 1 8 ( 180 26) 20 (2000. 29)
Olher models kg Icm' (kPa. pSI)
To 4 passengers 4 passengers + Max Load or Tyre size 4 passengers + Traile r Towmg !---------.. --------Front Rear Froni Rear ------------- --235/75R15 18 20 18
22 105S (180 26) (200 29) (180.26) (220 32) -c------
215R15100S ' 18
2 I 1 8 23 (180.26)
(210.30) (180.26) (230 33)
. Option for canvas lOP G L. melal lOP G L
Check the tyre inflation pre ssure of all the tyres while they are cold; if insufficient or excessive. adjust to the specified value. After the tyre inflation pressure ha s been adjusted. check the tyres for damage and air leaks. Be sure to put rubber caps on the valves.