1996 CHRYSLER VOYAGER wiring
[x] Cancel search: wiringPage 1444 of 1938
NOTE: Before installing power steering pressure
hose on power steering pump, inspect the O-ring
on the power steering pressure hose for damage
and replace if required.
(4) Install the power steering fluid pressure line
onto the output fitting of the power steering pump
(Fig. 21). Tighten the pressure line to pump fitting
tube nut to a torque of 31 N´m (275 in. lbs.).
(5) Install the power steering fluid, low pressure
return hose on the power steering pump low pressure
fitting (Fig. 21).Be sure hose clamps are prop-
erly reinstalled.
(6) Install the power steering fluid supply hose
from the power steering fluid reservoir, on the power
steering pump fluid fitting (Fig. 21).Be sure hose is
clear of accessory drive belts and all hose
clamps are properly reinstalled.
(7) Install the serpentine drive belt (Fig. 20). See
Cooling, Group 7 for detailed installation procedure.
(8) Install the power steering fluid return hose on
the steel tube at the front suspension cradle (Fig.
18).
(9) Install a screw type hose clamp on the power
steering hose to steel tube connection.Be sure hose
clamps are properly reinstalled.Tighten the screw
clamp to a torque of 2 N´m (18 in. lbs.).
CAUTION: The protective heat shield sleeves must
cover the entire rubber hose and hose to tube con-
nection portion of both the power steering fluid
pressure and return hoses (Fig. 18). This is required
to keep the power steering hoses from becoming
overheated.
(10) When used, properly position the protective
heat sleeves on the power steering hoses (Fig. 18).
Then, tie strap the heat sleeves to the power steering
hoses to keep them in their proper position.
(11) Install the exhaust pipe on the exhaust man-
ifold. Install all exhaust system hangers/isolators on
the exhaust system brackets.
(12) Connect the oxygen sensor wiring harness to
the vehicle wiring harness. Install wiring harness
grommet in the floor pan of the vehicle.
(13) Install the accessory drive splash shield (Fig.
19).
(14) Lower vehicle.
CAUTION: Do not use automatic transmission fluid
in power steering system. Only use MoparT, Power
Steering Fluid, or equivalent.
(15) Fill the remote power steering pump fluid res-
ervoir to correct fluid level.
(16) Install cap on power steering fluid reservoir.(17) Connect the negative battery cable on the
negative battery post.
(18) Start engine and turn steering wheel several
times from stop to stop to bleed air from fluid in sys-
tem. Stop engine, check fluid level, and inspect sys-
tem for leaks. See Checking Fluid Level.
POWER STEERING FLUID RESERVOIR TO PUMP
SUPPLY HOSE
REMOVE
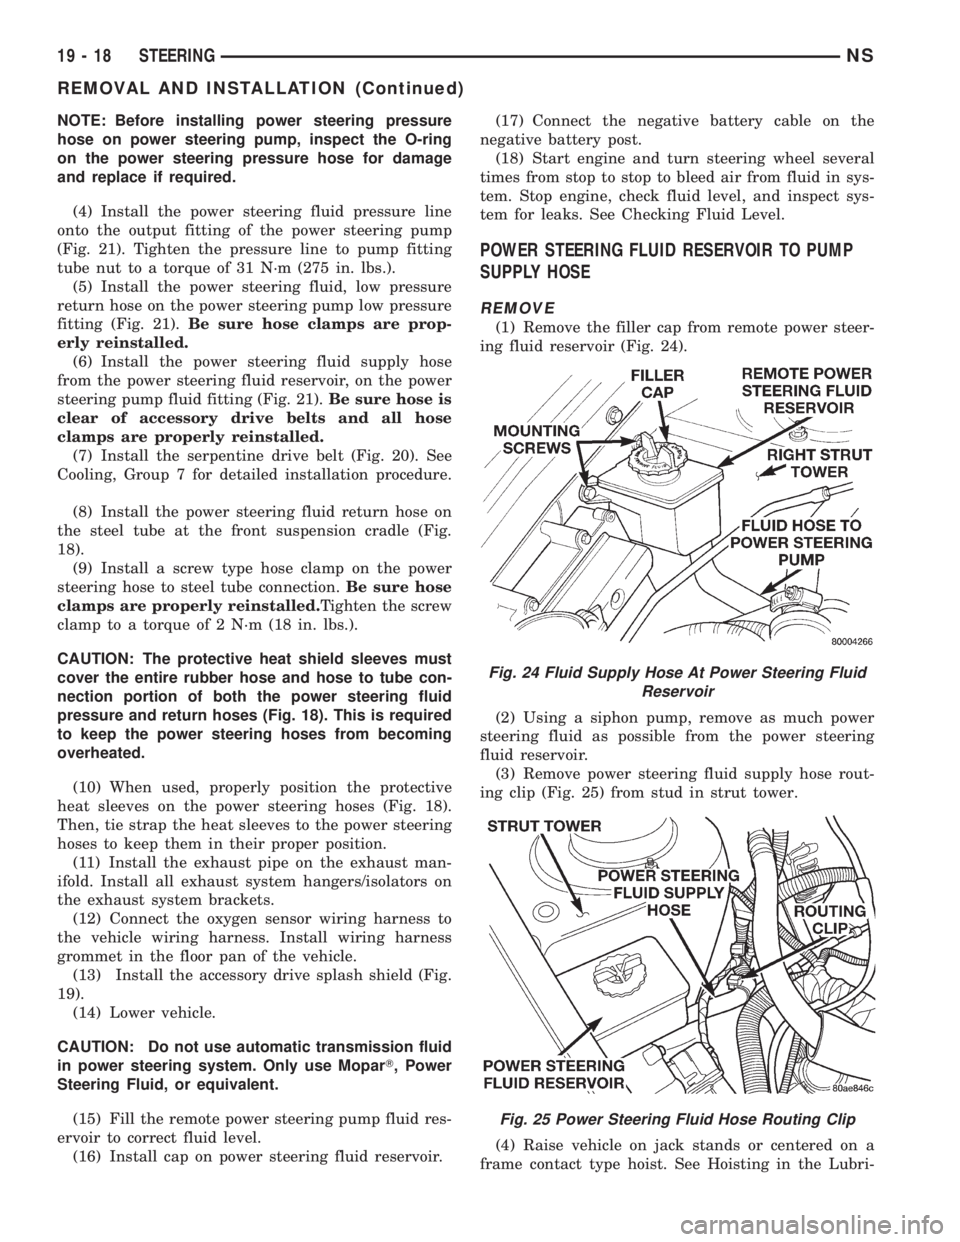
(1) Remove the filler cap from remote power steer-
ing fluid reservoir (Fig. 24).
(2) Using a siphon pump, remove as much power
steering fluid as possible from the power steering
fluid reservoir.
(3) Remove power steering fluid supply hose rout-
ing clip (Fig. 25) from stud in strut tower.
(4) Raise vehicle on jack stands or centered on a
frame contact type hoist. See Hoisting in the Lubri-
Fig. 24 Fluid Supply Hose At Power Steering Fluid
Reservoir
Fig. 25 Power Steering Fluid Hose Routing Clip
19 - 18 STEERINGNS
REMOVAL AND INSTALLATION (Continued)
Page 1445 of 1938
cation and Maintenance section of this service man-
ual, for the required lifting procedure to be used for
this vehicle.
(5) Remove at power steering pump, the power
steering fluid hose coming from the power steering
fluid reservoir. Let the power steering fluid drain out
of the reservoir and hose.
(6) Lower vehicle.
(7) Remove hose clamp attaching the power steer-
ing fluid supply hose to the power steering fluid res-
ervoir (Fig. 24).
(8) Remove the power steering fluid supply hose
from the vehicle. Hose is removed from the top of the
engine compartment.
INSTALL
CAUTION: On V-6 engine applications, the power
steering fluid reservoir to power steering hose must
be routed tightly against the strut tower and parallel
to the dash panel. It must also be routed under the
wiring harness and below the drip tube. This rout-
ing will prevent the power steering fluid supply
hose from coming in contact with the accessory
drive belt.
(1) Install and correctly route the power steering
fluid supply hose from remote fluid reservoir down to
power steering pump.
(2) Install the fluid supply hose onto the power
steering fluid reservoir (Fig. 24). Install the hose
clamp on the fluid supply hose.Be sure hose clamp
is installed past bead on fluid reservoir fitting.
(3) Raise vehicle on jack stands or centered on a
frame contact type hoist. See Hoisting in the Lubri-
cation and Maintenance section of this service man-
ual, for the required lifting procedure to be used for
this vehicle.
(4) Install power steering fluid supply hose on
power steering pump. Install the hose clamp on the
fluid supply hose.Be sure hose clamp is installed
past bead on pump fitting.
(5) Lower vehicle.
(6) Install routing clip on power steering fluid sup-
ply hose. Be sure routing clip is installed in a posi-
tion to correctly align with stud in strut tower.
(7) Install routing clip for power steering fluid sup-
ply hose on stud in strut tower (Fig. 25).
(8) Fill the remote fluid reservoir to the proper
level and let the fluid settle for at least two (2) min-
utes.
(9) Start the engine and let run for a few seconds.
Then turn the engine off.
(10) Add fluid if necessary. Repeat the above pro-
cedure until the fluid level remains constant after
running the engine.
(11) Raise the front wheels off the ground.(12) Start the engine. Slowly turn the steering
wheel right and left, lightly contacting the wheel
stops.
(13) Add power steering fluid if necessary.
(14) Lower the vehicle and turn the steering wheel
slowly from lock to lock.
(15) Stop the engine. Check the fluid level and
refill as required.
(16) If the fluid is extremely foamy, allow the vehi-
cle to stand a few minutes and repeat the above pro-
cedure.
POWER STEERING FLUID PRESSURE HOSE
Service all power steering hoses with vehicle raised
on hoist. Cap all open ends of hoses, power steering
pump fittings and steering gear ports to prevent
entry of foreign material into the components.
WARNING: POWER STEERING OIL, ENGINE
PARTS AND THE EXHAUST SYSTEM MAY BE
EXTREMELY HOT IF ENGINE HAS BEEN RUNNING.
DO NOT START ENGINE WITH ANY LOOSE OR DIS-
CONNECTED HOSES. DO NOT ALLOW HOSES TO
TOUCH HOT EXHAUST MANIFOLD OR CATALYST.
For part reference and part location for the vehicle
that is being serviced, refer to the following figure
numbers. These show the hose bracket locations,
hose routings and fitting locations by the engine
application of the vehicle. Use these figure numbers
when referring to the removal or installation proce-
dures for the power steering hoses listed below.
REMOVE
(1) Remove cap from power steering fluid reser-
voir.
(2) Using a siphon pump, remove as much power
steering fluid as possible from the power steering
fluid reservoir.
(3) Raise vehicle See Hoisting, Group 0. Put oil
drain pan under vehicle to catch power steering fluid.
(4) Raise the heat sleeve on the power steering
fluid return hose (Fig. 26) to expose the return hose
to steel tube connection. Remove the hose clamp from
the power steering fluid return hose (Fig. 26).
Remove power steering fluid return hose from steel
tube and allow power steering fluid to drain from
pump.
NSSTEERING 19 - 19
REMOVAL AND INSTALLATION (Continued)
Page 1448 of 1938
REMOTE POWER STEERING FLUID RESERVOIR
REMOVE
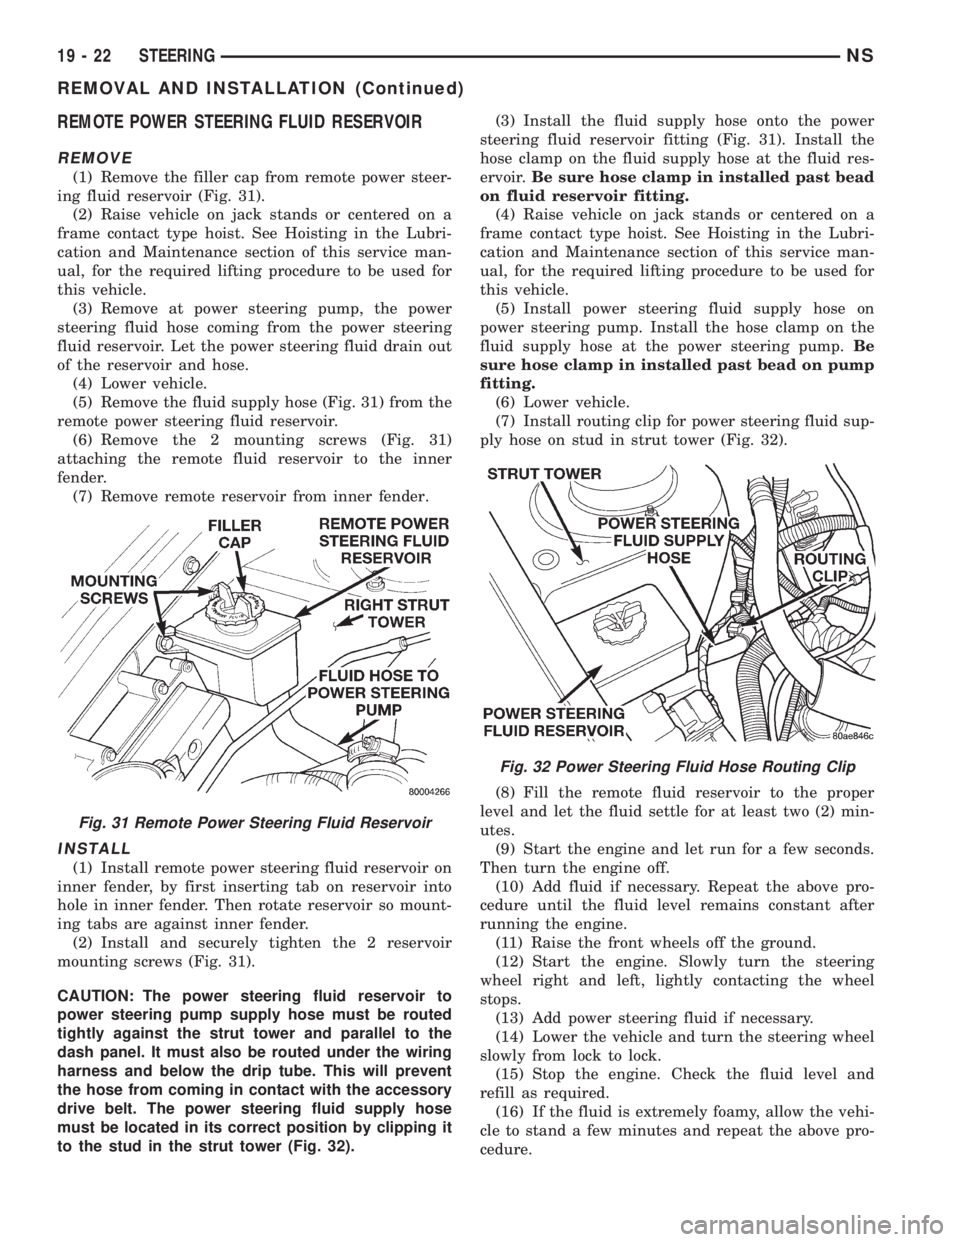
(1) Remove the filler cap from remote power steer-
ing fluid reservoir (Fig. 31).
(2) Raise vehicle on jack stands or centered on a
frame contact type hoist. See Hoisting in the Lubri-
cation and Maintenance section of this service man-
ual, for the required lifting procedure to be used for
this vehicle.
(3) Remove at power steering pump, the power
steering fluid hose coming from the power steering
fluid reservoir. Let the power steering fluid drain out
of the reservoir and hose.
(4) Lower vehicle.
(5) Remove the fluid supply hose (Fig. 31) from the
remote power steering fluid reservoir.
(6) Remove the 2 mounting screws (Fig. 31)
attaching the remote fluid reservoir to the inner
fender.
(7) Remove remote reservoir from inner fender.
INSTALL
(1) Install remote power steering fluid reservoir on
inner fender, by first inserting tab on reservoir into
hole in inner fender. Then rotate reservoir so mount-
ing tabs are against inner fender.
(2) Install and securely tighten the 2 reservoir
mounting screws (Fig. 31).
CAUTION: The power steering fluid reservoir to
power steering pump supply hose must be routed
tightly against the strut tower and parallel to the
dash panel. It must also be routed under the wiring
harness and below the drip tube. This will prevent
the hose from coming in contact with the accessory
drive belt. The power steering fluid supply hose
must be located in its correct position by clipping it
to the stud in the strut tower (Fig. 32).(3) Install the fluid supply hose onto the power
steering fluid reservoir fitting (Fig. 31). Install the
hose clamp on the fluid supply hose at the fluid res-
ervoir.Be sure hose clamp in installed past bead
on fluid reservoir fitting.
(4) Raise vehicle on jack stands or centered on a
frame contact type hoist. See Hoisting in the Lubri-
cation and Maintenance section of this service man-
ual, for the required lifting procedure to be used for
this vehicle.
(5) Install power steering fluid supply hose on
power steering pump. Install the hose clamp on the
fluid supply hose at the power steering pump.Be
sure hose clamp in installed past bead on pump
fitting.
(6) Lower vehicle.
(7) Install routing clip for power steering fluid sup-
ply hose on stud in strut tower (Fig. 32).
(8) Fill the remote fluid reservoir to the proper
level and let the fluid settle for at least two (2) min-
utes.
(9) Start the engine and let run for a few seconds.
Then turn the engine off.
(10) Add fluid if necessary. Repeat the above pro-
cedure until the fluid level remains constant after
running the engine.
(11) Raise the front wheels off the ground.
(12) Start the engine. Slowly turn the steering
wheel right and left, lightly contacting the wheel
stops.
(13) Add power steering fluid if necessary.
(14) Lower the vehicle and turn the steering wheel
slowly from lock to lock.
(15) Stop the engine. Check the fluid level and
refill as required.
(16) If the fluid is extremely foamy, allow the vehi-
cle to stand a few minutes and repeat the above pro-
cedure.
Fig. 31 Remote Power Steering Fluid Reservoir
Fig. 32 Power Steering Fluid Hose Routing Clip
19 - 22 STEERINGNS
REMOVAL AND INSTALLATION (Continued)
Page 1465 of 1938
(7) Remove the 3 bolts (1 in each spoke of the
steering wheel) attaching the air bag module to thesteering wheel. Remove air bag module from steering
wheel.
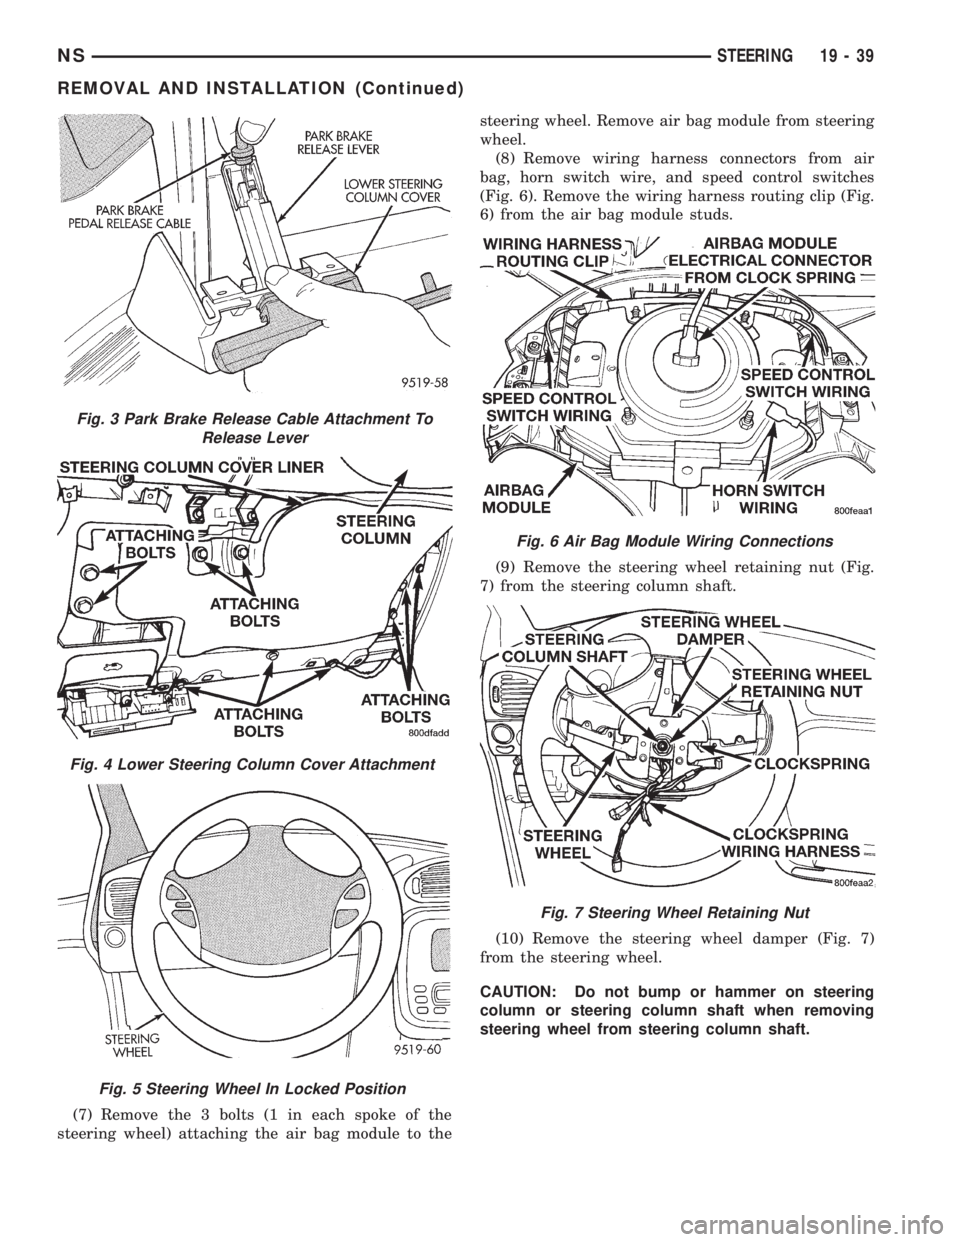
(8) Remove wiring harness connectors from air
bag, horn switch wire, and speed control switches
(Fig. 6). Remove the wiring harness routing clip (Fig.
6) from the air bag module studs.
(9) Remove the steering wheel retaining nut (Fig.
7) from the steering column shaft.
(10) Remove the steering wheel damper (Fig. 7)
from the steering wheel.
CAUTION: Do not bump or hammer on steering
column or steering column shaft when removing
steering wheel from steering column shaft.
Fig. 3 Park Brake Release Cable Attachment To
Release Lever
Fig. 4 Lower Steering Column Cover Attachment
Fig. 5 Steering Wheel In Locked Position
Fig. 6 Air Bag Module Wiring Connections
Fig. 7 Steering Wheel Retaining Nut
NSSTEERING 19 - 39
REMOVAL AND INSTALLATION (Continued)
Page 1466 of 1938
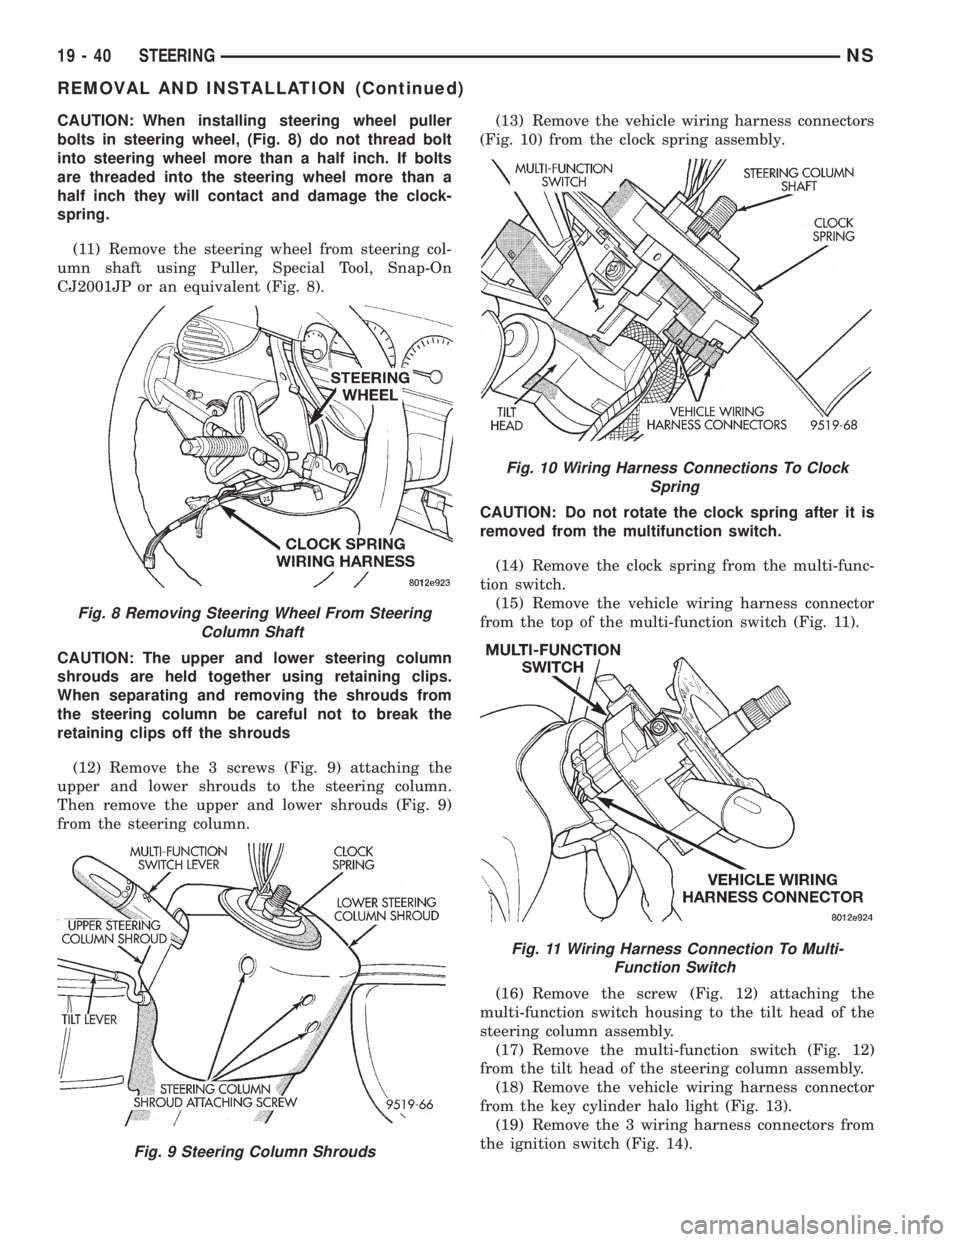
CAUTION: When installing steering wheel puller
bolts in steering wheel, (Fig. 8) do not thread bolt
into steering wheel more than a half inch. If bolts
are threaded into the steering wheel more than a
half inch they will contact and damage the clock-
spring.
(11) Remove the steering wheel from steering col-
umn shaft using Puller, Special Tool, Snap-On
CJ2001JP or an equivalent (Fig. 8).
CAUTION: The upper and lower steering column
shrouds are held together using retaining clips.
When separating and removing the shrouds from
the steering column be careful not to break the
retaining clips off the shrouds
(12) Remove the 3 screws (Fig. 9) attaching the
upper and lower shrouds to the steering column.
Then remove the upper and lower shrouds (Fig. 9)
from the steering column.(13) Remove the vehicle wiring harness connectors
(Fig. 10) from the clock spring assembly.
CAUTION: Do not rotate the clock spring after it is
removed from the multifunction switch.
(14) Remove the clock spring from the multi-func-
tion switch.
(15) Remove the vehicle wiring harness connector
from the top of the multi-function switch (Fig. 11).
(16) Remove the screw (Fig. 12) attaching the
multi-function switch housing to the tilt head of the
steering column assembly.
(17) Remove the multi-function switch (Fig. 12)
from the tilt head of the steering column assembly.
(18) Remove the vehicle wiring harness connector
from the key cylinder halo light (Fig. 13).
(19) Remove the 3 wiring harness connectors from
the ignition switch (Fig. 14).
Fig. 8 Removing Steering Wheel From Steering
Column Shaft
Fig. 9 Steering Column Shrouds
Fig. 10 Wiring Harness Connections To Clock
Spring
Fig. 11 Wiring Harness Connection To Multi-
Function Switch
19 - 40 STEERINGNS
REMOVAL AND INSTALLATION (Continued)
Page 1467 of 1938
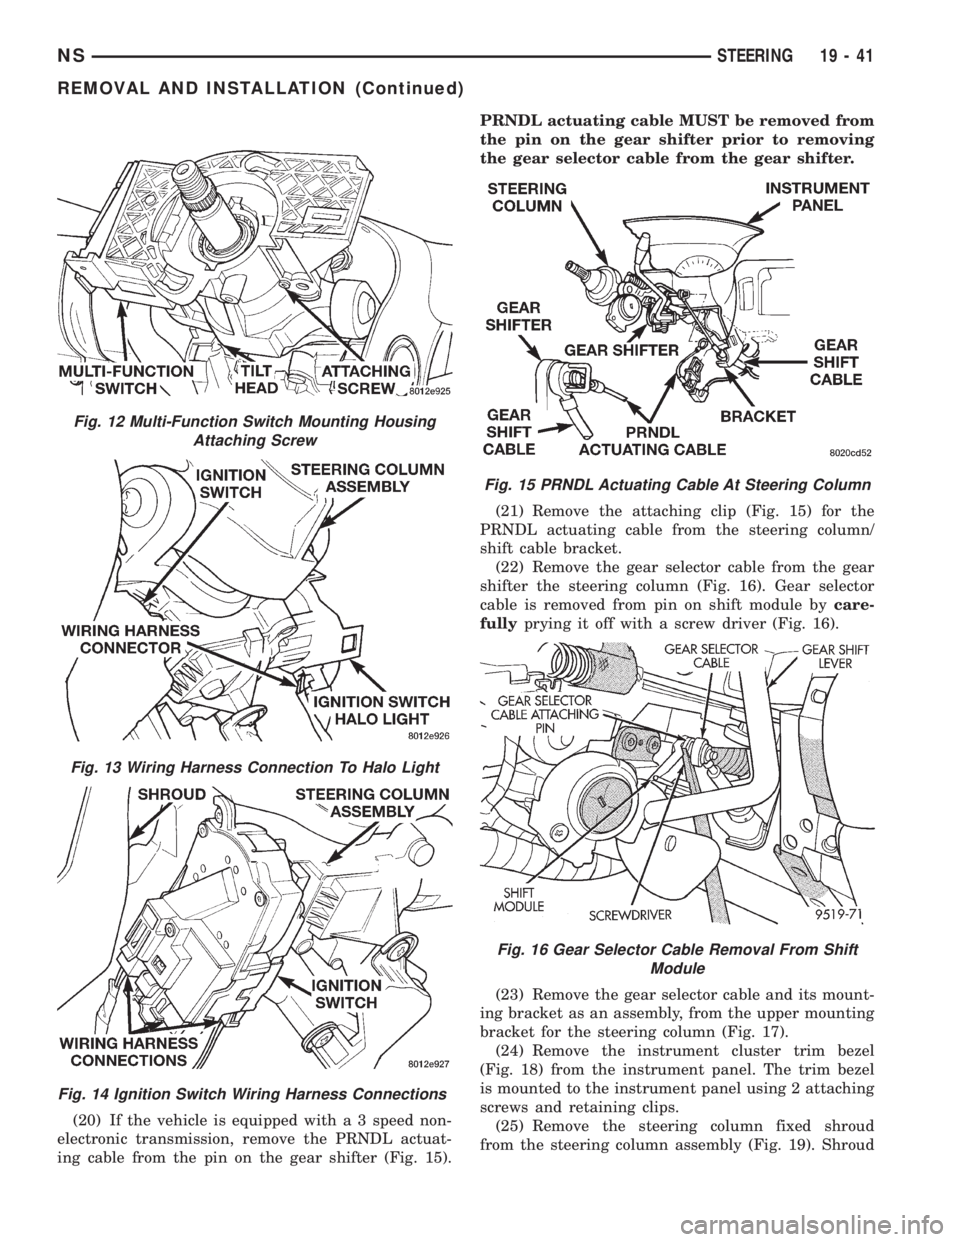
(20) If the vehicle is equipped with a 3 speed non-
electronic transmission, remove the PRNDL actuat-
ing cable from the pin on the gear shifter (Fig. 15).PRNDL actuating cable MUST be removed from
the pin on the gear shifter prior to removing
the gear selector cable from the gear shifter.
(21) Remove the attaching clip (Fig. 15) for the
PRNDL actuating cable from the steering column/
shift cable bracket.
(22) Remove the gear selector cable from the gear
shifter the steering column (Fig. 16). Gear selector
cable is removed from pin on shift module bycare-
fullyprying it off with a screw driver (Fig. 16).
(23) Remove the gear selector cable and its mount-
ing bracket as an assembly, from the upper mounting
bracket for the steering column (Fig. 17).
(24) Remove the instrument cluster trim bezel
(Fig. 18) from the instrument panel. The trim bezel
is mounted to the instrument panel using 2 attaching
screws and retaining clips.
(25) Remove the steering column fixed shroud
from the steering column assembly (Fig. 19). Shroud
Fig. 12 Multi-Function Switch Mounting Housing
Attaching Screw
Fig. 13 Wiring Harness Connection To Halo Light
Fig. 14 Ignition Switch Wiring Harness Connections
Fig. 15 PRNDL Actuating Cable At Steering Column
Fig. 16 Gear Selector Cable Removal From Shift
Module
NSSTEERING 19 - 41
REMOVAL AND INSTALLATION (Continued)
Page 1469 of 1938
(28) Remove steering column assembly from vehi-
cle. Use care to avoid damage to paint or interior
trim.
INSTALL
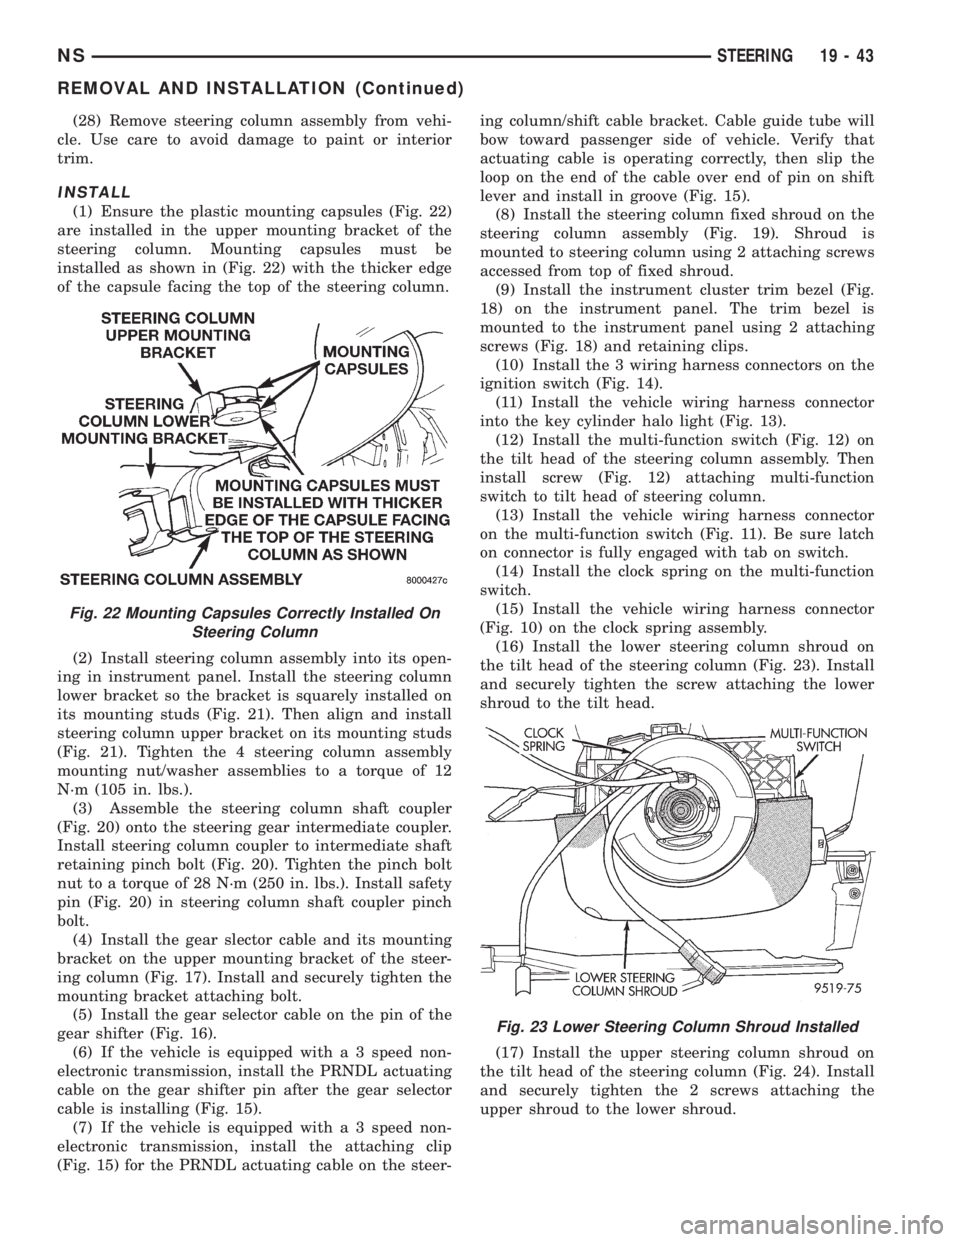
(1) Ensure the plastic mounting capsules (Fig. 22)
are installed in the upper mounting bracket of the
steering column. Mounting capsules must be
installed as shown in (Fig. 22) with the thicker edge
of the capsule facing the top of the steering column.
(2) Install steering column assembly into its open-
ing in instrument panel. Install the steering column
lower bracket so the bracket is squarely installed on
its mounting studs (Fig. 21). Then align and install
steering column upper bracket on its mounting studs
(Fig. 21). Tighten the 4 steering column assembly
mounting nut/washer assemblies to a torque of 12
N´m (105 in. lbs.).
(3) Assemble the steering column shaft coupler
(Fig. 20) onto the steering gear intermediate coupler.
Install steering column coupler to intermediate shaft
retaining pinch bolt (Fig. 20). Tighten the pinch bolt
nut to a torque of 28 N´m (250 in. lbs.). Install safety
pin (Fig. 20) in steering column shaft coupler pinch
bolt.
(4) Install the gear slector cable and its mounting
bracket on the upper mounting bracket of the steer-
ing column (Fig. 17). Install and securely tighten the
mounting bracket attaching bolt.
(5) Install the gear selector cable on the pin of the
gear shifter (Fig. 16).
(6) If the vehicle is equipped with a 3 speed non-
electronic transmission, install the PRNDL actuating
cable on the gear shifter pin after the gear selector
cable is installing (Fig. 15).
(7) If the vehicle is equipped with a 3 speed non-
electronic transmission, install the attaching clip
(Fig. 15) for the PRNDL actuating cable on the steer-ing column/shift cable bracket. Cable guide tube will
bow toward passenger side of vehicle. Verify that
actuating cable is operating correctly, then slip the
loop on the end of the cable over end of pin on shift
lever and install in groove (Fig. 15).
(8) Install the steering column fixed shroud on the
steering column assembly (Fig. 19). Shroud is
mounted to steering column using 2 attaching screws
accessed from top of fixed shroud.
(9) Install the instrument cluster trim bezel (Fig.
18) on the instrument panel. The trim bezel is
mounted to the instrument panel using 2 attaching
screws (Fig. 18) and retaining clips.
(10) Install the 3 wiring harness connectors on the
ignition switch (Fig. 14).
(11) Install the vehicle wiring harness connector
into the key cylinder halo light (Fig. 13).
(12) Install the multi-function switch (Fig. 12) on
the tilt head of the steering column assembly. Then
install screw (Fig. 12) attaching multi-function
switch to tilt head of steering column.
(13) Install the vehicle wiring harness connector
on the multi-function switch (Fig. 11). Be sure latch
on connector is fully engaged with tab on switch.
(14) Install the clock spring on the multi-function
switch.
(15) Install the vehicle wiring harness connector
(Fig. 10) on the clock spring assembly.
(16) Install the lower steering column shroud on
the tilt head of the steering column (Fig. 23). Install
and securely tighten the screw attaching the lower
shroud to the tilt head.
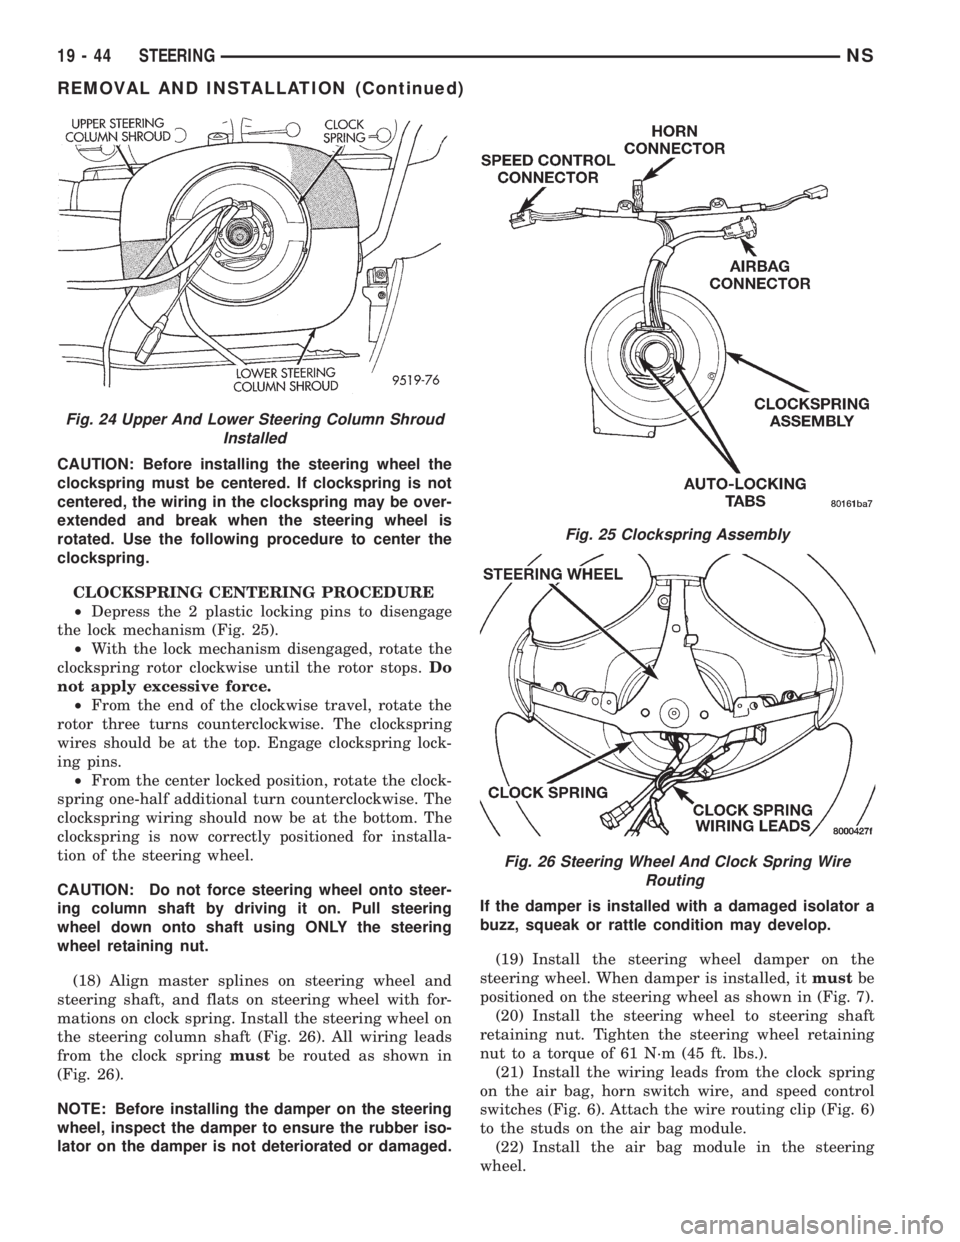
(17) Install the upper steering column shroud on
the tilt head of the steering column (Fig. 24). Install
and securely tighten the 2 screws attaching the
upper shroud to the lower shroud.
Fig. 22 Mounting Capsules Correctly Installed On
Steering Column
Fig. 23 Lower Steering Column Shroud Installed
NSSTEERING 19 - 43
REMOVAL AND INSTALLATION (Continued)
Page 1470 of 1938
CAUTION: Before installing the steering wheel the
clockspring must be centered. If clockspring is not
centered, the wiring in the clockspring may be over-
extended and break when the steering wheel is
rotated. Use the following procedure to center the
clockspring.
CLOCKSPRING CENTERING PROCEDURE
²Depress the 2 plastic locking pins to disengage
the lock mechanism (Fig. 25).
²With the lock mechanism disengaged, rotate the
clockspring rotor clockwise until the rotor stops.Do
not apply excessive force.
²From the end of the clockwise travel, rotate the
rotor three turns counterclockwise. The clockspring
wires should be at the top. Engage clockspring lock-
ing pins.
²From the center locked position, rotate the clock-
spring one-half additional turn counterclockwise. The
clockspring wiring should now be at the bottom. The
clockspring is now correctly positioned for installa-
tion of the steering wheel.
CAUTION: Do not force steering wheel onto steer-
ing column shaft by driving it on. Pull steering
wheel down onto shaft using ONLY the steering
wheel retaining nut.
(18) Align master splines on steering wheel and
steering shaft, and flats on steering wheel with for-
mations on clock spring. Install the steering wheel on
the steering column shaft (Fig. 26). All wiring leads
from the clock springmustbe routed as shown in
(Fig. 26).
NOTE: Before installing the damper on the steering
wheel, inspect the damper to ensure the rubber iso-
lator on the damper is not deteriorated or damaged.If the damper is installed with a damaged isolator a
buzz, squeak or rattle condition may develop.
(19) Install the steering wheel damper on the
steering wheel. When damper is installed, itmustbe
positioned on the steering wheel as shown in (Fig. 7).
(20) Install the steering wheel to steering shaft
retaining nut. Tighten the steering wheel retaining
nut to a torque of 61 N´m (45 ft. lbs.).
(21) Install the wiring leads from the clock spring
on the air bag, horn switch wire, and speed control
switches (Fig. 6). Attach the wire routing clip (Fig. 6)
to the studs on the air bag module.
(22) Install the air bag module in the steering
wheel.
Fig. 24 Upper And Lower Steering Column Shroud
Installed
Fig. 25 Clockspring Assembly
Fig. 26 Steering Wheel And Clock Spring Wire
Routing
19 - 44 STEERINGNS
REMOVAL AND INSTALLATION (Continued)