Page 1654 of 1954

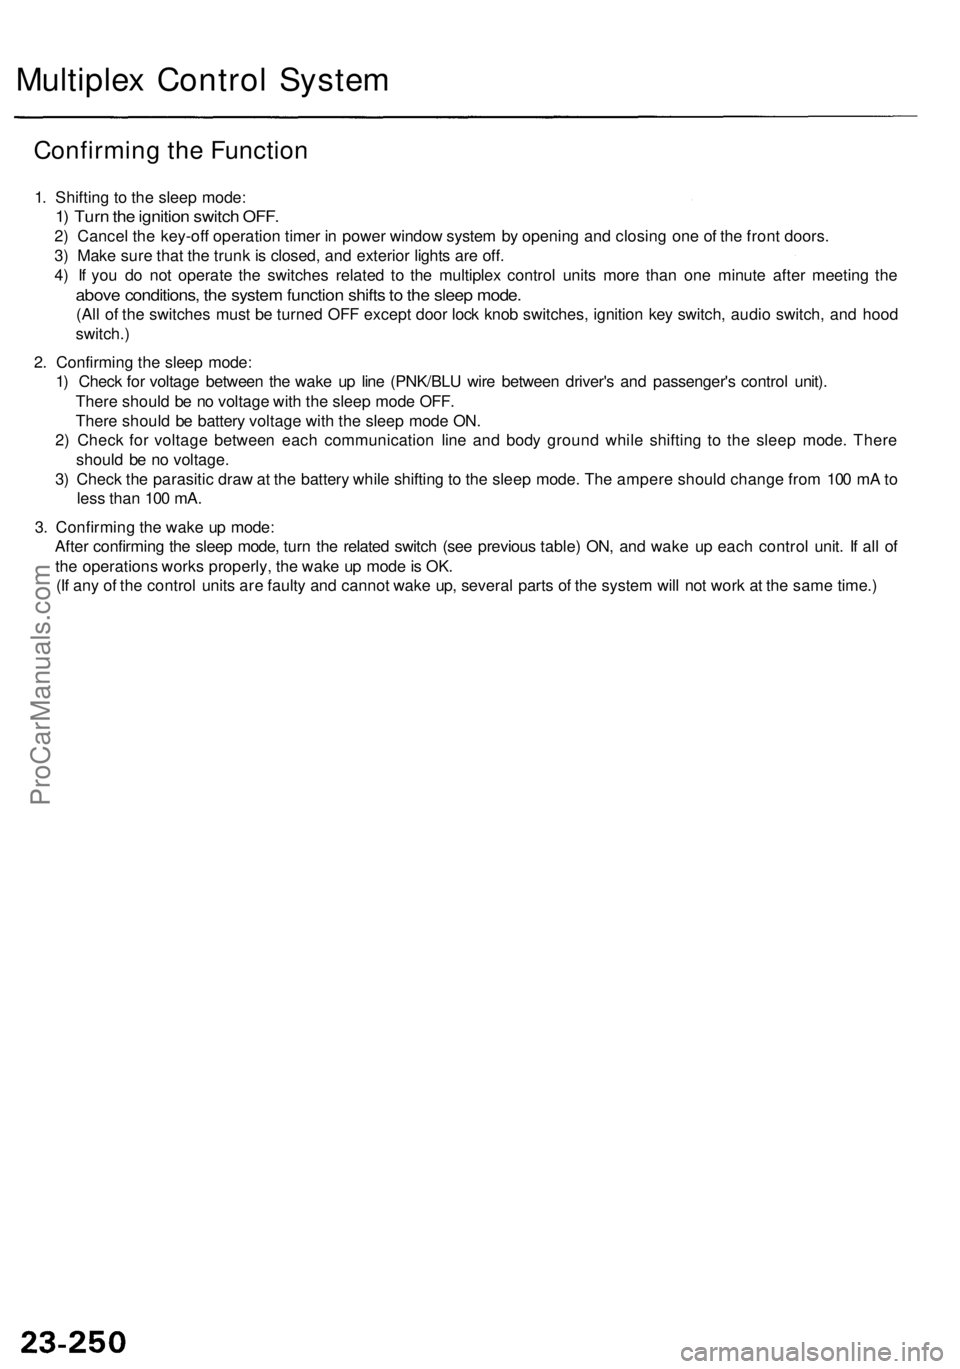
Confirming the Function
1. Shifting to the sleep mode:
1) Turn the ignition switch OFF.
2) Cancel the key-off operation timer in power window system by opening and closing one of the front doors.
3) Make sure that the trunk is closed, and exterior lights are off.
4) If you do not operate the switches related to the multiplex control units more than one minute after meeting the
above conditions, the system function shifts to the sleep mode.
(All of the switches must be turned OFF except door lock knob switches, ignition key switch, audio switch, and hood
switch.)
2. Confirming the sleep mode:
1) Check for voltage between the wake up line (PNK/BLU wire between driver's and passenger's control unit).
There should be no voltage with the sleep mode OFF.
There should be battery voltage with the sleep mode ON.
2) Check for voltage between each communication line and body ground while shifting to the sleep mode. There
should be no voltage.
3) Check the parasitic draw at the battery while shifting to the sleep mode. The ampere should change from 100 mA to
less than 100 mA.
3. Confirming the wake up mode:
After confirming the sleep mode, turn the related switch (see previous table) ON, and wake up each control unit. If all of
the operations works properly, the wake up mode is OK.
(If any of the control units are faulty and cannot wake up, several parts of the system will not work at the same time.)
Multiplex Control SystemProCarManuals.com
Page 1687 of 1954

Power Doo r Lock s
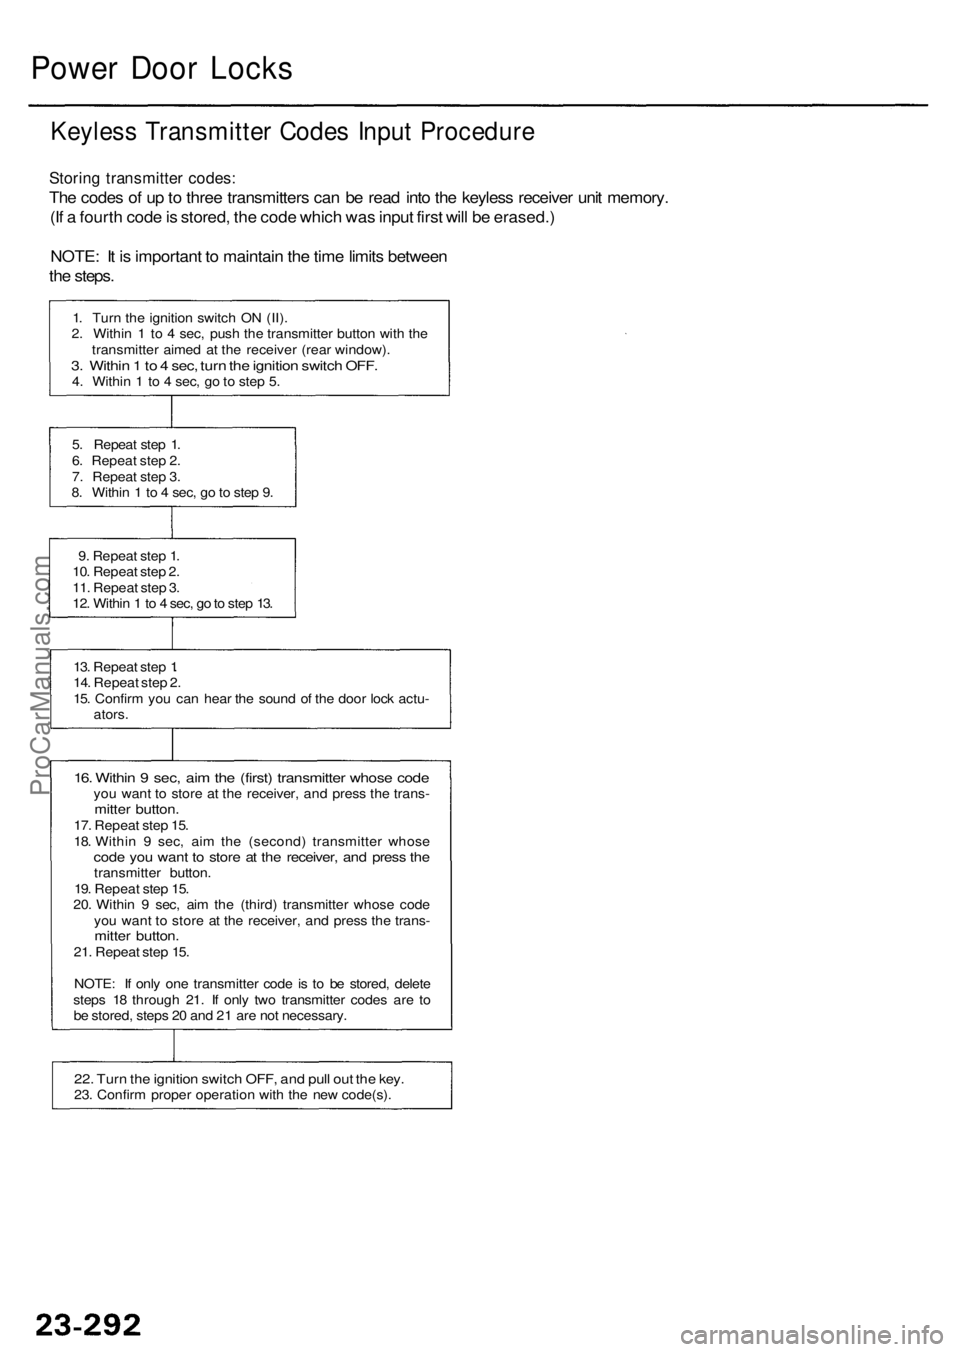
Keyles s Transmitte r Code s Inpu t Procedur e
Storing transmitte r codes :
The code s o f u p to thre e transmitter s ca n b e rea d int o th e keyles s receive r uni t memory .
(I f a fourt h cod e is stored , th e cod e whic h wa s inpu t firs t wil l b e erased. )
NOTE : I t i s importan t t o maintai n th e tim e limit s betwee n
th e steps .
1. Tur n th e ignitio n switc h O N (II) .
2 . Withi n 1 to 4 sec , pus h th e transmitte r butto n wit h th e
transmitte r aime d a t th e receive r (rea r window) .
3. Withi n 1 to 4 sec , tur n th e ignitio n switc h OFF .4. Withi n 1 to 4 sec , g o to ste p 5 .
5 . Repea t ste p 1 .
6 . Repea t ste p 2 .
7 . Repea t ste p 3 .
8 . Withi n 1 to 4 sec , g o to ste p 9 .
9 . Repea t ste p 1 .
10 . Repea t ste p 2 .
11 . Repea t ste p 3 .
12 . Withi n 1 to 4 sec , g o to ste p 13 .
13 . Repea t ste p 1.
14 . Repea t ste p 2 .
15 . Confir m yo u ca n hea r th e soun d o f th e doo r loc k actu -
ators .
16. Withi n 9 sec , ai m th e (first ) transmitte r whos e cod eyou wan t t o stor e a t th e receiver , an d pres s th e trans -mitter button .17. Repea t ste p 15 .
18 . Withi n 9 sec , ai m th e (second ) transmitte r whos e
code yo u wan t t o stor e a t th e receiver , an d pres s th etransmitte r button .
19 . Repea t ste p 15 .
20 . Withi n 9 sec , ai m th e (third ) transmitte r whos e cod e
yo u wan t t o stor e a t th e receiver , an d pres s th e trans -
mitter button .21. Repea t ste p 15 .
NOTE : I f onl y on e transmitte r cod e i s t o b e stored , delet e
step s 1 8 throug h 21 . I f onl y tw o transmitte r code s ar e t o
b e stored , step s 2 0 an d 2 1 ar e no t necessary .
22. Tur n th e ignitio n switc h OFF , an d pul l ou t th e key .23. Confir m prope r operatio n wit h th e ne w code(s) .
ProCarManuals.com
Page 1691 of 1954
Power Window s
Component Location Index
POWER WINDO WRELAYTest, pag e 23-6 8
UNDER-DAS H
FUSE/RELAYBOX
FRON T PASSENGER' S WINDO W SWITC H
Test , pag e 23-31 7
Replacement , pag e 23-31 6
FRON T PASSENGER' S WINDO W MOTO R
Test , pag e 23-31 7
RIGH T REA R WINDO W SWITC H
Test , pag e 23-31 7
Replacement , pag e 23-31 6
RIGH T REA R WINDO W MOTO R
Test , pag e 23-31 7
POWE
R WINDO W MASTE R
SWITCH*Replacement , pag e 23-31 6
DRIVER' S WINDO W
MOTO R
Test , pag e 23-31 8
LEF T REA R WINDO W MOTO R
Test , pag e 23-31 7
LEF T REA R WINDO W
SWITC H
Test , pag e 23-31 7
Replacement , pag e 23-31 6
Yo u ca n als o tes t th e switc h b y usin g th e self-diagnosi s functio n (mod e 2) . (Se e pag e 23-252 .)For additional '02-04 information refer to page 23-35a.
ProCarManuals.com
Page 1693 of 1954
Power Window s
Troubleshootin g
NOTE:
• Befor e testing , g o t o th e Troubleshootin g Guid e (se e pag e 23-244 ). B e sur e t o g o throug h self-diagnosi s functio n
mode s 1 an d 2 (se e page s 23-24 8 an d 23-252 ).
• Th e number s i n th e tabl e sho w th e troubleshootin g sequence .
'9 6 - 9 7 models : '9 8 model : '9 9 - 0 1 models :
No. 1 7 (2 0 A ) No . 1 7 (7. 5 A) No . 1 7 (7. 5 A)
No . 1 8 (2 0 A ) No . 1 8 (3 0 A ) No . 1 8 (2 0 A )
No . 2 1 (2 0 A ) No . 2 1 (3 0 A ) No . 2 1 (2 0 A )
No . 2 4 (2 0 A ) No . 2 4 (3 0 A ) No . 2 4 (2 0 A )
ProCarManuals.com
Page 1695 of 1954

Power Window s
Control Uni t Inpu t Tes t (cont'd )
NOTE:
• Befor e testing , g o t o th e Troubleshootin g Guid e (se e pag e 23-244 ). B e sur e t o g o throug h self-diagnosi s functio n
mode s 1 an d 2 (se e page s 23-24 8 an d 23-252 ).
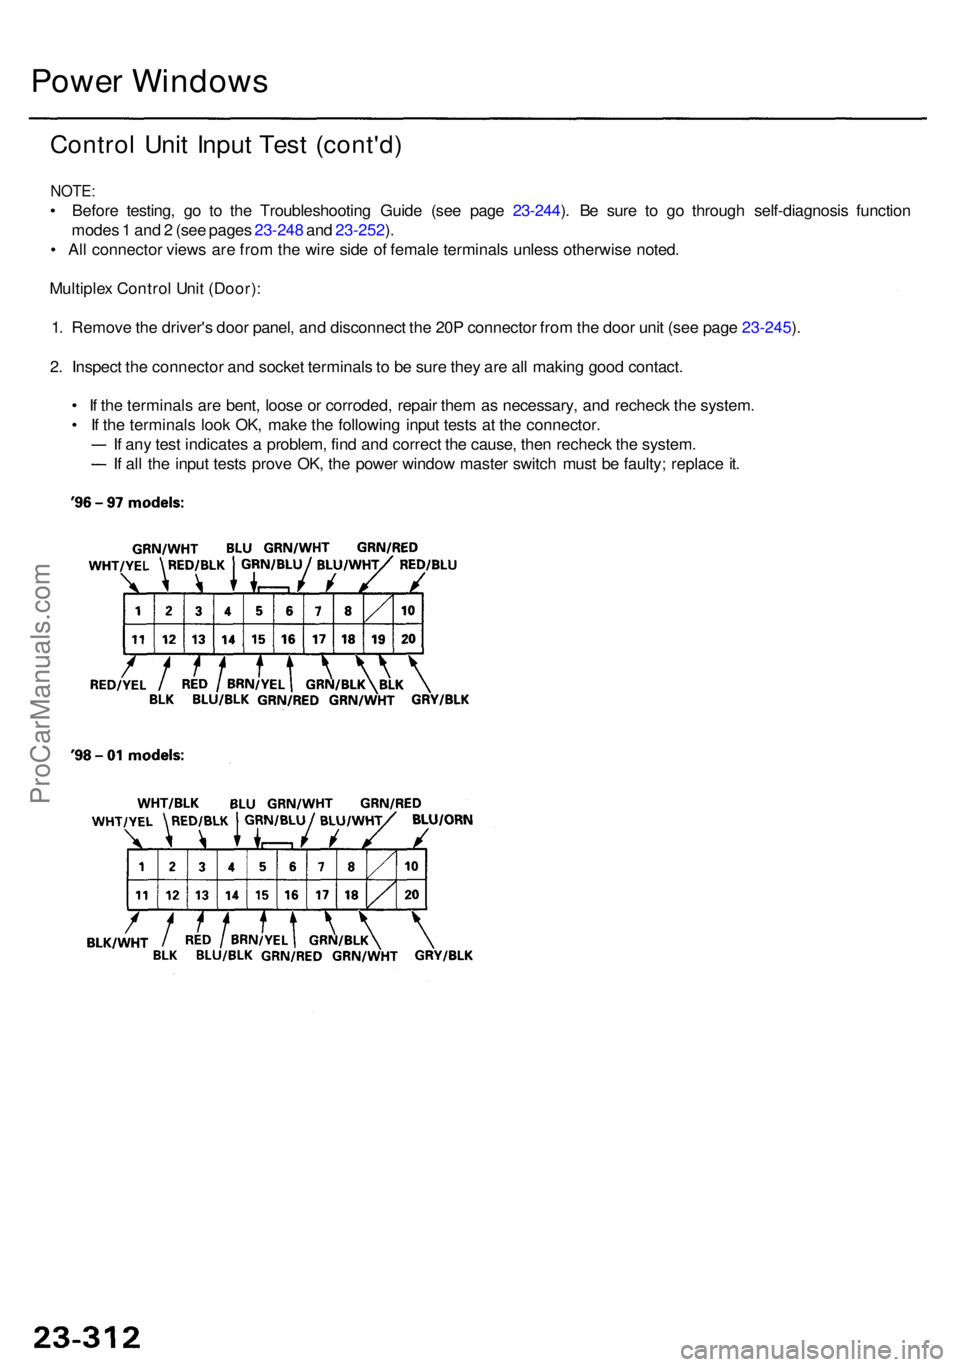
• Al l connecto r view s ar e fro m th e wir e sid e o f femal e terminal s unles s otherwis e noted .
Multiple x Contro l Uni t (Door) :
1 . Remov e th e driver' s doo r panel , an d disconnec t th e 20 P connecto r fro m th e doo r uni t (se e pag e 23-245 ).
2 . Inspec t th e connecto r an d socke t terminal s to b e sur e the y ar e al l makin g goo d contact .
• I f th e terminal s ar e bent , loos e o r corroded , repai r the m a s necessary , an d rechec k th e system .
• I f th e terminal s loo k OK , mak e th e followin g inpu t test s a t th e connector .
I f an y tes t indicate s a problem , fin d an d correc t th e cause , the n rechec k th e system .
I f al l th e inpu t test s prov e OK , th e powe r windo w maste r switc h mus t b e faulty ; replac e it .
ProCarManuals.com
Page 1697 of 1954

Power Window s
Control Uni t Inpu t Tes t (cont'd )
NOTE:
• Befor e testing , g o t o th e Troubleshootin g Guid e (se e pag e 23-244 ). B e sur e t o g o throug h self-diagnosi s functio n
mode s 1 an d 2 (se e page s 23-24 8 an d 23-252 ).
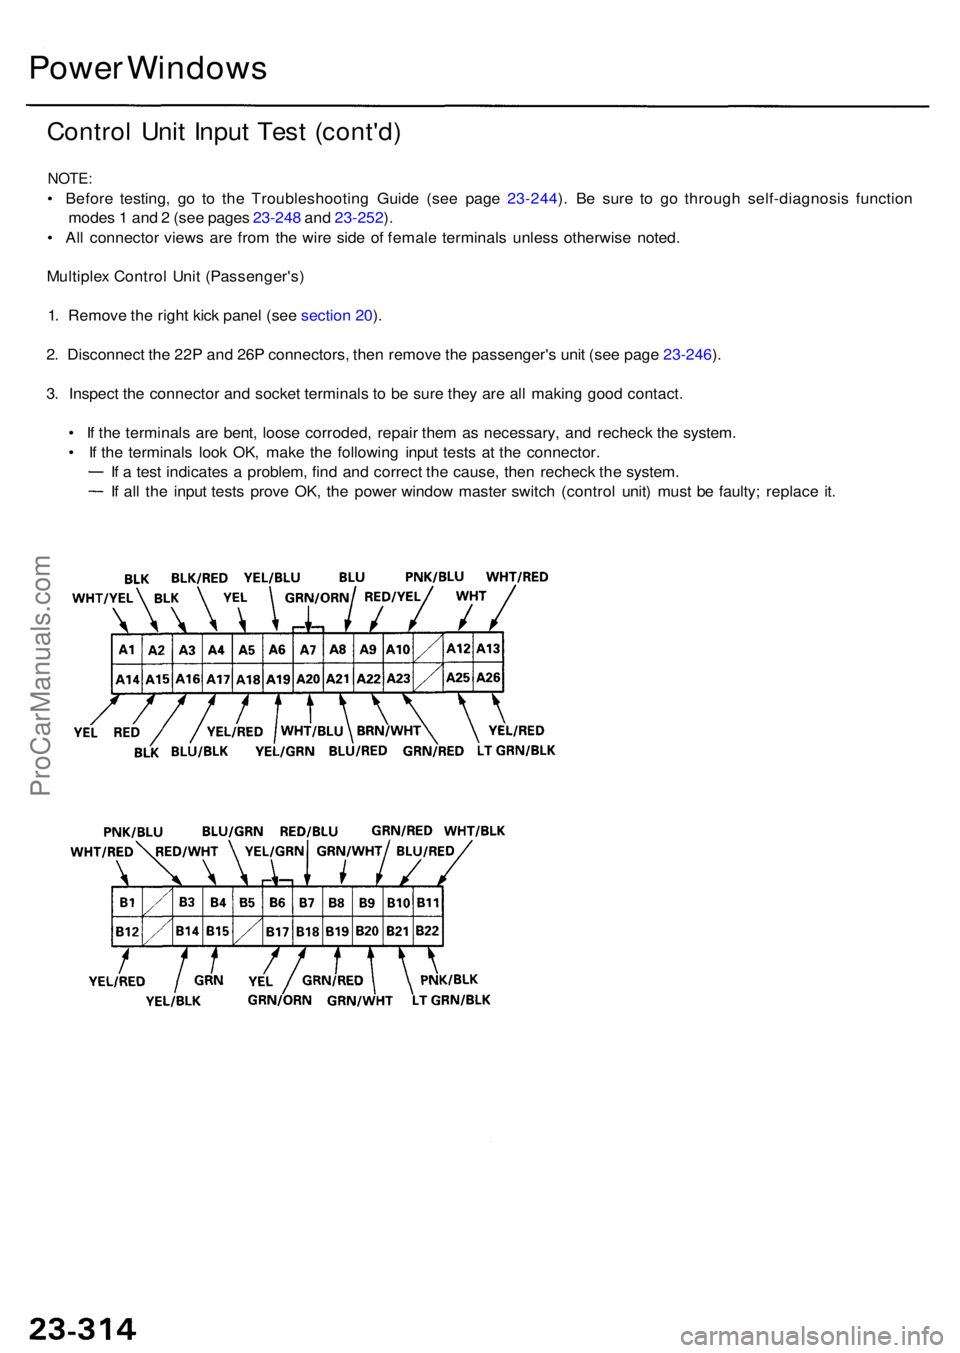
• Al l connecto r view s ar e fro m th e wir e sid e o f femal e terminal s unles s otherwis e noted .
Multiple x Contro l Uni t (Passenger's )
1 . Remov e th e righ t kic k pane l (se e sectio n 20 ).
2 . Disconnec t th e 22 P an d 26 P connectors , the n remov e th e passenger' s uni t (se e pag e 23-246 ).
3 . Inspec t th e connecto r an d socke t terminal s t o b e sur e the y ar e al l makin g goo d contact .
• I f th e terminal s ar e bent , loos e corroded , repai r the m a s necessary , an d recheck the system .
• I f th e terminal s loo k OK , mak e th e followin g inpu t test s a t th e connector .
I f a tes t indicate s a problem , fin d an d correc t th e cause , the n rechec k th e system .
I f al l th e inpu t test s prov e OK , th e powe r windo w maste r switc h (contro l unit ) mus t b e faulty ; replac e it .
ProCarManuals.com
Page 1699 of 1954
Power Window s
Master Switc h Replacemen t
1. Remov e th e driver' s doo r pane l (se e sectio n 20 ).
2 . Remov e th e tw o mountin g screws , the n remov e th e
maste r switc h assembl y fro m th e doo r panel .
MASTE R SWITC H ASSEMBL Y
Passenger's Windo w Switc h
Replacemen t
1. Remov e th e passenger' s doo r pane l (se e sectio n 20 ).
2 . Remov e th e tw o screws , the n remov e th e switc h
assembl y fro m th e doo r panel .
3. Remov e th e si x mountin g screws , the n remov e th e
passenger' s windo w switc h fro m th e panel .
PASSENGER' SWINDOW
SWITC H
PANEL
4. Instal l i n th e revers e orde r o f removal .
4 . Instal l i n th e revers e orde r o f removal .
PANEL
3. Remov e th e fiv e mountin g screws , the n remov e th e
maste r switc h fro m th e panel .
MASTE R SWITC H
ProCarManuals.com
Page 1700 of 1954
Passenger's Windo w Switc h Tes t
1. Remove the passenger's window switch (see
section 20 ).
'9 6 - 9 7 models :
'98 - 0 1 model s
Passenger' s Windo w Moto r Tes t
1. Remov e th e passenger' s doo r pane l (se e sectio n 20 ).
2 . Disconnec t th e 2 P connecto r fro m th e windo w motor .
Termina l sid e o f
mal e terminal s
3. Chec k windo w moto r operatio n b y connectin g powe r
an d groun d accordin g to th e table .
CAUTION : Whe n th e moto r stop s running , discon -
nec t on e lea d immediately .
4 . I f th e moto r doe s no t ru n o r fail s t o ru n smoothly ,
replac e it .
3 . Chec k fo r continuit y betwee n th e No . 4 an d No . 6
terminals . ('98-0 1 models )
Ther e shoul d b e continuity .
I f ther e i s n o continuity , chec k th e indicato r ligh t
bulb.
[ ] : '98-0 1 model s
2. Chec k fo r continuit y betwee n th e terminal s i n eac h
switc h positio n accordin g to th e table .
PASSENGER' SWINDOW SWITC H
ProCarManuals.com