1995 JEEP YJ torque
[x] Cancel search: torquePage 134 of 2158
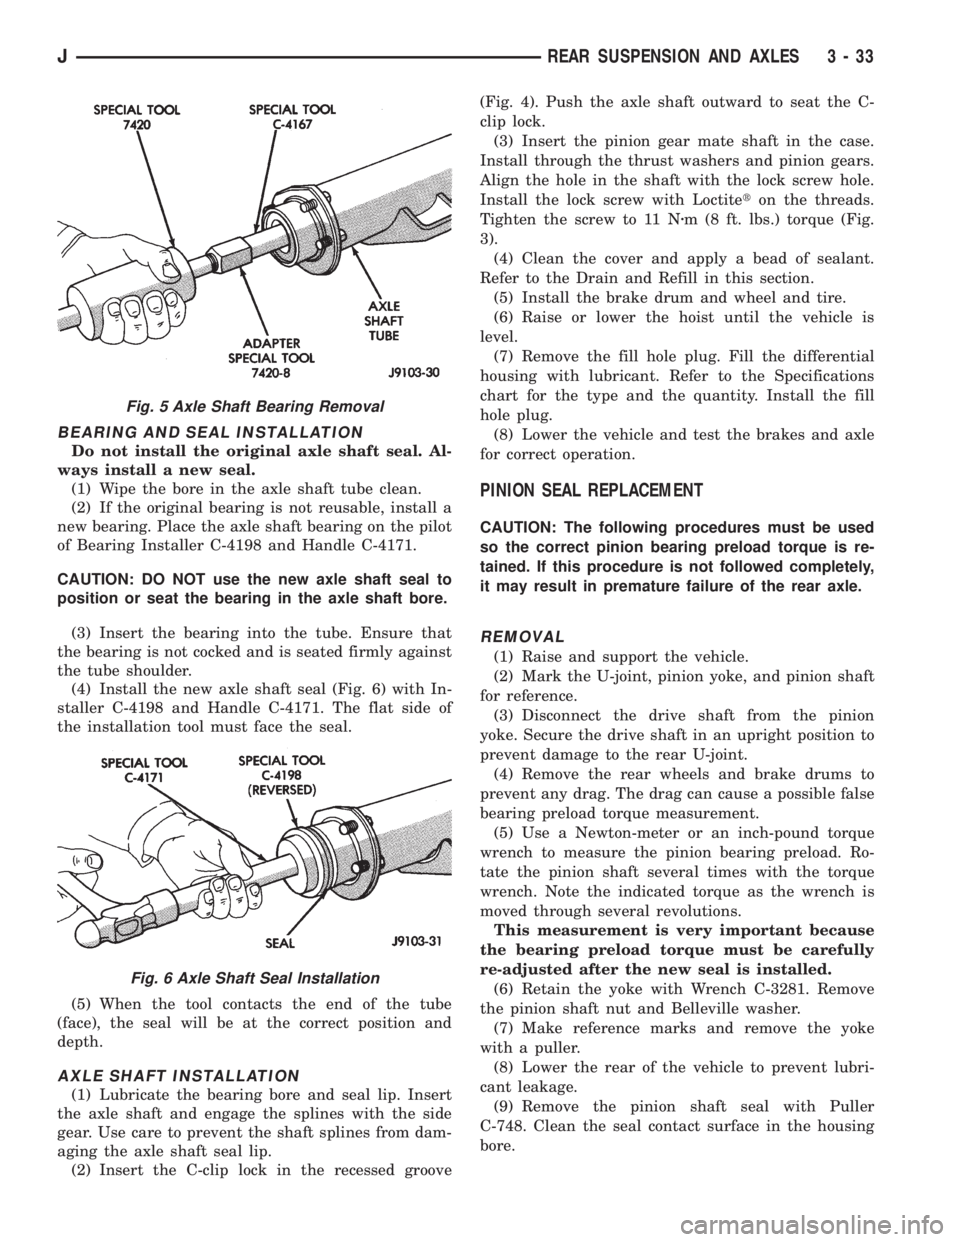
BEARING AND SEAL INSTALLATION
Do not install the original axle shaft seal. Al-
ways install a new seal.
(1) Wipe the bore in the axle shaft tube clean.
(2) If the original bearing is not reusable, install a
new bearing. Place the axle shaft bearing on the pilot
of Bearing Installer C-4198 and Handle C-4171.
CAUTION: DO NOT use the new axle shaft seal to
position or seat the bearing in the axle shaft bore.
(3) Insert the bearing into the tube. Ensure that
the bearing is not cocked and is seated firmly against
the tube shoulder.
(4) Install the new axle shaft seal (Fig. 6) with In-
staller C-4198 and Handle C-4171. The flat side of
the installation tool must face the seal.
(5) When the tool contacts the end of the tube
(face), the seal will be at the correct position and
depth.
AXLE SHAFT INSTALLATION
(1) Lubricate the bearing bore and seal lip. Insert
the axle shaft and engage the splines with the side
gear. Use care to prevent the shaft splines from dam-
aging the axle shaft seal lip.
(2) Insert the C-clip lock in the recessed groove(Fig. 4). Push the axle shaft outward to seat the C-
clip lock.
(3) Insert the pinion gear mate shaft in the case.
Install through the thrust washers and pinion gears.
Align the hole in the shaft with the lock screw hole.
Install the lock screw with Loctiteton the threads.
Tighten the screw to 11 Nzm (8 ft. lbs.) torque (Fig.
3).
(4) Clean the cover and apply a bead of sealant.
Refer to the Drain and Refill in this section.
(5) Install the brake drum and wheel and tire.
(6) Raise or lower the hoist until the vehicle is
level.
(7) Remove the fill hole plug. Fill the differential
housing with lubricant. Refer to the Specifications
chart for the type and the quantity. Install the fill
hole plug.
(8) Lower the vehicle and test the brakes and axle
for correct operation.
PINION SEAL REPLACEMENT
CAUTION: The following procedures must be used
so the correct pinion bearing preload torque is re-
tained. If this procedure is not followed completely,
it may result in premature failure of the rear axle.
REMOVAL
(1) Raise and support the vehicle.
(2) Mark the U-joint, pinion yoke, and pinion shaft
for reference.
(3) Disconnect the drive shaft from the pinion
yoke. Secure the drive shaft in an upright position to
prevent damage to the rear U-joint.
(4) Remove the rear wheels and brake drums to
prevent any drag. The drag can cause a possible false
bearing preload torque measurement.
(5) Use a Newton-meter or an inch-pound torque
wrench to measure the pinion bearing preload. Ro-
tate the pinion shaft several times with the torque
wrench. Note the indicated torque as the wrench is
moved through several revolutions.
This measurement is very important because
the bearing preload torque must be carefully
re-adjusted after the new seal is installed.
(6) Retain the yoke with Wrench C-3281. Remove
the pinion shaft nut and Belleville washer.
(7) Make reference marks and remove the yoke
with a puller.
(8) Lower the rear of the vehicle to prevent lubri-
cant leakage.
(9) Remove the pinion shaft seal with Puller
C-748. Clean the seal contact surface in the housing
bore.
Fig. 5 Axle Shaft Bearing Removal
Fig. 6 Axle Shaft Seal Installation
JREAR SUSPENSION AND AXLES 3 - 33
Page 135 of 2158
INSTALLATION
(1) Examine the splines on the pinion shaft for
burrs or wear.
(2) Remove any burrs and clean the shaft.
(3) Inspect the pinion yoke for cracks, worn splines
and a worn seal contact surface. Repair or replace
the yoke as necessary.
The outer perimeter of the seal is pre-coated
with a special sealant. An additional applica-
tion of sealant is not required.
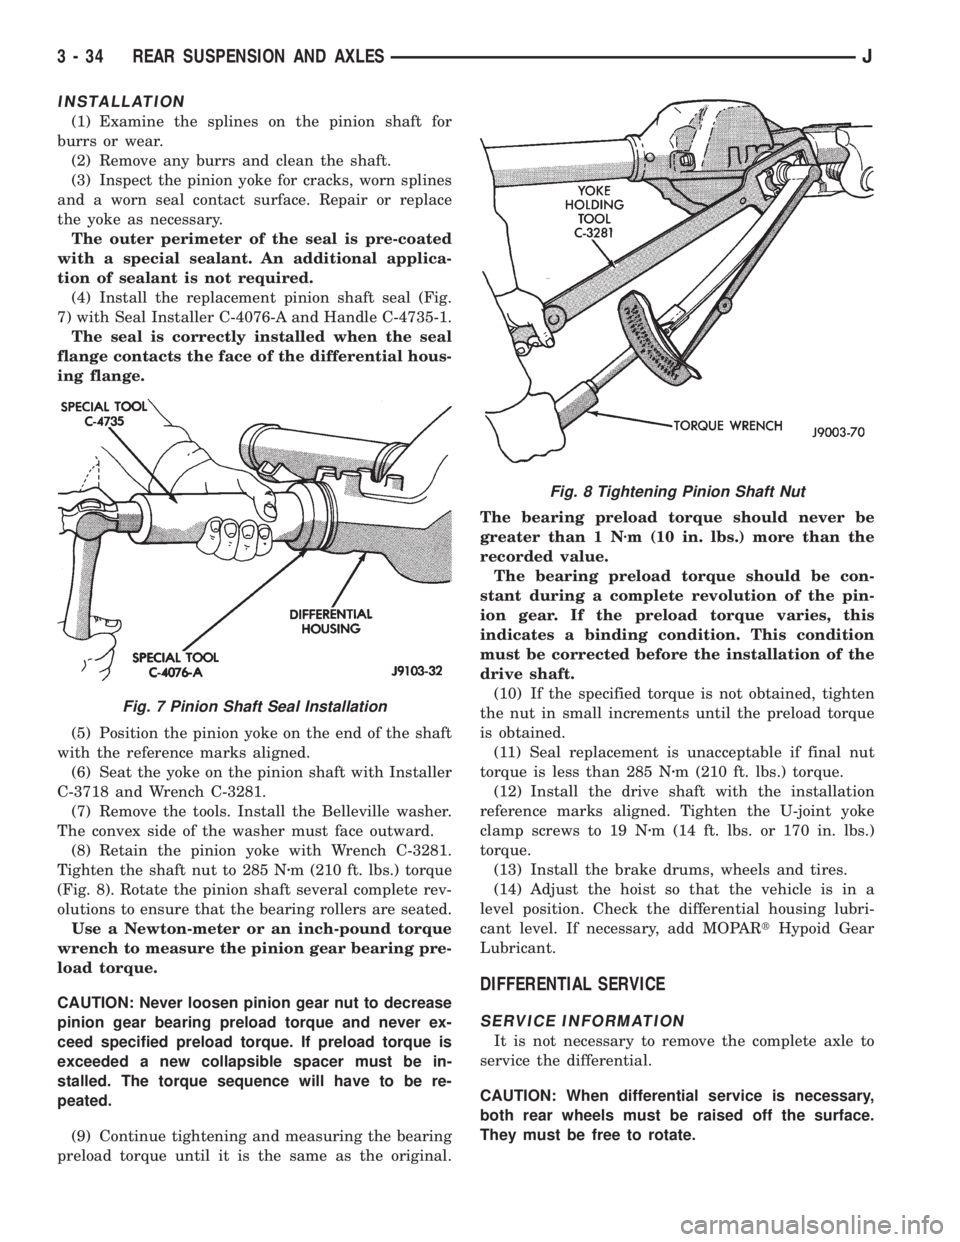
(4) Install the replacement pinion shaft seal (Fig.
7) with Seal Installer C-4076-A and Handle C-4735-1.
The seal is correctly installed when the seal
flange contacts the face of the differential hous-
ing flange.
(5) Position the pinion yoke on the end of the shaft
with the reference marks aligned.
(6) Seat the yoke on the pinion shaft with Installer
C-3718 and Wrench C-3281.
(7) Remove the tools. Install the Belleville washer.
The convex side of the washer must face outward.
(8) Retain the pinion yoke with Wrench C-3281.
Tighten the shaft nut to 285 Nzm (210 ft. lbs.) torque
(Fig. 8). Rotate the pinion shaft several complete rev-
olutions to ensure that the bearing rollers are seated.
Use a Newton-meter or an inch-pound torque
wrench to measure the pinion gear bearing pre-
load torque.
CAUTION: Never loosen pinion gear nut to decrease
pinion gear bearing preload torque and never ex-
ceed specified preload torque. If preload torque is
exceeded a new collapsible spacer must be in-
stalled. The torque sequence will have to be re-
peated.
(9) Continue tightening and measuring the bearing
preload torque until it is the same as the original.The bearing preload torque should never be
greater than 1 Nzm (10 in. lbs.) more than the
recorded value.
The bearing preload torque should be con-
stant during a complete revolution of the pin-
ion gear. If the preload torque varies, this
indicates a binding condition. This condition
must be corrected before the installation of the
drive shaft.
(10) If the specified torque is not obtained, tighten
the nut in small increments until the preload torque
is obtained.
(11) Seal replacement is unacceptable if final nut
torque is less than 285 Nzm (210 ft. lbs.) torque.
(12) Install the drive shaft with the installation
reference marks aligned. Tighten the U-joint yoke
clamp screws to 19 Nzm (14 ft. lbs. or 170 in. lbs.)
torque.
(13) Install the brake drums, wheels and tires.
(14) Adjust the hoist so that the vehicle is in a
level position. Check the differential housing lubri-
cant level. If necessary, add MOPARtHypoid Gear
Lubricant.
DIFFERENTIAL SERVICE
SERVICE INFORMATION
It is not necessary to remove the complete axle to
service the differential.
CAUTION: When differential service is necessary,
both rear wheels must be raised off the surface.
They must be free to rotate.
Fig. 7 Pinion Shaft Seal Installation
Fig. 8 Tightening Pinion Shaft Nut
3 - 34 REAR SUSPENSION AND AXLESJ
Page 139 of 2158

(6) If removed, heat ring gear with a heat lamp or
by immersing in a hot fluid. The temperature should
not exceed 149ÉC (300ÉF).Do not use a torch to
heat the ring gear.
(7) Position heated rear gear on case. Use two
equally spaced Pilot Studs C-3288-B to align the gear
with the flange holes (Fig. 18).
(8) Install replacement ring gear bolts (with left
hand threads). Alternately and evenly tighten each
bolt to 95 Nzm (70 ft. lbs.) torque.
CAUTION: When installing a differential bearing,
never apply force to the bearing cage because bear-
ing damage will result.
(9) Install a differential bearing on each hub with
Installer C-4340 and Handle C-4171 (Fig. 19).PINION DEPTH MEASUREMENT AND
ADJUSTMENT WITH GAUGE SET 6575
(1) Use pinion gear adjustment gauge set 6575
(Fig. 20) and continue the assembly:
(2) Install front (outer) bearing cup use Installer
D-130 and Handle C-4171.
(3) Install rear (inner) bearing cup use Installer
C-4308 and Handle C-4171.
Assemble tools as described;
²Position Spacer (SP-6030) over Shaft (SP-5385)
²Position pinion rear bearing on shaft
²Position tools (with bearing) in the housing
²Install Sleeve (SP-5382)
²Install pinion front bearing
²Install Spacer (SP-6022)
²Install Sleeve (SP-3194-B), Washer (SP-534) and
Nut (SP-3193)
(4) Prevent compression sleeve tool from turning
with Wrench C-3281.
Tighten the nut to seat the pinion bearings in the
housing (Fig. 21). Allow the sleeve to turn several
times during the tightening to prevent brinelling the
bearing cups or bearings.
Depth shim(s) are positioned between the pin-
ion gear rear bearing and pinion gear. The re-
quired thickness of the depth shim(s) is
determined according to the following informa-
tion.
(5) Loosen the compression nut tool. Lubricate the
pinion gear front and rear bearings with gear lubri-
cant. Re-tighten the compression nut tool to 1 to 3
Nzm (15 to 25 in. lbs.) torque. Rotate the pinion gear
several complete revolutions to align the bearing roll-
ers.
(6) Install Gauge Block SP-5383 at the end of SP-
5385. Install Cap Screw (SP-536) and tighten.
(7) Position Arbor (SP-6029) in the differential
housing (Fig. 22).
Fig. 18 Case-To-Ring Gear Alignment
Fig. 19 Differential Bearing Installation
Fig. 20 Axle Adjustment ToolsÐ8 1/4
3 - 38 REAR SUSPENSION AND AXLESJ
Page 140 of 2158
(8) Center the tool. Place a piece of 0.002 inch
shim stock at each end of the arbor tool. Install the
bearing caps on the arbor tool. Tighten the cap bolts
to 14 Nzm (10 ft. lbs.) torque.
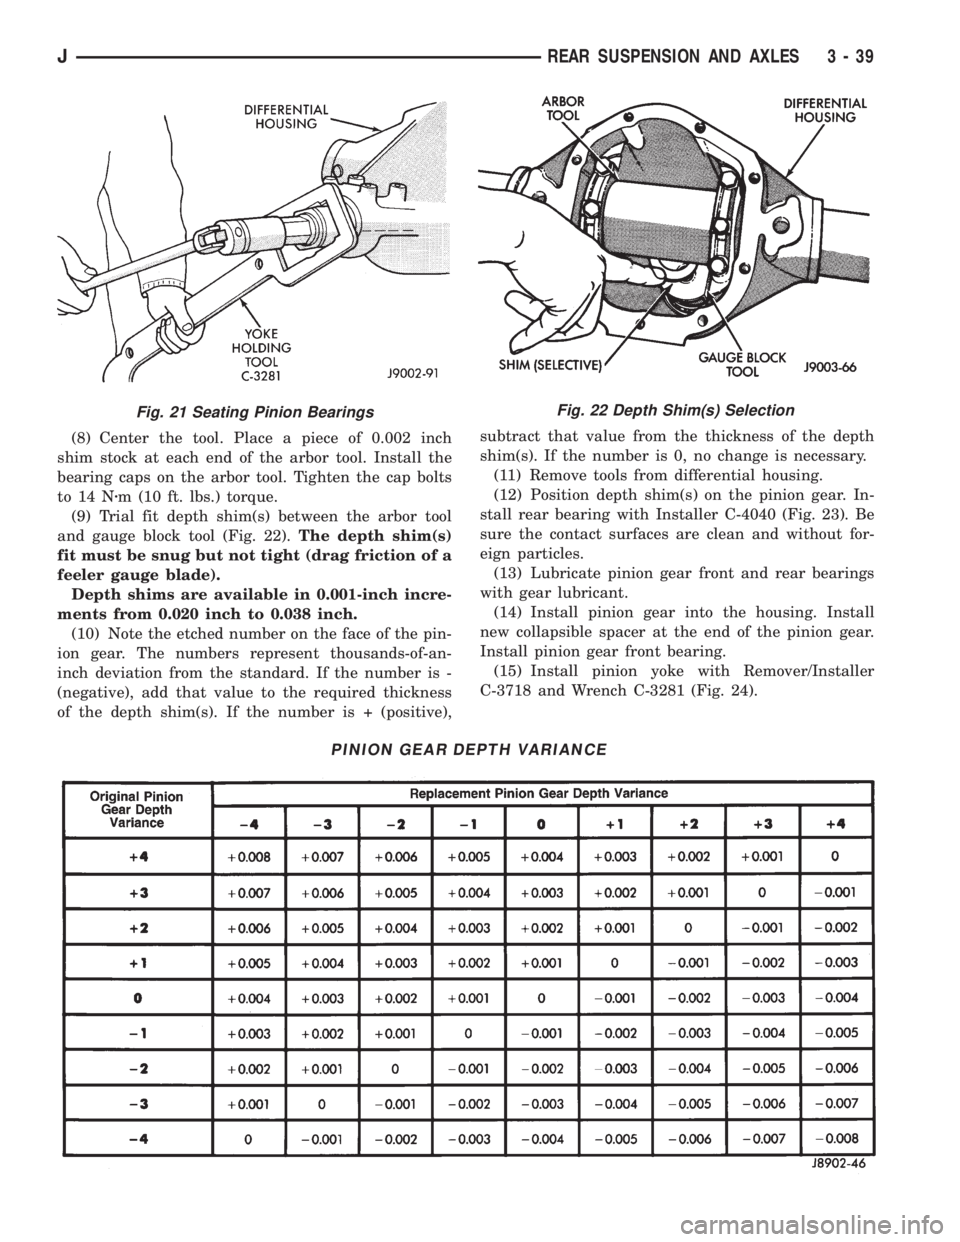
(9) Trial fit depth shim(s) between the arbor tool
and gauge block tool (Fig. 22).The depth shim(s)
fit must be snug but not tight (drag friction of a
feeler gauge blade).
Depth shims are available in 0.001-inch incre-
ments from 0.020 inch to 0.038 inch.
(10) Note the etched number on the face of the pin-
ion gear. The numbers represent thousands-of-an-
inch deviation from the standard. If the number is -
(negative), add that value to the required thickness
of the depth shim(s). If the number is + (positive),subtract that value from the thickness of the depth
shim(s). If the number is 0, no change is necessary.
(11) Remove tools from differential housing.
(12) Position depth shim(s) on the pinion gear. In-
stall rear bearing with Installer C-4040 (Fig. 23). Be
sure the contact surfaces are clean and without for-
eign particles.
(13) Lubricate pinion gear front and rear bearings
with gear lubricant.
(14) Install pinion gear into the housing. Install
new collapsible spacer at the end of the pinion gear.
Install pinion gear front bearing.
(15) Install pinion yoke with Remover/Installer
C-3718 and Wrench C-3281 (Fig. 24).
Fig. 22 Depth Shim(s) Selection
PINION GEAR DEPTH VARIANCE
Fig. 21 Seating Pinion Bearings
JREAR SUSPENSION AND AXLES 3 - 39
Page 141 of 2158
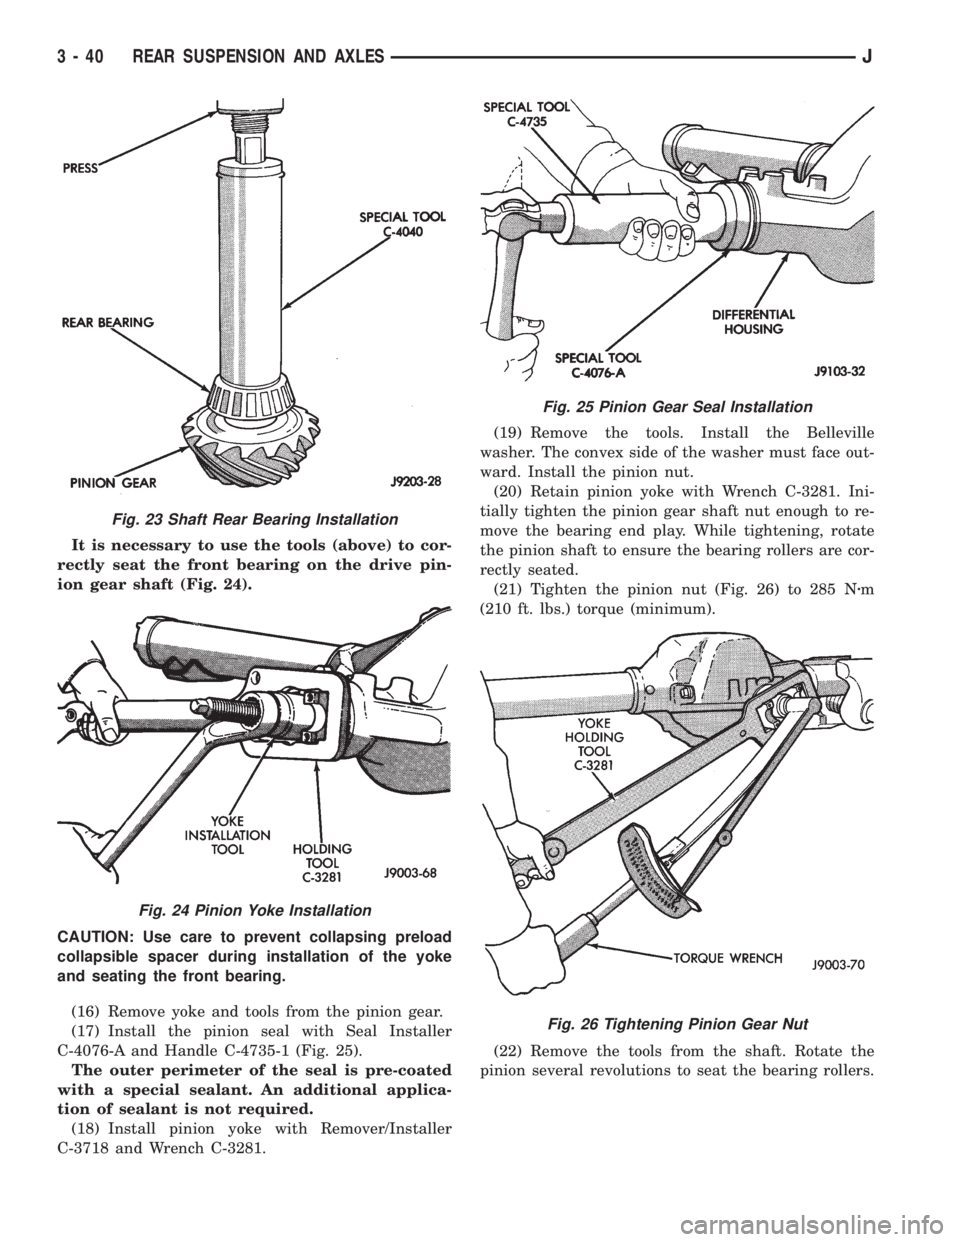
It is necessary to use the tools (above) to cor-
rectly seat the front bearing on the drive pin-
ion gear shaft (Fig. 24).
CAUTION: Use care to prevent collapsing preload
collapsible spacer during installation of the yoke
and seating the front bearing.
(16) Remove yoke and tools from the pinion gear.
(17) Install the pinion seal with Seal Installer
C-4076-A and Handle C-4735-1 (Fig. 25).
The outer perimeter of the seal is pre-coated
with a special sealant. An additional applica-
tion of sealant is not required.
(18) Install pinion yoke with Remover/Installer
C-3718 and Wrench C-3281.(19) Remove the tools. Install the Belleville
washer. The convex side of the washer must face out-
ward. Install the pinion nut.
(20) Retain pinion yoke with Wrench C-3281. Ini-
tially tighten the pinion gear shaft nut enough to re-
move the bearing end play. While tightening, rotate
the pinion shaft to ensure the bearing rollers are cor-
rectly seated.
(21) Tighten the pinion nut (Fig. 26) to 285 Nzm
(210 ft. lbs.) torque (minimum).
(22) Remove the tools from the shaft. Rotate the
pinion several revolutions to seat the bearing rollers.
Fig. 23 Shaft Rear Bearing Installation
Fig. 24 Pinion Yoke Installation
Fig. 25 Pinion Gear Seal Installation
Fig. 26 Tightening Pinion Gear Nut
3 - 40 REAR SUSPENSION AND AXLESJ
Page 142 of 2158

CAUTION: Never loosen pinion gear nut to decrease
pinion gear bearing preload torque and never ex-
ceed specified preload torque. If preload torque is
exceeded a new collapsible spacer must be in-
stalled. The torque sequence will have to be re-
peated.
(23) Measure pinion bearing preload torque by ro-
tating pinion shaft with a Newton-meter or an inch-
pound torque wrench. The correct bearing preload
torque is 1 to 2 Nzm (10 to 20 in. lbs.). This torque
value is with replacement bearings and pinion nut
tightened with a minimum of 285 Nzm (210 ft. lbs.)
torque (Fig. 27).
When using original pinion rear bearing and
a replacement front bearing. The correct pre-
load torque is 1 Nzm (10 in. lbs.) in addition to
the torque measured and recorded during dis-
assembly.
The bearing preload torque should be con-
stant during a complete revolution of the pin-
ion gear shaft. If preload torque varies during
rotation of the shaft, there is an internal bind-
ing that must be corrected before final assem-
bly.
(24) If the specified torque is not obtained, tighten
the nut in small increments until the preload torque
is obtained.
The differential will be unacceptable for use
if the final nut torque is less than 285 Nzm (210
ft. lbs.) torque. If the preload torque is not
within the specified range this is also unaccept-
able.
DIFFERENTIAL CASE INSTALLATION
(1) Apply a coating of hypoid gear lubricant to the
differential bearings, bearing cups and threaded ad-
justers. A dab of grease can be used to keep the ad-
justers in position. Carefully position the assembled
differential case in the housing.(2) Observe the reference marks and install the
differential bearing caps at their original locations
(Fig. 28).
(3) Install the bearing cap bolts (Fig. 28). Tighten
the upper bolts to 14 Nzm (10 ft. lbs.) torque. Tighten
the lower bolts finger-tight until the bolt head is
lightly seated.
DIFFERENTIAL BEARING PRELOAD AND RING
GEAR BACKLASH ADJUSTMENT
The following limitations must be considered when
adjusting the differential:
²The maximum ring gear backlash variation is
0.003 inch (0.076 mm).
²Mark the gears so the same teeth are meshed dur-
ing all backlash measurements.
²Maintain the specified threaded-adjuster torque
while adjusting.
²Excessive adjuster torque will introduce a high
bearing load and cause premature bearing failure.
Insufficient adjuster torque can result in excessive
differential case free-play and ring gear noise.
²Insufficient adjuster torque will not support the
ring gear correctly and can cause excessive differen-
tial case free-play and ring gear noise.
The differential bearing cups will not always
immediately follow the threaded adjusters as
they are moved during adjustment. Ensure ac-
curate bearing cup responses to the adjust-
ments. Maintain the gear teeth engaged
(meshed) as marked. The bearings must be
seated by rapidly rotating the pinion gear a
half turn back and forth. Do this five to ten
times each time the threaded adjusters are ad-
justed.
(1) Use Wrench C-4164 to adjust each threaded ad-
juster inward (Fig. 29) until the differential bearing
free-play is eliminated. Allow some ring gear back-
lash (approximately 0.01 inch/0.25 mm) between the
Fig. 27 Bearing Preload Torque Measurement
Fig. 28 Bearing Caps & Bolts
JREAR SUSPENSION AND AXLES 3 - 41
Page 143 of 2158
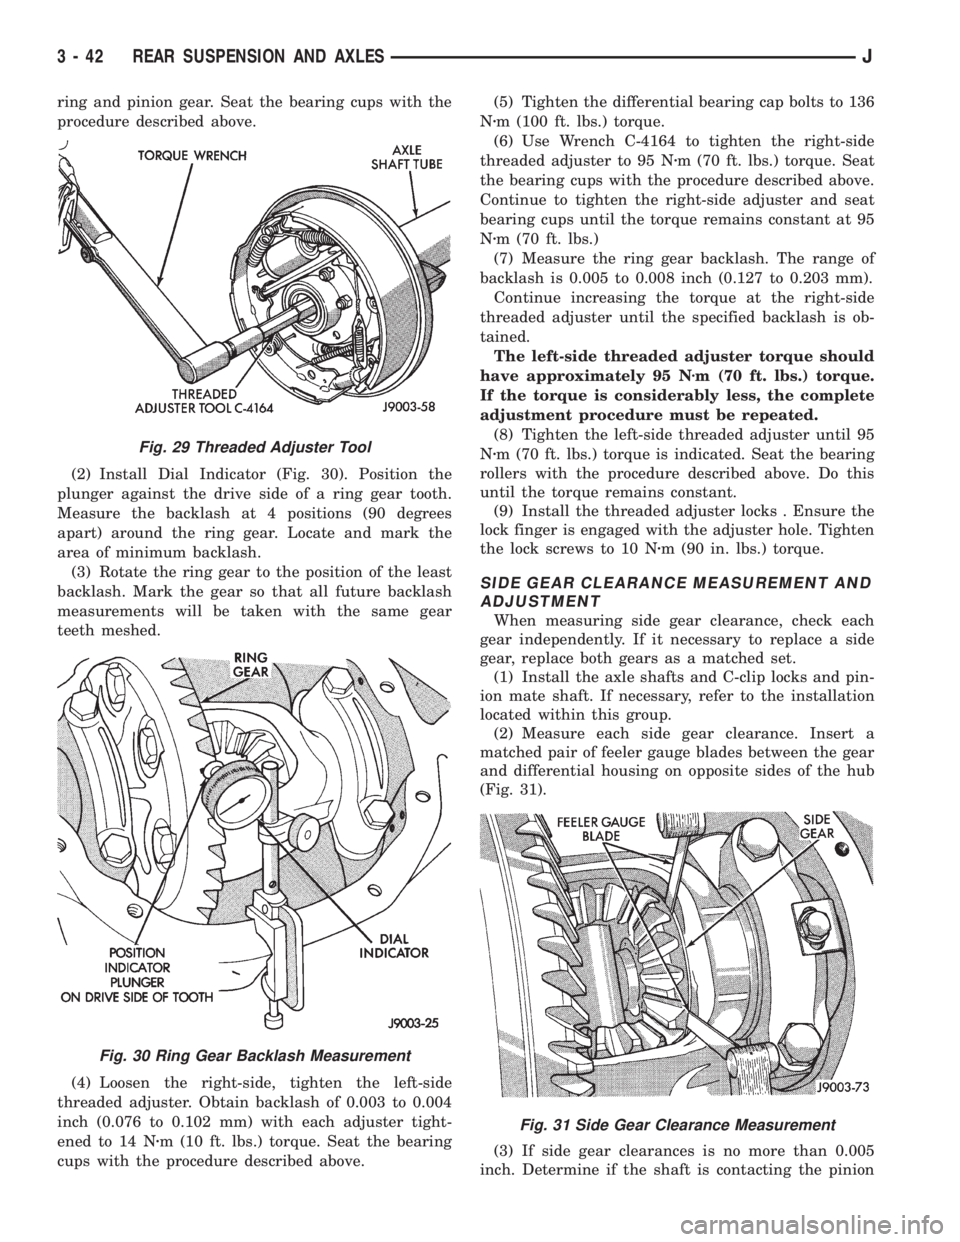
ring and pinion gear. Seat the bearing cups with the
procedure described above.
(2) Install Dial Indicator (Fig. 30). Position the
plunger against the drive side of a ring gear tooth.
Measure the backlash at 4 positions (90 degrees
apart) around the ring gear. Locate and mark the
area of minimum backlash.
(3) Rotate the ring gear to the position of the least
backlash. Mark the gear so that all future backlash
measurements will be taken with the same gear
teeth meshed.
(4) Loosen the right-side, tighten the left-side
threaded adjuster. Obtain backlash of 0.003 to 0.004
inch (0.076 to 0.102 mm) with each adjuster tight-
ened to 14 Nzm (10 ft. lbs.) torque. Seat the bearing
cups with the procedure described above.(5) Tighten the differential bearing cap bolts to 136
Nzm (100 ft. lbs.) torque.
(6) Use Wrench C-4164 to tighten the right-side
threaded adjuster to 95 Nzm (70 ft. lbs.) torque. Seat
the bearing cups with the procedure described above.
Continue to tighten the right-side adjuster and seat
bearing cups until the torque remains constant at 95
Nzm (70 ft. lbs.)
(7) Measure the ring gear backlash. The range of
backlash is 0.005 to 0.008 inch (0.127 to 0.203 mm).
Continue increasing the torque at the right-side
threaded adjuster until the specified backlash is ob-
tained.
The left-side threaded adjuster torque should
have approximately 95 Nzm (70 ft. lbs.) torque.
If the torque is considerably less, the complete
adjustment procedure must be repeated.
(8) Tighten the left-side threaded adjuster until 95
Nzm (70 ft. lbs.) torque is indicated. Seat the bearing
rollers with the procedure described above. Do this
until the torque remains constant.
(9) Install the threaded adjuster locks . Ensure the
lock finger is engaged with the adjuster hole. Tighten
the lock screws to 10 Nzm (90 in. lbs.) torque.
SIDE GEAR CLEARANCE MEASUREMENT AND
ADJUSTMENT
When measuring side gear clearance, check each
gear independently. If it necessary to replace a side
gear, replace both gears as a matched set.
(1) Install the axle shafts and C-clip locks and pin-
ion mate shaft. If necessary, refer to the installation
located within this group.
(2) Measure each side gear clearance. Insert a
matched pair of feeler gauge blades between the gear
and differential housing on opposite sides of the hub
(Fig. 31).
(3) If side gear clearances is no more than 0.005
inch. Determine if the shaft is contacting the pinion
Fig. 29 Threaded Adjuster Tool
Fig. 30 Ring Gear Backlash Measurement
Fig. 31 Side Gear Clearance Measurement
3 - 42 REAR SUSPENSION AND AXLESJ
Page 146 of 2158

TRAC-LOK DIFFERENTIAL
OPERATION
In a conventional differential, the torque applied to
the ring gear is transmitted to the axle shafts through
the differential gears. During normal operation, the
torque transmitted to each wheel is equal at all times.
However, if one wheel spins, the opposite wheel will
generate only as much torque as the spinning wheel.
In the Trac-Lok differential, part of the ring gear
torque is transmitted through clutch packs. The clutch
packs contain multiple disc. The clutch will have radial
grooves on the plates, and concentric grooves on the
discs or bonded fiber material which is smooth.
In operation, the Trac-Lok clutches are engaged by
two concurrent forces. The first being preload force ex-
erted through Belleville spring washers. The second is
from separating forces generated by the side gears (Fig.
1).
The Trac-Lok design provides the normal differential
action needed for turning corners. It also provides for
the transmission of equal torque to both wheels when
driving straight ahead. When one wheel loses traction,
the clutch packs transfer torque to the wheel having the
most traction. Trac-lok differentials resist wheel spin on
bumpy roads. It also provides more pulling power when
one wheel loses traction. Pulling power is continuous
until both wheels lose traction. If both wheels slip due
to unequal traction, Trac-Lok operation is normal. In ex-
treme cases of differences of traction, the wheel with
the least traction may spin. This occurs after the Trac-
Lok has transferred as much torque as possible to the
non-spinning wheel.
NOISE DIAGNOSIS
If chatter occurs when turning corners, the most
probable cause is incorrect or contaminated lubri-
cant. Before removing the Trac-Lok unit for repair,
drain, flush and refill the axle with the specified lu-
bricant. Refer to Lubricant change in this Group.
A container of Trac-Lok Lubricant (friction modi-
fier) should be added after.
Vehicles with a limited slip differential should be
road tested by making 10 to 12 slow figure-eight
turns. This maneuver will pump the lubricant
through the clutch discs.
Refer to Group 0, Lubrication and Maintenance for
additional information.
DIFFERENTIAL TEST
WARNING: WHEN SERVICING VEHICLES WITH A
LIMITED SLIP DIFFERENTIAL DO NOT USE THE EN-
GINE TO TURN THE AXLE AND WHEELS. BOTH
REAR WHEELS MUST BE RAISED AND THE VEHI-
CLE SUPPORTED. A LIMITED SLIP AXLE CAN EX-
ERT ENOUGH FORCE (IF ONE WHEEL IS IN
CONTACT WITH THE SURFACE) TO CAUSE THE
VEHICLE TO MOVE.
The differential can be tested without removing the
differential case by measuring rotating torque. Make
sure brakes are not dragging during this measure-
ment.
(1) Engine off, transmission in neutral, and park-
ing brake off.
(2) Place blocks in front and rear of both front
wheels.
(3) Jack up one rear wheel until it is completely off
the ground.
(4) Remove wheel and bolt special tool to studs.
Fig. 1 Limited Slip Differential OperationÐBoth
Wheels Driving
JREAR SUSPENSION AND AXLES 3 - 45