1995 JEEP YJ window
[x] Cancel search: windowPage 2061 of 2158
(2) Position the door at the body opening, insert
the hinge pins in the hinge receptacles and install
the retaining nuts (Fig. 16). Tighten the nuts se-
curely.
(3) Install the weatherstrip seal on the door edge
(Fig. 18).
(4) Install the door outside handle and the keepers.
Connect the latch release rod to the handle (Fig. 13).
(5) Install the key lock cylinder (Fig. 14).
(6) Position the window glass in the channel and
the door.
(7) Attach the window glass to the regulator arm
guide (Fig. 12).
(8) Install the beltline weatherstrip seals in the
door (Fig. 18).
(9) Position the latch in the door and install the re-
taining screws (Fig. 15). Tighten the screws securely.
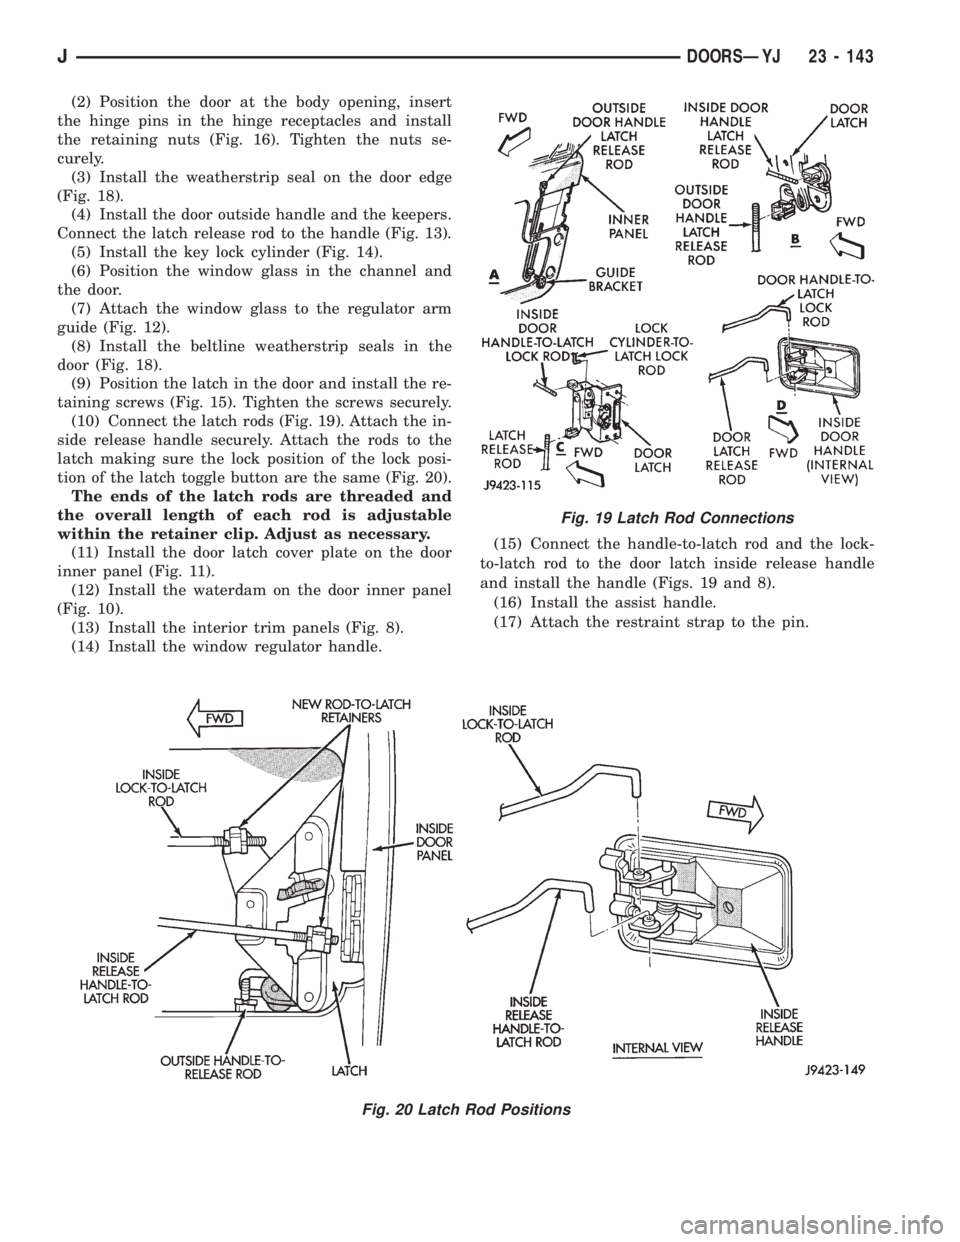
(10) Connect the latch rods (Fig. 19). Attach the in-
side release handle securely. Attach the rods to the
latch making sure the lock position of the lock posi-
tion of the latch toggle button are the same (Fig. 20).
The ends of the latch rods are threaded and
the overall length of each rod is adjustable
within the retainer clip. Adjust as necessary.
(11) Install the door latch cover plate on the door
inner panel (Fig. 11).
(12) Install the waterdam on the door inner panel
(Fig. 10).
(13) Install the interior trim panels (Fig. 8).
(14) Install the window regulator handle.(15) Connect the handle-to-latch rod and the lock-
to-latch rod to the door latch inside release handle
and install the handle (Figs. 19 and 8).
(16) Install the assist handle.
(17) Attach the restraint strap to the pin.
Fig. 19 Latch Rod Connections
Fig. 20 Latch Rod Positions
JDOORSÐYJ 23 - 143
Page 2062 of 2158
STATIONARY GLASS
INDEX
page page
Hard Top Quarter Window GlassÐYJ......... 149
Rearview Mirror Retaining BracketÐYJ........ 144
Rearview MirrorÐYJ...................... 144
Stationary Glass Water Leak Detection and
RepairÐYJ........................... 150Windshield Frame Weatherstrip SealÐYJ...... 146
Windshield FrameÐYJ.................... 145
Windshield GlassÐYJ..................... 146
Windshield Reveal MoldingÐYJ............. 144
WINDSHIELD REVEAL MOLDINGÐYJ
REMOVAL
(1) Disengage the reveal molding around the pe-
rimeter of the windshield glass with an appropriate
tool.
(2) Remove the moldings from the windshield
frame.
(3) Inspect the reveal molding retainers. Replace
the molding if it has broken, distorted or ineffective
retainers.
INSTALLATION
(1) Position the reveal moldings on the windshield
frame.
(2) Attach the moldings to the frame by tapping
each molding with a rubber mallet to seat the retain-
ers.
REARVIEW MIRRORÐYJ
REMOVAL/INSTALLATION
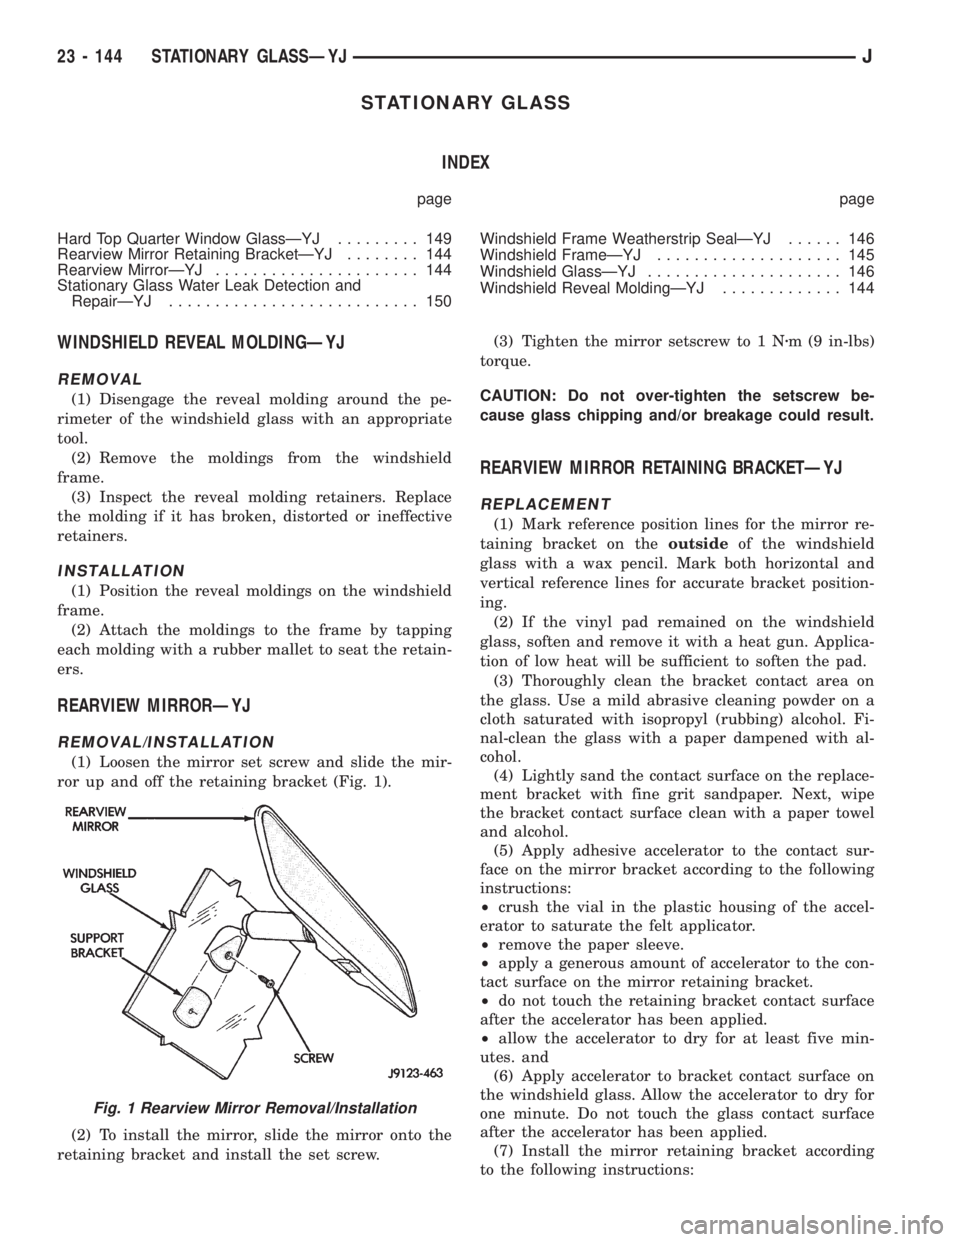
(1) Loosen the mirror set screw and slide the mir-
ror up and off the retaining bracket (Fig. 1).
(2) To install the mirror, slide the mirror onto the
retaining bracket and install the set screw.(3) Tighten the mirror setscrew to 1 Nzm (9 in-lbs)
torque.
CAUTION: Do not over-tighten the setscrew be-
cause glass chipping and/or breakage could result.
REARVIEW MIRROR RETAINING BRACKETÐYJ
REPLACEMENT
(1) Mark reference position lines for the mirror re-
taining bracket on theoutsideof the windshield
glass with a wax pencil. Mark both horizontal and
vertical reference lines for accurate bracket position-
ing.
(2) If the vinyl pad remained on the windshield
glass, soften and remove it with a heat gun. Applica-
tion of low heat will be sufficient to soften the pad.
(3) Thoroughly clean the bracket contact area on
the glass. Use a mild abrasive cleaning powder on a
cloth saturated with isopropyl (rubbing) alcohol. Fi-
nal-clean the glass with a paper dampened with al-
cohol.
(4) Lightly sand the contact surface on the replace-
ment bracket with fine grit sandpaper. Next, wipe
the bracket contact surface clean with a paper towel
and alcohol.
(5) Apply adhesive accelerator to the contact sur-
face on the mirror bracket according to the following
instructions:
²crush the vial in the plastic housing of the accel-
erator to saturate the felt applicator.
²remove the paper sleeve.
²apply a generous amount of accelerator to the con-
tact surface on the mirror retaining bracket.
²do not touch the retaining bracket contact surface
after the accelerator has been applied.
²allow the accelerator to dry for at least five min-
utes. and
(6) Apply accelerator to bracket contact surface on
the windshield glass. Allow the accelerator to dry for
one minute. Do not touch the glass contact surface
after the accelerator has been applied.
(7) Install the mirror retaining bracket according
to the following instructions:
Fig. 1 Rearview Mirror Removal/Installation
23 - 144 STATIONARY GLASSÐYJJ
Page 2066 of 2158
CAUTION: Be prepared to install the windshield
glass immediately after applying the adhesive. The
adhesive begins to cure within 10-15 minutes.
(12) Align the windshield with the grease pencil
marks (or the tape strips) and position windshield on
frame flanges.
(13) Force the windshield glass inward just enough
to wet-out and set urethane. Use care to avoid exces-
sive squeeze-out of adhesive.
(14) Water test the windshield with a cold water
spray after installation. Do not direct high pressure
streams of water directly at the urethane. Use a
moderate spray only. If any leaks are detected, apply
urethane as necessary.
(15) Install the windshield reveal molding and (if
used) remove the masking tape from the inner sur-
face of the glass.
(16) Install all removed components and clean the
vehicle. If necessary, refer to the applicable installa-
tion procedures.
(17) Open windows and liftgate to prevent pres-
sure build-up while the urethane is curing.
(18) Install the rearview mirror on the bracket and
tighten the mirror setscrew with 2 Nzm (15 in-lbs)
torque.
INSTALLATIONÐEXTENDED METHOD
Normally, after a windshield is installed, the rear-
view mirror bracket also requires installation.Do
not install the bracket until after the wind-
shield installation is completed.
(1) Remove all of the original urethane from all the
frame pinchweld flanges. Use an electric hot knife
and a plow-type knife blade to remove the adhesive.
(2) Inspect and repair the windshield frame and
the pinchweld flanges as necessary.
(3) Inspect and replace the reveal molding if the
retainers are damaged.
(4) Prime the frame pinchweld flanges with a ure-
thane base primer. However, if the flange is top-
coated with paint, prime the flanges with a paint
finish primer.This is important because ure-
thane adhesive will not adhere to all top coat
paints.
(5) Install the replacement interior trim molding
(Fig. 5) on the frame pinchweld flanges (Fig. 5).
(6) Install and inspect the fit of the windshield
glass on the pinchweld flanges according to the fol-
lowing instructions:
²Position the windshield glass on the flanges and
adjust the position until it is correctly aligned within
the windshield frame.
²Measure the gap between the frame and the glass
around the entire perimeter of the glass and the
flange.
²The gap should be at least 3 mm (1/8 in) but no
more than 6 mm (1/4 in) at any point around the pe-rimeter, and the flanges should be in complete con-
tact with the glass around the perimeter of the
frame.
(7) If the pinchweld flanges require repair, remove
the windshield glass and straighten, align, or repair
the flange(s) as necessary.
(8) Position the windshield on the flanges and in-
spect the windshield fit again. If the fit is acceptable,
mark windshield final position on the glass and the
frame. The marks (or masking tape) will be used for
installation alignment reference.
(9) If the replacement windshield glass does not
have blackout primer:
²Attach a 25-mm (1-in) wide masking tape band
around the interior side of the glass 16 mm (5/8 in)
from the edge of the glass (Fig. 6).
²Attach the tape only to the interior side of
the glass.
²Thoroughly mix and apply blackout primer to the
16 mm (5/8 in) surface area around the interior side
of the glass (Fig. 6).
²Allow the primer to dry for at least 10-12 minutes.
(10) Cut the urethane adhesive applicator nozzle
(Fig. 7).
(11) Apply a 3-mm (1/8-in) diameter bead of ure-
thane to the surface area.
CAUTION: Be prepared to install the windshield
glass immediately after applying the adhesive. The
adhesive begins to cure within 10-15 minutes.
(12) Align windshield with reference marks (or the
tape strips) and position it on the frame pinchweld
flanges.
(13) Force the windshield glass inward just enough
to wet-out and set urethane. Use care to avoid exces-
sive squeeze-out of adhesive.
(14) Water test the windshield with a cold water
spray after installation. Do not direct high pressure
streams of water directly at the urethane. Use a
moderate spray only. If any leaks are detected, apply
urethane as necessary.
(15) Install the windshield reveal molding and (if
used) remove the masking tape from the inner sur-
face of the glass.
(16) Install all the other previously removed com-
ponents and clean the vehicle. If necessary, refer to
the applicable installation procedures.
(17) Open windows and liftgate to prevent pres-
sure build-up while the urethane is curing.
(18) Install the rearview mirror on the bracket and
tighten the mirror setscrew to 2 Nzm (15 in-lbs)
torque.
23 - 148 STATIONARY GLASSÐYJJ
Page 2067 of 2158
HARD TOP QUARTER WINDOW GLASSÐYJ
REMOVAL
(1) Cover surface areas with protective covering to
avoid paint damage and extra clean-up time.
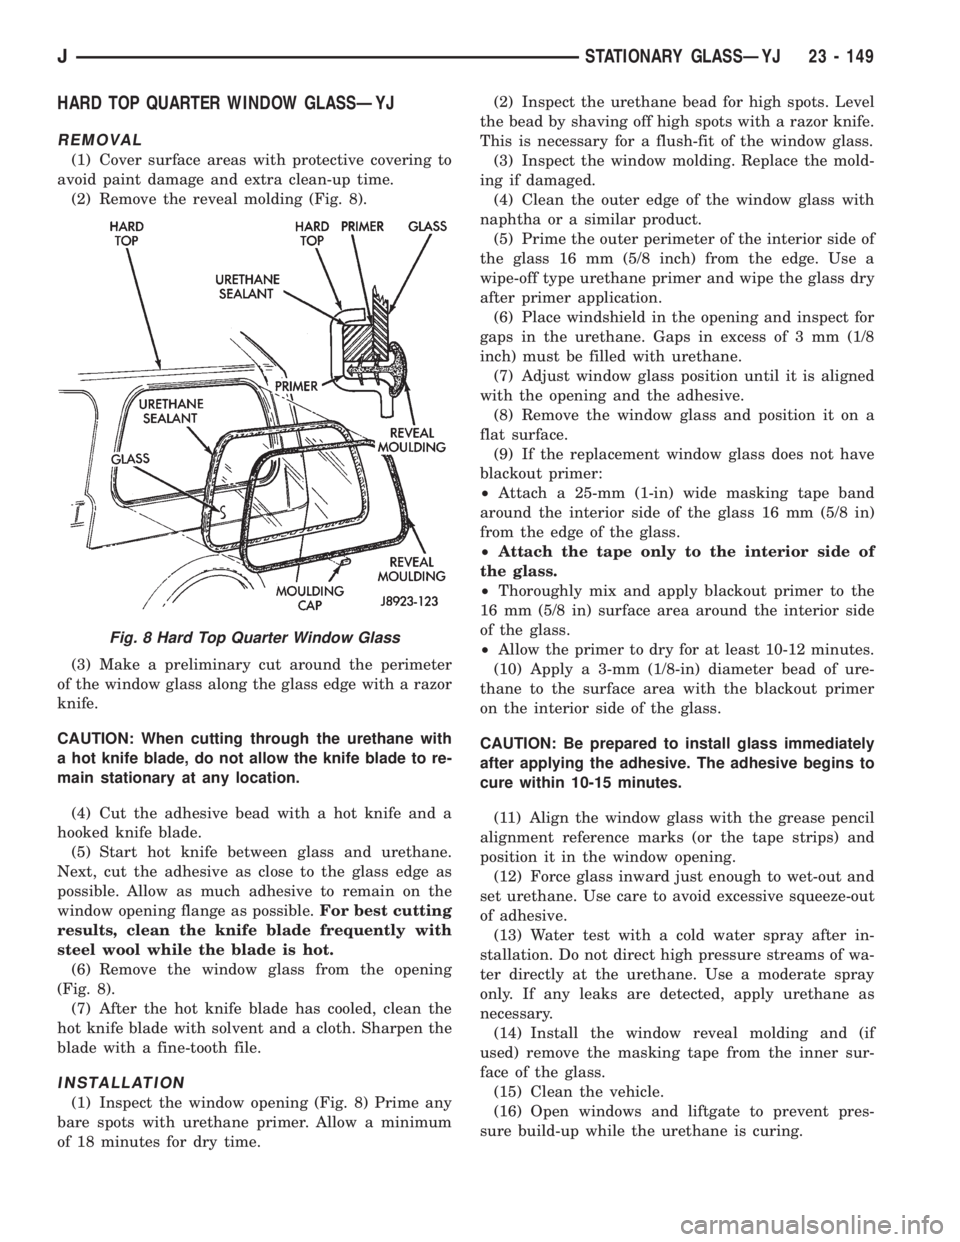
(2) Remove the reveal molding (Fig. 8).
(3) Make a preliminary cut around the perimeter
of the window glass along the glass edge with a razor
knife.
CAUTION: When cutting through the urethane with
a hot knife blade, do not allow the knife blade to re-
main stationary at any location.
(4) Cut the adhesive bead with a hot knife and a
hooked knife blade.
(5) Start hot knife between glass and urethane.
Next, cut the adhesive as close to the glass edge as
possible. Allow as much adhesive to remain on the
window opening flange as possible.For best cutting
results, clean the knife blade frequently with
steel wool while the blade is hot.
(6) Remove the window glass from the opening
(Fig. 8).
(7) After the hot knife blade has cooled, clean the
hot knife blade with solvent and a cloth. Sharpen the
blade with a fine-tooth file.
INSTALLATION
(1) Inspect the window opening (Fig. 8) Prime any
bare spots with urethane primer. Allow a minimum
of 18 minutes for dry time.(2) Inspect the urethane bead for high spots. Level
the bead by shaving off high spots with a razor knife.
This is necessary for a flush-fit of the window glass.
(3) Inspect the window molding. Replace the mold-
ing if damaged.
(4) Clean the outer edge of the window glass with
naphtha or a similar product.
(5) Prime the outer perimeter of the interior side of
the glass 16 mm (5/8 inch) from the edge. Use a
wipe-off type urethane primer and wipe the glass dry
after primer application.
(6) Place windshield in the opening and inspect for
gaps in the urethane. Gaps in excess of 3 mm (1/8
inch) must be filled with urethane.
(7) Adjust window glass position until it is aligned
with the opening and the adhesive.
(8) Remove the window glass and position it on a
flat surface.
(9) If the replacement window glass does not have
blackout primer:
²Attach a 25-mm (1-in) wide masking tape band
around the interior side of the glass 16 mm (5/8 in)
from the edge of the glass.
²Attach the tape only to the interior side of
the glass.
²Thoroughly mix and apply blackout primer to the
16 mm (5/8 in) surface area around the interior side
of the glass.
²Allow the primer to dry for at least 10-12 minutes.
(10) Apply a 3-mm (1/8-in) diameter bead of ure-
thane to the surface area with the blackout primer
on the interior side of the glass.
CAUTION: Be prepared to install glass immediately
after applying the adhesive. The adhesive begins to
cure within 10-15 minutes.
(11) Align the window glass with the grease pencil
alignment reference marks (or the tape strips) and
position it in the window opening.
(12) Force glass inward just enough to wet-out and
set urethane. Use care to avoid excessive squeeze-out
of adhesive.
(13) Water test with a cold water spray after in-
stallation. Do not direct high pressure streams of wa-
ter directly at the urethane. Use a moderate spray
only. If any leaks are detected, apply urethane as
necessary.
(14) Install the window reveal molding and (if
used) remove the masking tape from the inner sur-
face of the glass.
(15) Clean the vehicle.
(16) Open windows and liftgate to prevent pres-
sure build-up while the urethane is curing.
Fig. 8 Hard Top Quarter Window Glass
JSTATIONARY GLASSÐYJ 23 - 149
Page 2068 of 2158
STATIONARY GLASS WATER LEAK DETECTION
AND REPAIRÐYJ
The sources of water leaks around windshield/win-
dow glass can be sealed without removing the wind-
shield/window glass. If the glass is firmly bonded and
only has a small leak, seal areas with a liquid butyl
sealant. However, if weatherstrip seal or urethane
sealant has large breaks, a urethane sealant must be
used.
LEAK TEST
Water test the windshield/window with a spray
only.Do not use hard streams of water.Work
from the bottom to the top of the windshield/window.
Water test the windshield/window with a spray
only.Do not use hard streams of water.Work
from the bottom to the top of the windshield/window
glass.
If a water leak exists between the glass and weath-
erstrip seal (or between the seal and a body flange):
²Push the glass outward at the leak area, and de-
termine the extent of the gap.
Push the glass outward while a helper sprays the
windshield/window glass with water.
SEALING MINOR LEAK AREAS
(1) Thoroughly clean and remove all foreign mate-
rial from the leak area. Dry the area with com-
pressed air.
(2) Seal the leak area with butyl sealant. Allow the
sealant to cure for at least 1/2 hour. Next, water test
the glass to ensure that the leak area is sealed.
SEALING MAJOR LEAK AREAS
(1) Thoroughly clean the leak area.
(2) As applicable, apply primer to either glass or
weatherstrip seal leak area. Use blackout primer on
the glass and urethane primer on the weatherstrip
seal.
(3) Apply urethane to the leak area. Use an adhe-
sive cartridge with a pointed nozzle.
(4) Water test glass immediately with cold water
spray. Allow the water to spill over the edge of glass
and weatherstrip seal.
(5) Apply additional adhesive, if necessary.
(6) Remove any excess adhesive.
23 - 150 STATIONARY GLASSÐYJJ
Page 2126 of 2158
ANTENNA........................8F-2,8F-5
ANTENNA, POWER; RADIO (XJ-RHD) . . . 8W-47-1
ANTENNA REMOVE/INSTALL - XJ.........8F-8
ANTENNA REMOVE/INSTALL - YJ........8F-10
ANTILOCK BRAKES (ABS)................5-1
ANTILOCK BRAKING MODE, ABS
OPERATION IN.......................5-36
ANTILOCK ECU AND HCU DIAGNOSIS......5-3
APPLICATION CHARTS, GEARTRAIN
OPERATION........................21-169
APPLICATION, TRANSMISSION..........21-67
APPLICATIONÐXJ VEHICLES, BULB......8L-18
APPLICATIONÐYJ VEHICLES, BULB......8L-32
APPLIQUEÐXJ, QUARTER WINDOW.....23-25
APPLIQUEÐYJ, RADIATOR GRILLE.....23-104
APRONSÐYJ, FENDER SPLASH........23-115
ARM, LOWER SUSPENSION.............2-13
ARM, PITMAN..................19-17,19-20
ARM REMOVE/INSTALL, LIFTGATE
WIPER.............................8K-17
ARM REMOVE/INSTALL, WINDSHIELD
WIPER.............................8K-17
ARM, UPPER SUSPENSION.............2-12
ARMING/DISARMING MECHANISM;
RESTRAINT SYSTEMS.................8M-2
ARMING/DISARMING MECHANISM;
STEERING..........................19-48
ARMS AND PUSH RODS, ROCKER....9-23,9-65
ASH RECEIVER TRAY LAMPÐXJ, I/P.....23-80
ASSEMBLY....................19-63,19-71
ASSEMBLY AND ADJUSTMENT, VALVE
BODY.............................21-153
ASSEMBLY, CALIPER...................5-50
ASSEMBLY, COMPRESSOR CLUTCH......24-20
ASSEMBLY, DIFFERENTIAL; FRONT
SUSPENSION AND AXLE................2-38
ASSEMBLY, DIFFERENTIAL; REAR
SUSPENSION AND AXLES...............3-21
ASSEMBLY, FINAL; FRONT SUSPENSION
AND AXLE...........................2-46
ASSEMBLY, FINAL; REAR SUSPENSION
AND AXLES..........................3-29
ASSEMBLY, FUEL RAIL................14-62
ASSEMBLY, GEAR....................19-43
ASSEMBLY, IMPACT SENSOR/INFLATOR . . . 8M-2
ASSEMBLY, PINION MEASUREMENT.......3-22
ASSEMBLY REMOVE/INSTALL, CLUSTER . . 8E-17,
8E-35
ASSEMBLY REPLACEMENT, ADJUSTER
PLUG..............................19-29
ASSEMBLY REPLACEMENT, COLUMN.....19-52
ASSEMBLY REPLACEMENTÐXJ
VEHICLES, DRIVE AXLE; FRONT
SUSPENSION AND AXLE................2-23
ASSEMBLY REPLACEMENTÐXJ
VEHICLES, DRIVE AXLE; REAR
SUSPENSION AND AXLES...........3-14,3-31
ASSEMBLY REPLACEMENTÐYJ
VEHICLES, DRIVE AXLE; FRONT
SUSPENSION AND AXLE................2-24
ASSEMBLY REPLACEMENTÐYJ
VEHICLES, DRIVE AXLE; REAR
SUSPENSION AND AXLES...............3-14
ASSEMBLY (SHORT BLOCK), SERVICE
ENGINE..............................9-4
ASSEMBLY TIPS, TRANSMISSION......21-155
ASSEMBLY, TRANSFER CASE
....21-294,21-319
ASSEMBLY/INSTALLATION, PINION GEAR
. . 2-42
ASSEMBLYÐXJ VEHICLES, ENGINE
. . . 9-18,9-59
ASSEMBLYÐYJ VEHICLES, ENGINE
. . . 9-20,9-62
ASSIST HANDLEÐXJ
.................23-89
ASSIST HANDLEÐYJ, FULL-METAL
DOOR
............................23-136
AUTO SHUTDOWN (ASD) RELAYÐPCM
OUTPUT
............................14-26
AUTOMATIC BELT TENSIONERÐXJ
MODELS WITH RIGHT HAND DRIVE
.......7-42
AUTOMATIC SHUT DOWN (ASD) RELAY;
FUEL/IGNITION (XJ)
................8W-30-1
AUTOMATIC SHUT DOWN (ASD) RELAY;
FUEL/IGNITION (YJ)
................8W-30-1
AUTOMATIC SHUT DOWN (ASD) RELAY;
FUEL/IGNITION (XJ-RHD)
............8W-30-1
AUTOMATIC SHUTDOWN (ASD) RELAY;
FUEL SYSTEM
.......................14-59
AUTOMATIC SHUTDOWN (ASD) RELAY;
IGNITION SYSTEMS
..............8D-17,8D-1AUTOMATIC SHUTDOWN (ASD) RELAY
TEST...............................8D-6
AUTOMATIC SHUTDOWN (ASD) RELAY
TESTING...........................14-46
AUTOMATIC SHUTDOWN (ASD)
SENSEÐPCM INPUT..................14-21
AUTOMATIC TRANSMISSION............0-23
AUTOMATIC TRANSMISSION, 30RH/
32RH..............................21-67
AUTOMATIC TRANSMISSION, AW-4.....21-165
AUTOMATIC TRANSMISSION SHIFTER/
IGNITION INTERLOCK MECHANISM......19-55
AUXILIARY ELECTRIC COOLING FANÐXJ
MODELS WITH 4.0L 6-CYLINDER
ENGINE.............................7-35
AW-4 ACCUMULATOR COMPONENT
IDENTIFICATION....................21-342
AW-4 AUTOMATIC TRANSMISSION......21-165
AW-4 BUSHING AND PISTON
CLEARANCE........................21-339
AW-4 CLUTCH AND BRAKE PACK
REQUIREMENTS....................21-341
AW-4 CLUTCH DISC AND PLATE
THICKNESS........................21-338
AW-4 GENERAL SPECIFICATIONS.......21-337
AW-4 IN-VEHICLE SERVICE............21-182
AW-4 OIL PUMP WEAR LIMITS........21-338
AW-4 RETAINER AND PISTON
SPECIFICATIONS....................21-340
AW-4 TORQUE SPECIFICATIONS........21-344
AW-4 TRANSMISSION DIAGNOSIS......21-176
AW-4 TRANSMISSION OVERHAUL......21-201
AW-4 TRANSMISSION REMOVAL AND
INSTALLATION......................21-198
AW-4 VALVE AND SPRING
IDENTIFICATION....................21-343
AW-4 VALVE BODY CHECK BALL
DIMENSIONS.......................21-341
AWAY, PEDAL FALLS....................5-5
AX 15 MANUAL TRANSMISSION........21-33
AX 4/5 MANUAL TRANSMISSION.........21-1
AXLE (2WD), MODEL 30 AXLE AND
TUBE...............................2-22
AXLE, 8 1/4......................3-30,3-51
AXLE ALIGNMENT, REAR...............3-10
AXLE AND TUBE AXLE (2WD), MODEL
30 .................................2-22
AXLE ASSEMBLY REPLACEMENTÐXJ
VEHICLES, DRIVE; FRONT
SUSPENSION AND AXLE................2-23
AXLE ASSEMBLY REPLACEMENTÐXJ
VEHICLES, DRIVE; REAR SUSPENSION
AND AXLES......................3-14,3-31
AXLE ASSEMBLY REPLACEMENTÐYJ
VEHICLES, DRIVE; FRONT
SUSPENSION AND AXLE................2-24
AXLE ASSEMBLY REPLACEMENTÐYJ
VEHICLES, DRIVE; REAR SUSPENSION
AND AXLES..........................3-14
AXLE BUSHING REPLACEMENT......2-12,2-34
AXLE, FRONT DRIVE....................2-3
AXLE, MODEL 30.....................2-49
AXLE, MODEL 30 FRONT...............2-49
AXLE, MODEL 35.................3-13,3-51
AXLE NOISE/VIBRATION DIAGNOSIS;
FRONT SUSPENSION AND AXLE..........2-18
AXLE NOISE/VIBRATION DIAGNOSIS;
REAR SUSPENSION AND AXLES
..........3-9
AXLE SHAFT
.........................3-16
AXLE SHAFT, HUB BEARING
.............2-25
AXLE SHAFT OIL SEAL REPLACEMENT,
INNER
..............................2-35
AXLE SHAFT SEAL AND BEARING
........3-17
AXLE SHAFT, SEAL AND BEARING
SERVICE
............................3-32
AXLE SPECIFICATIONS; FRONT
SUSPENSION AND AXLE
................2-49
AXLE SPECIFICATIONS; REAR
SUSPENSION AND AXLES
...............3-51
AXLEÐYJ VEHICLES, VACUUM
DISCONNECT
.........................2-27
AXLES
...............................3-1
AXLES, FRONT AND REAR
..............0-24
AXLE/SHIFT MOTOR DIAGNOSIS
(CONT'D), DISCONNECT
................2-30
AXLE/SHIFT MOTOR DIAGNOSIS,
DISCONNECT
.........................2-29BACKLASH AND CONTACT PATTERN
ANALYSIS; FRONT SUSPENSION AND
AXLE...............................2-45
BACKLASH AND CONTACT PATTERN
ANALYSIS; REAR SUSPENSION AND
AXLES..............................3-27
BACK-UP LAMPS; REAR LIGHTING (XJ) . 8W-51-1
BACK-UP LAMPS; REAR LIGHTING
(XJ-RHD).........................8W-51-1
BACK-UP LAMPS; REAR LIGHTING (YJ) . 8W-51-1
BACK-UP/REAR TURN SIGNAL/TAIL
LAMP BULB REPLACEMENTÐXJ........8L-12
BACK-UP/REAR TURN SIGNAL/TAIL
LAMP BULB REPLACEMENTÐYJ........8L-28
BALANCE, TIRE AND WHEEL............22-6
BALL DIMENSIONS, AW-4 VALVE BODY
CHECK............................21-341
BALL STUD REPLACEMENTÐXJ,
LIFTGATE SUPPORT ROD..............23-63
BALL STUDS, STEERING KNUCKLE.......2-32
BAR, STABILIZER; FRONT SUSPENSION
AND AXLE.......................2-11,2-15
BAR, STABILIZER; REAR SUSPENSION
AND AXLES...........................3-5
BAR, TRACK; FRONT SUSPENSION AND
AXLE...........................2-11,2-15
BAR, TRACK; REAR SUSPENSION AND
AXLES...............................3-8
BARÐXJ, SOUND....................23-94
BARÐYJ, SPORT...................23-132
BARRIERÐXJ, CARGO...............23-101
BASE COAT/CLEAR COAT FINISH.........23-158
BATTERY; BATTERY/STARTER/
GENERATOR SERVICE..................8B-1
BATTERY; BATTERY/STARTING/
CHARGING SYSTEMS DIAGNOSTICS......8A-2
BATTERY; LUBRICATION AND
MAINTENANCE.......................0-20
BATTERY CHARGING...................8A-7
BATTERY CHARGING TIME TABLE........8A-8
BATTERY CLASSIFICATIONS AND
RATINGS...........................8A-23
BATTERY DIAGNOSIS..................8A-4
BATTERY FEED; FUEL/IGNITION (XJ) . . . 8W-30-1
BATTERY FEED; FUEL/IGNITION (YJ) . . . 8W-30-2
BATTERY FEED; FUEL/IGNITION
(XJ-RHD).........................8W-30-1
BATTERY RATINGS....................8A-3
BATTERY REMOVE/INSTALL.............8B-1
BATTERY SPECIFICATIONS; BATTERY/
STARTER/GENERATOR SERVICE..........8B-8
BATTERY SPECIFICATIONS; BATTERY/
STARTING/CHARGING SYSTEMS
DIAGNOSTICS.......................8A-23
BATTERY TRAYÐXJ..................23-14
BATTERY TRAYÐYJ.................23-110
BATTERY VOLTAGEÐPCM INPUT........14-21
B/C-PILLAR AND LIFTGATE PILLAR TRIM
COVERSÐXJ........................23-88
BEARING AND AXLE SHAFT, HUB.........2-25
BEARING, AXLE SHAFT SEAL............3-17
BEARING LUBRICANTS, CHASSIS
COMPONENT AND WHEEL..............0-28
BEARING NOISE, GEAR; FRONT
SUSPENSION AND AXLE................2-18
BEARING NOISE, GEAR; REAR
SUSPENSION AND AXLES................3-9
BEARING REPLACEMENT, PILOT..........6-12
BEARING REPLACEMENT, PITMAN
SHAFT SEALS.......................19-34
BEARING REPLACEMENT, RELEASE.......6-11
BEARING SERVICE, AXLE SHAFT, SEAL....3-32
BEARINGS, CRANKSHAFT MAIN......9-45,9-87
BEARINGS, FRONT WHEEL..............0-28
BELT, ACCESSORY DRIVE...............0-21
BELT DIAGNOSIS......................7-38
BELT INDICATOR WARNING LAMP, SEAT;
INSTRUMENT CLUSTER (XJ).........8W-40-2
BELT INDICATOR WARNING LAMP, SEAT;
INSTRUMENT CLUSTER (XJ-RHD).....8W-40-2
BELT SCHEMATICS....................7-38
BELT SERVICEÐEXCEPT RIGHT HAND
DRIVE
..............................7-40
BELT SERVICEÐXJ MODELS WITH
RIGHT HAND DRIVE
...................7-42
BELT SWITCH, DRIVER'S SEAT
......8U-1,8U-3
BELT TENSION, DRIVE
.................7-45
BELT TENSION SPECIFICATIONS
..........7-38
2 INDEXJ
Description Group-Page Description Group-Page Description Group-Page
Page 2131 of 2158
CYLINDER COMBUSTION PRESSURE
LEAKAGE TEST DIAGNOSIS..............9-7
CYLINDER COMPRESSION PRESSURE
TEST................................9-5
CYLINDER DISPOSALÐXJ, LIFTGATE
SUPPORT ROD......................23-63
CYLINDER ENGINE, VACUUM ROUTING
SCHEMATICÐ2.5L 4...................25-3
CYLINDER ENGINE, VACUUM ROUTING
SCHEMATICÐ4.0L 6...................25-3
CYLINDER HEAD COVER, ENGINE....9-22,9-64
CYLINDER HEAD, ENGINE...........9-25,9-67
CYLINDER HEAD GASKET FAILURE
DIAGNOSIS, ENGINE....................9-5
CYLINDER INSTALLATION (NON-ABS),
MASTER............................5-16
CYLINDER INSTALLATION, WHEEL........5-58
CYLINDER OVERHAUL (4-CYLINDER
MODELS), MASTER....................5-16
CYLINDER OVERHAUL, WHEEL...........5-57
CYLINDER REMOVAL (NON-ABS),
MASTER............................5-15
CYLINDER REMOVAL, WHEEL...........5-57
CYLINDER SERVICE, IGNITION SWITCH
AND KEY...........................8D-26
CYLINDERÐCOMBINATION VALVE,
MASTER............................5-15
CYLINDERÐXJ, DOOR KEY LOCK.......23-47
CYLINDERÐXJ, LIFTGATE SUPPORT
ROD...............................23-62
CYLINDERÐYJ, FULL-METAL DOOR KEY
LOCK..............................23-139
CYLINDERÐYJ, TAILGATE LOCK.......23-122
CYLINDER/POWER BOOSTER TEST,
MASTER.............................5-8
CYLINDER/POWER BRAKE BOOSTER,
MASTER............................5-34
CYLINDER/STRIKERÐXJ, LIFTGATE
LATCH/KEY LOCK....................23-61
DAMAGED OR WORN THREADS, REPAIR....9-4
DAMPER, ENGINE.....................9-17
DAMPER, STEERING.............19-17,19-20
DAMPER, VIBRATION..............9-30,9-72
DASH PANEL INSULATOR PANELÐXJ....23-12
DATA LINK CONNECTOR; ANTI-LOCK
BRAKES (XJ)......................8W-32-2
DATA LINK CONNECTOR; ANTI-LOCK
BRAKES (XJ-RHD).................8W-32-2
DATA LINK CONNECTOR; ANTI-LOCK
BRAKES (YJ)......................8W-32-2
DATA LINK CONNECTOR; FUEL/IGNITION
(XJ).............................8W-30-5
DATA LINK CONNECTOR; FUEL/IGNITION
(YJ).............................8W-30-5
DATA LINK CONNECTOR;
TRANSMISSION CONTROLS (XJ-RHD) . . 8W-31-1
DATA LINK CONNECTOR; FUEL/IGNITION
(XJ-RHD).........................8W-30-4
DATA LINK CONNECTORÐPCM INPUT....14-22
DATA LINK CONNECTORÐPCM OUTPUT . . 14-27
DATA, VEHICLE DIMENSION.....Intro.-5,Intro.-6
DATA, VEHICLE LOAD................Intro.-5
DATAÐXJ, VEHICLE LOAD............Intro.-7
DATAÐYJ, VEHICLE LOAD............Intro.-8
DAYTIME RUNNING LAMP (DRL)
MODULE; FRONT LIGHTING (XJ)......8W-50-2
DAYTIME RUNNING LAMP (DRL)
MODULEÐCANADIAN VEHICLES ONLY;
FRONT LIGHTING (YJ)
..............8W-50-2
DAYTIME RUNNING LIGHTS (CANADA
ONLY)ÐXJ
.........................8L-15
DAYTIME RUNNING LIGHTS (CANADA
ONLY)ÐYJ
.........................8L-30
DECODING, VEHICLE CODE
...........Intro.-5
DECODING, VEHICLE IDENTIFICATION
NUMBER (VIN)
.....................Intro.-4
DEFLECTORÐXJ, COWL WEATHERSTRIP
SEAL/CROSSMEMBER AIR
.............23-11
DEFOGGER RELAY
....................8N-3
DEFOGGER RELAY/TIMER
...............8N-1
DEFOGGER RELAY/TIMER REMOVE/
INSTALL
............................8N-4
DEFOGGER SWITCH
...............8N-1,8N-3
DEFOGGER SWITCH REMOVE/INSTALL
....8N-4
DEFROSTER NOZZLE AND DUCT
........24-33
DELAY FUNCTION TROUBLE
DIAGNOSISÐXJ, HEADLAMP
...........8L-14DELAY MODULE, HEADLAMP; FRONT
LIGHTING (XJ)....................8W-50-2
DELAY MODULE, HEADLAMP; FRONT
LIGHTING (XJ-RHD)................8W-50-1
DELAY MODULE REPLACEMENTÐXJ,
HEADLAMP.........................8L-14
DELAY MODULEÐXJ, SENTINEL
HEADLAMP.........................8L-14
DELIVERY SYSTEM, FUEL...............14-3
DEMAGNETIZING, COMPASS............8C-5
DEPTH INFORMATION, PINION GEAR;
FRONT SUSPENSION AND AXLE..........2-39
DEPTH INFORMATION, PINION GEAR;
REAR SUSPENSION AND AXLES..........3-21
DEPTH VARIANCE, PINION GEAR; FRONT
SUSPENSION AND AXLE................2-40
DEPTH VARIANCE, PINION GEAR; REAR
SUSPENSION AND AXLES...........3-22,3-39
DESCRIPTION; HEATING AND AIR
CONDITIONING............24-19,24-23,24-32
DESCRIPTION; TRANSMISSION AND
TRANSFER CASE....................21-165
DESCRIPTION/SYSTEM OPERATION,
MULTI-PORT FUEL INJECTION
(MFI)ÐCOMPONENT..................14-19
DESIGNATIONS, LABELS/PLATES, CODES
AND DIMENSIONS..................Intro.-1
DESIGNATIONS, VEHICLE.............Intro.-1
DESIGNATIONS, VEHICLE CODE........Intro.-1
DETECTION AND REPAIRÐXJ,
STATIONARY GLASS WATER LEAK.......23-76
DETECTION AND REPAIRÐYJ,
STATIONARY GLASS WATER LEAK.......23-150
DEVICES, ELECTROSTATIC DISCHARGE
(ESD) SENSITIVE; WIRING
DIAGRAMSÐGENERAL INFORMATION
(XJ)...............................8W-2
DIAGNOSING PARKING BRAKE
MALFUNCTIONS.......................5-8
DIAGNOSIS; AUDIO SYSTEMS...........8F-2
DIAGNOSIS; BATTERY/STARTING/
CHARGING SYSTEMS DIAGNOSTICS.....8A-10,
8A-11,8A-17,8A-3
DIAGNOSIS; CHIME/BUZZER WARNING
SYSTEMS...........................8U-2
DIAGNOSIS; COOLING SYSTEM...........7-4
DIAGNOSIS; HORNS...................8G-2
DIAGNOSIS; INSTRUMENT PANEL AND
GAUGESÐXJ....................8E-27,8E-5
DIAGNOSIS; OVERHEAD CONSOLE........8C-2
DIAGNOSIS; POWER LOCKS.............8P-2
DIAGNOSIS; POWER MIRRORS..........8T-1
DIAGNOSIS; POWER SEATS.............8R-2
DIAGNOSIS; POWER WINDOWS..........8S-1
DIAGNOSIS; REAR WINDOW DEFOGGER . . . 8N-1
DIAGNOSIS; RESTRAINT SYSTEMS.......8M-2
DIAGNOSIS; STEERING................19-37
DIAGNOSIS; TURN SIGNAL AND HAZARD
WARNING SYSTEMS...................8J-3
DIAGNOSIS; VEHICLE SPEED CONTROL
SYSTEM............................8H-2
DIAGNOSIS, 2.5L STARTER NOISE.......8A-16
DIAGNOSIS, 30RH/32RH TRANSMISSION . 21-70
DIAGNOSIS, ABS BRAKE.................5-3
DIAGNOSIS, ANTILOCK ECU AND HCU......5-3
DIAGNOSIS, AW-4 TRANSMISSION.....21-176
DIAGNOSIS, AXLE NOISE/VIBRATION;
FRONT SUSPENSION AND AXLE..........2-18
DIAGNOSIS, AXLE NOISE/VIBRATION;
REAR SUSPENSION AND AXLES..........3-9
DIAGNOSIS, BATTERY..................8A-4
DIAGNOSIS, BELT.....................7-38
DIAGNOSIS, CHARGING SYSTEM........8A-19
DIAGNOSIS, CLUTCH...................6-3
DIAGNOSIS, COMPASS/THERMOMETER....8C-4
DIAGNOSIS (CONT.), COOLING SYSTEM . . . 7-10,
7-11,7-12,7-7,7-8,7-9
DIAGNOSIS (CONT.), SERPENTINE DRIVE
BELT ...............................7-40
DIAGNOSIS (CONT'D), DISCONNECT
AXLE/SHIFT MOTOR
...................2-30
DIAGNOSIS (CONT'D), SERVICE; FRONT
SUSPENSION AND AXLE
................2-21
DIAGNOSIS (CONT'D), SERVICE; REAR
SUSPENSION AND AXLES
...............3-12
DIAGNOSIS, CONVERTER HOUSING
LEAK
..............................21-75
DIAGNOSIS, COOLING SYSTEM
...........7-6DIAGNOSIS, CYLINDER COMBUSTION
PRESSURE LEAKAGE TEST...............9-7
DIAGNOSIS, DISCONNECT AXLE/SHIFT
MOTOR.............................2-29
DIAGNOSIS, ENGINE....................9-5
DIAGNOSIS, ENGINE CYLINDER HEAD
GASKET FAILURE......................9-5
DIAGNOSIS, EXHAUST SYSTEM..........11-2
DIAGNOSIS, FOG LAMP...........8L-21,8L-3
DIAGNOSIS, GEAR LEAKAGE............19-10
DIAGNOSIS, HEADLAMP...........8L-20,8L-2
DIAGNOSIS, HEATER..................24-17
DIAGNOSIS, HEATING SYSTEM..........24-18
DIAGNOSIS, IGNITION SECONDARY
CIRCUIT...........................8D-10
DIAGNOSIS INFORMATION, GENERAL;
CLUTCH..............................6-3
DIAGNOSIS INFORMATION, GENERAL;
TRANSMISSION AND TRANSFER CASE . . 21-176
DIAGNOSIS, INTAKE MANIFOLD
LEAKAGE.............................9-5
DIAGNOSIS, MANUAL STEERING
SYSTEM............................19-38
DIAGNOSIS, MULTI-PORT FUEL
INJECTION (MFI)ÐGENERAL...........14-35
DIAGNOSIS, NP231 SERVICE..........21-285
DIAGNOSIS, NP242 SERVICE..........21-308
DIAGNOSIS, PERFORMANCE............24-14
DIAGNOSIS, POWER STEERING SYSTEM . . 19-3,
19-4,19-5,19-6,19-7,19-8,19-9
DIAGNOSIS, PUMP LEAKAGE...........19-10
DIAGNOSIS, RADIO....................8F-3
DIAGNOSIS, SERPENTINE DRIVE BELT.....7-39
DIAGNOSIS, SERVICE; FRONT
SUSPENSION AND AXLE................2-20
DIAGNOSIS, SERVICE; PROPELLER
SHAFTS.............................16-3
DIAGNOSIS, SERVICE; REAR
SUSPENSION AND AXLES...............3-11
DIAGNOSIS, SERVICE; TRANSMISSION
AND TRANSFER CASE . 21-180,21-181,21-34,21-2
DIAGNOSIS, SERVICE BRAKE.............5-4
DIAGNOSIS, SPRING AND SHOCK;
FRONT SUSPENSION AND AXLE......2-13,2-15
DIAGNOSIS, SPRING AND SHOCK; REAR
SUSPENSION AND AXLES.............3-3,3-6
DIAGNOSIS, SPRING AND SHOCK
ABSORBER........................3-3,3-6
DIAGNOSIS, STARTER NOISE...........8A-16
DIAGNOSIS, STARTING SYSTEM........8A-12
DIAGNOSIS, SUSPENSION AND
STEERING SYSTEM.....................2-7
DIAGNOSIS, THERMOMETER............8C-2
DIAGNOSIS, TORQUE CONVERTER . 21-86,21-87,
21-88
DIAGNOSIS, TRANSMISSION . 21-78,21-79,21-80,
21-81,21-82,21-83,21-84,21-85
DIAGNOSIS, VIBRATION..........22-10,22-11
DIAGNOSISÐLUBRICATION SERVICE......9-12
DIAGNOSISÐXJ, DOME/COURTESY
LAMP TROUBLE.....................8L-16
DIAGNOSISÐXJ, HEADLAMP DELAY
FUNCTION TROUBLE..................8L-14
DIAGNOSISÐXJ, LIGHTED VANITY
MIRROR TROUBLE...................8L-16
DIAGNOSISÐYJ, DOME/COURTESY
LAMP TROUBLE.....................8L-31
DIAGNOSTIC CONNECTOR, ABS.......5-35,5-3
DIAGNOSTIC PROCEDURESÐXJ.........8L-1
DIAGNOSTIC PROCEDURESÐYJ........8L-19
DIAGNOSTIC SYSTEM, USING
ON-BOARD; BATTERY/STARTING/
CHARGING SYSTEMS DIAGNOSTICS.....8A-22
DIAGNOSTIC SYSTEM, USING
ON-BOARD; VEHICLE SPEED CONTROL
SYSTEM............................8H-5
DIAGNOSTIC TROUBLE CODE (DTC)......14-54
DIAGNOSTIC TROUBLE CODE,
GENERATOR........................8A-22
DIAGNOSTIC TROUBLE CODE, SPEED
CONTROL
...........................8H-5
DIAGNOSTICS (OBD), ON-BOARD;
COOLING SYSTEM
.....................7-4
DIAGNOSTICS (OBD), ON-BOARD; FUEL
SYSTEM
............................14-51
DIAGNOSTICS, ON-BOARD
.............8D-15
DIAGRAM INDEX; AIR CONDITIONING/
HEATER (XJ)
......................8W-42-2
JINDEX 7
Description Group-Page Description Group-Page Description Group-Page
Page 2132 of 2158
DIAGRAM INDEX; AIR CONDITIONING/
HEATER (XJ-RHD)..................8W-42-2
DIAGRAM INDEX; AIR CONDITIONING/
HEATER (YJ)...............8W-42-1,8W-42-2
DIAGRAM INDEX; ANTI-LOCK BRAKES
(XJ).............................8W-32-3
DIAGRAM INDEX; ANTI-LOCK BRAKES
(XJ-RHD).........................8W-32-3
DIAGRAM INDEX; ANTI-LOCK BRAKES
(YJ).............................8W-32-2
DIAGRAM INDEX; CHARGING SYSTEM
(XJ).............................8W-20-1
DIAGRAM INDEX; CHARGING SYSTEM
(XJ-RHD).........................8W-20-1
DIAGRAM INDEX; CHARGING SYSTEM
(YJ).............................8W-20-1
DIAGRAM INDEX; FRONT LIGHTING (XJ) . 8W-50-2
DIAGRAM INDEX; FRONT LIGHTING
(XJ-RHD).........................8W-50-3
DIAGRAM INDEX; FRONT LIGHTING (YJ) . 8W-50-2
DIAGRAM INDEX; FUEL/IGNITION (YJ) . . 8W-30-5
DIAGRAM INDEX; FUSE/FUSE BLOCK
(XJ).............................8W-10-1
DIAGRAM INDEX; FUSE/FUSE BLOCK
(XJ-RHD).........................8W-10-1
DIAGRAM INDEX; FUSE/FUSE BLOCK
(YJ).............................8W-10-1
DIAGRAM INDEX; GROUND
DISTRIBUTION (XJ)................8W-15-1
DIAGRAM INDEX; GROUND
DISTRIBUTION (XJ-RHD)............8W-15-1
DIAGRAM INDEX; GROUND
DISTRIBUTION (YJ)..................8W-15-1
DIAGRAM INDEX; HEATED REAR
WINDOW (XJ).....................8W-48-1
DIAGRAM INDEX; HEATED REAR
WINDOW (XJ-RHD).................8W-48-1
DIAGRAM INDEX; HEATED REAR
WINDOW (YJ).....................8W-48-1
DIAGRAM INDEX; HORN/CIGAR LIGHTER . . . 8E-1
DIAGRAM INDEX; HORN/CIGAR LIGHTER
(YJ).............................8W-41-1
DIAGRAM INDEX; INSTRUMENT
CLUSTER (XJ).............8W-40-1,8W-40-3
DIAGRAM INDEX; INSTRUMENT
CLUSTER (XJ-RHD)................8W-40-3
DIAGRAM INDEX; INSTRUMENT
CLUSTER (YJ).....................8W-40-2
DIAGRAM INDEX; INTERIOR LIGHTING
(XJ).............................8W-44-2
DIAGRAM INDEX; INTERIOR LIGHTING
(XJ-RHD).........................8W-44-2
DIAGRAM INDEX; INTERIOR LIGHTING
(YJ).............................8W-44-2
DIAGRAM INDEX; OVERHEAD CONSOLE
(XJ).............................8W-49-1
DIAGRAM INDEX; OVERHEAD CONSOLE
(XJ-RHD).........................8W-49-1
DIAGRAM INDEX; POWER DISTRIBUTION
(XJ).............................8W-11-1
DIAGRAM INDEX; POWER DISTRIBUTION
(XJ-RHD).........................8W-11-1
DIAGRAM INDEX; POWER DISTRIBUTION
(YJ).............................8W-11-1
DIAGRAM INDEX; POWER DOOR LOCKS
(XJ)
.............................8W-61-1
DIAGRAM INDEX; POWER DOOR LOCKS
(XJ-RHD)
.........................8W-61-1
DIAGRAM INDEX; POWER MIRRORS
(XJ)
.............................8W-62-1
DIAGRAM INDEX; POWER MIRRORS
(XJ-RHD)
.........................8W-62-1
DIAGRAM INDEX; POWER SEAT (XJ)
. . . 8W-63-1
DIAGRAM INDEX; POWER SEAT
(XJ-RHD)
.........................8W-63-1
DIAGRAM INDEX; POWER WINDOWS
(XJ)
.............................8W-60-2
DIAGRAM INDEX; POWER WINDOWS
(XJ-RHD)
.........................8W-60-2
DIAGRAM INDEX; REAR LIGHTING (XJ)
. 8W-51-1
DIAGRAM INDEX; REAR LIGHTING
(XJ-RHD)
.........................8W-51-1
DIAGRAM INDEX; REAR LIGHTING (YJ)
. 8W-51-1
DIAGRAM INDEX; STARTING SYSTEM
(XJ)
.............................8W-21-1
DIAGRAM INDEX; STARTING SYSTEM
(XJ-RHD)
.........................8W-21-1DIAGRAM INDEX; STARTING SYSTEM
(YJ).............................8W-21-1
DIAGRAM INDEX; TRAILER TOW (XJ) . . 8W-54-1
DIAGRAM INDEX; TRAILER TOW
(XJ-RHD).........................8W-54-1
DIAGRAM INDEX; TRANSMISSION
CONTROLS (XJ)...................8W-31-1
DIAGRAM INDEX; TRANSMISSION
CONTROLS (XJ-RHD)...............8W-31-1
DIAGRAM INDEX; TRANSMISSION
CONTROLS (YJ)...................8W-31-1
DIAGRAM INDEX; TURN SIGNALS (XJ) . 8W-52-1
DIAGRAM INDEX; TURN SIGNALS
(XJ-RHD).........................8W-52-1
DIAGRAM INDEX; TURN SIGNALS (YJ) . 8W-52-1
DIAGRAM INDEX; VEHICLE SPEED
CONTROL (XJ)....................8W-33-1
DIAGRAM INDEX; VEHICLE SPEED
CONTROL (XJ-RHD)................8W-33-1
DIAGRAM INDEX; WIPERS (XJ).......8W-53-2
DIAGRAM INDEX; WIPERS (XJ-RHD) . . . 8W-53-2
DIAGRAM INDEX; WIPERS (YJ).......8W-53-2
DIAGRAM INDEX; FUEL/IGNITION
(XJ-RHD).........................8W-30-5
DIAGRAM INDEXÐ2.5L ENGINE;
FUEL/IGNITION (XJ)................8W-30-6
DIAGRAM INDEXÐ4.0L ENGINE;
FUEL/IGNITION (XJ)................8W-30-6
DIFFERENTIAL AND PINION
MEASUREMENT.......................2-40
DIFFERENTIAL ASSEMBLY; FRONT
SUSPENSION AND AXLE.................2-38
DIFFERENTIAL ASSEMBLY; REAR
SUSPENSION AND AXLES...............3-21
DIFFERENTIAL DISASSEMBLY; FRONT
SUSPENSION AND AXLE................2-35
DIFFERENTIAL DISASSEMBLY; REAR
SUSPENSION AND AXLES...............3-18
DIFFERENTIAL INSTALLATION............2-44
DIFFERENTIAL, LIMITED SLIP............3-10
DIFFERENTIAL MEASUREMENT AND
INSTALLATION........................3-25
DIFFERENTIAL OVERHAUL..............3-46
DIFFERENTIAL REMOVAL; FRONT
SUSPENSION AND AXLE................2-34
DIFFERENTIAL REMOVAL; REAR
SUSPENSION AND AXLES...............3-18
DIFFERENTIAL SERVICE................3-34
DIFFERENTIAL SHIM PACK
MEASUREMENT AND ADJUSTMENT.......2-43
DIFFERENTIAL, TRAC-LOK..............3-45
DIMENSION DATA, VEHICLE.....Intro.-5,Intro.-6
DIMENSIONS, AW-4 VALVE BODY CHECK
BALL.............................21-341
DIMENSIONS, DESIGNATIONS,
LABELS/PLATES, CODES..............Intro.-1
DIMENSIONS, FRAME.............13-13,13-1
DIMMER SWITCH REMOVE/INSTALL,
HEADLAMP OR PANEL................8E-42
DIMMER SWITCH REPLACEMENTÐYJ,
HEADLAMP.........................8L-26
DIMMING MODULE; FRONT LIGHTING
(XJ-RHD).........................8W-50-1
DIODE REPLACEMENT; WIRING
DIAGRAMSÐGENERAL INFORMATION
(XJ)...............................8W-8
DIRECT CLUTCH OVERHAUL...........21-228
DISASSEMBLY AND INSPECTION, VALVE
BODY.............................21-147
DISASSEMBLY AND OVERHAUL,
TRANSFER CASE..............21-289,21-310
DISASSEMBLY AND OVERHAUL,
TRANSMISSION.................21-37,21-5
DISASSEMBLY, CALIPER................5-48
DISASSEMBLY, DIFFERENTIAL; FRONT
SUSPENSION AND AXLE................2-35
DISASSEMBLY, DIFFERENTIAL; REAR
SUSPENSION AND AXLES...............3-18
DISASSEMBLY, TRANSMISSION . . 21-119,21-201
DISASSEMBLYÐCOLUMN OR CONSOLE
SHIFT..............................19-60
DISC AND PLATE THICKNESS, AW-4
CLUTCH...........................21-338
DISC BRAKE ROTOR REFINISHING
........5-53
DISC BRAKE ROTOR RUNOUT
...........5-52
DISC BRAKE ROTOR THICKNESS
.........5-52
DISC BRAKES
........................5-45
DISC BRAKESHOE INSTALLATION
.........5-47DISC BRAKESHOE REMOVAL............5-46
DISC INSTALLATION, CLUTCH COVER.....6-10
DISC REMOVAL, CLUTCH COVER.........6-10
DISC RUNOUT, CLUTCH COVER...........6-3
DISCHARGE (ESD) SENSITIVE DEVICES,
ELECTROSTATIC; WIRING
DIAGRAMSÐGENERAL INFORMATION
(XJ)...............................8W-2
DISCONNECT AXLEÐYJ VEHICLES,
VACUUM............................2-27
DISCONNECT AXLE/SHIFT MOTOR
DIAGNOSIS..........................2-29
DISCONNECT AXLE/SHIFT MOTOR
DIAGNOSIS (CONT'D)..................2-30
DISPLAY, ABS WARNING LIGHT...........5-3
DISPLAY SYMBOLS, INTERNATIONAL
VEHICLE CONTROL..................Intro.-5
DISPLAY SYMBOLS, VEHICLE CONTROL . Intro.-10
DISPOSALÐXJ, LIFTGATE SUPPORT
ROD CYLINDER......................23-63
DISTRIBUTOR.......................8D-19
DISTRIBUTOR CAP....................8D-7
DISTRIBUTOR CAP AND ROTOR,
IGNITION CABLES.....................0-20
DISTRIBUTOR ROTOR.................8D-8
DISTRIBUTORS.......................8D-4
DOME LAMP, CARGO LAMP; INTERIOR
LIGHTING (XJ-RHD)................8W-44-1
DOME LAMP, CARGO LAMP, COURTESY
LAMPS; INTERIOR LIGHTING (XJ).....8W-44-1
DOME LAMP REPLACEMENTÐXJ.........8L-17
DOME LAMPÐXJ....................23-93
DOME LAMPS, COURTESY LAMPS;
INTERIOR LIGHTING (YJ)............8W-44-1
DOME/CARGO LAMP BULB
REPLACEMENTÐYJ VEHICLES,
HARDTOP..........................8L-31
DOME/COURTESY LAMP SERVICE
INFORMATIONÐXJ...................8L-16
DOME/COURTESY LAMP SERVICE
INFORMATIONÐYJ...................8L-31
DOME/COURTESY LAMP TROUBLE
DIAGNOSISÐXJ.....................8L-16
DOME/COURTESY LAMP TROUBLE
DIAGNOSISÐYJ.....................8L-31
DOOR ALIGNMENT ADJUSTMENTÐ
MAJOR............................23-41
DOOR ALIGNMENT ADJUSTMENTÐ
MINOR.............................23-37
DOOR ASSIST HANDLEÐYJ, FULL-
METAL............................23-136
DOOR BUMPERSÐXJ, FUEL FILLER.....23-27
DOOR CONTROL CABLES, VENT.........24-32
DOOR EDGE GUARD/EDGE PROTECTOR
STRIPÐXJ.........................23-54
DOOR EXTERNAL HANDLEÐXJ.........23-48
DOOR FRAME GLASS CHANNEL
REPLACEMENTÐYJ.................23-142
DOOR HINGE/HINGE PIN
REPLACEMENTÐXJ..................23-52
DOOR HINGESÐYJ, FULL-METAL.......23-140
DOOR INSIDE LATCH RELEASE AND
LOCK RODSÐXJ.....................23-50
DOOR JAMB SWITCH, DRIVER'S.....8U-1,8U-2
DOOR KEY LOCK CYLINDERÐXJ........23-47
DOOR KEY LOCK CYLINDERÐYJ,
FULL-METAL.......................23-139
DOOR LATCH ADJUSTMENTÐXJ........23-48
DOOR LATCH EXTERNAL RELEASE
HANDLEÐYJ, FULL-METAL............23-140
DOOR LATCH INSIDE RELEASE AND
LOCK HANDLEÐYJ, FULL-METAL.......23-137
DOOR LATCH STRIKERÐYJ, HALF-
METAL............................23-135
DOOR LATCHÐXJ....................23-49
DOOR LATCHÐYJ, FULL-METAL........23-140
DOOR LOCKS, POWER; POWER DOOR
LOCKS (XJ).......................8W-61-1
DOOR LOCKS, POWER; POWER DOOR
LOCKS (XJ-RHD)
..................8W-61-1
DOOR MIRROR (EXTERNAL)ÐYJ, HALF
METAL
............................23-121
DOOR MOTOR SWITCH REPLACEMENT,
BLOWER MOTOR/AIR
.................24-32
DOOR OPENER STORAGE, REMOTE
GARAGE
............................8C-1
DOOR OPENING WEATHERSTRIP
SEALSÐXJ, DOOR WINDOW GLASS
.....23-55
8 INDEXJ
Description Group-Page Description Group-Page Description Group-Page