1995 JEEP YJ key
[x] Cancel search: keyPage 1555 of 2158
(45) If equipped with a column shift:
²Remove the wave washer and the shift tube spring
²Remove the shift bowl from the steering column
jacket
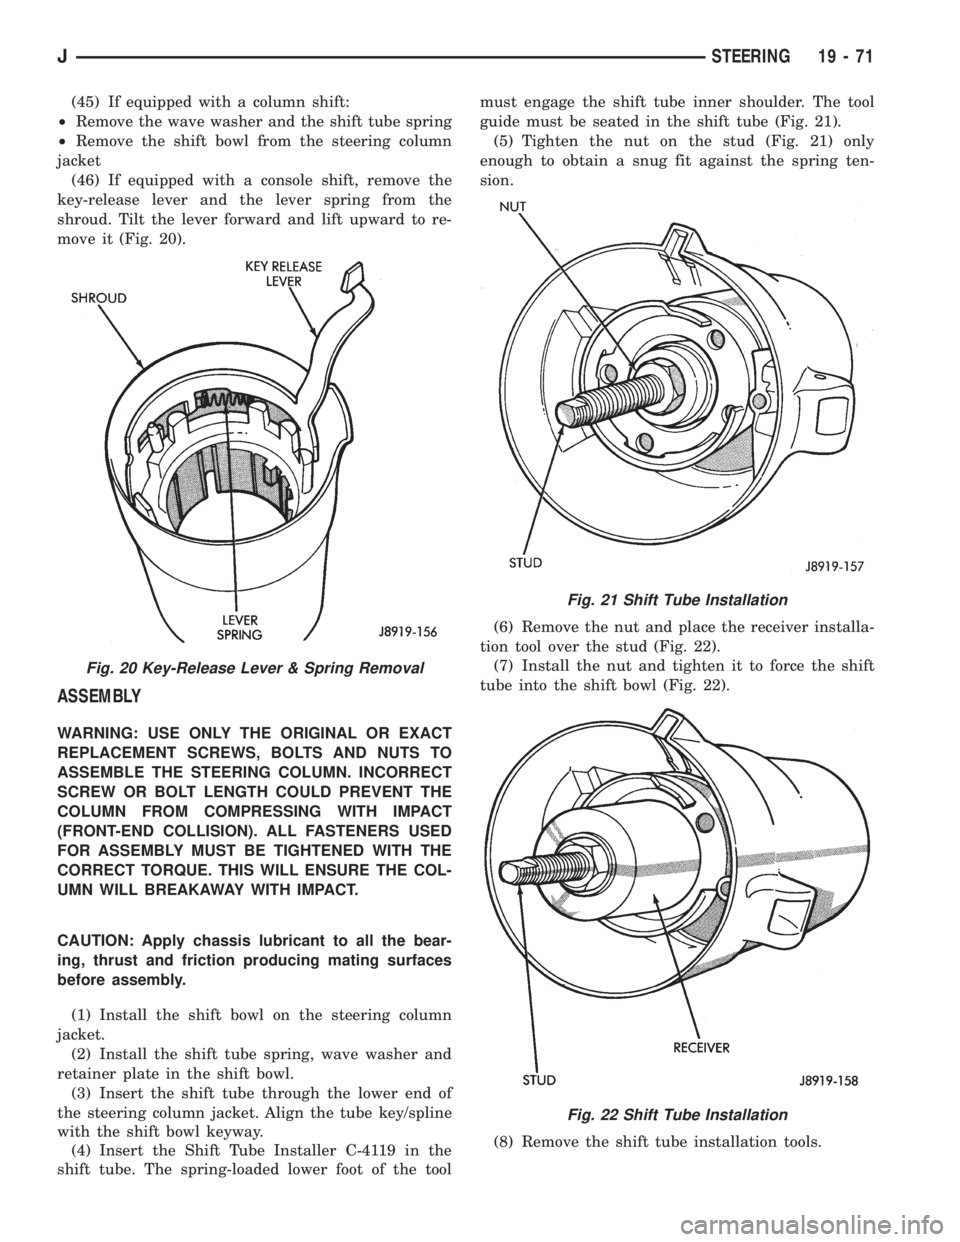
(46) If equipped with a console shift, remove the
key-release lever and the lever spring from the
shroud. Tilt the lever forward and lift upward to re-
move it (Fig. 20).
ASSEMBLY
WARNING: USE ONLY THE ORIGINAL OR EXACT
REPLACEMENT SCREWS, BOLTS AND NUTS TO
ASSEMBLE THE STEERING COLUMN. INCORRECT
SCREW OR BOLT LENGTH COULD PREVENT THE
COLUMN FROM COMPRESSING WITH IMPACT
(FRONT-END COLLISION). ALL FASTENERS USED
FOR ASSEMBLY MUST BE TIGHTENED WITH THE
CORRECT TORQUE. THIS WILL ENSURE THE COL-
UMN WILL BREAKAWAY WITH IMPACT.
CAUTION: Apply chassis lubricant to all the bear-
ing, thrust and friction producing mating surfaces
before assembly.
(1) Install the shift bowl on the steering column
jacket.
(2) Install the shift tube spring, wave washer and
retainer plate in the shift bowl.
(3) Insert the shift tube through the lower end of
the steering column jacket. Align the tube key/spline
with the shift bowl keyway.
(4) Insert the Shift Tube Installer C-4119 in the
shift tube. The spring-loaded lower foot of the toolmust engage the shift tube inner shoulder. The tool
guide must be seated in the shift tube (Fig. 21).
(5) Tighten the nut on the stud (Fig. 21) only
enough to obtain a snug fit against the spring ten-
sion.
(6) Remove the nut and place the receiver installa-
tion tool over the stud (Fig. 22).
(7) Install the nut and tighten it to force the shift
tube into the shift bowl (Fig. 22).
(8) Remove the shift tube installation tools.
Fig. 20 Key-Release Lever & Spring Removal
Fig. 21 Shift Tube Installation
Fig. 22 Shift Tube Installation
JSTEERING 19 - 71
Page 1556 of 2158
(9) Install the shift tube thrust washer and the re-
tainer plate snap ring.
(10) Install the lower bearing in the steering col-
umn.
(11) Position the shift gate in the steering column
support. Install the attaching screws.
(12) Position the support in the steering column.
(13) Install all support attaching screws finger-
tight. Next, tighten the screws alternately and evenly
to7Nzm (60 in. lbs.) torque.
(14) Install the remote rod in the support. Route
the rod through the upper end of the shroud and in-
sert it into the rod slot located in the support.
(15) Install the dimmer switch and ignition switch.
(16) Install the steering shaft in the steering col-
umn.
(17) Install replacement races and bearings in the
key/lock cylinder, if removed.Ensure that the bear-
ings are lubricated with chassis lubricant be-
fore installation.
(18) Install the lock shoes, the lock shoe springs
and the lock shoe pin the key/lock cylinder housing.
Use a 4.5-mm (0.18-in) diameter rod to align the
shoes and the pin during installation.
(19) Install the tilt-release lever, the lever spring
and the lever pin in the key/lock cylinder housing.
Insert a wedge between the housing and the lever to
relieve the spring tension. This will allow easier re-
lease lever pin installation.
(20) Install the lock bolt in the key/lock cylinder
housing and engage it in the lock sector cam surface.
(21) Install the lock rack, the rack preload spring
and a replacement shim in the key/lock cylinder
housing. Align and mate the square block tooth on
the lock rack and the lock sector.
(22) Install the lock spring and the spring retain-
ing screw. Tighten the screw to 4 Nzm (35 in. lbs.)
torque.
(23) Align and install the assembled key/lock cylin-
der housing on the support. Retain the lock shoes in
the disengaged position for easier housing installa-
tion.
(24) Align the pivot pin holes in the housing with
those in the support. Insert the pivot pins.Press the
housing firmly downward when inserting the
pivot pins. This prevents damaging the holes in
the support.When the pivot pins are within both
the housing and the support holes, seat them fully
with a punch and a hammer.
(25) Insert tilt-release lever in key/lock cylinder
housing and place housing in the full-upward tilt po-
sition.
(26) Lubricate the tilt spring guide and the tilt
spring liberally with chassis lubricant and position
the spring on the guide.
(27) Insert the tilt spring guide and the spring into
the key/lock cylinder housing. Install the guide re-tainer over the spring. Engage the retainer lock tabs
with the housing lugs by pressing the retainer down-
ward and turning clockwise with a screwdriver.
(28) Place the cover on the key/lock cylinder hous-
ing. Align and install the cover retaining screws.
Tighten the screws to 7 Nzm (60 in. lbs.) torque.
(29) Install the gear selector indicator lamp mount-
ing bracket screw.
(30) Install the gear selector indicator cover and
retaining screws.
(31) Route the dimmer switch wire harness and
gear selector indicator down through the steering col-
umn.
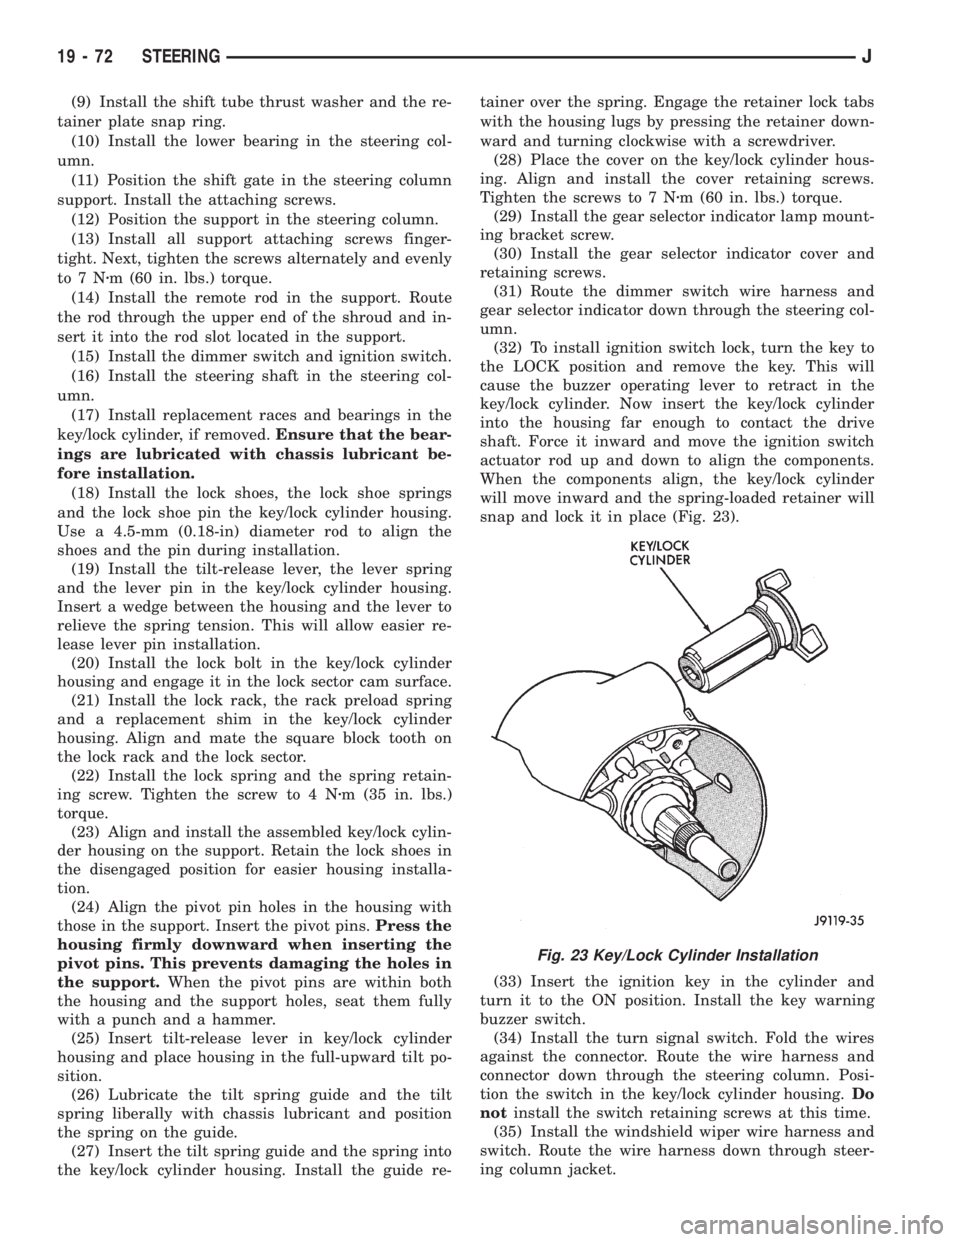
(32) To install ignition switch lock, turn the key to
the LOCK position and remove the key. This will
cause the buzzer operating lever to retract in the
key/lock cylinder. Now insert the key/lock cylinder
into the housing far enough to contact the drive
shaft. Force it inward and move the ignition switch
actuator rod up and down to align the components.
When the components align, the key/lock cylinder
will move inward and the spring-loaded retainer will
snap and lock it in place (Fig. 23).
(33) Insert the ignition key in the cylinder and
turn it to the ON position. Install the key warning
buzzer switch.
(34) Install the turn signal switch. Fold the wires
against the connector. Route the wire harness and
connector down through the steering column. Posi-
tion the switch in the key/lock cylinder housing.Do
notinstall the switch retaining screws at this time.
(35) Install the windshield wiper wire harness and
switch. Route the wire harness down through steer-
ing column jacket.
Fig. 23 Key/Lock Cylinder Installation
19 - 72 STEERINGJ
Page 1557 of 2158
(36) If equipped, install the cruise control wire har-
ness. Install the turn signal stalk by pushing it
straight into the column.
(37) Insert the hazard warning knob in the hazard
warning switch and press it inward. Align and install
the turn signal switch retaining screws. Ensure that
the turn signal switch is properly seated before tight-
ening the screws. Tighten the screws to 4 Nzm (33 in.
lbs.) torque. Thread the hazard warning switch knob
into the switch and pull the knob outward.
(38) Install and seat the upper bearing race in the
key/lock cylinder housing.
(39) Install the upper bearing preload spring, the
canceling cam and the lockplate.
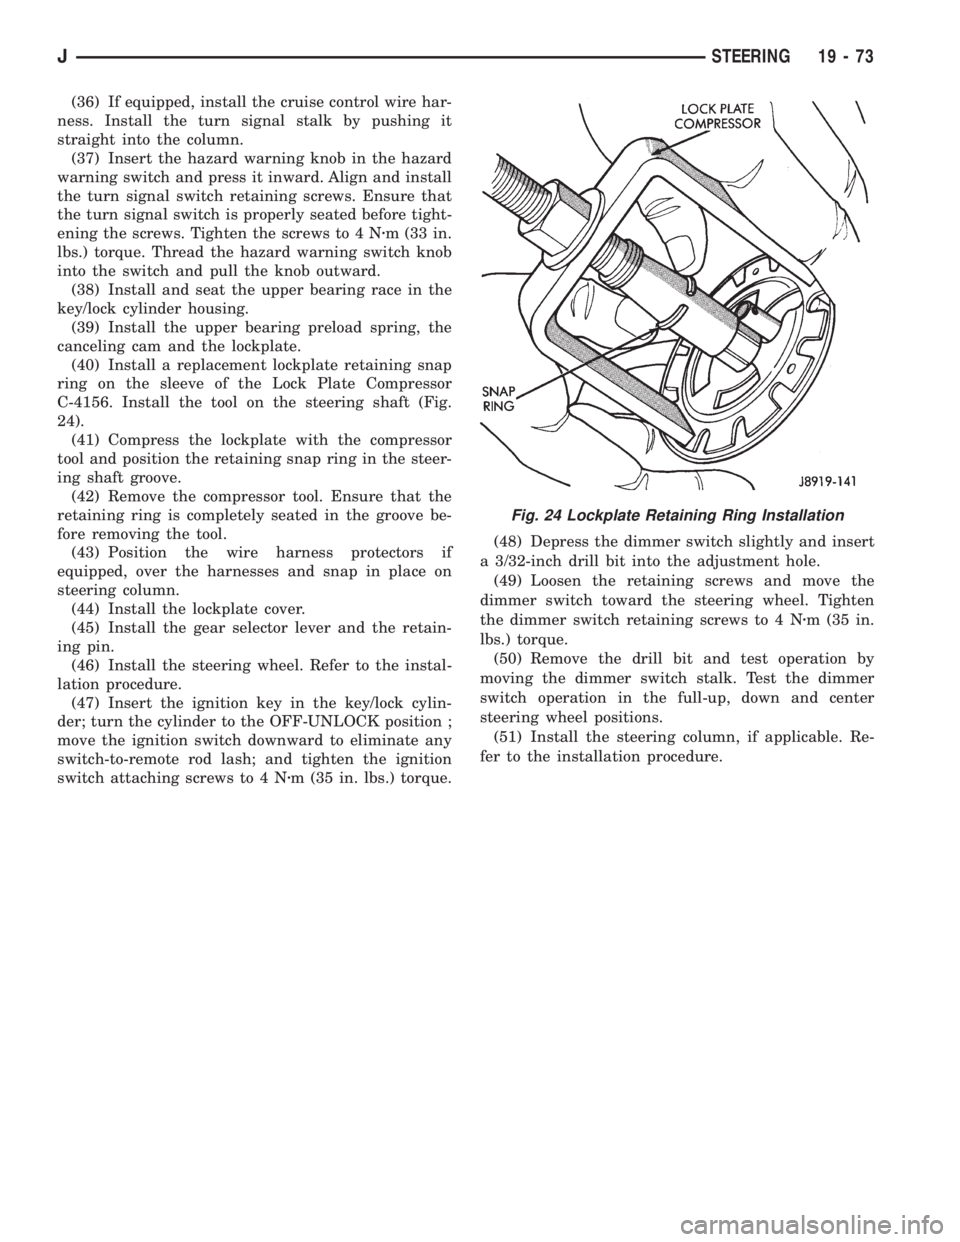
(40) Install a replacement lockplate retaining snap
ring on the sleeve of the Lock Plate Compressor
C-4156. Install the tool on the steering shaft (Fig.
24).
(41) Compress the lockplate with the compressor
tool and position the retaining snap ring in the steer-
ing shaft groove.
(42) Remove the compressor tool. Ensure that the
retaining ring is completely seated in the groove be-
fore removing the tool.
(43) Position the wire harness protectors if
equipped, over the harnesses and snap in place on
steering column.
(44) Install the lockplate cover.
(45) Install the gear selector lever and the retain-
ing pin.
(46) Install the steering wheel. Refer to the instal-
lation procedure.
(47) Insert the ignition key in the key/lock cylin-
der; turn the cylinder to the OFF-UNLOCK position ;
move the ignition switch downward to eliminate any
switch-to-remote rod lash; and tighten the ignition
switch attaching screws to 4 Nzm (35 in. lbs.) torque.(48) Depress the dimmer switch slightly and insert
a 3/32-inch drill bit into the adjustment hole.
(49) Loosen the retaining screws and move the
dimmer switch toward the steering wheel. Tighten
the dimmer switch retaining screws to 4 Nzm (35 in.
lbs.) torque.
(50) Remove the drill bit and test operation by
moving the dimmer switch stalk. Test the dimmer
switch operation in the full-up, down and center
steering wheel positions.
(51) Install the steering column, if applicable. Re-
fer to the installation procedure.
Fig. 24 Lockplate Retaining Ring Installation
JSTEERING 19 - 73
Page 1579 of 2158
ASSEMBLING OUTPUT SHAFT, INPUT SHAFT
AND COUNTER GEAR
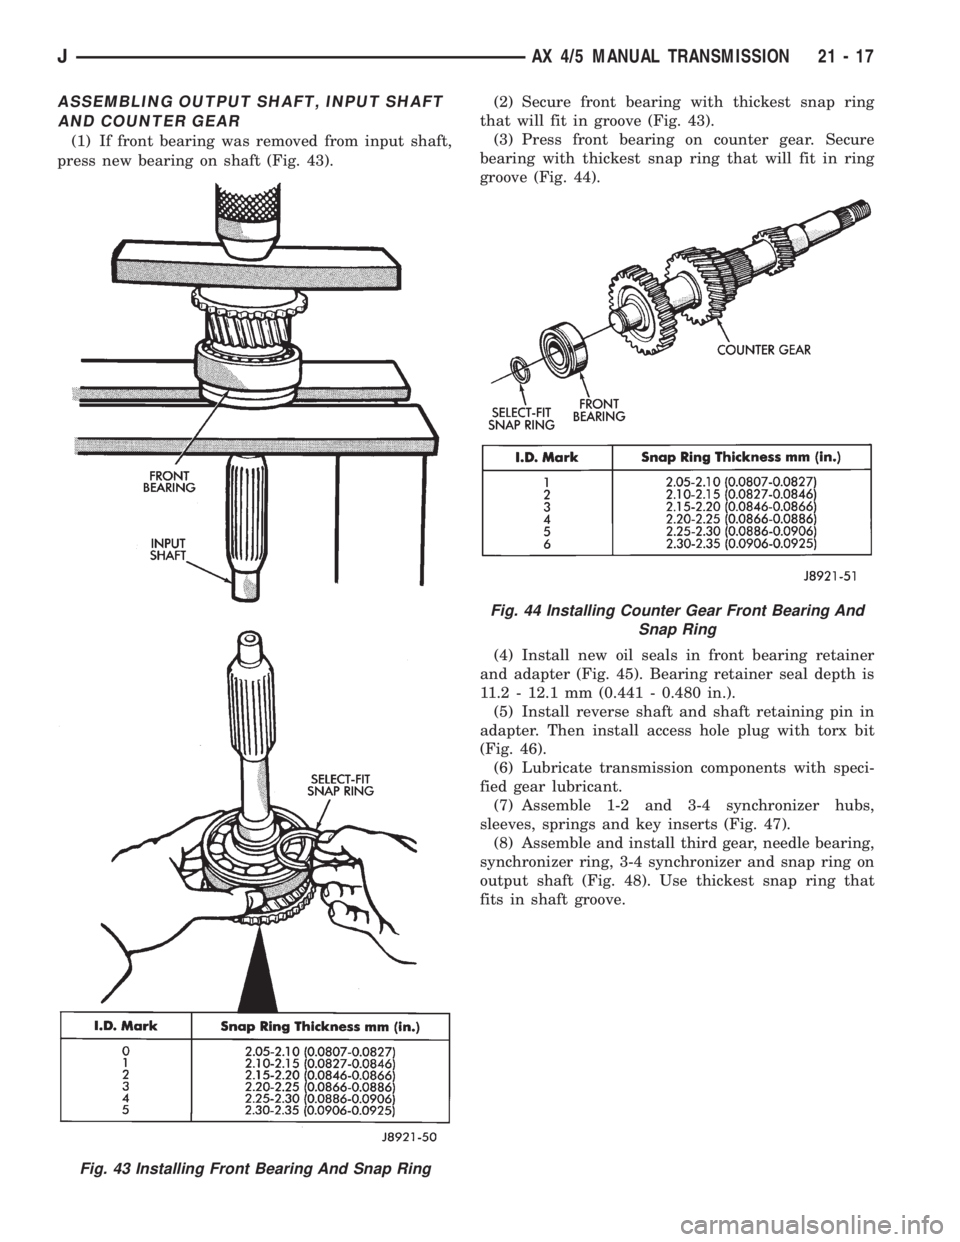
(1) If front bearing was removed from input shaft,
press new bearing on shaft (Fig. 43).(2) Secure front bearing with thickest snap ring
that will fit in groove (Fig. 43).
(3) Press front bearing on counter gear. Secure
bearing with thickest snap ring that will fit in ring
groove (Fig. 44).
(4) Install new oil seals in front bearing retainer
and adapter (Fig. 45). Bearing retainer seal depth is
11.2 - 12.1 mm (0.441 - 0.480 in.).
(5) Install reverse shaft and shaft retaining pin in
adapter. Then install access hole plug with torx bit
(Fig. 46).
(6) Lubricate transmission components with speci-
fied gear lubricant.
(7) Assemble 1-2 and 3-4 synchronizer hubs,
sleeves, springs and key inserts (Fig. 47).
(8) Assemble and install third gear, needle bearing,
synchronizer ring, 3-4 synchronizer and snap ring on
output shaft (Fig. 48). Use thickest snap ring that
fits in shaft groove.
Fig. 43 Installing Front Bearing And Snap Ring
Fig. 44 Installing Counter Gear Front Bearing And
Snap Ring
JAX 4/5 MANUAL TRANSMISSION 21 - 17
Page 1764 of 2158
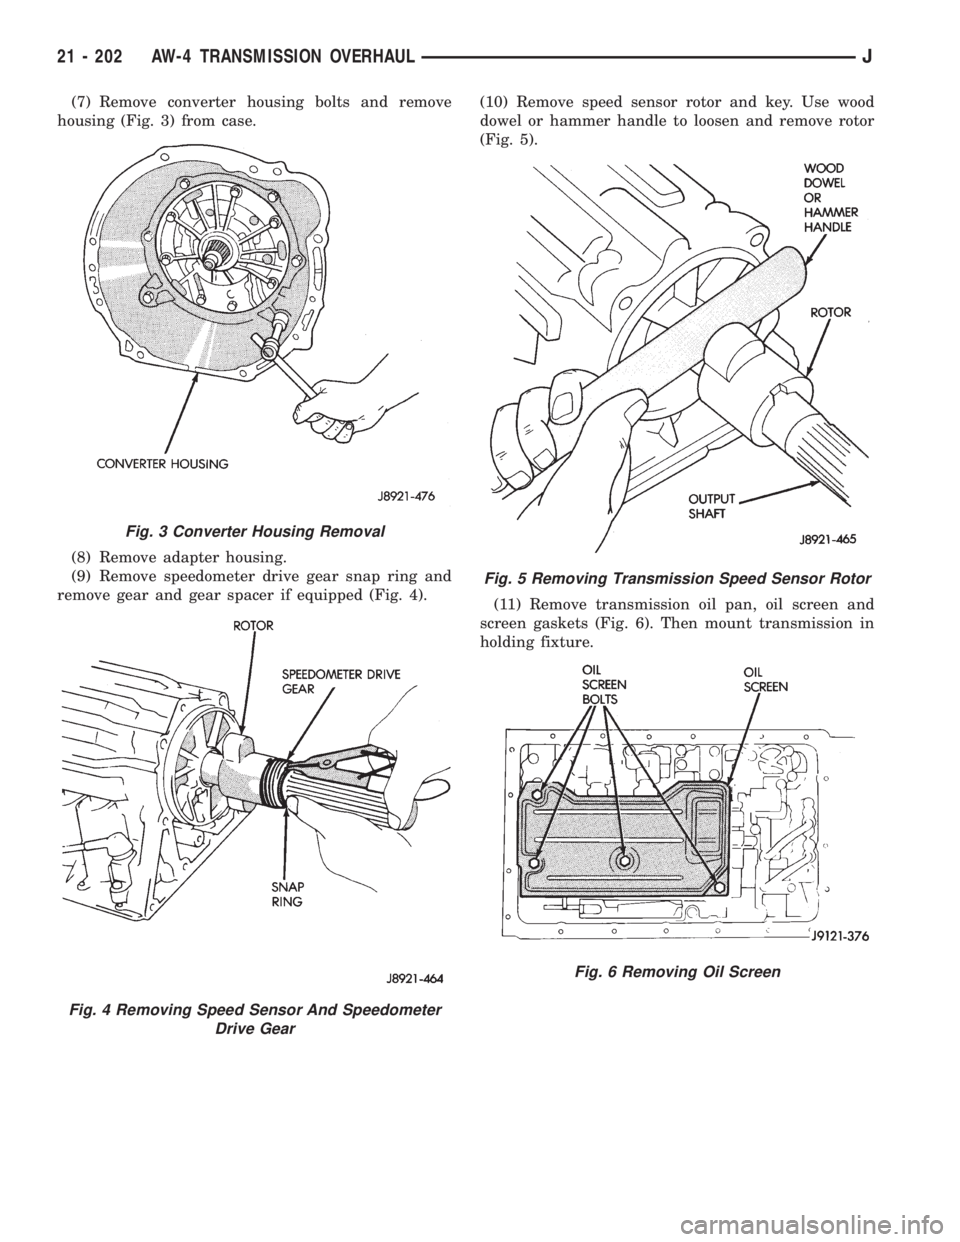
(7) Remove converter housing bolts and remove
housing (Fig. 3) from case.
(8) Remove adapter housing.
(9) Remove speedometer drive gear snap ring and
remove gear and gear spacer if equipped (Fig. 4).(10) Remove speed sensor rotor and key. Use wood
dowel or hammer handle to loosen and remove rotor
(Fig. 5).
(11) Remove transmission oil pan, oil screen and
screen gaskets (Fig. 6). Then mount transmission in
holding fixture.
Fig. 3 Converter Housing Removal
Fig. 4 Removing Speed Sensor And Speedometer
Drive Gear
Fig. 5 Removing Transmission Speed Sensor Rotor
Fig. 6 Removing Oil Screen
21 - 202 AW-4 TRANSMISSION OVERHAULJ
Page 1842 of 2158
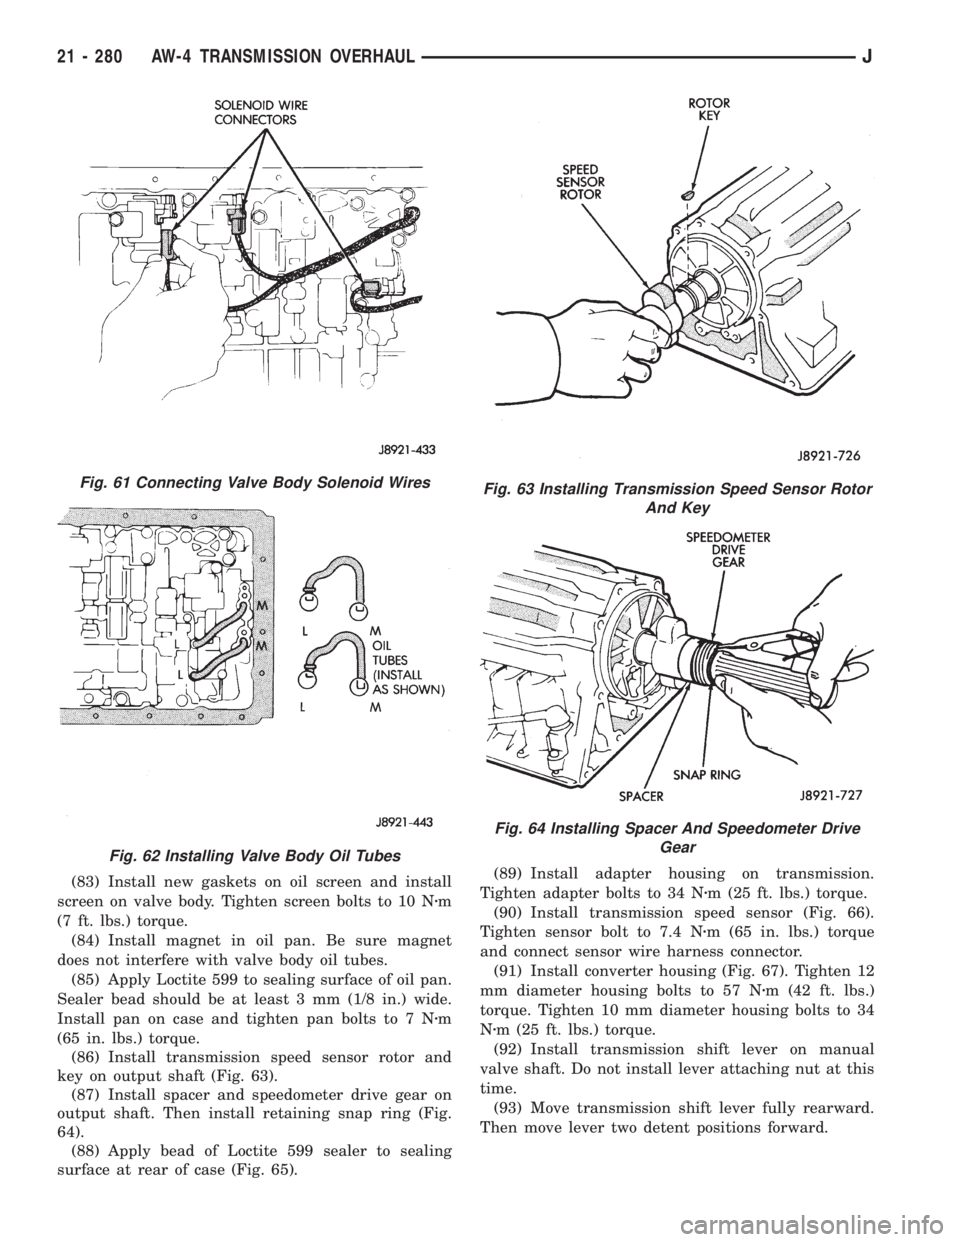
(83) Install new gaskets on oil screen and install
screen on valve body. Tighten screen bolts to 10 Nzm
(7 ft. lbs.) torque.
(84) Install magnet in oil pan. Be sure magnet
does not interfere with valve body oil tubes.
(85) Apply Loctite 599 to sealing surface of oil pan.
Sealer bead should be at least 3 mm (1/8 in.) wide.
Install pan on case and tighten pan bolts to 7 Nzm
(65 in. lbs.) torque.
(86) Install transmission speed sensor rotor and
key on output shaft (Fig. 63).
(87) Install spacer and speedometer drive gear on
output shaft. Then install retaining snap ring (Fig.
64).
(88) Apply bead of Loctite 599 sealer to sealing
surface at rear of case (Fig. 65).(89) Install adapter housing on transmission.
Tighten adapter bolts to 34 Nzm (25 ft. lbs.) torque.
(90) Install transmission speed sensor (Fig. 66).
Tighten sensor bolt to 7.4 Nzm (65 in. lbs.) torque
and connect sensor wire harness connector.
(91) Install converter housing (Fig. 67). Tighten 12
mm diameter housing bolts to 57 Nzm (42 ft. lbs.)
torque. Tighten 10 mm diameter housing bolts to 34
Nzm (25 ft. lbs.) torque.
(92) Install transmission shift lever on manual
valve shaft. Do not install lever attaching nut at this
time.
(93) Move transmission shift lever fully rearward.
Then move lever two detent positions forward.
Fig. 61 Connecting Valve Body Solenoid Wires
Fig. 62 Installing Valve Body Oil Tubes
Fig. 63 Installing Transmission Speed Sensor Rotor
And Key
Fig. 64 Installing Spacer And Speedometer Drive
Gear
21 - 280 AW-4 TRANSMISSION OVERHAULJ
Page 1948 of 2158
DOORS
INDEX
page page
Door Alignment AdjustmentÐMajor............ 41
Door Alignment AdjustmentÐMinor............ 37
Door Edge Guard/Edge Protector StripÐXJ...... 54
Door External HandleÐXJ................... 48
Door Hinge/Hinge Pin ReplacementÐXJ........ 52
Door Inside Latch Release and Lock RodsÐXJ . . . 50
Door Key Lock CylinderÐXJ................. 47
Door Latch AdjustmentÐXJ.................. 48
Door LatchÐXJ.......................... 49
Door Removal/InstallationÐXJ............... 35
Door Restraint ReplacementÐXJ............. 41
Door Trim PanelÐXJ...................... 31
Door Window Exterior MoldingsÐXJ........... 54
Door Window Glass and Door Opening
Weatherstrip SealsÐXJ................... 55
Front Door Spacer BlocksÐTwo-Door Vehicles . . . 53
Front Door Window Glass RegulatorÐXJ........ 42Front Door Window GlassÐXJ............... 43
Liftgate AdjustmentÐXJ.................... 63
Liftgate HingeÐXJ........................ 60
Liftgate Latch/Key Lock Cylinder/StrikerÐXJ..... 61
Liftgate License Plate Lamp HousingÐXJ....... 65
Liftgate License Plate Screw Anchor and BumperÐXJ.65
Liftgate Opening Weatherstrip SealÐXJ........ 64
Liftgate Support Rod Ball Stud ReplacementÐXJ . 63
Liftgate Support Rod Cylinder DisposalÐXJ...... 63
Liftgate Support Rod CylinderÐXJ............. 62
Liftgate Trim PanelÐXJ..................... 59
LiftgateÐXJ............................. 58
Rear Door Stationary Window GlassÐXJ........ 46
Rear Door Window Glass RegulatorÐXJ........ 44
Rear Door Window GlassÐXJ................ 45
Service Information........................ 30
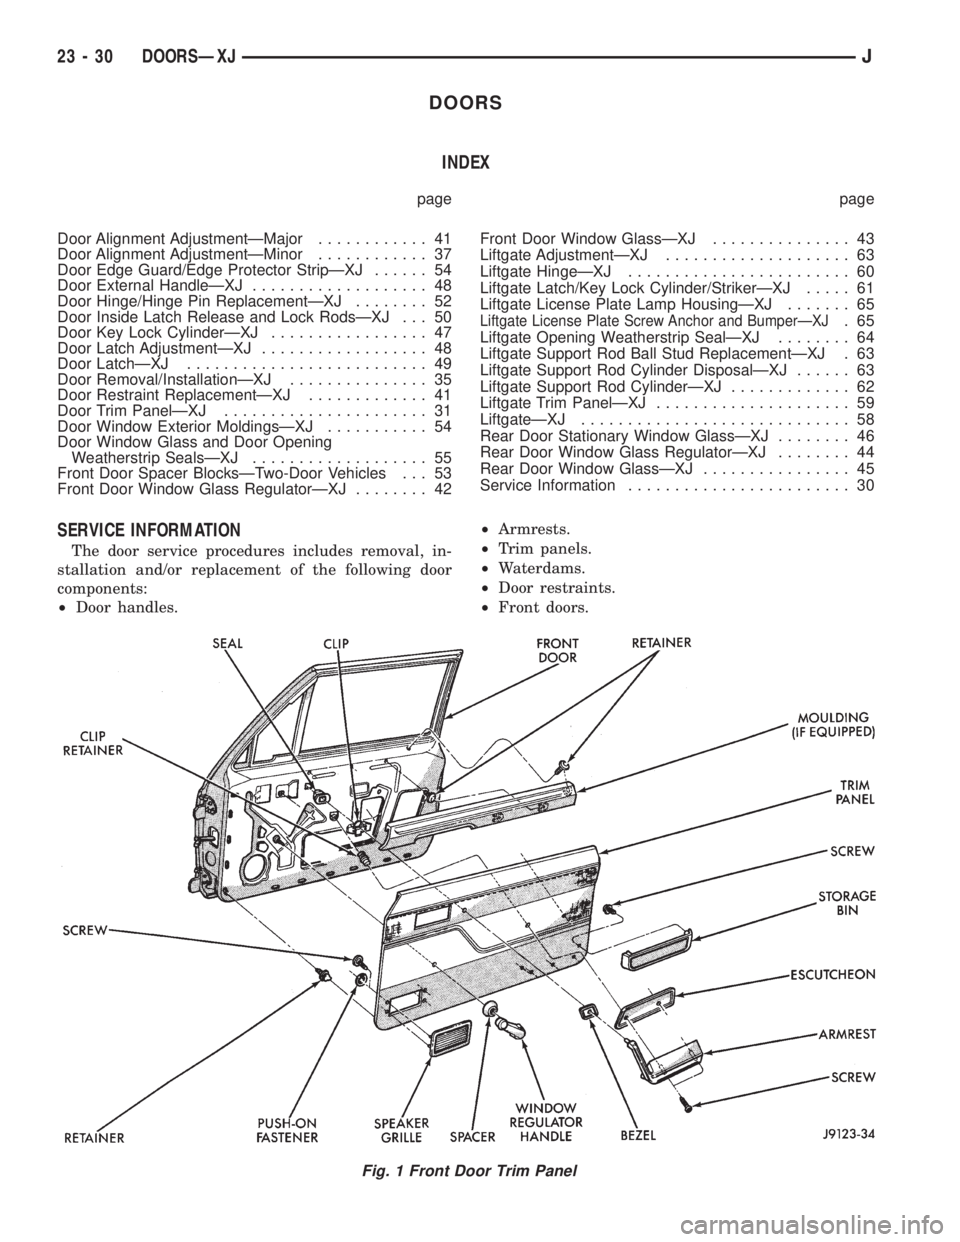
SERVICE INFORMATION
The door service procedures includes removal, in-
stallation and/or replacement of the following door
components:
²Door handles.²Armrests.
²Trim panels.
²Waterdams.
²Door restraints.
²Front doors.
Fig. 1 Front Door Trim Panel
23 - 30 DOORSÐXJJ
Page 1949 of 2158
²Rear doors.
²Window glass regulators.
²Key lock cylinders.
²Door half-hinges.
²Liftgate.
²Liftgate hinges.
²Liftgate gas support rod cylinders.
²Rocker panel seals.
²Moldings/weatherstrip seals.DOOR TRIM PANELÐXJ
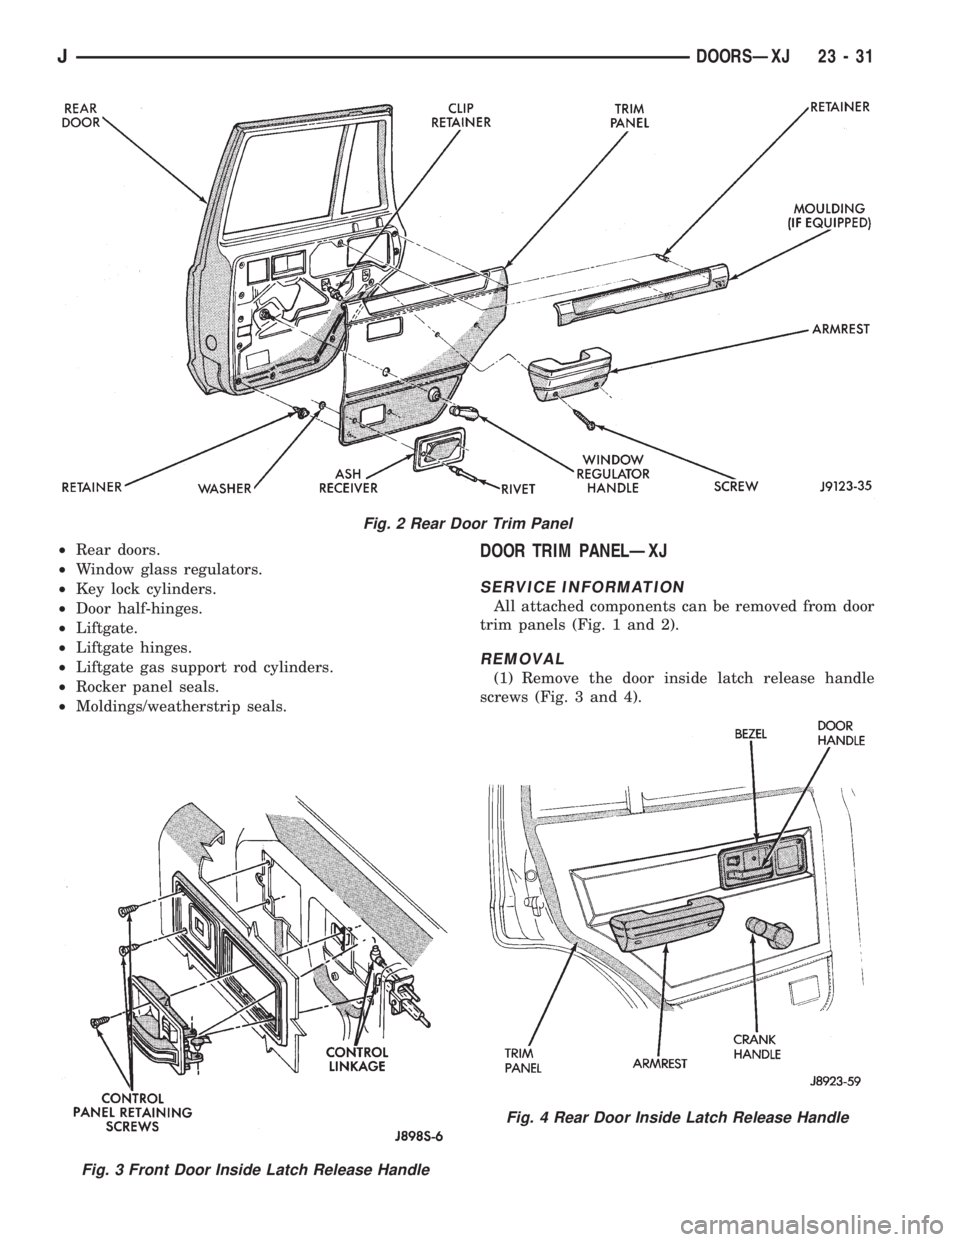
SERVICE INFORMATION
All attached components can be removed from door
trim panels (Fig. 1 and 2).
REMOVAL
(1) Remove the door inside latch release handle
screws (Fig. 3 and 4).
Fig. 2 Rear Door Trim Panel
Fig. 3 Front Door Inside Latch Release Handle
Fig. 4 Rear Door Inside Latch Release Handle
JDOORSÐXJ 23 - 31