Page 1086 of 1708
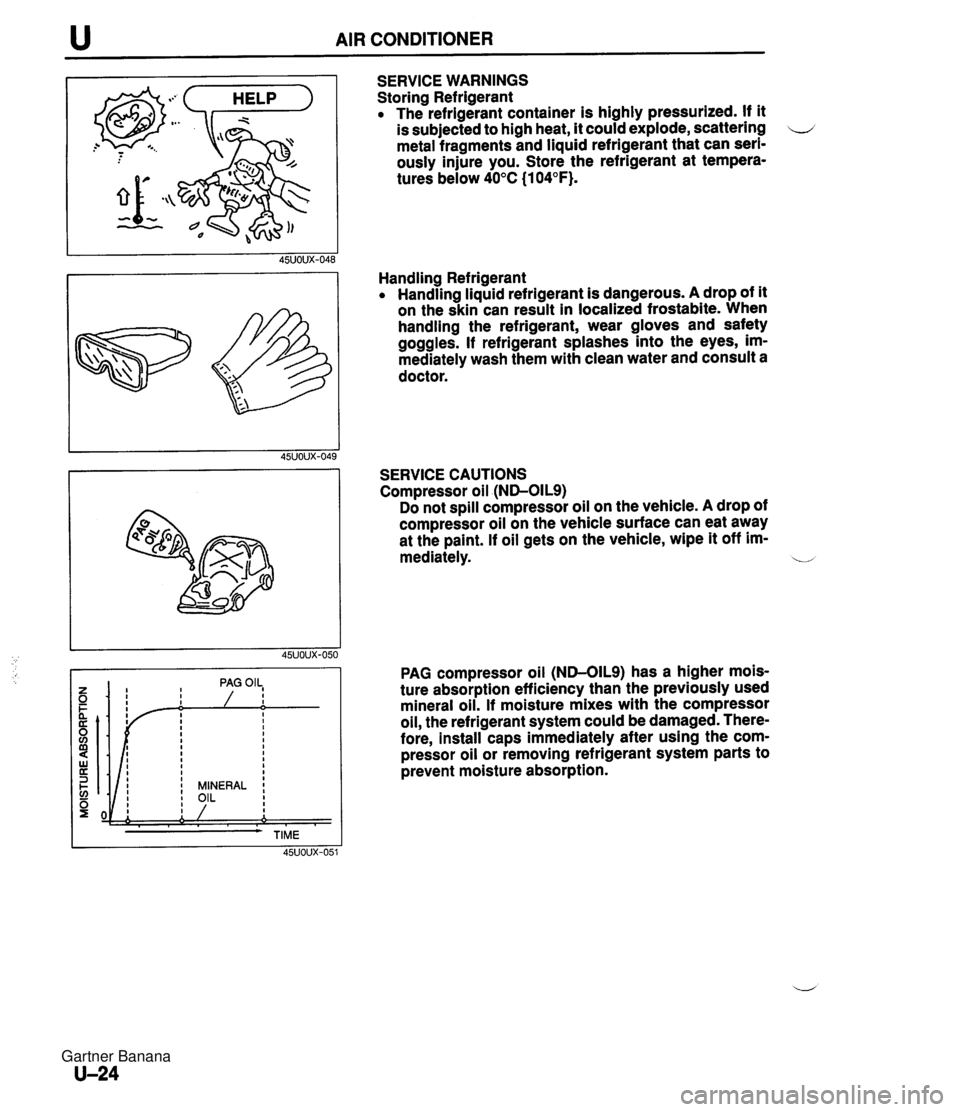
u AIR CONDITIONER SERVICE WARNINGS Storing Refrigerant The refrigerant container is highly pressurized. If it is subjected to high heat, it could explode, scattering u metal fragments and liquid refrigerant that can seri- ously injure you. Store the refrigerant at tempera- tures below 40°C (1 04°F). Handling Refrigerant Handling liquid refrigerant is dangerous. A drop of it on the skin can result in localized frostabite. When handling the refrigerant, wear gloves and safety goggles. If refrigerant splashes into the eyes, im- mediately wash them with clean water and consult a doctor. SERVICE CAUTIONS Compressor oil (ND-OILS) Do not spill compressor oil on the vehicle. A drop of compressor oil on the vehicle surface can eat away at the paint. If oil gets on the vehicle, wipe it off im- mediately. b PAG compressor oil (ND-OILS) has a higher mois- ture absorption efficiency than the previously used mineral oil. If moisture mixes with the compressor oil, the refrigerant system could be damaged. There- fore, install caps immediately after using the com- pressor oil or removing refrigerant system parts to prevent moisture absorption. Gartner Banana
Page 1087 of 1708
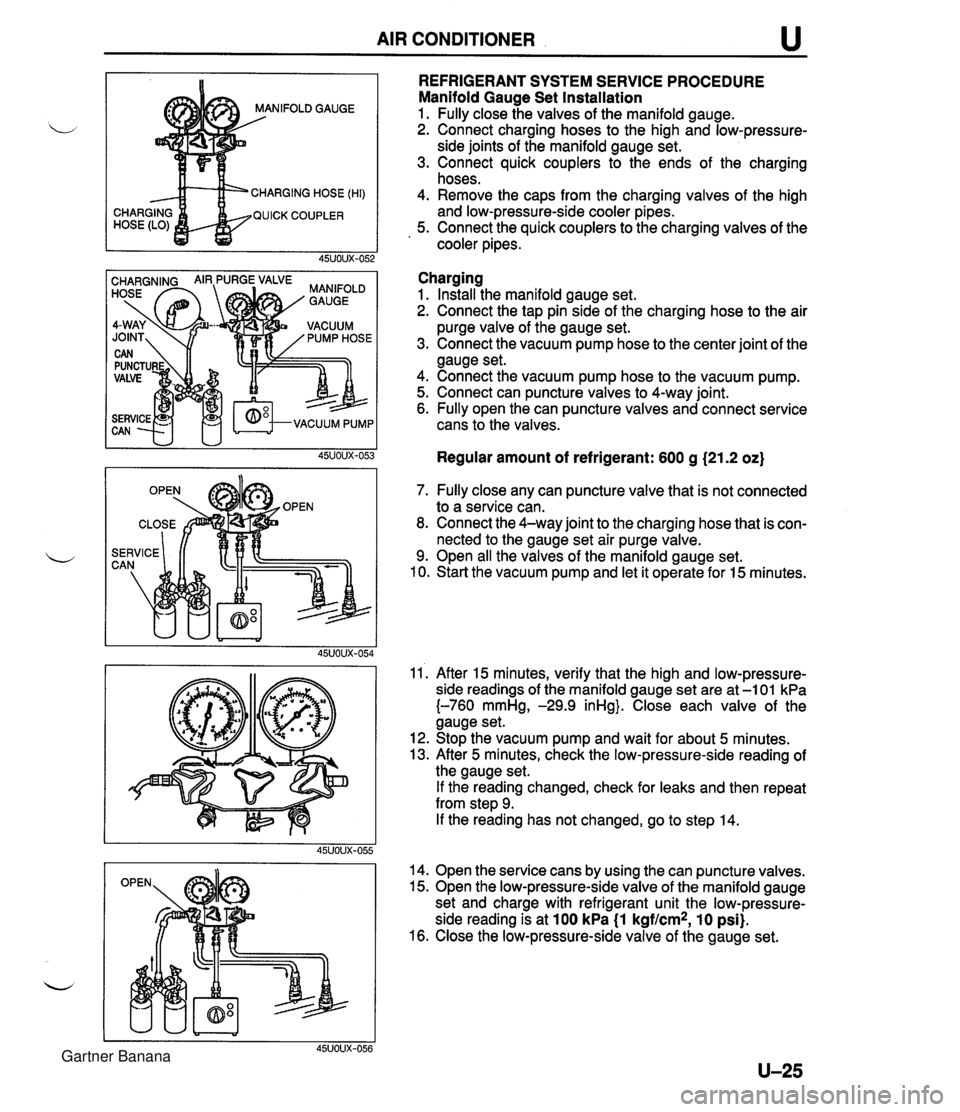
AIR CONDITIONER u NIFOLD GAUGE CHARGING HOSE (HI) QUICK COUPLER REFRIGERANT SYSTEM SERVICE PROCEDURE Manifold Gauge Set Installation 1. Fully close the valves of the manifold gauge. 2. Connect charging hoses to the high and low-pressure- side joints of the manifold gauge set. 3. Connect quick couplers to the ends of the charging hoses. 4. Remove the caps from the charging valves of the high and low-pressure-side cooler pipes. 5. Connect the quick couplers to the charging valves of the cooler pipes. Charging 1. Install the manifold gauge set. 2. Connect the tap pin side of the charging hose to the air purge valve of the gauge set. 3. Connect the vacuum pump hose to the center joint of the gauge set. 4. Connect the vacuum pump hose to the vacuum pump. 5. Connect can puncture valves to 4-way joint. 6. Fully open the can puncture valves and connect service cans to the valves. Regular amount of refrigerant: 600 g (21.2 oz) 7. Fully close any can puncture valve that is not connected to a service can. 8. Connect the 4-way joint to the charging hose that is con- nected to the gauge set air purge valve. 9. Open all the valves of the manifold gauge set. 10. Start the vacuum pump and let it operate for 15 minutes. 11'. After 15 minutes, verify that the high and low-pressure- side readings of the manifold gauge set are at -1 01 kPa {-760 mmHg, -29.9 inHg}. Close each valve of the gauge set. 12. Stop the vacuum pump and wait for about 5 minutes. 13. After 5 minutes, check the low-pressure-side reading of the gauge set. If the reading changed, check for leaks and then repeat from step 9. If the reading has not changed, go to step 14. 14. Open the service cans by using the can puncture valves. 15. Open the low-pressure-side valve of the manifold gauge set and charge with refrigerant unit the low-pressure- side reading is at 100 kPa (1 kgf/cm2, 10 psi). 16. Close the low-pressure-side valve of the gauge set. Gartner Banana
Page 1088 of 1708
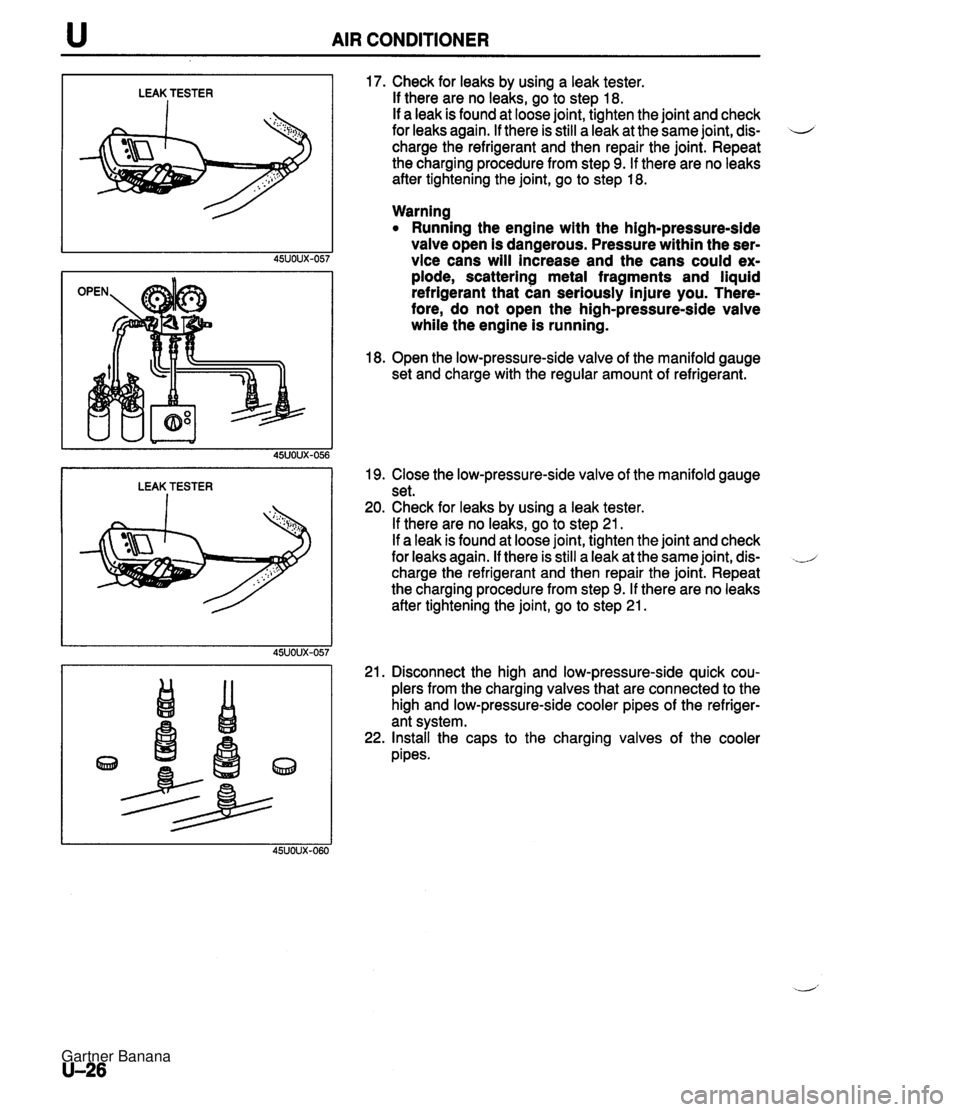
u AIR CONDITIONER LEAK TESTER I LEAK TESTER I 17. Check for leaks by using a leak tester. If there are no leaks, go to step 18. If a leak is found at loose joint, tighten the joint and check for leaks again. If there is still a leak at the same joint, dis- 4 charge the refrigerant and then repair the joint. Repeat the charging procedure from step 9. If there are no leaks after tightening the joint, go to step 18. Warning Running the engine with the high-pressure-side valve open is dangerous. Pressure within the ser- vice cans will increase and the cans could ex- plode, scattering metal fragments and liquid refrigerant that can seriously injure you. There- fore, do not open the high-pressure-side valve while the engine is running. 18. Open the low-pressure-side valve of the manifold gauge set and charge with the regular amount of refrigerant. 19. Close the low-pressure-side valve of the manifold gauge set. 20. Check for leaks by using a leak tester. If there are no leaks, go to step 21. If a leak is found at loose joint, tighten the joint and check for leaks again. If there is still a leak at the same joint, dis- charge the refrigerant and then repair the joint. Repeat the charging procedure from step 9. If there are no leaks after tightening the joint, go to step 21. 21. Disconnect the high and low-pressure-side quick cou- plers from the charging valves that are connected to the high and low-pressure-side cooler pipes of the refriger- ant system. 22. Install the caps to the charging valves of the cooler pipes. Gartner Banana
Page 1089 of 1708
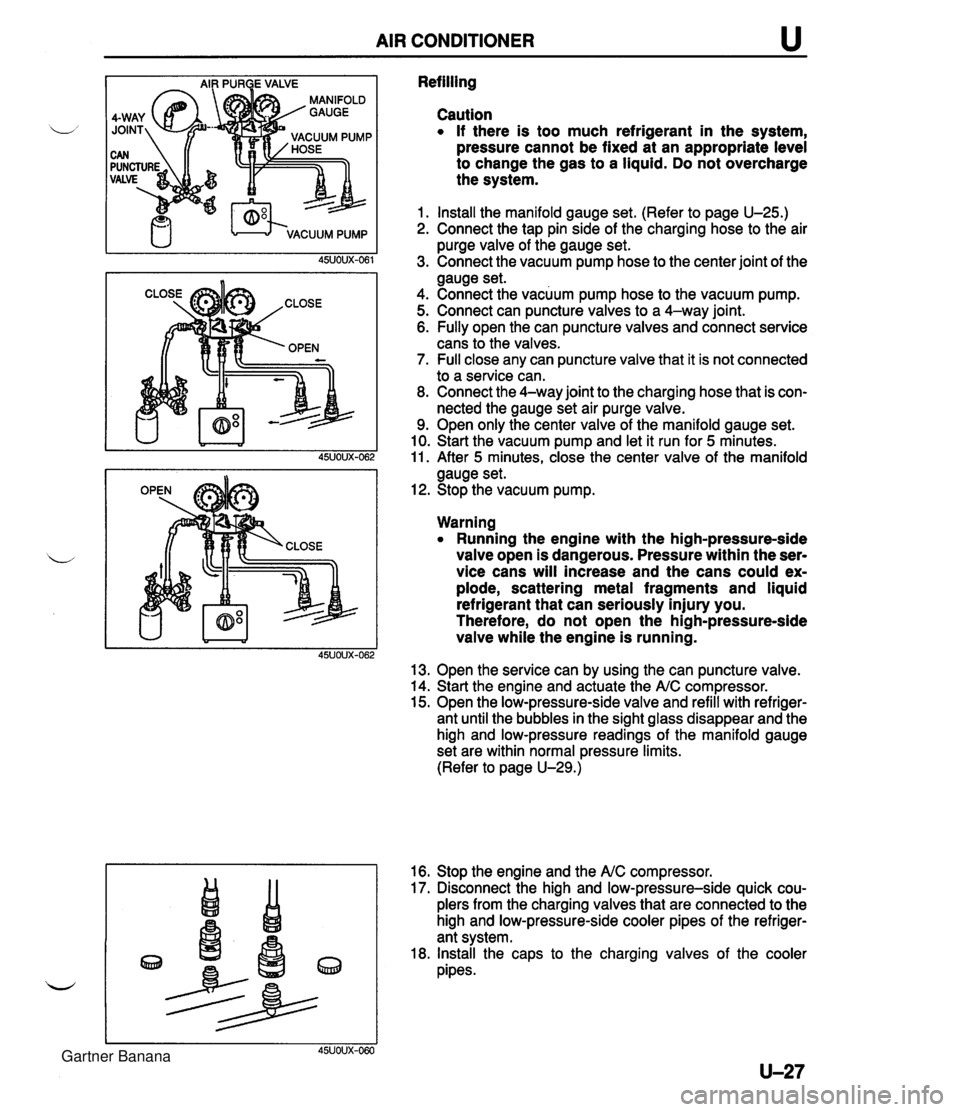
AIR CONDITIONER u Refilling Caution If there is too much refrigerant in the system, pressure cannot be fixed at an appropriate level to change the gas to a liquid. Do not overcharge the system. 1. Install the manifold gauge set. (Refer to page U-25.) 2. Connect the tap pin side of the charging hose to the air purge valve of the gauge set. 3. Connect the vacuum pump hose to the center joint of the gauge set. 4. Connect the vacuum pump hose to the vacuum pump. 5. Connect can puncture valves to a 4-way joint. 6. Fully open the can puncture valves and connect service cans to the valves. 7. Full close any can puncture valve that it is not connected to a service can. 8. Connect the 4-way joint to the charging hose that is con- nected the gauge set air purge valve. 9. Open only the center valve of the manifold gauge set. 10. Start the vacuum pump and let it run for 5 minutes. 11. After 5 minutes, close the center valve of the manifold gauge set. 12. Stop the vacuum pump. Warning Running the engine with the high-pressure-side valve open is dangerous. Pressure within the ser- vice cans will increase and the cans could ex- plode, scattering metal fragments and liquid refrigerant that can seriously injury you. Therefore, do not open the high-pressure-side valve while the engine is running. 13. Open the service can by using the can puncture valve. 14. Start the engine and actuate the A/C compressor. 15. Open the low-pressure-side valve and refill with refriger- ant until the bubbles in the sight glass disappear and the high and low-pressure readings of the manifold gauge set are within normal pressure limits. (Refer to page U-29.) 16. Stop the engine and the NC compressor. 17. Disconnect the high and low-pressure-side quick cou- plers from the charging valves that are connected to the high and low-pressure-side cooler pipes of the refriger- ant system. 18. Install the caps to the charging valves of the cooler pipes. 45UOUX-060 Gartner Banana
Page 1090 of 1708
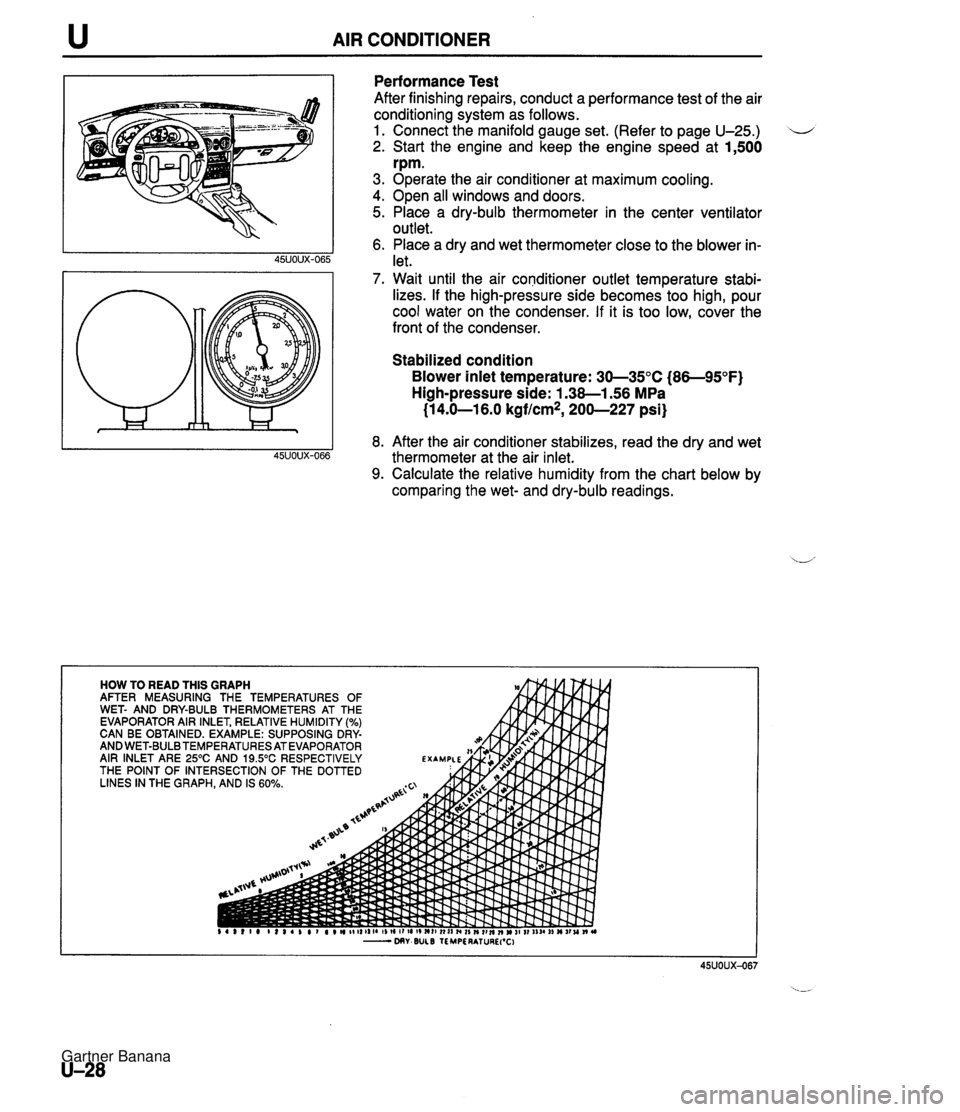
u AIR CONDITIONER Performance Test After finishing repairs, conduct a performance test of the air conditioning system as follows. 1. Connect the manifold gauge set. (Refer to page U-25.) 2. Start the engine and keep the engine speed at 1,500 rpm. 3. Operate the air conditioner at maximum cooling. 4. Open all windows and doors. 5. Place a dry-bulb thermometer in the center ventilator outlet. 6. Place a dry and wet thermometer close to the blower in- let. 7. Wait until the air conditioner outlet temperature stabi- lizes. If the high-pressure side becomes too high, pour cool water on the condenser. If it is too low, cover the front of the condenser. Stabilized condition Blower inlet temperature: 30-35°C (86-95°F) High-pressure side: 1.38-1.56 MPa (1 4.0-1 6.0 kgflcm*, 200-227 psi) 8. After the air conditioner stabilizes, read the dry and wet thermometer at the air inlet. 9. Calculate the relative humidity from the chart below by comparing the wet- and dry-bulb readings. Gartner Banana
Page 1091 of 1708
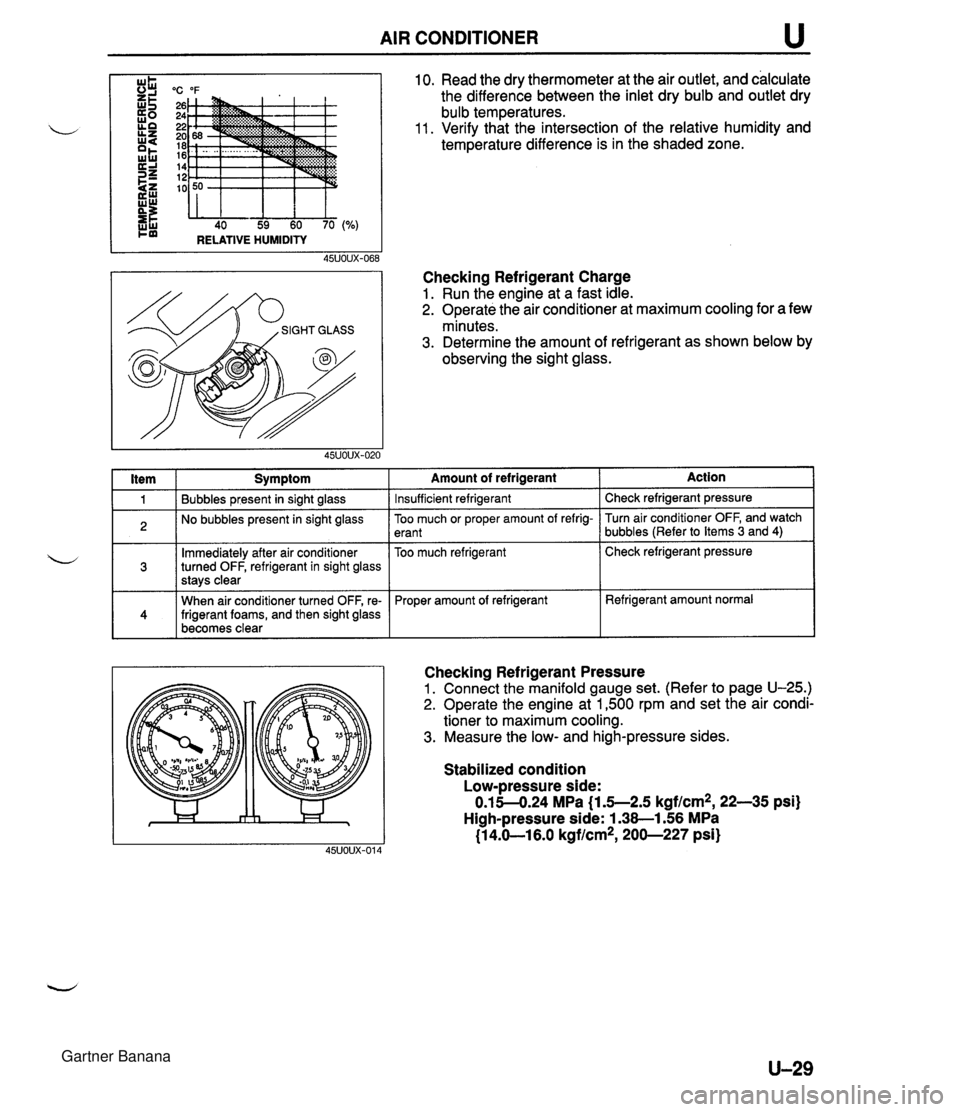
AIR CONDITIONER u "C "F 26 24 22 20 18 16 14 12 10 40 59 60 70 RELATIVE HUMIDITY I ltem I Symptom 10. Read the dry thermometer at the air outlet, and calculate the difference between the inlet dry bulb and outlet dry bulb temperatures. 11. Verify that the intersection of the relative humidity and temperature difference is in the shaded zone. Checking Refrigerant Charge 1. Run the engine at a fast idle. 2. Operate the air conditioner at maximum cooling for a few minutes. 3. Determine the amount of refrigerant as shown below by observing the sight glass. 1 Bubbles present in sight glass 2 No bubbles present in sight glass Immediately after air conditioner turned OFF, refrigerant in sight glass stavs clear 141 When air conditioner turned OFF, re- frigerant foams, and then sight glass becomes clear -- Amount of refrigerant Insufficient refrigerant Action Check refrigerant pressure -- Too much or proper amount of refrig- erant Too much refrigerant Checking Refrigerant Pressure 1. Connect the manifold gauge set. (Refer to page U-25.) 2. Operate the engine at 1,500 rpm and set the air condi- tioner to maximum cooling. 3. Measure the low- and high-pressure sides. Turn air conditioner OFF, and watch bubbles (Refer to Items 3 and 4) Check refrigerant pressure Proper amount of refrigerant Stabilized condition Low-pressure side: 0.15-4.24 MPa {I .5--2.5 kgf/cm2, 22-35 psi) High-pressure side: 1.38-1.56 MPa (1 4.61 6.0 kgflcm*, 200-227 psi) Refrigerant amount normal Gartner Banana
Page 1092 of 1708
u AIR CONDITIONER COOLING UNIT Removal 1 Installation 1. Discharge the refrigerant system. 2. Remove the glove compartment. (Refer to section S.) il 3. Remove in the order shown in the figure. Immediately plug all open fittings to keep moisture out of the system. 4. Install in the reverse order of removal. Position the unit so that its connections match those of the heater unit and blower unit. Apply clean compressor oil to the O-rings before connecting the fittings; do not ap- ply compressor oil to the fitting nuts. Tightening torque Inlet pipe: 10-19 N-m (1.0-2.0 kgfsm, 8-14 ft-lbf} Outlet pipe: 20-29 N-m (2.0-3.0 kgf-m, 15--21 ft-lbf} 5. Charge the refrigerant system. (Refer to page U-25.) 7.910.7 N.m {EO-110 kgfmn, 69.5-95.4 In4bf} 45uoux-071 1. Cooling unit 2. Sealing plate Disassembly / Assembly . . . . . . page U-31 U-30 Gartner Banana
Page 1093 of 1708
AIR CONDITIONER u Disassembly 1 Assembly 1. Disassemble in the order shown in the figure. 1. Evaporator 3. Thermoswitch ................... ......... Inspection page U-32 On-vehicle Inspection page U-32 ................... 2. Expansion valve Inspection page U-32 ................... Assembly note below Assembly note Expansion valve Apply clean compressor oil to the O-rings before con- necting the fittings; do not apply compressor oil to the fit- ting nuts. Gartner Banana