Page 888 of 1708
LIGHTING SYSTEM T LAY Step 2 1. Turn the headlight switch ON. 2. Measure the voltage at the following terminal-wires of the headlight relay connector. B+: Battery positive voltage Other Action Go to Step 3 Check B terminal Go to Step 6 Check A terminal Check D terminal Repair wirring harness Repair wiring harness (HEAD 30A - Headliclht relav) I Step 3 1. Turn the headlight switch ON. 2. Measure the voltaae at the followinn terminal-wires of - the headlight switch connector. B+: Battery positive voltage Termlnal I Switch position I Voltage / Action I Check I terminal switch) Low beam G B+ Other - Go to Step 4 Replace combination switch High beam Step 4 1. Check the headlight bulbs. 2. If a bulb is burned, replace it. 3. If the bulbs are OK, go to Step 5. B+ Other Go to Step 4 Replace combination switch Gartner Banana
Page 890 of 1708
LIGHTING SYSTEM T I Symptom: Headlight does not illuminate (Right or left). I Step 1 1. Check the headlight bulbs. 2. If a bulb is burned, replace it. 3. If the bulbs are OK, go to Step 2. Step 2 1. Disconnect the headlight connector of the faulty side. 2. Turn the headlight switch on. 3. Measure the voltage at the following terminal wires. B+: Battery positive voltage Other IB(FVW) Highbeam Action Repair wiring harness (Retractable headlight - GND) Repair wiring harness (Combination switch - Retract- able headlight) Repair wiring harness (Retractable headlight - GND) Repair wiring harness (Combination switch - Retract- able headlight) Gartner Banana
Page 894 of 1708
LIGHTING SYSTEM T Removal 1 Installation Remove and install as shown in the figure. Do not turn the adjusting screws during removal or installa- tion. i/ Retractable headlight u 1. Bezel 2. Headlight housing 3. Headlight Rear Combination Light 4. Motor link 5. Retractor hinge 6. Retractable headlight actuator 1. Lens 2. Gasket 3. Bulb 4. Bracket Gartner Banana
Page 915 of 1708
LIGHTING SYSTEM - -- -- Troubleshooting I Symptom: Taillights, side marker lights, and license plate lights do not illuminate. 45UOTX-141 Step 1 1. Check TAIL 15A fuse. 2. If the fuse is burned, replace it. Check and, if necessary, repair the wiring harness. 3. If the fuse is OK, go to Step 2. Step 2 1. Turn the headlight switch ON. 2. Measure the voltage at the following terminal wires of the - TNS relay connedor. B+: Battery positive voltage - Terminal 1 Voltage 1 Action I B+ I Go to Step 3 C (WIL) Other I Check D terminal B+ Other Go to Step 4 Check A terminal A (WIR) Step 3 1. Check the bulbs of each light. 2. If the bulb is burned, replace the bulb. 3. If the bulbs are OK, repair wiring harness between the TNS relay and the body ground of each light. B (WIR) B+ Other Check B terminal Repair wiring harness (TAIL 15A fuse - TNS relay) B+ Other Replace TNS relay Repair wiring harness (TAIL 15A fuse - TNS relay) Gartner Banana
Page 1123 of 1708

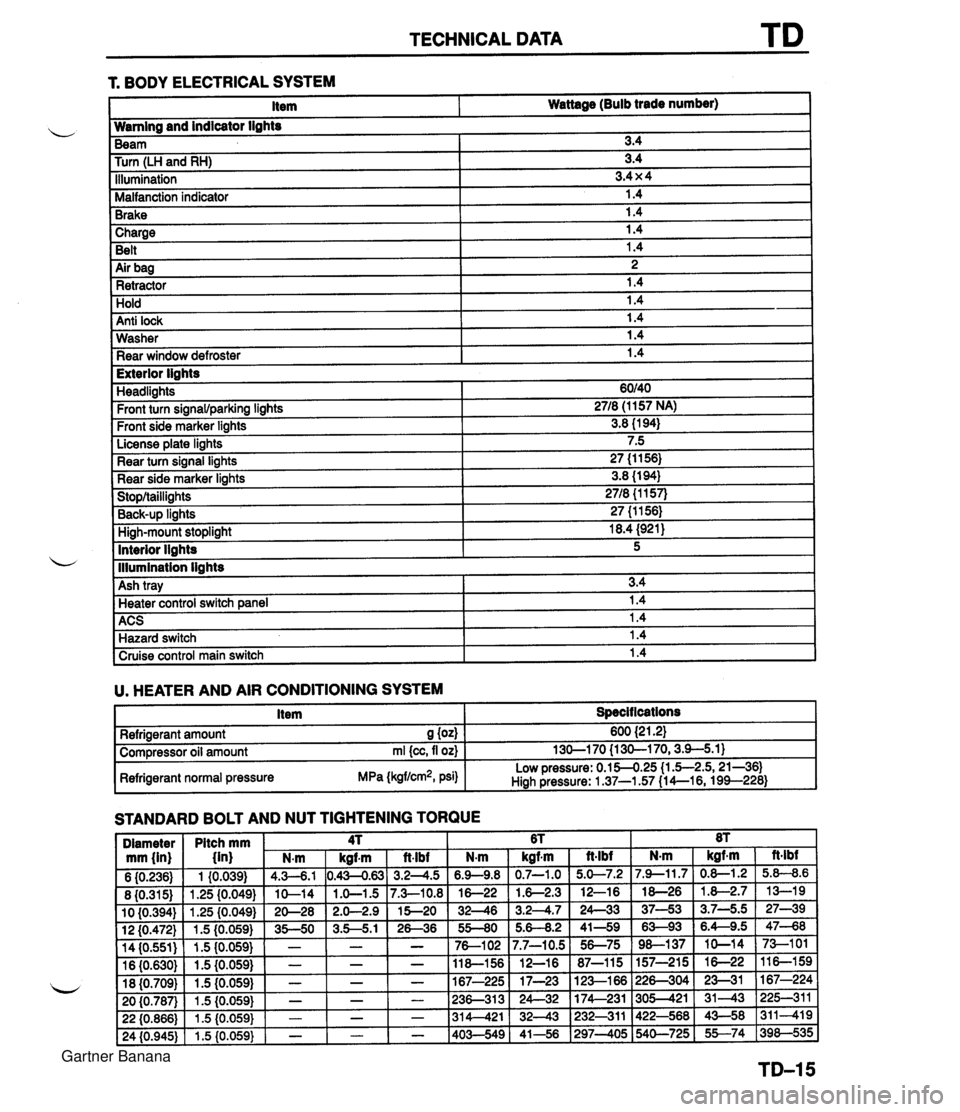
TECHNICAL DATA 1 Charge I 1.4 Belt 1.4 r. BODY ELECTRICAL SYSTEM 1 Air bag I 2 1 Retractor 1.4 Item Wattage (Bulb trade number) Hold Anti lock Wamlng and indicator lights 1.4 1.4 Washer Rear window defroster Beam Turn (LH and RH) Illumination Malfanction indicator Brake 1.4 1.4 I Exterior lights 3.4 3.4 3.4 x 4 1.4 1.4 Headlights Front turn signawparking lights Front side marker lights License plate lights Rear turn signal lights Rear side marker lights Stop/taillights Back-UP linhts High-mount stoplight I 18.4 (921) ACS 1 1.4 Hazard switch 1.4 60140 2718 (1 157 NA) 3.8 (1 94) 7.5 27 (1 1 56) 3.8 (1 94) 2718 {I 157) 27 (1 1561 Interior llahts - I lllumination lights I Cruise control main switch I 1.4 I 5 Ash tray U. HEATER AND AIR CONDITIONING SYSTEM I Item I Specit lcations I 3.4 Heater control switch ane el I 1.4 STANDARD BOLT AND NUT TIGHTENING TORQUE Refrigerant amount S (04 Compressor oil amount rnl {cc, fl oz) Refrigerant normal pressure MPa (kgflcm2, psi) 600 {2 1.21 130-1 70 {I 30-1 70,3.9-5.1) Low pressure: 0.154.25 (1 .5-2.5,21-361 Hiah Pressure: 1 37-1.57 (1 4--16, 199--228) Gartner Banana